


项目基础技术
- springcloud
- springse curity oauth2
- spring boot starter
整体权限框架
- 基于spring security oauth2
- 认证服务器: blade-auth,配置类
- 资源服务器:需要认证的模块项目
- 网关过滤,AuthFilter执行路径拦截和放行,基于jjwt读取token中的信息
技术点
- 继承HandlerMethodArgumentResolver(controller统一入参拦截器)


可以直接在controller写参数来获取当前登录用户
系统模块
登录界面

1. 验证码获取
http://localhost:1888/api/blade-auth/oauth/captcha
- 自定义接口,BladeTokenEndPoint
- 网关放行,资源服务器放行
- 将key(uuid)与生成验证码存入redis,登录时候需要根据key去查code进行匹配
2. 用户登录
使用spring security oauth2实现,登录接口

- BasicAuthenticationFilter
1.1 Basic认证是一种较为简单的HTTP认证方式,客户端通过明文(Base64编码格式)传输用户名和密码到服务端进行认证,通常需要配合HTTPS来保证信息传输的安全。这里会解析请求头中的Authorization的值
1.2 解析完后,一系列调用到BladeClientDetailsServiceImpl,客户端信息实现类,这个类没有做其他逻辑处理,继承JdbcClientDetailsService,直接调用父类的客户端认证,查询sql有数据后返回 - TokenEndPoint
2.1 进入/oauth/token,取出客户端对象封装的principal,其中的clientId,又一次执行上面1.2的逻辑,这次返回的对象信息更多,主要需要scope、grant_type,封装返回TokenRequest对象
2.2 验证TokenRequest的scope值是否包含请求参数中的scope
2.3 判断是否为简易模式、授权码模式、刷新token模式
2.4 获取所有的tokenGranter,实现类CompositeTokenGranter,成员变量List,维护了两个对象,AuthorizationServerEndpointConfigurer和CaptchaTokenGranter,第一个对象维护了5个内置模式,第二个对象维护的就是我们自定义的验证码模式。遍历所有模式直到grant_type与传入的grant_type匹配成功,调用getOAuth2Authentication验证码逻辑 - CaptchaTokenGranter
3.1 操作redis执行验证码判断,判断成功主动调用authenticationManager.authenticate(userAuth)进行用户认证
3.2 DaoAuthenticationProvider的retrieveUser方法,会调用自定义的用户验证逻辑BladeUserDetailsServiceImpl.loadUserByUsername(username)
3.3 BladeUserDetailsServiceImpl
查询租户信息,成功后根据用户名密码和租户ID,去查询是否有用户,最后返回BladeUserDetails(继承自spring security内置User对象) - DefaultTokenServices
4.1 该类由2.4的CompositeTokenGranter对象调用。3.3对象返回后,createAccessToken传入对象调用createAccessToken方法。首先创建refresh_token,再次查询数据库client信息,取刷新令牌过期时间过期时间,算出refesh_token过期时间以及创建UUID作为DefaultOAuth2RefreshToken对象的参数。
4.2 创建完refresh_token之后,创建关键的access_token,同4.1一样,不过取的是access_token的过期时间。封装对象OAuth2AccessToken,包含了access_token的UUID、DefaultOAuth2RefreshToken、tokenType(比如bearer)、scope、过期时间。UUID作为JTI,用于防止重放攻击
4.3 createAccessToken方法的最后,判断是否配置了增强token类(项目中配置了BladeJwtTokenEnhancer),调用BladeJwtTokenEnhancer.enhance,加入了自定义数据。
最后,一个内置的enhance对象JwtAccessTokenConverter,它的enhance方法,将之前的所有参数作为jwt的claims,组成标准的jwt三部分。生成access_token和refresh_token的JWT(替换掉之前的UUID)
至此整个TokenEndPoint的/oauth/token逻辑就走完了,由于用的是JWT模式,所以不在服务器端保存生成的jwt,最后将对象返回客户端
缓存
系统集成了redis缓存
使用缓存:
@Cacheable(cacheNames = {DICT_CACHE},key="'sys:ld:dic:' + #code")
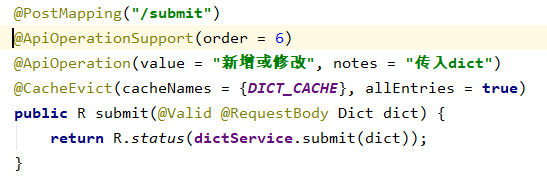
清除缓存
@CacheEvict(cacheNames = {DICT_CACHE}, allEntries = true)
- 访问系统管理==>系统字典==>某一父级字典名
请求接口为
http://localhost:1888/api/blade-system/dict/child-list?current=1&size=10&parentId=1123598814738675204


会查询缓存(比如blade:dict::dict: id:1123598814738675204),id表示是当前字典表的父节点,存储的是Dict对象
- 模块中的查询字典表缓存
下拉框的字典表没有缓存,直接调用的是接口

查询数据的时候,接口如下


会从缓存中找,如下:

最后的数字是数据库保存的字典值,如果没有查到数据,会写入缓存,最后查到中文返回 - 修改、删除字典表
@CacheEvict(cacheNames = {DICT_CACHE}, allEntries = true)
会删除缓存,下次查询的时候再加入缓存
日志
错误日志

接口日志
@ApiLog("")
通用日志
引用BladeLogger
数据权限
- 通过@DataAuth固定写死权限,需要写在Mapper接口上
固定模式


拦截器会获取注解上的参数值,最后组装sql,本例子是通过create_user字段来做权限,仅查看本人的数据

如果注解colum改变


自定义模式

这里的括号里面的el表达式,通过下面bladeUser对象key来指定

- 半自动配置

需要配合web,code等于web的权限编号

这种写法不需要配置角色和数据权限绑定,类名只需要到类路径 - 纯web配置


这种写法需要到类中的方法名上
源码追踪
我们访问第三种方法(在web页面配置)的接口,在Mapper接口运行之前,拦截器拦截请求

判断接口上是否有@DataAuth,有的话赋值给DataScopeModel,进入sql组装类

在getDataScopeByMapper方法,在scope-api的config中,配置了实现类

通过当前访问接口名和角色名来获取当前角色的数据权限

返回结果之后,会存入缓存(无论是否为null,为null下次继续查询数据库)


如果我们访问第二种方法(半自动配置),我们通过mapperid和roleid查不出数据,因为没有绑定roleid和数据权限(不清楚的话看第二种配置),那么会通过code来查数据

同样会存入缓存


查到数据之后,会组装sql,比如当前例子为本人查看,会自动组装成where create_user = ???
缓存存放的数据格式如下

考虑到性能,并不是所有Mapper都会判断数据权限


默认为Mapper的接口名仅包含page,Page,list,List会判断数据权限
接口权限
-
固定角色
@PreAuth,里面可以写hasRole,hasAnyRole(因为函数名为这两个,第三个图)


-
web动态配置角色
@PreAuth(“hasPermission(‘permission_test’)”)


根据接口上的permission和roleid去查询,放入缓存
@PreAuth(“permissionAll()”)


根据配置的权限路径和访问的接口路径比对,如果包含此接口路径,表示有权限。
还有其他的一些权限判断,在AuthFun里面找函数名
改造授权码模式,实现授权自定义页面
@Configuration
@AllArgsConstructor
public class SecurityConfiguration extends WebSecurityConfigurerAdapter {

	@Bean
	@Override
	@SneakyThrows
	public AuthenticationManager authenticationManagerBean() {
		return super.authenticationManagerBean();
	}

	@Bean
	public PasswordEncoder passwordEncoder() {
		return BladePasswordEncoderFactories.createDelegatingPasswordEncoder();
	}

	@Override
	public void configure(WebSecurity web) {
		//Ignore, public
		web.ignoring().antMatchers("/static/**");
	}

	@Override
	@SneakyThrows
	protected void configure(HttpSecurity http) {
		http.authorizeRequests()
			// permitAll() 的URL路径属于公开访问,不需要权限
			.antMatchers("/oauth2.0/show*").permitAll()
			.antMatchers(HttpMethod.GET, "/oauth2.0/show*").anonymous()
			.anyRequest().authenticated();
		http
			.formLogin()
			.loginPage("/oauth2.0/show")
			.loginProcessingUrl("/signin")
			.failureUrl("/oauth2.0/show?error=1")
			.usernameParameter("username")
			.passwordParameter("password")
			.and()
			.logout()
			.logoutUrl("/signout")
			.deleteCookies("JSESSIONID")
			.logoutSuccessUrl("/")
			.and()
			.exceptionHandling();

		http.httpBasic().disable();
	}

}

@Controller
public class OauthController {

	@GetMapping(value = {"/oauth2.0/show"})
	public String login(Model model, HttpServletRequest request) {
		CsrfToken csrf = (CsrfToken) request.getAttribute("_csrf");
		model.addAttribute("csrf", csrf.getToken());
		return "login";
	}

	@RequestMapping("/custom/confirm_access")
	public ModelAndView getAccessConfirmation(@RequestParam Map<String, Object> map, HttpServletRequest request) throws Exception {
		ModelAndView view = new ModelAndView();
		view.setViewName("grant");
		view.addObject("clientId",map.get("client_id"));
		return view;
	}
}
<!DOCTYPE html>
<html xmlns="http://www.w3.org/1999/xhtml" xmlns:th="http://www.thymeleaf.org">
<head>
<meta charset="UTF-8">
<title>第三方登录</title>
</head>
<style>
.login-container {
margin: 50px;
width: 100%;
}
.form-container {
margin: 0px auto;
width: 50%;
text-align: center;
box-shadow: 1px 1px 10px #888888;
height: 300px;
padding: 5px;
}
input {
margin-top: 10px;
width: 350px;
height: 30px;
border-radius: 3px;
border: 1px #E9686B solid;
padding-left: 2px;
}
.btn {
width: 350px;
height: 35px;
line-height: 35px;
cursor: pointer;
margin-top: 20px;
border-radius: 3px;
background-color: #E9686B;
color: white;
border: none;
font-size: 15px;
}
.title {
margin-top: 5px;
font-size: 18px;
color: #E9686B;
}
</style>
<body>
<div class="login-container">
<div class="form-container">
<p class="title">第三方登录</p>
<form name="loginForm" method="post" action="http://localhost:8099/signin">
<input type="text" name="username" placeholder="用户名"/>
<br>
<input type="text" name="password" placeholder="密码"/>
<br>
<input type="text" name="_csrf" placeholder="CSRF" th:value="${csrf}"/>
<br>
<button type="submit" class="btn">登 录</button>
</form>
<p style="color: red" th:if="${param.error}">用户名或密码错误</p>
</div>
</div>
</body>
</html>
<!DOCTYPE html>
<html lang="en" xmlns:th="http://www.thymeleaf.org">
<head>
    <meta charset="UTF-8">
    <title>授权</title>
</head>
<style>

    html {
        padding: 0px;
        margin: 0px;
    }

    .title {
        background-color: #E9686B;
        height: 50px;
        padding-left: 20%;
        padding-right: 20%;
        color: white;
        line-height: 50px;
        font-size: 18px;
    }

    .title-left {
        float: right;
    }

    .title-right {
        float: left;
    }

    .title-left a {
        color: white;
    }

    .container {
        clear: both;
        text-align: center;
    }

    .btn {
        width: 350px;
        height: 35px;
        line-height: 35px;
        cursor: pointer;
        margin-top: 20px;
        border-radius: 3px;
        background-color: #E9686B;
        color: white;
        border: none;
        font-size: 15px;
    }
</style>
<body style="margin: 0px">
<div class="title">
    <div class="title-right">OAUTH-BOOT 授权</div>
    <div class="title-left">
        <a href="#help">帮助</a>
    </div>
</div>
<div class="container">
    <h3 th:text="${clientId}+' 请求授权,该应用将获取你的以下信息'"></h3>
    <p>昵称,头像和性别</p>
    授权后表明你已同意 <a href="#boot" style="color: #E9686B">OAUTH-BOOT 服务协议</a>
    <form method="post" action="/oauth/authorize">
        <input type="hidden" name="user_oauth_approval" value="true">
        <input type="hidden" name="_csrf" th:value="${_csrf.getToken()}"/>
        <button class="btn" type="submit"> 同意/授权</button>
    </form>
</div>
</body>
</html>
yml配置
spring:
  thymeleaf:
    prefix: classpath:/static/
    suffix: .html
效果图如下:


收到回调后,判断states与session保存的值是否一致,防止csrf
再通过后台http调用,这里测试用的前端访问,通过code获取token

简易SSO搭建
用户授权基于auth项目。
- 编写sso-starter
@Component
public class SsoAuthenticationFilter extends OncePerRequestFilter {

    @Override
    protected void doFilterInternal(HttpServletRequest request, HttpServletResponse response, FilterChain filterChain) throws ServletException, IOException {
        String token = null;
        Cookie[] cookies = request.getCookies();
        for (Cookie cookie : cookies) {
            if (cookie.getName().equals("SSO-TOKEN")) {
                token = cookie.getValue();
            }
        }
        if (token == null) {
            response.sendRedirect("http://localhost:8099/sso/login");
            return;
        } else {
            Map<String, Object> params = new HashMap<>();
            params.put("token", token);
			String result = HttpUtil.post("http://localhost:8099/sso/checkSsoToken", new HashMap<>(), params);
			// 验证result
//			if(Func.equals(result,"true")){
//				filterChain.doFilter(request, response);
//			}else{
//				response.sendRedirect("http://localhost:8099/sso/login");
//				return;
//			}
            filterChain.doFilter(request, response);
		}
    }
}
- 扩展auth项目接口
@Controller
@RequestMapping("/sso")
public class SsoController {

	@RequestMapping("/login")
	public ModelAndView login(@RequestParam Map<String, Object> map, HttpServletRequest request) throws Exception {
		ModelAndView view = new ModelAndView();
		view.setViewName("ssologin");
		return view;
	}

	@RequestMapping("/success")
	public String success(@RequestParam Map<String, String> map, HttpServletRequest request, HttpServletResponse response) throws Exception {
		Cookie cok = new Cookie("SSO-TOKEN",map.get("token"));
		cok.setHttpOnly(true);
		cok.setPath("/");
		response.addCookie(cok);
		// 回调写死测试
		return "redirect:http://localhost:8080/#/workOffice/cultureBuild/board";
	}


	@RequestMapping("/checkSsoToken")
	public String checkSsoToken(@RequestParam Map<String, Object> map, HttpServletRequest request) throws Exception {
		Object token = map.get("token");
		return "true";
	}
}
- sso登录页面
<!DOCTYPE html>
<html xmlns="http://www.w3.org/1999/xhtml" xmlns:th="http://www.thymeleaf.org">
<head>
<meta charset="UTF-8">
<title>sso登录</title>
</head>
<style>
.login-container {
margin: 50px;
width: 100%;
}
.form-container {
margin: 0px auto;
width: 50%;
text-align: center;
box-shadow: 1px 1px 10px #888888;
height: 300px;
padding: 5px;
}
input {
margin-top: 10px;
width: 350px;
height: 30px;
border-radius: 3px;
border: 1px #E9686B solid;
padding-left: 2px;
}
.btn {
width: 350px;
height: 35px;
line-height: 35px;
cursor: pointer;
margin-top: 20px;
border-radius: 3px;
background-color: #E9686B;
color: white;
border: none;
font-size: 15px;
}
.title {
margin-top: 5px;
font-size: 18px;
color: #E9686B;
}
</style>
<body>
<div class="login-container">
<div class="form-container">
<p class="title">sso登录</p>
<input type="text" id="username" name="username" placeholder="用户名"/>
<br>
<input type="text" id="password" name="password" placeholder="密码"/>
<br>
<button class="btn" onclick="login()">登 录</button>
</div>
<script>
function login(){
var username = document.getElementById("username").value;
var password = document.getElementById("password").value;
var xmlhttp = new XMLHttpRequest();
xmlhttp.open("GET","http://localhost:8099/oauth/token?username="+username+"&password="+password+"&grant_type=captcha&scope=all&type=account&client_id=saber&client_secret=saber_secret",false);
xmlhttp.send();
var k = xmlhttp.responseText;
// 写死token测试
window.location.href="http://localhost:8099/sso/success?token=testToken";
}
</script>
</div>
</body>
</html>
- 客户端的前端需要判断ajax请求是否为重定向,如果是重定向跳到登录页面
if(response.request.responseURL == "http://localhost:8099/sso/login"){
	window.location.href = "http://localhost:8099/sso/login";
}


 5224
5224


 被折叠的 条评论
为什么被折叠?
被折叠的 条评论
为什么被折叠?
 到【灌水乐园】发言


