


Vue 组件通信可以使用以下几种方法:
- 父组件向子组件传递数据:使用
props将数据从父组件传递给子组件,子组件可以通过props接收和使用数据。- 子组件向父组件传递数据:使用
$emit触发自定义事件,父组件可以通过事件监听器来接收数据。- 非父子组件之间的通信:使用一个中央事件总线或 Vuex 状态管理库来管理和共享数据。
- 通过
provide和inject传递数据:在父组件中使用provide提供数据,在子组件中使用inject注入数据,可以实现跨级组件通信。- 通过
ref获取组件实例:在父组件中使用ref获取子组件的实例,可以直接调用子组件的方法或属性。- 通过
$parent和$children访问父组件或子组件:在组件中使用$parent可以访问父组件,使用$children可以访问子组件,可以直接调用父组件或子组件的方法或属性。但是在实际开发中,它们的使用并不是很常见,因为它们可能会导致组件的耦合性过高,不利于代码的可维护性和可扩展性。
组件系统是 Vue 的另一个重要概念,因为它是一种抽象,允许我们使用小型、独立和通常可复用的组件构建大型应用。仔细想想,几乎任意类型的应用界面都可以抽象为一个组件树:
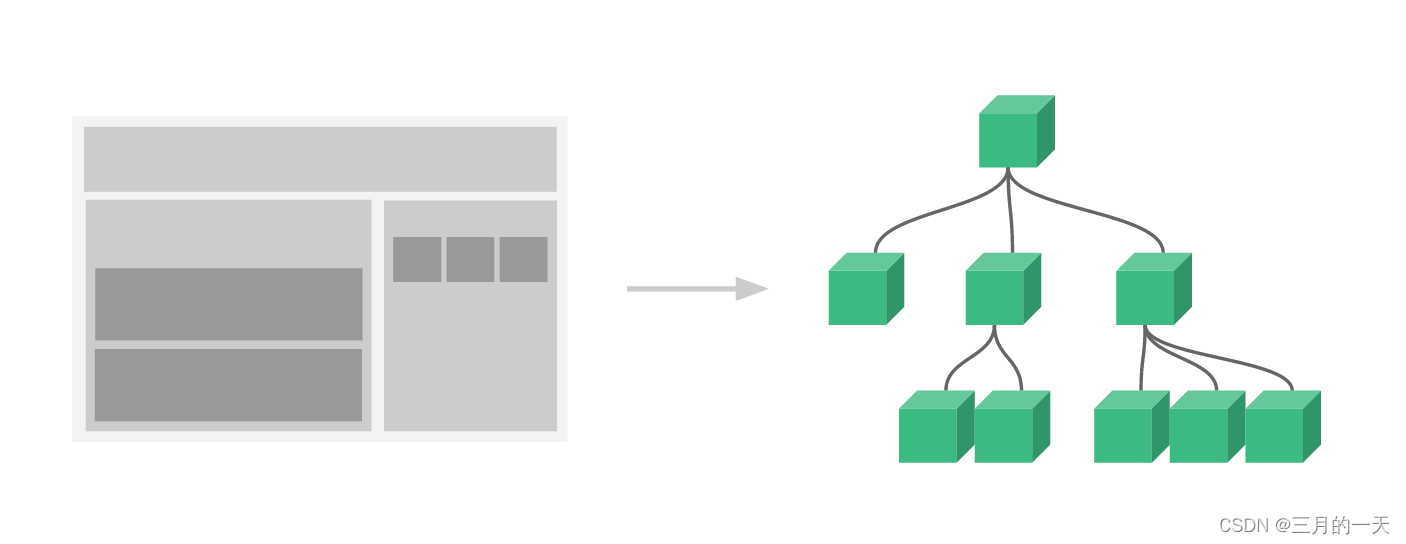
例如,你可能会有页头、侧边栏、内容区等组件,每个组件又包含了其它的像导航链接、博文之类的组件。为了能让页面正常工作,一些功能可能要求我们和父级组件进行沟通。
父子组件双向通信 props+$emit
在 Vue 中,父子组件通信是非常常见的场景,其中 props 和 $emit 是两种主要的机制用于实现父子组件之间的通信。
props 和 $emit 是两种主要的机制用于实现父子组件之间的通信。props 是父组件向子组件传递数据的一种机制,子组件可以通过 props 选项声明需要接收的数据,父组件可以通过标签的属性将数据传递给子组件。
如果子组件需要向父组件传递数据,子组件可以通过调用内建的 $emit 方法并传入事件名称来触发一个事件。父组件可以通过
v-on:或@方法监听子组件的自定义事件,并在事件回调函数中处理数据,从而实现子组件向父组件传递数据的需求。
Props(属性):
- 用法:在父组件中通过在子组件标签上绑定属性的方式传递数据,子组件通过 props 属性接收数据。
- 特点:props 是单向数据流,父组件传递数据给子组件,子组件接收并渲染这些数据,但子组件不能直接修改 props 中的数据。
$emit(事件):
- 用法:子组件通过 $emit 方法触发一个自定义事件,并传递数据,父组件通过在子组件标签上使用 @event 来监听这个事件,并在相应的方法中处理传递过来的数据。
- 特点:$emit 是一种子组件向父组件通信的方式,子组件可以通过触发自定义事件来传递数据给父组件。
vue2示例——props+$emit
子组件
<template>
  <div class="child-component">
    <h3>我是子组件</h3>
    <span>{{ msg }}</span>
    <button @click="sendMessageToParent">我可以将数据传给父组件</button>
  </div>
</template>
<script>
export default {
  name: "ChildComponent",
  props: {
    msg: String,
  },
  methods: {
    sendMessageToParent() {
      this.$emit("sendMessage", "我是子组件数据");
    },
  },
};
</script>
<style>
.child-component {
  border: 1px solid green;
  width: 50vw;
  margin: auto;
}
</style>
vue2的选项式api写法。在script中通过export default导出一个对象。在对象中,使用data(){return {key:val,ke:val}定义响应式数据。method:{func1,func2}定义方法。通过props属性,定义需要接收父组件的变量及类型,props:{msg:String}。
在组件的选项中,data 函数是一个函数,而不是一个对象,这是因为 Vue 需要在每个实例上创建一个独立的数据对象,避免多个实例共享同一个数据对象,从而导致数据污染或冲突。
props在子组件的使用:通过props属性声明一个msg变量,类型是String。
$emit在子组件的使用:通过this.$emit("事件名”,传递给父组件的数据),向父组件抛出一个sendMessage事件。
父组件
<template>
  <div class="parent-component">
    <h2>我是父组件</h2>
    <div>{{ childMsg }}</div>
    <ChildComponent
      :msg="msg"
      @sendMessage="getMessageFromChild"
    ></ChildComponent>
  </div>
</template>

<script>
import ChildComponent from "./ChildComponent.vue";
export default {
  name: "ParentComponent",
  components: {
    ChildComponent,
  },
  data() {
    return { msg: "父组件的数据", childMsg: "" };
  },
  methods: {
    getMessageFromChild(arg) {
      this.childMsg = this.childMsg + arg;
    },
  },
};
</script>
<style>
.parent-component {
  border: 1px solid blue;
}
</style>
vue2的选项式api写法。在components:{组件}显示声明子组件。在组件的 methods、computed 和 watch 等选项中,访问数据需要使用
this关键字,因为this指向当前组件的实例,而当前组件的实例上有一个data函数返回的数据对象,该对象中定义了所有的数据
props在父组件的使用:父组件通过属性绑定的方式,<ChildComponent :msg=“msg”>,将父组件中定义的数据传给子组件的msg属性。
$emit在父组件的使用:在父组件里通过事件监听@sendMessage,接收子组件抛出的sendMessage方法,并在父组件中通过getMessageFromChild方法,接收子组件在$emit中第二个参数传入的数据,并处理子组件的数据。
效果演示
vue3示例——defineProps+defineEmits
子组件
vue3里,通过defneProps、defineEmits两个函数定义属性和事件。defneProps接收一个对象{key:{属性描述}},defineEmits接收一个数组,数组每项是个字符串,标识向外抛出的事件名。
<template>
  <div class="child-component">
    <h3>我是子组件</h3>
    <span>{{ msg }}</span>
    <button @click="sendMessageToParent">我可以将数据传给父组件</button>
  </div>
</template>
<script setup>
import { defineProps, defineEmits } from "vue";
//定义属性props
const props = defineProps({
  msg: {
    type: String,
    required: true,
  },
});
//定义emit事件
const emit = defineEmits(["sendMessage"]);
function sendMessageToParent() {
  emit("sendMessage", "我是子组件数据");
}
</script>
<style>
.child-component {
  border: 1px solid green;
  width: 50vw;
  margin: auto;
}
</style>
父组件
vue3 setup组合式api写法,不用写method:{},data()。不需要使用this。定义响应式数据用ref显示定义一切类型数据,使用.value获取实际数据值。
<template>
  <div class="parent-component">
    <h2>我是父组件</h2>
    <div>{{ childMsg }}</div>
    <ChildComponent
      :msg="msg"
      @sendMessage="getMessageFromChild"
    ></ChildComponent>
  </div>
</template>
<script setup>
import { ref } from "vue";
import ChildComponent from "./ChildComponent.vue";
const msg = ref("父组件的数据");
let childMsg = ref("");
function getMessageFromChild(arg) {
  childMsg.value = childMsg.value + arg;
}
</script>
<style>
.parent-component {
  border: 1px solid blue;
  width: 100vw;
}
</style>
跨级组件单向通信provide+inject
在 Vue 2 中,
props和$emit则只能在父子组件直接传值。但如果需要更加方便、灵活的进行通信,可以使用provide和inject。provide和inject主要用于跨级组件传值,且没有限制 depth。
- 这对选项需要一起使用,以允许一个祖先组件向其所有子孙后代注入一个依赖,不论组件层次有多深,并在其上下游关系成立的时间里始终生效。
provide选项允许我们指定我们想要提供给后代组件的数据/方法 ;祖先组件不需要知道哪些后代组件使用它提供的 property或方法- 在任何后代组件里,我们都可以使用
inject选项来接收指定的我们想要添加在这个实例上的方法或数据。后代组件不需要知道被注入的 property 或方法来自哪里
vue2示例
- provide:
Object | () => Object- inject:
Array<string> | { [key: string]: string | Symbol | Object }
祖先组件
使用provide的函数式写法,访问data中定义的属性,和methods定义的方法,
<template>
  <div class="parent-component">
    <h2>我是父组件</h2>
    <ChildComponent></ChildComponent>
  </div>
</template>

<script>
import ChildComponent from "./ChildComponent.vue";
export default {
  name: "ParentComponent",
  components: {
    ChildComponent,
  },
  data() {
    return {
      parentMsg: "我是父组件消息",
    };
  },
  provide() {//provide函数,注入parentMsg属性和greet方法
    return {
      parentMsg: this.parentMsg,
      greet: this.greet,
    };
  },
  methods: {
    greet() {
      console.log("Hello from ParentComponent!");
    },
  },
};
</script>
<style>
.parent-component {
  border: 1px solid blue;
}
</style>
子孙组件
在子孙组件中使用inject属性,接收一个数组,将父组件传递的属性和方法名写进去。在子组件中通过this访问方法。属性可以直接使用。
<template>
  <div class="child-component">
    <h3>我是子组件</h3>
    <span>接收到的父组件的消息:{{ parentMsg }}</span>
    <button @click="callGreet">我是父组件传递的事件</button>
  </div>
</template>
<script>
export default {
  name: "ChildComponent",
  inject: ["parentMsg", "greet"], //通过inject属性,接受一个数组,每项是个字符串,表示属性名或方法名
  methods: {
    callGreet() {
      this.greet(); //调用父组件传递的方法
    },
  },
};
</script>
<style>
.child-component {
  border: 1px solid green;
  width: 50vw;
  margin: auto;
}
</style>
效果演示
思考:provide注入的数据,可以在定义provide的组件中使用methods方法修改吗?
在定义 provide 的组件中使用 methods 方法修改 provide 提供的数据是不推荐的,因为 provide 提供的数据应该是用于向子组件传递数据的,而不是在提供的组件中进行修改的。如果想要在提供的组件中修改数据并让子组件感知这些更改,可以考虑使用事件总线或 Vuex 等状态管理工具。
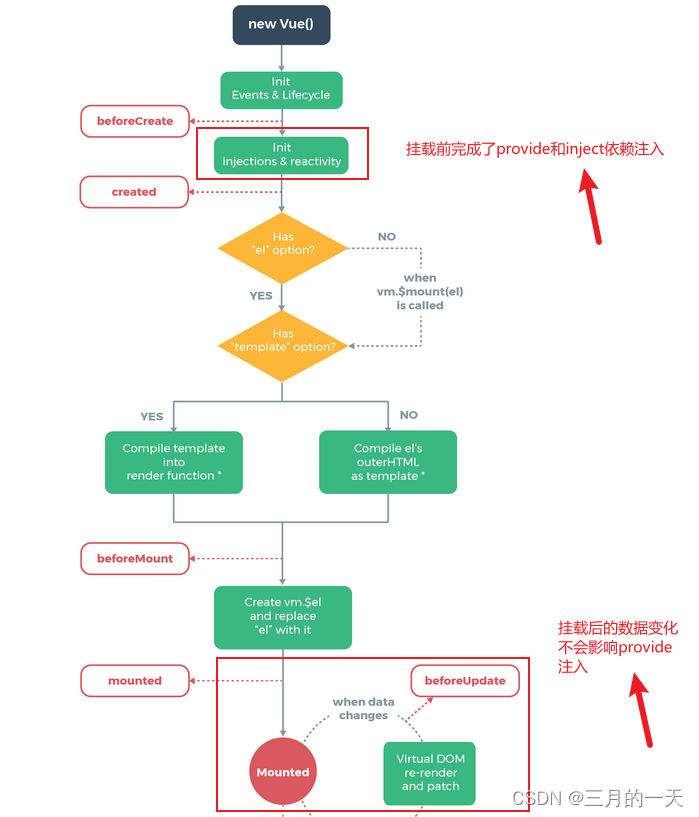
在vue生命周期中,provide和inject是在挂载前完成的。之后数据的更改update那些不会在对provide和inject执行操作。
vue3示例
在 Vue 3 中,
provide可以接受一个响应式对象作为参数,而在 Vue 2 中则只能接受普通对象。这意味着在 Vue 3 中,如果使用provide提供的数据发生变化,那么所有依赖它的组件都会重新渲染,而在 Vue 2 中则需要使用Vue.observable来手动创建一个响应式对象。
祖先组件
<template>
  <div class="parent-component">
    <h2>我是父组件</h2>
    <ChildComponent></ChildComponent>
  </div>
</template>
<script setup>
import { ref, provide } from "vue";
import ChildComponent from "./ChildComponent.vue";
const msg = ref("父组件的数据");
function greet() {
  console.log("Hello from ParentComponent!");
}

provide("parentMsg", msg);
provide("greet", greet);
</script>
<style>
.parent-component {
  border: 1px solid blue;
  width: 100vw;
}
</style>
子孙组件
<template>
  <div class="child-component">
    <h3>我是子组件</h3>
    <span>接收到的父组件的消息:{{ parentMsg }}</span>
    <button @click="callGreet">我是父组件传递的事件</button>
  </div>
</template>
<script setup>
import { inject } from "vue";
const parentMsg = inject("parentMsg");
const callGreet = inject("greet");
</script>
<style>
.child-component {
  border: 1px solid green;
  width: 50vw;
  margin: auto;
}
</style>
$refs获取子组件的实例
$refs的主要用途是在父组件中获取子组件的实例,从而可以调用子组件的方法或直接操作子组件的数据。我们可以在父组件中为子组件设置一个ref属性,然后在父组件的方法中获取子组件的实例,并调用子组件的方法。
在 Vue 2 中,我们可以直接使用
$refs来访问子组件的方法,而在 Vue 3 中,需要使用defineExpose函数将子组件中的方法抛出来,然后在父组件中使用ref函数获取到子组件的实例,并调用子组件中的方法。
这是因为在 Vue 2 中,子组件的实例是作为父组件的一个子属性保存下来的,并且子组件中的方法可以直接在父组件中调用。
但是,在 Vue 3 中,由于组件封装的设计,子组件中的方法不再是父组件的一个子属性,而是通过 provide 函数提供给子组件的,子组件可以通过 inject 函数来注入父组件提供的数据和方法。
因此,在 Vue 3 中,需要使用 defineExpose 函数将子组件中的方法抛出来,然后在父组件中使用 ref 函数获取到子组件的实例,并调用子组件中的方法。
vue2示例——$refs+ref
子组件
在子组件定义一个chidMethod方法
<template>
  <div class="child-component">
    <h3>我是子组件</h3>
  </div>
</template>
<script>
export default {
  name: "ChildComponent",
  methods: {
    childMethod() {
      console.log("我是子组件的方法");
    },
  },
};
</script>
<style>
.child-component {
  border: 1px solid green;
  width: 50vw;
  margin: auto;
}
</style>
父组件
在父组件中调用子组件的时候通过ref绑定一个childRef属性,在methods中通过$refs.childRef调用子组件的方法。
<template>
  <div class="parent-component">
    <h2>我是父组件</h2>
    <button @click="callChildMethod">点我调用子组件方法</button>
    <ChildComponent ref="childRef"></ChildComponent>
  </div>
</template>

<script>
import ChildComponent from "./ChildComponent.vue";
export default {
  name: "ParentComponent",
  components: {
    ChildComponent,
  },

  methods: {
    callChildMethod() {
      this.$refs.childRef.childMethod();
    },
  },
};
</script>
<style>
.parent-component {
  border: 1px solid blue;
}
</style>
效果示例

vue3示例——$refs+ defineExpose
使用
<script setup>的组件是默认关闭的——即通过模板引用或者$parent链获取到的组件的公开实例,不会暴露任何在<script setup>中声明的绑定。如果子组件中的方法需要被父组件访问,需要使用
defineExpose函数将其抛出来,这样父组件就可以通过ref函数获取到子组件的实例,并调用子组件中的方法。
子组件
组件定义一个childMethod方法,通过defineExpose抛出去
<template>
  <div class="child-component">
    <h3>我是子组件</h3>
  </div>
</template>
<script setup>
function childMethod() {
  console.log("我是子组件的方法");
}
//调用defineExpose方法,将子组件要抛出的方法放在对象里
defineExpose({
  childMethod,
});
</script>
<style>
.child-component {
  border: 1px solid green;
  width: 50vw;
  margin: auto;
}
</style>
父组件
<template>
  <div class="parent-component">
    <h2>我是父组件</h2>
    <button @click="callChildMethod">点我调用子组件方法</button>
    <ChildComponent ref="childRef"></ChildComponent>
  </div>
</template>
<script setup>
import { ref, provide } from "vue";
import ChildComponent from "./ChildComponent.vue";
const msg = ref("父组件的数据");

const childRef = ref(null); //定义childRef变量,赋给子组件的ref属性

function callChildMethod() {
  childRef.value.childMethod(); //通过childRef拿到子组件访问实例,调用子组件的方法
}
</script>
<style>
.parent-component {
  border: 1px solid blue;
  width: 100vw;
}
</style>
思考,为什么拿到子组件实例的ref变量childRef必须定义为响应式的?
可以试下,使用childRef=null;然后childRef.childMethod()会报错。
vue的语法规定:如果要在模板中访问或操作一个变量,该变量必须是响应式的。使用
ref函数可以将一个普通变量转换为响应式变量,从而确保在模板中能够正确地追踪和更新变量的变化。因此,为了确保在 Vue 3 中能够正确地引用子组件实例,需要将childRef定义为响应式的ref变量。
$attrs+$listeners获取父组件传递的属性和事件
在 Vue 中,
$attrs和$listeners在二次封装组件中的使用比较多。通常的业务组件用props+emit或者ref比较多。但是,在开发可复用的组件时,我们可能需要将组件的属性和事件暴露给父组件,以便父组件可以自定义组件的行为。在这种情况下,我们可以使用$attrs和$listeners来传递属性和事件。
在使用 $attrs 和 $listeners 时,我们需要注意以下几点:
- 在组件的
props中定义了与父组件相同的属性时,父组件传递的这些属性会被props接收,不会被$attrs接收。 - 在组件的
inheritAttrs选项设置为false时,父组件传递的属性不会被默认添加到组件的根元素上,需要手动使用v-bind="$attrs"来绑定这些属性。 - vue2中,在组件的
methods中定义的事件处理函数,不会被$listeners接收
vue2 VS vue3
- 在 Vue 2 中,
$attrs对象中不包含父组件中的class和style属性,使用:class和:style绑定分别将父组件中的class和style属性传递给子组件的根元素- Vue 3 中,
$listeners对象在 Vue 3 中已被移除。事件监听器现在是$attrs的一部分。$attrs对象包含了父组件中传递给子组件的所有属性以及事件。当然props定义的不在$attrs内。- $attrs只能在template模板使用,在script中用useAttrs方法获取属性。
设置inheritAttrs: false的作用
注意:设置
inheritAttrs: false的作用是禁用属性继承,这意味着父组件中的未被子组件声明的属性不会自动应用到子组件的根元素上。这样做的目的是为了避免样式冲突等:例如当父组件中的属性与子组件的class或style发生冲突时,可以使用inheritAttrs:false。但是,即使设置了
inheritAttrs: false,父组件的属性仍然会传递给子组件,仍然可以通过$attrs拿到属性,只是不会自动应用到子组件的根元素上。
vue2示例——$attrs+$listeners
在 Vue 2 中,你可以通过
this.$attrs访问传递给组件的 attribute,以及通过this.$listeners访问传递给组件的事件监听器。结合inheritAttrs: false,开发者可以将这些 attribute 和监听器应用到根元素之外的其它元素。
Vue 2 中,
$attrs对象中不包含父组件中的class和style属性,因为这两个属性在 Vue 中有特殊的处理方式。 用:class和:style绑定分别将父组件中的class和style属性传递给子组件的根元素。
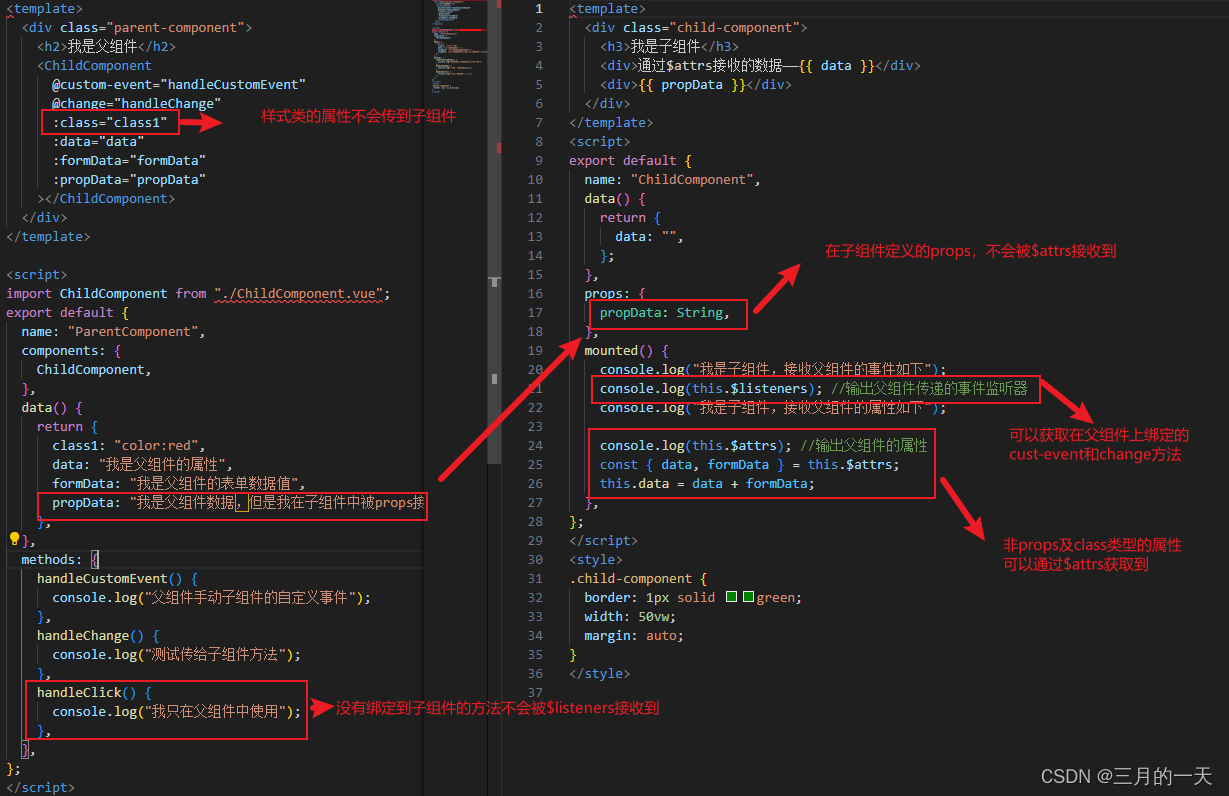
父组件
父组件定义了两个事件,两个属性,和一个class样式类。绑定到子组件ChildComponent中。
使用子组件,假设子组件是一个已经封装好的组件,事件也是子组件抛出可以使用的。
在ChildComponent通过@绑定事件,通过:绑定属性。并且测试绑定class能否生效。
ChildComponent不通过props接收属性。测试一下子组件通过$attrs和$listeners能否接受到方法和属性。
<template>
  <div class="parent-component">
    <h2>我是父组件</h2>
    <ChildComponent
      @custom-event="handleCustomEvent"
      @change="handleChange"
      :class="class1"
      :data="data"
      :formData="formData"
      :propData="propData"
    ></ChildComponent>
  </div>
</template>

<script>
import ChildComponent from "./ChildComponent.vue";
export default {
  name: "ParentComponent",
  components: {
    ChildComponent,
  },
  data() {
    return {
      class1: "color:red",
      data: "我是父组件的属性",
      formData: "我是父组件的表单数据值",
      propData: "我是父组件数据,但是我在子组件中被props接收",
    };
  },
  methods: {
    handleCustomEvent() {
      console.log("父组件手动子组件的自定义事件");
    },
    handleChange() {
      console.log("测试传给子组件方法");
    },
    handleClick() {
      console.log("我只在父组件中使用");
    },
  },
};
</script>
<style>
.parent-component {
  border: 1px solid blue;
}
</style>
子组件
如果在
created或beforeMount钩子函数中使用$attrs和$listeners,可能会导致组件的属性和事件未能正确地传递给子组件。因此,我们可以在mounted钩子函数中使用$attrs和$listeners,以确保组件的属性和事件能够正确地传递给子组件。
<template>
  <div class="child-component">
    <h3>我是子组件</h3>
    <p>接收到的属性:</p>
    <ul>
      <li v-for="(value, key) in $attrs" :key="key">{{ key }}: {{ value }}</li>
    </ul>
    <p>接收到的事件:</p>
    <ul>
      <li v-for="(value, key) in $listeners" :key="key">
        {{ key }}
      </li>
    </ul>

  </div>
</template>
<script>

export default {
  name: "ChildComponent",
  props: {
    propData: String,
  },
  mounted() {
    console.log("我是子组件,接收父组件的事件如下");
    console.log(this.$listeners); //输出父组件传递的事件监听器
    // console.log("我是子组件,接收父组件的属性如下");
    // console.log(this.$attrs); //输出父组件的属性
  },
};
</script>
<style>
.child-component {
  border: 1px solid green;
  width: 50vw;
  margin: auto;
}
</style>
效果演示
可以看到$attrs接收的是父组件传递的非props和class属性。
$listeners接收到的是父组件传递的绑定在子组件上的事件。
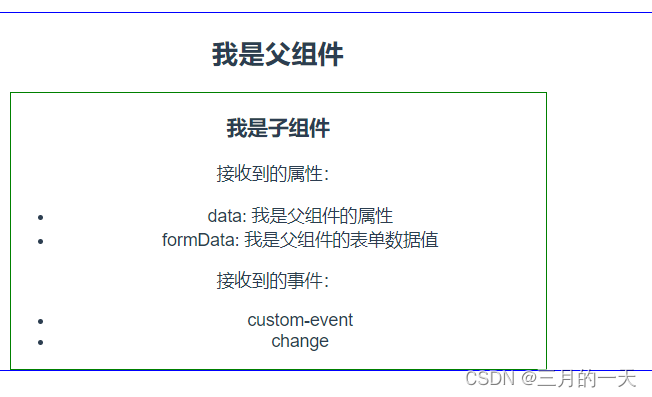
代码解释:父组件的属性如果在子组件中通过props接收了,那么数据不会在走$attrs了。并且样式不会通过$attrs传下去。通过事件绑定在子组件的事件都会被子组件监听到。
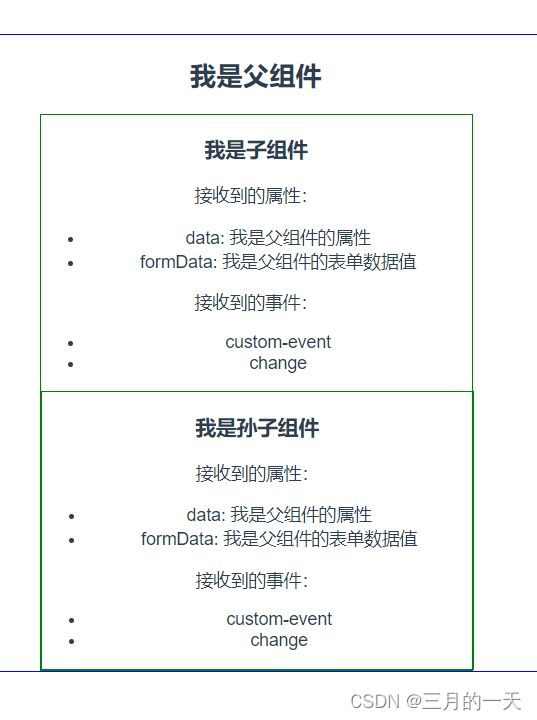
思考: $attrs 和 $listeners 会默认向下传递吗?
增加一个孙组件,打印一下$attrs和$listeners。看能否拿到祖先组件的属性和事件
<template>
  <div class="child-component">
    <h3>我是孙子组件</h3>
    <p>接收到的属性:</p>
    <ul>
      <li v-for="(value, key) in $attrs" :key="key">{{ key }}: {{ value }}</li>
    </ul>
    <p>接收到的事件:</p>
    <ul>
      <li v-for="(value, key) in $listeners" :key="key">
        {{ key }}
      </li>
    </ul>
  </div>
</template>
<script>
export default {
  name: "ChildChildComponent",
  mounted() {
    console.log("孙子组件接收的事件"); //输出父组件传递的事件监听器
    console.log(this.$listeners); //输出父组件传递的事件监听器
  },
};
</script>
<style>
.child-component {
  border: 1px solid green;
  width: 25vw;
  margin: auto;
}
</style>
可以看到孙组件中并没有接收到祖先传递的属性和事件

如何将属性和事件透传下去?
只要在子组件中调用子孙组件的地方显示的绑定$attrs和$listeners即可
    <ChildChildComponent
      v-bind="$attrs"
      v-on="$listeners"
    ></ChildChildComponent>
在公司二次封装公共组件的时候,会频繁使用$attrs和$listeners,这个孙组件就相当与第三方公共组件,比如element-ui或ant-design-vue。这个子组件就相当于你公司自己二次封装一次的组件。父组件就相当于你要写业务组件的地方。那在使用二次封装的组件的时候怎么无感的继续访问使用element-ui的属性和方法呢?
你就把父组件传到二次封装的属性和事件通过透传给传到element-ui就好了。
vue3示例——$attrs+useAttrs
$listeners对象在 Vue 3 中已被移除。事件监听器现在是$attrs的一部分。在模板中直接通过$attrs方法文属性。但是如果你想在script里访问透传属性,必须使用useAttrs辅助函数。
父组件
在父组件定义两个绑定事件,一个非绑定事件。一个class属性,两个非props数据,一个prop数据。看子组件能拿到哪些属性和事件
<template>
  <div class="parent-component">
    <h2>我是父组件</h2>
    <ChildComponent
      @custom-event="handleCustomEvent"
      @change="handleChange"
      :class="class1"
      style="width: 300px"
      :data="data"
      :formData="formData"
      :propData="propData"
    ></ChildComponent>
  </div>
</template>
<script setup>
import { ref } from "vue";
import ChildComponent from "./ChildComponent.vue";
let class1 = ref("color:red");
let data = ref("我是父组件的属性");
let formData = ref("我是父组件的表单数据值");
let propData = ref("我是父组件的数据,但是我在子组件中被props接收");
function handleCustomEvent() {
  console.log("父组件手动子组件的自定义事件");
}
function handleChange() {
  console.log("测试传给子组件方法");
}
function handleClick() {
  console.log("我只在父组件中使用");
}
</script>
<style>
.parent-component {
  border: 1px solid blue;
  width: 100vw;
}
</style>
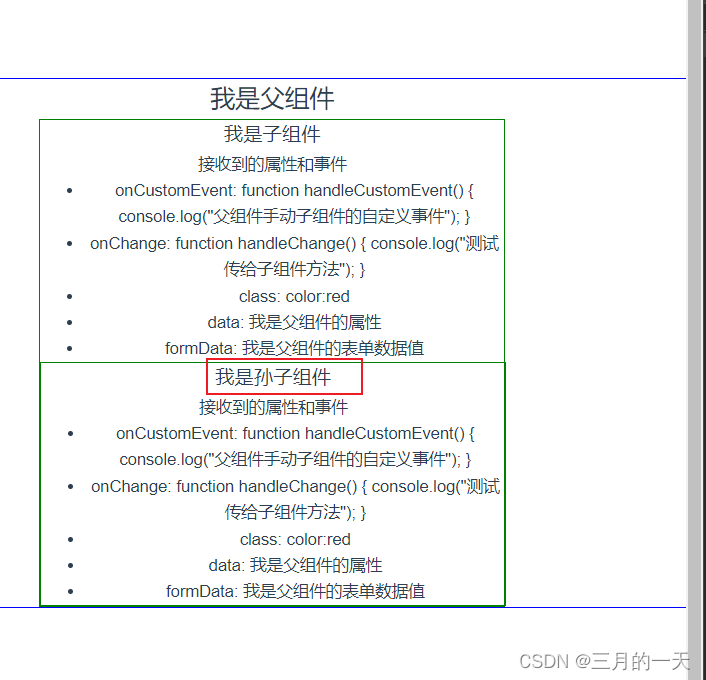
子组件
在vue3中,属性和事件都通过$attrs拿到。 通过v-bind:$attrs显示绑定子组件获取的属性和孙组件,使得属性和方法得以向下传递。在模板外,script标签里,必须通过useAttrs方法拿到属性或方法。
<template>
  <div class="child-component" v-bind="$attrs">
    <h3>我是子组件</h3>
    <p>接收到的属性和事件</p>
    {{ $parent }}
    <ul>
      <li v-for="(value, key) in $attrs" :key="key">{{ key }}: {{ value }}</li>
    </ul>
    <ChildChildComponent v-bind="$attrs"></ChildChildComponent>
  </div>
</template>
<script setup>
import { useAttrs } from "vue";
import ChildChildComponent from "./ChildChildComponent.vue";

defineProps({
  propData: {
    type: String,
    required: true,
  },
});
defineOptions({
  inheritAttrs: false,
});
const attrs = useAttrs(); //通过useAttrs在脚本里获取属性和方法
console.log("我是子组件,接收父组件的属性和事件如下");
console.log(attrs);
</script>
<style>
.child-component {
  border: 1px solid green;
  width: 50vw;
  margin: auto;
}
</style>
孙组件
<template>
  <div class="child-component">
    <h3>我是孙子组件</h3>
    <p>接收到的属性和事件</p>
    <ul>
      <li v-for="(value, key) in $attrs" :key="key">{{ key }}: {{ value }}</li>
    </ul>
  </div>
</template>
<script setup>
defineProps({
  propData: {
    type: String,
    required: true,
  },
});
</script>
<style>
.child-component {
  border: 1px solid green;
  width: 50vw;
  margin: auto;
}
</style>


 1万+
1万+


 被折叠的 条评论
为什么被折叠?
被折叠的 条评论
为什么被折叠?
 到【灌水乐园】发言


