


在学习傅里叶变换的过程中,我发现了JohnHany大神的这篇博客:
opencv实现基于傅里叶变换的旋转文本校正,所以在学习完傅里叶变换以后,我迫不及待的想要去尝试一下,在此记录一下。在搜索的过程中,我发现网上并没有用python实现的,希望看了这篇文章,能对学习python的小伙伴有帮助。转载请注明出处,原创不易 ---zyh 2018-5-31
傅里叶变换的原理,可以看下我的上一篇博客:
傅里叶变换。
直接开始正题:
第一步、读取文件,灰度化
#1、读取文件,灰度化
img = cv.imread(
'img/imageTextR.png')
gray = cv.cvtColor(img, cv.COLOR_BGR2GRAY)
cv.imshow(
'gray', gray)
第二步、图像延扩
h, w = img.shape[:2]
new_h = cv.getOptimalDFTSize(h)
new_w = cv.getOptimalDFTSize(w)
right = new_w - w
bottom = new_h - h
nimg = cv.copyMakeBorder(gray, 0, bottom, 0, right, borderType=cv.BORDER_CONSTANT, value=0)
cv.imshow('new image', nimg)
OpenCV中的DFT采用的是快速算法,这种算法要求图像的尺寸是2的、3和5的倍数是处理速度最快。所以需要用getOptimalDFTSize()找到最合适的尺寸,然后用copyMakeBorder()填充多余的部分。这里是让原图像和扩大的图像左上角对齐。填充的颜色如果是纯色,对变换结果的影响不会很大,后面寻找倾斜线的过程又会完全忽略这一点影响。
第三步、执行傅里叶变换,并过得频域图像
f = np.fft.fft2(nimg)
fshift = np.fft.fftshift(f)
magnitude = np.log(np.abs(fshift))
magnitude_uint = magnitude.astype(np.uint8)
我们用np.fft.fft2()将图像从空间域转到频域,然后用np.fft.fftshift()将低频分量移动到中心,我们得到的结果是复数形式,所以用abs()得到实数,取对数是为了将数据变换到0-255,相当与实现了归一化。
第四步、二值化,进行Houge直线检测
#二值化
magnitude_uint = magnitude.astype(np.uint8)
ret, thresh = cv.threshold(magnitude_uint, 11, 255, cv.THRESH_BINARY)
print(ret)
cv.imshow('thresh', thresh)
print(thresh.dtype)
#霍夫直线变换
lines = cv.HoughLinesP(thresh, 2, np.pi/180, 30, minLineLength=40, maxLineGap=100)
print(len(lines))
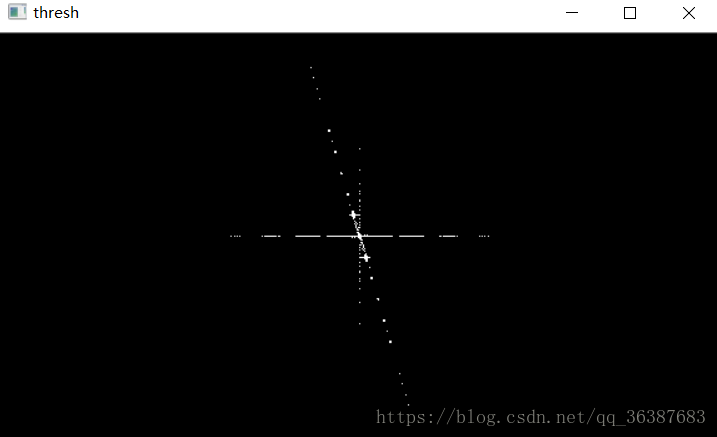
因为HougnLinesP()函数要求
输入图像必须为8位单通道图像,所以我们用astype()函数把图像数据转成uint8类型,接下来执行二值化操作。在操作过程中参数要自己根据情况设定。
第五步、创建一个新图像,标注直线,找出偏移弧度
#创建一个新图像,标注直线
lineimg = np.ones(nimg.shape,dtype=np.uint8)
lineimg = lineimg * 255

piThresh = np.pi/180
pi2 = np.pi/2
print(piThresh)

for line in lines:
    x1, y1, x2, y2 = line[0]
    cv.line(lineimg, (x1, y1), (x2, y2), (0, 255, 0), 2)
    if x2 - x1 == 0:
        continue
    else:
        theta = (y2 - y1) / (x2 - x1)
    if abs(theta) < piThresh or abs(theta - pi2) < piThresh:
        continue
    else:
        print(theta)
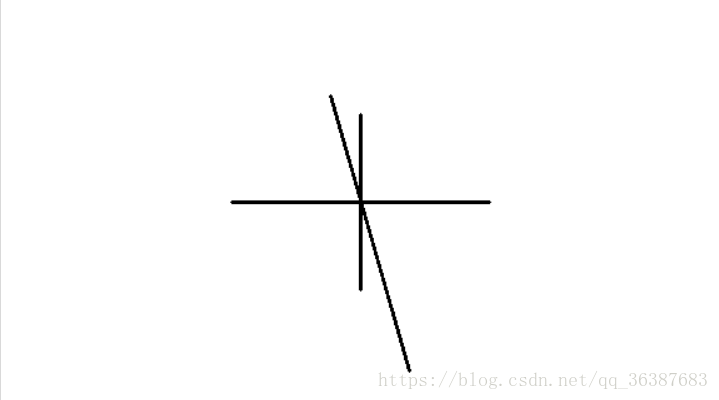
上面得到三个角度,一个是0度,一个是90度,另一个就是我们需要的倾斜角。我们要把这个角找出来,并且要考虑判断条件。
第六步、计算倾斜角,将弧度转换成角度,并注意误差
angle = math.atan(theta)
print(angle)
angle = angle * (180 / np.pi)
print(angle)
angle = (angle - 90)/(w/h)
print(angle)
由于DFT的特点,只有输出图像是正方形时,检测到的角才是文本真正旋转的角度。但是我们的输入图像不一定是正方形的,所以要根据图像的长宽比改变这个角度。
在OpenCV中,
逆时针旋转,角度为正,所以我们要对角度进行处理。
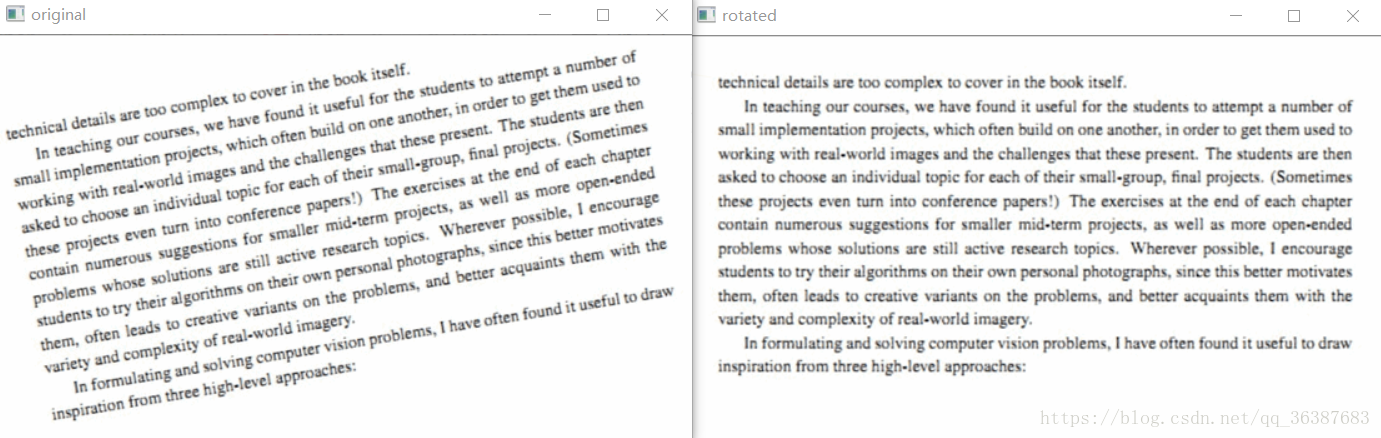
第七步、校正图片
center = (w//
2, h//
2)
M = cv.getRotationMatrix2D(center, angle,
1.0)
rotated = cv.warpAffine(img, M, (w, h),
flags=cv.INTER_CUBIC,
borderMode=cv.BORDER_REPLICATE)
cv.imshow(
'line image', lineimg)
cv.imshow(
'rotated', rotated)
先用getRotationMatrix2D()获得一个仿射变换矩阵,再把这个矩阵输入warpAffine(),做一个单纯的仿射变换。
校正的结果:
完整代码:
import cv2 as cv
import numpy as np
import math
from matplotlib import pyplot as plt

def fourier_demo():
    #1、读取文件,灰度化
    img = cv.imread('img/imageTextR.png')
    cv.imshow('original', img)
    gray = cv.cvtColor(img, cv.COLOR_BGR2GRAY)
    cv.imshow('gray', gray)

    #2、图像延扩
    h, w = img.shape[:2]
    new_h = cv.getOptimalDFTSize(h)
    new_w = cv.getOptimalDFTSize(w)
    right = new_w - w
    bottom = new_h - h
    nimg = cv.copyMakeBorder(gray, 0, bottom, 0, right, borderType=cv.BORDER_CONSTANT, value=0)
    cv.imshow('new image', nimg)

    #3、执行傅里叶变换,并过得频域图像
    f = np.fft.fft2(nimg)
    fshift = np.fft.fftshift(f)
    magnitude = np.log(np.abs(fshift))


    #二值化
    magnitude_uint = magnitude.astype(np.uint8)
    ret, thresh = cv.threshold(magnitude_uint, 11, 255, cv.THRESH_BINARY)
    print(ret)
    cv.imshow('thresh', thresh)
    print(thresh.dtype)
    #霍夫直线变换
    lines = cv.HoughLinesP(thresh, 2, np.pi/180, 30, minLineLength=40, maxLineGap=100)
    print(len(lines))

    #创建一个新图像,标注直线
    lineimg = np.ones(nimg.shape,dtype=np.uint8)
    lineimg = lineimg * 255

    piThresh = np.pi/180
    pi2 = np.pi/2
    print(piThresh)

    for line in lines:
        x1, y1, x2, y2 = line[0]
        cv.line(lineimg, (x1, y1), (x2, y2), (0, 255, 0), 2)
        if x2 - x1 == 0:
            continue
        else:
            theta = (y2 - y1) / (x2 - x1)
        if abs(theta) < piThresh or abs(theta - pi2) < piThresh:
            continue
        else:
            print(theta)

    angle = math.atan(theta)
    print(angle)
    angle = angle * (180 / np.pi)
    print(angle)
    angle = (angle - 90)/(w/h)
    print(angle)

    center = (w//2, h//2)
    M = cv.getRotationMatrix2D(center, angle, 1.0)
    rotated = cv.warpAffine(img, M, (w, h), flags=cv.INTER_CUBIC, borderMode=cv.BORDER_REPLICATE)
    cv.imshow('line image', lineimg)
    cv.imshow('rotated', rotated)

fourier_demo()
cv.waitKey(0)
cv.destroyAllWindows()


 被折叠的 条评论
为什么被折叠?
被折叠的 条评论
为什么被折叠?
 到【灌水乐园】发言


