


-
签名->验证数据是否被篡改,验证数据的所有者
核心思想:私钥加密,公钥解密
A,B两端,假设A要发送数据,A端生成一个密钥对,将公钥进行分发,自己留私钥
签名:
A对原始数据进行哈希运算->哈希值
A使用私钥对哈希值加密->密文
将原始数据+密文发送给B
校验签名:
B接收数据:密文+收到的原始数据
使用公钥对密文解密->哈希值old
使用has算法对收到的数据进行哈希运算->哈希值new
比较这两个哈希值
相同:校验成功
生成一个密钥对函数:
#incldue <iostream>
#include <string.h>
#include <openssl/sha.h>
#include <openssl/rsa.h>
#include <openssl/pem.h>
using namespace std;
void sha1Teat(){
//初始化
SHA_CTX ctx;
SHA1_Init(&ctx);
//添加数据
SHA1_Update(&ctx, "hello", strlen("hello"));
SHA1_Update(&ctx, ", world", strlen(", world"));
//哈希计算
unsigned char* md = new unsigned char[SHA_DIGEST_LENGTH];
char* res = new char[SHA_DIGEST_LENGTH * 2 + 1];
SHA1_Final(md, &ctx);
//格式转换
for(int i = 0; i < SHA_DIGEST_LENGTH; i++){
sprintf(&res[i * 2], "%02x", md[i]);
}
cout << "sha1: " << res << endl;
}
//生成rsa密钥对
void generateRsaKey(){
//创建rsa变量
RSA* rsa = RSA_new();
//创建bignum对象并初始化
BIGNUM* e = BN_new();
BN_set_word(e, 12345);
//生成密钥对,在内存中
RSA_generate_key_ex(rsa, 1024, e, NULL);
//将密钥对写入到磁盘
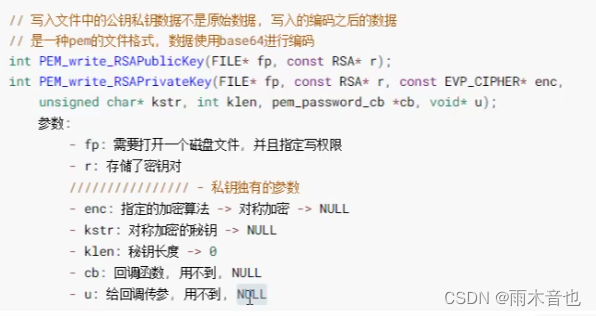
#if 0
FILE*fp = fopen("public.pem", "w");
PEM_write_RSAPublikKey(fp, rsa);
fclose(fp);
//写私钥
FILE* fp = fopen("private.pem", "w");
PEM_write_RSAPrivateKey(fp, rsa, NULL, NULL, 0, NULL, NULL);
fclose(fp);
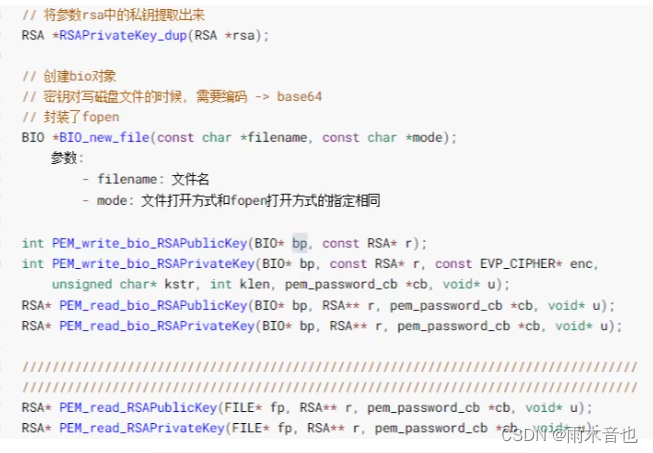
#else
BIO* bio = BIO_new_file("public-1.pem", "w");
PEM_write_RSAPublikKey(BIO, rsa);
BIO_free();
bio = BIO_new_file("private-1.pem", "w");
PEM_write_RSAPrivateKey(bio, rsa, NULL, NULL, 0, NULL, NULL);
BIO_free();
}
-
OPENSSL_Uplink no OPENSSL_Applink错误
Applink()函数不属于openssl的dll内部函数的一部分(通过dll分析器看出这个函数不存在),所以必须把applink.c文件应用程序的一部分编译
-
解决方案
extern "C" { #include <openssl/applink.c> } -
加密
以块的方式进行加密,加密的数据长度不能大于密钥长度
假设密钥长度:1024bit=128byte
//公钥加密
int RSA_public_encrypt(int flen, const unsigned char* from,
                      unsigned char* to, RSA *rsa, int padding);
//私钥解密
int RSA_private_decrypt(int flen, const unsigned char* from,
                      unsigned char* to, RSA *rsa, int padding);
/签名,私钥加密,公钥解密
int RSA_private_encrypt(int flen, const unsigned char* from,
                      unsigned char* to, RSA *rsa, int padding);
int RSA_public_decrypt(int flen, const unsigned char* from,
                      unsigned char* to, RSA *rsa, int padding);
参数:flen:加密/解密的长度 长度 0 <= 密钥长度-11
    -padding:加密的时候对数据进行分组加密处理,填充不需要使用者做,指定填充方案
    	-RSA_PKCS1_PADDING 公共填充方案填充11个字节

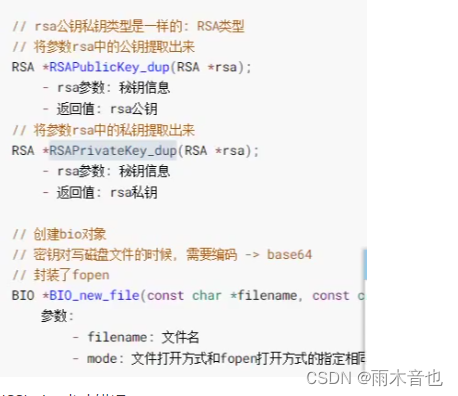
//得到公钥
RSA* pubKey = RSAPublicKey_dup(rsa);
//得到私钥
RSA* priKey = RSAPrivateKey_dup(rsa);
//公钥加密
void encryptPublicKey(){
//准备加密数据
	string test = "没有人能夺走你的远方";
//准备密钥->公钥 从磁盘文件读密钥
	BIO* bio = BIO_new_file("public.pem", "r");
    RSA* pubKey = RSA_new();
    if (pem_read_bio_RSAPublicKey(bio, &pubKey, NULL, NULL) == NULL){
        cout << "failed" << endl;
        return string();
    }
//加密->密文 数据被加密之后,长度和密钥长度相同
    //计算密钥长度
    int keyLen = RSA_size(pubkey);
    char* buf = new char[128];
    //返回值是密文长度
    int len = RSA_public_encrypt(text.size(), (const unsigned char*)test.data(), (unsigned char*)buf, pubKey, RSA_PKCS1_PADDING);
//将密文返回
    return string(buf, len);
}
//私钥解密
string decryptPublicKey(string str){
//准备密钥->私钥 从磁盘文件读密钥,使用bio的方式
	BIO* bio = BIO_new_file("private.pem", "r");
    RSA* priKey = RSA_new();
    if (pem_read_bio_RSAPrilicKey(bio, &priKey, NULL, NULL) == NULL){
        cout << "failed" << endl;
        return string();
    }
    BIO_free(bio);
//解密--明文
    int keyLen = RSA_size(prikey);
    char* buf = new char[keyLen];
    int len = RSA_prilic_decrypt(str.size(), (const unsigned char*)str.data(), (unsigned char*)buf, priKey, RSA_PKCS1_PADDING);
//将明文返回
    cout << buf << endl;
    return string(buf, len);
}
签名
int RSA_sign(int type, const unsigned char* m, unsigned int m_length,
            unsigned char* sigret, unsigned int* siglen, RSA* rsa);
参数:type:使用的的哈希算法
    m:要进行签名的数据
    m_length:长度 0 < 长度 <= 长度-11 不能太长
        sigret:传出参数,存储了签名之后的数据 密文
        rsa:私钥
 返回值:判断函数状态
int RSA_verify(int type, const unsigned char* m, unsigned int m_length,
            unsigned char* sigbuf, unsigned int* siglen, RSA* rsa);
参数:m:进行签名的原始数据--接收到的
    sigbuf:接收到的签名数据--密文
    rsa:公钥
返回值:if != 1 失败 == 1 成功
签名和验证签名
void rsaSigAndVerfiy(){
    //签名数据
    string text = "没有人能夺走你的远方";
    //密钥
    RSA* pubKey = RSA_new();
    RSA* priKey = RSA_new();
    BIO* pubBio = BIO_new_file("public.pem", "r");
    PEM_read_bio_RSAPublicKey(pubBio, &pubKey, NULL, NULL);
    BIO_free(pubBio);
    BIO* priBio = BIO_new_file("private.pem", "r");
    PEM_read_bio_RSAPrilicKey(priBio, &priKey, NULL, NULL);
    BIO_free(priBio);
    //签名
    int len = RSA_size(priKey);
    unsigned int outLen = 0;
    RSA_sign(NID_sha1, (const unsigned char*)test.data(), text.size(),
            (unsigned char*)out, &outLen, priKey);
    //要给到用户的数据
    string sigbuf((char*)out, outLen);
    //验证签名
    RSA_verify(NID_sha1, (const unsigned char*)text.data(),text.size(),
              (const unsigned char*)sigbuf.data(), sigbuf.size(),
              pubKey);
    cout << ret << endl;
}
C++的类
class MyRSA{
public:
    MyRSA();
    ~MyRSA();
    //生成密钥对
    //公钥加密
    //私钥解密
    //数据签名
    //验证签名函数
private:
    RSA* m_pubKey;
    RSA* m_pubKey;
}
对称加密
对称密钥加密法主要基于块加密,选取固定长度的密钥,去加密明文中固定长度的块,生成的密文块与明文块长度一样。显然密钥长度十分重要,块的长度也很重要。如果太短,则很容易枚举出所有的明文-密文映射;如果太长,性能则会急剧下降。AES中规定块长度为128,192,256bit。暴力破解密钥需要万亿年,保证了安全性
分组加密:每组长度 -> 16byte, 128bit
密钥长度:16byte, 24byte, 32byte
每组明文和密文的长度相同,分组加密有不同的加密方式,最常用:cbc – > 密文分组链接
需要一个初始化向量->数组->存储一个随机字符串->分组长度相同
加密和解密的时候都需要初始化向量,加解密的时候初始化向量的值必须相同
AES加解密的API
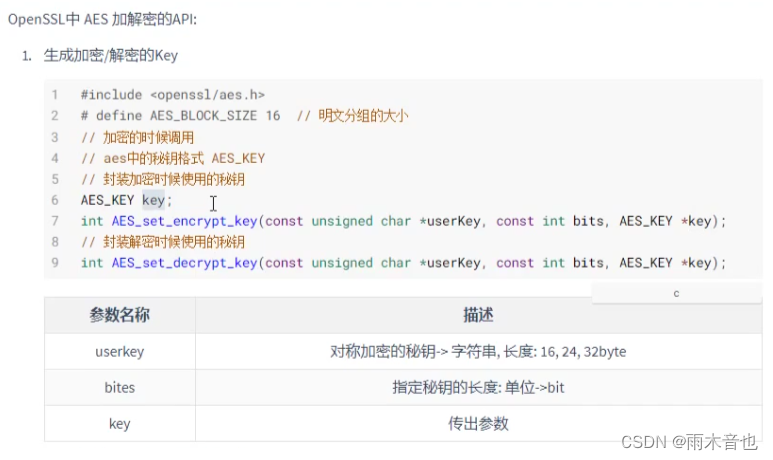
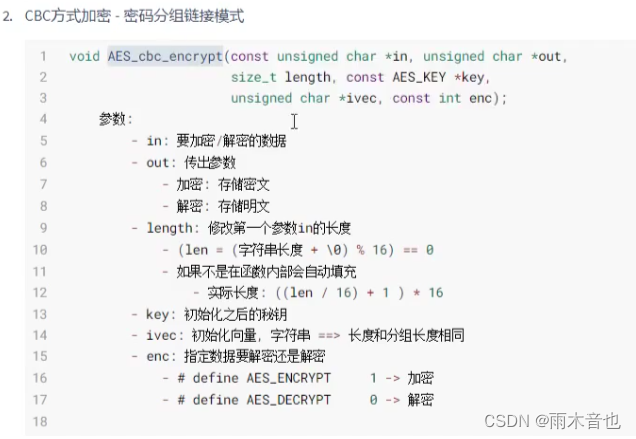
//测试对称加密
void aesCBCCrypto(){
    //准备数据
    const char* pt = "没有人能夺走你的远方";//可以加密大数据
    //准备密钥
    const char* key = "1234567887654321";//16byte
    //初始化密钥
    AES_KEY encKey;
    AES_set_encrypt_key((const unsigned char*)key, 128, &encKey);
    //加密
    //计算长度
    int length = 0;
    int len = strlen((char*)pt) + 1;
    if(len % 16 != 0){
        //内部填充
        length = ((len / 16) + 1) * 16;
    }
    else{
        length = len;
    }
    unsigned char* out = new unsigned char[length];
    unsigned char ivec[AES_BLOCK_SIZE];
    memset(ivec, 9, sizeof(ivec));//初始化为9
    //密文存储在out中
    AES_cbc_encrypt((const unsigned char*)pt, out, length, &encKey,
                    ivec, AES_ENCRYPT);
    //解密 把out密文解出来
    unsigned char* data = new unsigned char[length];
    AES_KEY decKey;
    memset(ivec, 9, sizeof(ivec));//初始化为9
    AES_set_decrypt_key((const unsigned char*)key, 128, &deckey);
    //ivec传入传出参数
    AES_cbc_encrypt(out, data, length, &decKey, ivec, AES_DECRYPT);
    //打印
    cout << data << endl;
    delete[]out;
    delete[]data;
}


 7979
7979


 被折叠的 条评论
为什么被折叠?
被折叠的 条评论
为什么被折叠?
 到【灌水乐园】发言


