


1.定义
将一个复杂对象的构建与它的表示分离,使得同样的构建过程可以创建不同的表示。
建造模式是将复杂的内部创建封装在内部,对于外部调用的人来说,只需要传入建造者和建造工具,对于内部是如何建造成成品的,调用者无需关心。
建造者模式(Builder Pattern)使用多个简单的对象一步一步构建成一个复杂的对象。这种类型的设计模式属于创建型模式,它提供了一种创建对象的最佳方式。
一个 Builder 类会一步一步构造最终的对象。该 Builder 类是独立于其他对象的。
2.介绍
建造者模式属于创建型模式。
建造者模式主要用来创建复杂的对象,用户可以不用关心其建造过程和细节。
例如:当要组装一台电脑时,我们选择好CPU、内存、硬盘等等,然后交给装机师傅,装机师傅就把电脑给组装起来,我们不需要关心是怎么拼装起来的。
主要解决:主要解决在软件系统中,有时候面临着"一个复杂对象"的创建工作,其通常由各个部分的子对象用一定的算法构成;由于需求的变化,这个复杂对象的各个部分经常面临着剧烈的变化,但是将它们组合在一起的算法却相对稳定。
3.UML类图
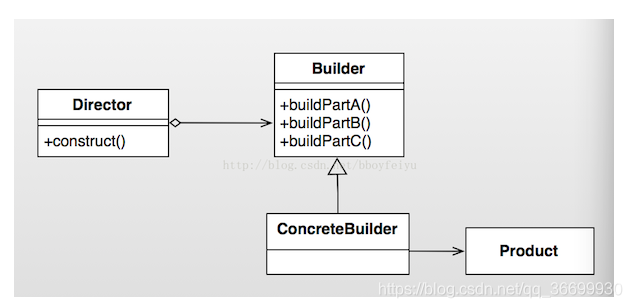
它分为抽象建造者(Builder)角色、具体建造者(ConcreteBuilder)角色、导演者(Director)角色、产品(Product)角色四个角色。
Product(产品类):要创建的复杂对象。在本类图中,产品类是一个具体的类,而非抽象类。实际编程中,产品类可以是由一个抽象类与它的不同实现组成,也可以是由多个抽象类与他们的实现组成。
Builder(抽象建造者):创建产品的抽象接口,一般至少有一个创建产品的抽象方法和一个返回产品的抽象方法。引入抽象类,是为了更容易扩展。
ConcreteBuilder(实际的建造者):继承Builder类,实现抽象类的所有抽象方法。实现具体的建造过程和细节。
Director(指挥者类):分配不同的建造者来创建产品,统一组装流程。
4.案例
定义具体的产品类(Product):Person
public class Person {

    private String name;
    private boolean sex;
    private int age;
    private float height;
    private float weight;


    public Person(String name, boolean sex, int age, float height, float weight) {
        this.name = name;
        this.sex = sex;
        this.age = age;
        this.height = height;
        this.weight = weight;
    }

    public String getName() {
        return name;
    }

    public void setName(String name) {
        this.name = name;
    }

    public boolean isSex() {
        return sex;
    }

    public void setSex(boolean sex) {
        this.sex = sex;
    }

    public int getAge() {
        return age;
    }

    public void setAge(int age) {
        this.age = age;
    }

    public float getHeight() {
        return height;
    }

    public void setHeight(float height) {
        this.height = height;
    }

    public float getWeight() {
        return weight;
    }

    public void setWeight(float weight) {
        this.weight = weight;
    }
}
定义抽象建造者(Builder):Builder
public interface Builder {

    Builder setName(String name);

    Builder setSex(boolean sex);

    Builder setAge(int age);

    Builder setHeight(float height);

    Builder setWeight(float weight);

    Person create();
}
创建具体的建造者(ConcreteBuilder):ConcreteBuilder
public class ConcreteBuilder implements Builder {

    private String name;
    private boolean sex;
    private int age;
    private float height;
    private float weight;

    public Builder setName(String name) {
        this.name = name;
        return this;
    }

    public Builder setSex(boolean sex) {
        this.sex = sex;
        return this;
    }

    public Builder setAge(int age) {
        this.age = age;
        return this;
    }

    public Builder setHeight(float height) {
        this.height = height;
        return this;
    }

    public Builder setWeight(float weight) {
        this.weight = weight;
        return this;
    }

    public Person create() {
        return new Person(name, sex, age, height, weight);
    }
}
定义指挥者类(Director):Director
public class Director {

    private Builder builder;

    public Director(Builder builder){
        this.builder = builder;
    }

    public void construct(String name, boolean sex, int age, float height, float weight) {
        builder.setName(name);
        builder.setSex(sex);
        builder.setAge(age);
        builder.setHeight(height);
        builder.setWeight(weight);
    }
}
测试
public class Test {

    public static void main(String[] args) {
        Builder builder = new ConcreteBuilder();
        Director director = new Director(builder);
        director.construct("张三", true, 25, 180, 120);
        Person person = builder.create();
    }
5.应用场景
需要生成的对象具有复杂的内部结构。
5.应用场景
创建一些复杂的对象时,对象内部的构建过程存在复杂变化。
相同的构建过程,不同的执行顺序,产生不同结果时。
不同配置的构建对象,产生不同结果时。
6.优点
封装性良好,隐藏内部构建细节。
易于解耦,将产品本身与产品创建过程进行解耦,可以使用相同的创建过程来得到不同的产品。也就说细节依赖抽象。
易于扩展,具体的建造者类之间相互独立,增加新的具体建造者无需修改原有类库的代码。
易于精确控制对象的创建,由于具体的建造者是独立的,因此可以对建造过程逐步细化,而不对其他的模块产生任何影响。
7.缺点
产生多余的Build对象以及Dirextor类。
建造者模式所创建的产品一般具有较多的共同点,其组成部分相似;如果产品之间的差异性很大,则不适合使用建造者模式,因此其使用范围受到一定的限制。
如果产品的内部变化复杂,可能会导致需要定义很多具体建造者类来实现这种变化,导致系统变得很庞大。
8.Android中的构建者模式吧,最经典的就是AlertDialog
AlertDialog用法
 AlertDialog.Builder builder = new AlertDialog.Builder(activity);//创建一个Builder对象
        builder.setIcon(R.drawable.icon);
        builder.setTitle("标题");
        builder.setMessage("信息");
        builder.setPositiveButton("确定",
                new DialogInterface.OnClickListener() {
                    @Override
                    public void onClick(DialogInterface dialog, int which) {

                    }
                });
        AlertDialog alertDialog = builder.create();//创建AlertDialog对象
        alertDialog.show();//展示AlertDialog
通过Builder对象来构建Icon、Title、Message等,将AlertDialog的构建过程和细节隐藏了起来。
AlertDialog源码分析
public class AlertDialog extends AppCompatDialog implements DialogInterface {

	//接受Builder成员变量P的参数,存放设置属性的对象
    final AlertController mAlert;

    /**
     * No layout hint.
     */
    static final int LAYOUT_HINT_NONE = 0;

    /**
     * Hint layout to the side.
     */
    static final int LAYOUT_HINT_SIDE = 1;

    protected AlertDialog(@NonNull Context context) {
        this(context, 0);
    }


    protected AlertDialog(@NonNull Context context, @StyleRes int themeResId) {
        super(context, resolveDialogTheme(context, themeResId));
        mAlert = new AlertController(getContext(), this, getWindow());
    }

    protected AlertDialog(@NonNull Context context, boolean cancelable,
            @Nullable OnCancelListener cancelListener) {
        this(context, 0);
        setCancelable(cancelable);
        setOnCancelListener(cancelListener);
    }

    static int resolveDialogTheme(@NonNull Context context, @StyleRes int resid) {
        // Check to see if this resourceId has a valid package ID.
        if (((resid >>> 24) & 0x000000ff) >= 0x00000001) {   // start of real resource IDs.
            return resid;
        } else {
            TypedValue outValue = new TypedValue();
            context.getTheme().resolveAttribute(R.attr.alertDialogTheme, outValue, true);
            return outValue.resourceId;
        }
    }


    public Button getButton(int whichButton) {
        return mAlert.getButton(whichButton);
    }


    public ListView getListView() {
        return mAlert.getListView();
    }

    @Override
    public void setTitle(CharSequence title) {
        super.setTitle(title);
        mAlert.setTitle(title); //保存在AlertController对象中
    }

    public void setCustomTitle(View customTitleView) {
        mAlert.setCustomTitle(customTitleView);
    }


    public void setMessage(CharSequence message) {
        mAlert.setMessage(message);
    }


    public void setView(View view) {
        mAlert.setView(view);
    }


    public void setView(View view, int viewSpacingLeft, int viewSpacingTop, int viewSpacingRight,
            int viewSpacingBottom) {
        mAlert.setView(view, viewSpacingLeft, viewSpacingTop, viewSpacingRight, viewSpacingBottom);
    }


    @RestrictTo(LIBRARY_GROUP)
    void setButtonPanelLayoutHint(int layoutHint) {
        mAlert.setButtonPanelLayoutHint(layoutHint);
    }


    public void setButton(int whichButton, CharSequence text, Message msg) {
        mAlert.setButton(whichButton, text, null, msg);
    }


    public void setButton(int whichButton, CharSequence text, OnClickListener listener) {
        mAlert.setButton(whichButton, text, listener, null);
    }


    public void setIcon(int resId) {
        mAlert.setIcon(resId);
    }


    public void setIcon(Drawable icon) {
        mAlert.setIcon(icon);
    }


    public void setIconAttribute(int attrId) {
        TypedValue out = new TypedValue();
        getContext().getTheme().resolveAttribute(attrId, out, true);
        mAlert.setIcon(out.resourceId);
    }

    @Override
    protected void onCreate(Bundle savedInstanceState) {
        super.onCreate(savedInstanceState);
        mAlert.installContent();
    }

    @Override
    public boolean onKeyDown(int keyCode, KeyEvent event) {
        if (mAlert.onKeyDown(keyCode, event)) {
            return true;
        }
        return super.onKeyDown(keyCode, event);
    }

    @Override
    public boolean onKeyUp(int keyCode, KeyEvent event) {
        if (mAlert.onKeyUp(keyCode, event)) {
            return true;
        }
        return super.onKeyUp(keyCode, event);
    }

    public static class Builder {
    	//创建了一个属性容器AlertParams,用来存放AlertDialog所有的属性,最后会将这些属性应用到AlertDialog身上
        private final AlertController.AlertParams P;
        private final int mTheme;


        public Builder(@NonNull Context context) {
            this(context, resolveDialogTheme(context, 0));
        }


        public Builder(@NonNull Context context, @StyleRes int themeResId) {
            P = new AlertController.AlertParams(new ContextThemeWrapper(
                    context, resolveDialogTheme(context, themeResId)));
            mTheme = themeResId;
        }


        @NonNull
        public Context getContext() {
            return P.mContext;
        }


        public Builder setTitle(@StringRes int titleId) {
            P.mTitle = P.mContext.getText(titleId); //保存title到P中
            return this;
        }


        public Builder setTitle(@Nullable CharSequence title) {
            P.mTitle = title;
            return this;
        }


        public Builder setCustomTitle(@Nullable View customTitleView) {
            P.mCustomTitleView = customTitleView;
            return this;
        }


        public Builder setMessage(@StringRes int messageId) {
            P.mMessage = P.mContext.getText(messageId);
            return this;
        }


		//Builder其他代码略

        public AlertDialog create() {
            //构建AlertDialog
            final AlertDialog dialog = new AlertDialog(P.mContext, mTheme);
            P.apply(dialog.mAlert); //将P中的参数设置到AlertController中
            dialog.setCancelable(P.mCancelable);
            if (P.mCancelable) {
                dialog.setCanceledOnTouchOutside(true);
            }
            dialog.setOnCancelListener(P.mOnCancelListener);
            dialog.setOnDismissListener(P.mOnDismissListener);
            if (P.mOnKeyListener != null) {
                dialog.setOnKeyListener(P.mOnKeyListener);
            }
            return dialog;
        }


        public AlertDialog show() {
            final AlertDialog dialog = create();
            dialog.show();
            return dialog;
        }
    }

}
//Dialog源码
 public class Dialog implements DialogInterface, Window.Callback, KeyEvent.Callback, View.OnCreateContextMenuListener, Window.OnWindowDismissedCallback {
        //其他代码略
        public void show() {
            //前面代码略
            if (!mCreated) {
                dispatchOnCreate(null);//分发onCreate
            } else {
                final Configuration config = mContext.getResources().getConfiguration();
                mWindow.getDecorView().dispatchConfigurationChanged(config);
            }

            onStart();//调用onStart()
            mDecor = mWindow.getDecorView();

            //设置参布局参数略

            mWindowManager.addView(mDecor, l);//添加到WindowManager
            mShowing = true;

            sendShowMessage();
        }

        void dispatchOnCreate(Bundle savedInstanceState) {//分发onCreate
            if (!mCreated) {
                onCreate(savedInstanceState);//调用AlertDialog的onCreate方法,创建AlertDialog视图
                mCreated = true;
            }
        }
    }
//AlertController源码
public class AlertController {
        //其他代码略

        public void installContent() {//安装内容
            int contentView = selectContentView();//选择合适的布局
            mWindow.setContentView(contentView);//布局添加到Window中
            setupView();//把dialog.mAlert对象中需要构建的元素逐个添加设置到Window上,即构建我们设置的布局发生在这一步中
        }
    }
简单流程说明:
1.通过AlertDialog.Builder设置各种属性后(如:setTitle()),这些属性信息会保存在P变量中,P变量的类型为AlertController.AlertParams。
2.调用builder.create()即可返回一个AlertDialog对象,builder.create()方法中首先会创建一个AlertDialog对象,AlertDialog对象构造时会初始化WindowManager和Window。
3.builder.create()创建完AlertDialog对象后,会调用 P.apply(dialog.mAlert);即把P变量中所存储的用来构建AlertDialog对象的元素设置到了dialog.mAlert中,dialog.mAlert的类型为AlertController。
4.调用AlertDialog的show()方法,展示界面。 show()方法中会调用 dispatchOnCreate(null),dispatchOnCreate(null)调起onCreate(),onCreate()会调起mAlert.installContent();即安装AlertDialog的内容。
4.installContent()中会调用mWindow.setContentView(mAlertDialogLayout);即把mAlertDialogLayout这个布局加到Window中去。
6.调完mWindow.setContentView(mAlertDialogLayout)后会调用setupView(),setupView()中会把dialog.mAlert对象中需要构建的元素逐个添加设置到mWindow上。
7.最后通过把view添加到mWindowManager上展示出来。
总结
builder模式隐藏了这种复杂的构建过程,只需几行简单的代码就把AlertDialog给展示出来了。
AlertDialog的builder中并没有抽象建造者(Builder)、Director(指挥者类)等角色。AlertDialog.Builder同时扮演了Builder、ConcreteBuilder、Director等角色,这是Android中的一种简化,也值得我们去学习使用。


 314
314


 被折叠的 条评论
为什么被折叠?
被折叠的 条评论
为什么被折叠?
 到【灌水乐园】发言


