


如果不喜欢博客样式,可以查看文档:Spring学习文档
Spring学习
1 准备
1.1 Maven构建项目
个人开发环境:IDEA
API:https://docs.spring.io/spring/docs/5.2.6.RELEASE/javadoc-api/
在IDEA中创建一个新的Maven项目,便于导包.
1.2 导入Spring包
在 pom.xml 文件的<dependencies></dependencies>中,引入如下语句
<!-- https://mvnrepository.com/artifact/org.springframework/spring-context -->
<dependency>
    <groupId>org.springframework</groupId>
    <artifactId>spring-context</artifactId>
    <version>5.2.6.RELEASE</version>
</dependency>
或者通过maven库选择别的版本
https://mvnrepository.com/artifact/org.springframework/spring-context
1.3 检查导入是否成功
在 External Libraries 文件夹中,检查是否有如下几个包:
Maven:org.springframework:Spring-aop:x.x.x.RELEASEMaven:org.springframework:Spring-beans:x.x.x.RELEASEMaven:org.springframework:Spring-context:x.x.x.RELEASEMaven:org.springframework:Spring-core:x.x.x.RELEASEMaven:org.springframework:Spring-expression:x.x.x.RELEASEMaven:org.springframework:Spring-jcl:x.x.x.RELEASE
如果没有,请尝试右键pom.xml>Maven>Reload Project,重新加载.
1.4 创建beans.xml文件
在 src>main 底下,新建文件夹 resources ,并在该目录底下,创建 beans.xml 文件
通过右键>New>Xml Configuration File>Spring Config
beans.xml文件内容如下
<?xml version="1.0" encoding="UTF-8"?>
<beans xmlns="http://www.springframework.org/schema/beans"
       xmlns:xsi="http://www.w3.org/2001/XMLSchema-instance"
       xsi:schemaLocation="http://www.springframework.org/schema/beans
       http://www.springframework.org/schema/beans/spring-beans.xsd">

</beans>
2 beans.xml
2.1 一个简单的bean
在beans内写入bean,bean就是java对象,由Spring容器创建和管理.
以下是一个简单的例子
beans.xml
<?xml version="1.0" encoding="UTF-8"?>
<beans xmlns="http://www.springframework.org/schema/beans"
       xmlns:xsi="http://www.w3.org/2001/XMLSchema-instance"
       xsi:schemaLocation="http://www.springframework.org/schema/beans
       http://www.springframework.org/schema/beans/spring-beans.xsd">
    <bean id="hello" class="edu.mju.bean.Hello">
        <property name="yourName" value="蜡笔小新" />
    </bean>
</beans>
Hello.class
public class Hello {
    private String yourName;

    public void setYourName(String yourName) {
        this.yourName = yourName;
    }

    public void show(){
        System.out.println("你好,"+yourName);
    }
}
TestHello.class
public class TestHello {
    @Test
    public  void TestBean() {
        //解析applicationContext.xml文件,生成对应Bean对象
        ApplicationContext applicationContext = new ClassPathXmlApplicationContext("beans.xml");
        Hello hello = (Hello) applicationContext.getBean("hello");
        hello.show();
    }
}
输出结果
你好,蜡笔小新
2.2 初识Ioc
通过以上的 简单bean案例,我们可以看到
Hello对象由Spring容器创建。Hello对象的yourName参数由beans.xml的<property/>属性设置的。
解析如下:
- 对象原先由:
程序本身创建 》 现在由程序接收对象。 - 实现了
service层与dao层的解耦,当dao层发生改变,应用程序本身不受影响。
这就是Spring框架的IOC(Inversion of Control):控制反转
-
控制的内容:由谁来控制对象的创建(
程序创建对象反转为Spring创建对象) -
反转:
程序本身不创建对象,被动接收Spring容器所创建对象
这里还有一个关键词:依赖注入
依赖注入:
Hello依赖于yourName,而yourName的值由Spring容器注入(通过setYourName)设值。
控制反转的实现由Ioc容器来实现。(Ioc容器:BeanFactory)
2.3 依赖注入
依赖注入——Dependency Injection
- 依赖:指bean对象的创建依赖于容器(由Spring容器创建)。bean对象依赖的资源(
对象、属性、值等等) - 注入:指bean对象依赖的资源由容器来设值注入。
Spring注入分为以下两大类:
2.3.1 基于构造函数的依赖注入
Constructor-based DI is accomplished by the container invoking a constructor with a number of arguments, each representing a dependency. Calling a static factory method with specific arguments to construct the bean is nearly equivalent, and this discussion treats arguments to a constructor and to a static factory method similarly. The following example shows a class that can only be dependency-injected with constructor injection:
基于构造器的DI是由容器调用带有许多参数的构造器来完成的,每个参数表示一个依赖项。调用带有特定参数的静态工厂方法来构造bean几乎是等效的,本讨论对构造函数的参数和静态工厂方法的处理是类似的。下面的示例显示了只能通过构造函数注入进行依赖注入的类。
public class SimpleMovieLister {

    // the SimpleMovieLister has a dependency on a MovieFinder
    private MovieFinder movieFinder;

    // a constructor so that the Spring container can inject a MovieFinder
    public SimpleMovieLister(MovieFinder movieFinder) {
        this.movieFinder = movieFinder;
    }

    // business logic that actually uses the injected MovieFinder is omitted...
}
Constructor argument resolution matching occurs by using the argument’s type. If no potential ambiguity exists in the constructor arguments of a bean definition, the order in which the constructor arguments are defined in a bean definition is the order in which those arguments are supplied to the appropriate constructor when the bean is being instantiated. Consider the following class:
构造函数参数解析匹配使用参数s类型。如果bean定义的构造函数参数中不存在潜在的歧义,那么构造函数参数在bean定义中定义的顺序就是实例化bean时将这些参数提供给适当的构造函数的顺序。考虑以下类
package x.y;

public class ThingOne {

    public ThingOne(ThingTwo thingTwo, ThingThree thingThree) {
        // ...
    }
}
Assuming that ThingTwo and ThingThree classes are not related by inheritance, no potential ambiguity exists. Thus, the following configuration works fine, and you do not need to specify the constructor argument indexes or types explicitly in the element.
假设ThingTwo和ThingThree类没有通过继承关联,则不存在潜在的歧义。 因此,以下配置可以正常工作,并且您无需在元素中显式指定构造函数参数索引或类型。
<beans>
    <bean id="beanOne" class="x.y.ThingOne">
        <constructor-arg ref="beanTwo"/>
        <constructor-arg ref="beanThree"/>
    </bean>

    <bean id="beanTwo" class="x.y.ThingTwo"/>

    <bean id="beanThree" class="x.y.ThingThree"/>
</beans>
2.3.2 基于设置依赖项注入 *
Setter-based DI is accomplished by the container calling setter methods on your beans after invoking a no-argument constructor or a no-argument static factory method to instantiate your bean.
The following example shows a class that can only be dependency-injected by using pure setter injection. This class is conventional Java. It is a POJO that has no dependencies on container specific interfaces, base classes, or annotations.
基于setter的DI是由容器在调用无参数构造函数或无参数静态工厂方法来实例化bean之后调用bean上的setter方法来完成的。下面的示例显示了一个只能通过使用纯setter注入进行依赖注入的类。这个类是传统的Java。它是一个POJO,不依赖于容器特定的接口、基类或注释。
2.3.2.1 常量注入
Student类
public class Student {
   private String stuName;

   public void setStuName(String stuName) {
       this.stuName = stuName;
   }

   public void speak(){
       System.out.println("学生姓名:"+stuName);
   }
}
beans.xml
<!--set设置注入-->
<bean id="student" class="edu.mju.bean.Student">
    <!--常量注入-->
    <property name="stuName" value="蜡笔小新"/>
</bean>
test测试类
@Test
public void StudentSpeak(){
    ApplicationContext applicationContext =new  ClassPathXmlApplicationContext("beans.xml");
    Student student = (Student) applicationContext.getBean("student");
    student.speak();
}
运行结果
学生姓名:蜡笔小新
2.3.2.2 bean注入
Student类
public class Student {
   private String stuName;
   private StudentInfo studentInfo;
   public void setStuName(String stuName) {
       this.stuName = stuName;
   }

   public void setStudentInfo(StudentInfo studentInfo) {
       this.studentInfo = studentInfo;
   }

   public void speak(){
       System.out.println("学生姓名:"+stuName);
       System.out.println("地址信息:"+studentInfo.getAddress());
   }
}
StudentInfo类
public class StudentInfo {
    private String address;

    public void setAddress(String address) {
        this.address = address;
    }

    public String getAddress() {
        return address;
    }
}
beans.xml
<!--set设置注入-->
<bean id="student" class="edu.mju.bean.Student">
    <!--常量注入-->
    <property name="stuName" value="蜡笔小新"/>
    <!--bean注入-->
    <property name="studentInfo" ref="studentInfo"/>
</bean>
<bean id="studentInfo" class="edu.mju.bean.StudentInfo">
    <property name="address" value="福建漳州"/>
</bean>
test测试类
@Test
public void StudentSpeak(){
    ApplicationContext applicationContext =new  ClassPathXmlApplicationContext("beans.xml");
    Student student = (Student) applicationContext.getBean("student");
    student.speak();
}
运行结果
学生姓名:蜡笔小新
地址信息:福建漳州
2.3.2.3 数组注入
Student类
public class Student {
   private String stuName;
   private StudentInfo studentInfo;
   private String[] stuCourse;
   public void setStuName(String stuName) {
       this.stuName = stuName;
   }

   public void setStudentInfo(StudentInfo studentInfo) {
       this.studentInfo = studentInfo;
   }

   public void setStuCourse(String[] stuCourse) {
       this.stuCourse = stuCourse;
   }

   public void speak(){
       System.out.println("学生姓名:"+stuName);
       System.out.println("地址信息:"+studentInfo.getAddress());
       //这里为了便于查看stuCourse对象,使用了阿里巴巴的fastjson解析对象成字符串
       System.out.println("所学课程:"+ JSON.toJSONString(stuCourse));
   }
}
StudentInfo类
同上
beans.xml
<!--set设置注入-->
<bean id="student" class="edu.mju.bean.Student">
    <!--常量注入-->
    <property name="stuName" value="蜡笔小新"/>
    <!--bean注入-->
    <property name="studentInfo" ref="studentInfo"/>
    <!--数组注入-->
    <property name="stuCourse">
        <array>
            <value>计算机组成原理</value>
            <value>Java企业级开发</value>
            <value>概率与数理统计</value>
            <value>OracleSQL入门与实战</value>
        </array>
    </property>
</bean>
<bean id="studentInfo" class="edu.mju.bean.StudentInfo">
    <property name="address" value="福建漳州"/>
</bean>
test测试类
同上
运行结果
学生姓名:蜡笔小新
地址信息:福建漳州
所学课程:["计算机组成原理","Java企业级开发","概率与数理统计","OracleSQL入门与实战"]
2.3.2.4 List集合注入
Student类
public class Student {
   private String stuName;
   private StudentInfo studentInfo;
   private String[] stuCourse;
   private List<String> books;
   public void setStuName(String stuName) {
       this.stuName = stuName;
   }

   public void setStudentInfo(StudentInfo studentInfo) {
       this.studentInfo = studentInfo;
   }

   public void setStuCourse(String[] stuCourse) {
       this.stuCourse = stuCourse;
   }

   public void setBooks(List<String> books) {
       this.books = books;
   }

   public void speak(){
       System.out.println("学生姓名:"+stuName);
       System.out.println("地址信息:"+studentInfo.getAddress());
       System.out.println("所学课程:"+ JSON.toJSONString(stuCourse));
       System.out.println("看过的书:"+ JSON.toJSONString(books));
   }
}
StudentInfo类
同上
beans.xml
<!--set设置注入-->
<bean id="student" class="edu.mju.bean.Student">
    <!--常量注入-->
    <property name="stuName" value="蜡笔小新"/>
    <!--bean注入-->
    <property name="studentInfo" ref="studentInfo"/>
    <!--数组注入-->
    <property name="stuCourse">
        <array>
            <value>计算机组成原理</value>
            <value>Java企业级开发</value>
            <value>概率与数理统计</value>
            <value>OracleSQL入门与实战</value>
        </array>
    </property>
    <!--list注入-->
    <property name="books">
        <list>
            <value>计算机信息安全技术</value>
            <value>JavaScript从入门到精通</value>
            <value>Java基础</value>
        </list>
    </property>
</bean>
<bean id="studentInfo" class="edu.mju.bean.StudentInfo">
    <property name="address" value="福建漳州"/>
</bean>
test测试类
同上
运行结果
学生姓名:蜡笔小新
地址信息:福建漳州
所学课程:["计算机组成原理","Java企业级开发","概率与数理统计","OracleSQL入门与实战"]
看过的书:["计算机信息安全技术","JavaScript从入门到精通","Java基础"]
2.3.2.5 Map注入
Student类
public class Student {
   private String stuName;
   private StudentInfo studentInfo;
   private String[] stuCourse;
   private List<String> books;
   private Map<String,String> dream;
   public void setStuName(String stuName) {
       this.stuName = stuName;
   }

   public void setStudentInfo(StudentInfo studentInfo) {
       this.studentInfo = studentInfo;
   }

   public void setStuCourse(String[] stuCourse) {
       this.stuCourse = stuCourse;
   }

   public void setBooks(List<String> books) {
       this.books = books;
   }

   public void setDream(Map<String, String> dream) {
       this.dream = dream;
   }

   public void speak(){
       System.out.println("学生姓名:"+stuName);
       System.out.println("地址信息:"+studentInfo.getAddress());
       System.out.println("所学课程:"+ JSON.toJSONString(stuCourse));
       System.out.println("看过的书:"+ JSON.toJSONString(books));
       System.out.println("个人理想:"+ JSON.toJSONString(dream));
   }
}
StudentInfo类
同上
beans.xml
<!--set设置注入-->
<bean id="student" class="edu.mju.bean.Student">
    <!--常量注入-->
    <property name="stuName" value="蜡笔小新"/>
    <!--bean注入-->
    <property name="studentInfo" ref="studentInfo"/>
    <!--数组注入-->
    <property name="stuCourse">
        <array>
            <value>计算机组成原理</value>
            <value>Java企业级开发</value>
            <value>概率与数理统计</value>
            <value>OracleSQL入门与实战</value>
        </array>
    </property>
    <!--list注入-->
    <property name="books">
        <list>
            <value>计算机信息安全技术</value>
            <value>JavaScript从入门到精通</value>
            <value>Java基础</value>
        </list>
    </property>
    <!--map注入-->
    <property name="dream">
        <map>
            <entry key="小学的理想" value="考上清华北大"/>
            <entry>
                <key><value>中学的理想</value></key>
                <value>考上厦大</value>
            </entry>
            <entry key="大学的理想" value="考上闽江"/>
        </map>
    </property>
</bean>
<bean id="studentInfo" class="edu.mju.bean.StudentInfo">
    <property name="address" value="福建漳州"/>
</bean>
test测试类
同上
运行结果
学生姓名:蜡笔小新
地址信息:福建漳州
所学课程:["计算机组成原理","Java企业级开发","概率与数理统计","OracleSQL入门与实战"]
看过的书:["计算机信息安全技术","JavaScript从入门到精通","Java基础"]
个人理想:{"小学的理想":"考上清华北大","中学的理想":"考上厦大","大学的理想":"考上闽江"}
2.3.2.6 Set注入
Student类
public class Student {
   private String stuName;
   private StudentInfo studentInfo;
   private String[] stuCourse;
   private List<String> books;
   private Map<String,String> dream;
   private Set<String> hobbies;
   public void setStuName(String stuName) {
       this.stuName = stuName;
   }

   public void setStudentInfo(StudentInfo studentInfo) {
       this.studentInfo = studentInfo;
   }

   public void setStuCourse(String[] stuCourse) {
       this.stuCourse = stuCourse;
   }

   public void setBooks(List<String> books) {
       this.books = books;
   }

   public void setDream(Map<String, String> dream) {
       this.dream = dream;
   }

   public void setHobbies(Set<String> hobbies) {
       this.hobbies = hobbies;
   }

   public void speak(){
       System.out.println("学生姓名:"+stuName);
       System.out.println("地址信息:"+studentInfo.getAddress());
       System.out.println("所学课程:"+ JSON.toJSONString(stuCourse));
       System.out.println("看过的书:"+ JSON.toJSONString(books));
       System.out.println("个人理想:"+ JSON.toJSONString(dream));
       System.out.println("个人爱好:"+ JSON.toJSONString(hobbies));
   }
}
StudentInfo类
同上
beans.xml
<!--set设置注入-->
<bean id="student" class="edu.mju.bean.Student">
    <!--常量注入-->
    <property name="stuName" value="蜡笔小新"/>
    <!--bean注入-->
    <property name="studentInfo" ref="studentInfo"/>
    <!--数组注入-->
    <property name="stuCourse">
        <array>
            <value>计算机组成原理</value>
            <value>Java企业级开发</value>
            <value>概率与数理统计</value>
            <value>OracleSQL入门与实战</value>
        </array>
    </property>
    <!--list注入-->
    <property name="books">
        <list>
            <value>计算机信息安全技术</value>
            <value>JavaScript从入门到精通</value>
            <value>Java基础</value>
        </list>
    </property>
    <!--map注入-->
    <property name="dream">
        <map>
            <entry key="小学的理想" value="考上清华北大"/>
            <entry>
                <key><value>中学的理想</value></key>
                <value>考上厦大</value>
            </entry>
            <entry key="大学的理想" value="考上闽江"/>
        </map>
    </property>
    <!--set注入-->
    <property name="hobbies">
        <set>
            <value>打篮球</value>
            <value>打羽毛球</value>
            <value>敲代码</value>
        </set>
    </property>
</bean>
<bean id="studentInfo" class="edu.mju.bean.StudentInfo">
    <property name="address" value="福建漳州"/>
</bean>
test测试类
同上
运行结果
学生姓名:蜡笔小新
地址信息:福建漳州
所学课程:["计算机组成原理","Java企业级开发","概率与数理统计","OracleSQL入门与实战"]
看过的书:["计算机信息安全技术","JavaScript从入门到精通","Java基础"]
个人理想:{"小学的理想":"考上清华北大","中学的理想":"考上厦大","大学的理想":"考上闽江"}
个人爱好:["打篮球","打羽毛球","敲代码"]
2.3.2.7 null空注入
Student类
public class Student {
   private String stuName;
   private StudentInfo studentInfo;
   private String[] stuCourse;
   private List<String> books;
   private Map<String,String> dream;
   private Set<String> hobbies;
   private String girlFriend;
   public void setStuName(String stuName) {
       this.stuName = stuName;
   }

   public void setStudentInfo(StudentInfo studentInfo) {
       this.studentInfo = studentInfo;
   }

   public void setStuCourse(String[] stuCourse) {
       this.stuCourse = stuCourse;
   }

   public void setBooks(List<String> books) {
       this.books = books;
   }

   public void setDream(Map<String, String> dream) {
       this.dream = dream;
   }

   public void setHobbies(Set<String> hobbies) {
       this.hobbies = hobbies;
   }


   public void setGirlFriend(String girlFriend) {
       this.girlFriend = girlFriend;
   }

   public void speak(){
       System.out.println("学生姓名:"+stuName);
       System.out.println("地址信息:"+studentInfo.getAddress());
       System.out.println("所学课程:"+ JSON.toJSONString(stuCourse));
       System.out.println("看过的书:"+ JSON.toJSONString(books));
       System.out.println("个人理想:"+ JSON.toJSONString(dream));
       System.out.println("个人爱好:"+ JSON.toJSONString(hobbies));
       System.out.println("女性朋友:"+ girlFriend);
   }
}
StudentInfo类
同上
beans.xml
<!--set设置注入-->
<bean id="student" class="edu.mju.bean.Student">
    <!--常量注入-->
    <property name="stuName" value="蜡笔小新"/>
    <!--bean注入-->
    <property name="studentInfo" ref="studentInfo"/>
    <!--数组注入-->
    <property name="stuCourse">
        <array>
            <value>计算机组成原理</value>
            <value>Java企业级开发</value>
            <value>概率与数理统计</value>
            <value>OracleSQL入门与实战</value>
        </array>
    </property>
    <!--list注入-->
    <property name="books">
        <list>
            <value>计算机信息安全技术</value>
            <value>JavaScript从入门到精通</value>
            <value>Java基础</value>
        </list>
    </property>
    <!--map注入-->
    <property name="dream">
        <map>
            <entry key="小学的理想" value="考上清华北大"/>
            <entry>
                <key><value>中学的理想</value></key>
                <value>考上厦大</value>
            </entry>
            <entry key="大学的理想" value="考上闽江"/>
        </map>
    </property>
    <!--set注入-->
    <property name="hobbies">
        <set>
            <value>打篮球</value>
            <value>打羽毛球</value>
            <value>敲代码</value>
        </set>
    </property>
    <!--空注入-->
    <property name="girlFriend">
        <null/>
    </property>
</bean>
<bean id="studentInfo" class="edu.mju.bean.StudentInfo">
    <property name="address" value="福建漳州"/>
</bean>
test测试类
同上
运行结果
学生姓名:蜡笔小新
地址信息:福建漳州
所学课程:["计算机组成原理","Java企业级开发","概率与数理统计","OracleSQL入门与实战"]
看过的书:["计算机信息安全技术","JavaScript从入门到精通","Java基础"]
个人理想:{"小学的理想":"考上清华北大","中学的理想":"考上厦大","大学的理想":"考上闽江"}
个人爱好:["打篮球","打羽毛球","敲代码"]
女性朋友:null
2.3.2.8 Properties注入
Student类
public class Student {
   private String stuName;
   private StudentInfo studentInfo;
   private String[] stuCourse;
   private List<String> books;
   private Map<String,String> dream;
   private Set<String> hobbies;
   private String girlFriend;
   private Properties family;
   public void setStuName(String stuName) {
       this.stuName = stuName;
   }

   public void setStudentInfo(StudentInfo studentInfo) {
       this.studentInfo = studentInfo;
   }

   public void setStuCourse(String[] stuCourse) {
       this.stuCourse = stuCourse;
   }

   public void setBooks(List<String> books) {
       this.books = books;
   }

   public void setDream(Map<String, String> dream) {
       this.dream = dream;
   }

   public void setHobbies(Set<String> hobbies) {
       this.hobbies = hobbies;
   }


   public void setGirlFriend(String girlFriend) {
       this.girlFriend = girlFriend;
   }

   public void setFamily(Properties family) {
       this.family = family;
   }

   public void speak(){
       System.out.println("学生姓名:"+stuName);
       System.out.println("地址信息:"+studentInfo.getAddress());
       System.out.println("所学课程:"+ JSON.toJSONString(stuCourse));
       System.out.println("看过的书:"+ JSON.toJSONString(books));
       System.out.println("个人理想:"+ JSON.toJSONString(dream));
       System.out.println("个人爱好:"+ JSON.toJSONString(hobbies));
       System.out.println("女性朋友:"+ girlFriend);
       System.out.println("家庭情况:"+ family);
   }
}
StudentInfo类
同上
beans.xml
<!--set设置注入-->
<bean id="student" class="edu.mju.bean.Student">
    <!--常量注入-->
    <property name="stuName" value="蜡笔小新"/>
    <!--bean注入-->
    <property name="studentInfo" ref="studentInfo"/>
    <!--数组注入-->
    <property name="stuCourse">
        <array>
            <value>计算机组成原理</value>
            <value>Java企业级开发</value>
            <value>概率与数理统计</value>
            <value>OracleSQL入门与实战</value>
        </array>
    </property>
    <!--list注入-->
    <property name="books">
        <list>
            <value>计算机信息安全技术</value>
            <value>JavaScript从入门到精通</value>
            <value>Java基础</value>
        </list>
    </property>
    <!--map注入-->
    <property name="dream">
        <map>
            <entry key="小学的理想" value="考上清华北大"/>
            <entry>
                <key><value>中学的理想</value></key>
                <value>考上厦大</value>
            </entry>
            <entry key="大学的理想" value="考上闽江"/>
        </map>
    </property>
    <!--set注入-->
    <property name="hobbies">
        <set>
            <value>打篮球</value>
            <value>打羽毛球</value>
            <value>敲代码</value>
        </set>
    </property>
    <!--空注入-->
    <property name="girlFriend">
        <null/>
    </property>
    <!--Properties注入-->
    <property name="family">
        <props>
            <prop key="父亲">小新</prop>
            <prop key="母亲">蜡笔</prop>
        </props>
    </property>
</bean>
<bean id="studentInfo" class="edu.mju.bean.StudentInfo">
    <property name="address" value="福建漳州"/>
</bean>
test测试类
同上
运行结果
学生姓名:蜡笔小新
地址信息:福建漳州
所学课程:["计算机组成原理","Java企业级开发","概率与数理统计","OracleSQL入门与实战"]
看过的书:["计算机信息安全技术","JavaScript从入门到精通","Java基础"]
个人理想:{"小学的理想":"考上清华北大","中学的理想":"考上厦大","大学的理想":"考上闽江"}
个人爱好:["打篮球","打羽毛球","敲代码"]
女性朋友:null
家庭情况:{母亲=蜡笔, 父亲=小新}
2.3.2.9 P命名空间注入
官方文档
XML Shortcut with the p-namespace
The p-namespace lets you use the bean element’s attributes (instead of nested elements) to describe your property values collaborating beans, or both.Spring supports extensible configuration formats with namespaces, which are based on an XML Schema definition. The beans configuration format discussed in this chapter is defined in an XML Schema document. However, the p-namespace is not defined in an XSD file and exists only in the core of Spring.
The following example shows two XML snippets (the first uses standard XML format and the second uses the p-namespace) that resolve to the same result:
<beans xmlns="http://www.springframework.org/schema/beans"
    xmlns:xsi="http://www.w3.org/2001/XMLSchema-instance"
    xmlns:p="http://www.springframework.org/schema/p"
    xsi:schemaLocation="http://www.springframework.org/schema/beans
        https://www.springframework.org/schema/beans/spring-beans.xsd">

    <bean name="classic" class="com.example.ExampleBean">
        <property name="email" value="someone@somewhere.com"/>
    </bean>

    <bean name="p-namespace" class="com.example.ExampleBean"
        p:email="someone@somewhere.com"/>
</beans>
例子如下:
User类
public class User {
    private String userName;
    private String passWord;

    public void setUserName(String userName) {
        this.userName = userName;
    }

    public void setPassWord(String passWord) {
        this.passWord = passWord;
    }

    @Override
    public String toString() {
        return "User{" +
                "userName='" + userName + '\'' +
                ", passWord='" + passWord + '\'' +
                '}';
    }
}
beans.xml
这里的bean配置文件需要引入以下代码:
xmlns:p=“http://www.springframework.org/schema/p”
<!--P命名空间注入-->
<bean id="user" class="edu.mju.bean.User"  p:userName="p_userName" p:passWord="p_passWord"/>
测试类
public class TestUser {
    @Test
    public void TestUser(){
        ApplicationContext applicationContext = new ClassPathXmlApplicationContext("beans.xml");
        User user = (User) applicationContext.getBean("user");
        System.out.println(user.toString());
    }
}
运行结果
User{userName='p_userName', passWord='p_passWord'}
2.3.2.10 c命名空间注入
官方文档
XML Shortcut with the c-namespace
Similar to the XML Shortcut with the p-namespace, the c-namespace, introduced in Spring 3.1, allows inlined attributes for configuring the constructor arguments rather then nested constructor-arg elements.
The following example uses the c: namespace to do the same thing as the from Constructor-based Dependency Injection:
<beans xmlns="http://www.springframework.org/schema/beans"
    xmlns:xsi="http://www.w3.org/2001/XMLSchema-instance"
    xmlns:c="http://www.springframework.org/schema/c"
    xsi:schemaLocation="http://www.springframework.org/schema/beans
        https://www.springframework.org/schema/beans/spring-beans.xsd">

    <bean id="beanTwo" class="x.y.ThingTwo"/>
    <bean id="beanThree" class="x.y.ThingThree"/>

    <!-- traditional declaration with optional argument names -->
    <bean id="beanOne" class="x.y.ThingOne">
        <constructor-arg name="thingTwo" ref="beanTwo"/>
        <constructor-arg name="thingThree" ref="beanThree"/>
        <constructor-arg name="email" value="something@somewhere.com"/>
    </bean>

    <!-- c-namespace declaration with argument names -->
    <bean id="beanOne" class="x.y.ThingOne" c:thingTwo-ref="beanTwo"
        c:thingThree-ref="beanThree" c:email="something@somewhere.com"/>

</beans>
例子如下:
User2类
这里的User2()必须要有构造方法
public class User2 {
    private String userName;
    private String passWord;

    public void setUserName(String userName) {
        this.userName = userName;
    }

    public void setPassWord(String passWord) {
        this.passWord = passWord;
    }

    public User2(String userName, String passWord) {
        this.userName = userName;
        this.passWord = passWord;
    }

    @Override
    public String toString() {
        return "User{" +
                "userName='" + userName + '\'' +
                ", passWord='" + passWord + '\'' +
                '}';
    }
}
beans.xml
这里的bean配置文件需要引入以下代码:
xmlns:c=“http://www.springframework.org/schema/c”
<!--C命名空间注入-->
<bean id="user2" class="edu.mju.bean.User2" c:userName="c_userName" c:passWord="c_passWord"/>
测试类
public class TestUser2 {
    @Test
    public void TestUser(){
        ApplicationContext applicationContext = new ClassPathXmlApplicationContext("beans.xml");
        User2 user = (User2) applicationContext.getBean("user2");
        System.out.println(user.toString());
    }
}
运行结果
User{userName='c_userName', passWord='c_passWord'}
2.4 自动装配(不建议)
Autowiring Collaborators
The Spring container can autowire relationships between collaborating beans. You can let Spring resolve collaborators (other beans) automatically for your bean by inspecting the contents of the ApplicationContext. Autowiring has the following advantages:
Autowiring can significantly reduce the need to specify properties or constructor arguments. (Other mechanisms such as a bean template discussed elsewhere in this chapter are also valuable in this regard.)
Autowiring can update a configuration as your objects evolve. For example, if you need to add a dependency to a class, that dependency can be satisfied automatically without you needing to modify the configuration. Thus autowiring can be especially useful during development, without negating the option of switching to explicit wiring when the code base becomes more stable.
When using XML-based configuration metadata (see Dependency Injection), you can specify the autowire mode for a bean definition with the autowire attribute of the element. The autowiring functionality has four modes. You specify autowiring per bean and can thus choose which ones to autowire. The following table describes the four autowiring modes:
| Mode | Explanation |
|---|---|
| no | (默认)无自动装配。 |
| byName | 按属性名称自动布线。Spring寻找与需要自动装配的属性同名的bean。(根据set名) |
| byType | 如果容器中恰好存在一个该属性类型的bean,则使该属性自动连接。如果存在多个错误,则将引发致命异常,这表明您不能byType对该bean 使用自动装配。如果没有匹配的bean,则什么都不会发生(未设置该属性)。 |
| constructor | 类似于byType但适用于构造函数参数。如果容器中不存在构造函数参数类型的一个bean,则将引发致命错误。 |
2.5 配置文件详解
2.5.1 Bean作用域
| Scope | 描述信息 |
|---|---|
| singleton | (默认)单例模式,只有一个对象实例 |
| prototype | 每次获取都产生一个新对象。 |
| request | 每次请求时创建一个新的对象。 |
| session | 与HTTPsession作用域一致。 |
| application | 作用域位于ServletContext级别,并存储为常规ServletContext属性。 |
| websocket | 每个WebSocket会话都有一个属性映射。 该映射作为标头附加到入站客户端消息,可以通过控制器方法进行访问。 |
<bean id="">:id属性是Bean的标识符,且唯一(当id没有配置,name为默认标识符;当id与name同时配置,则name为别名)。alias:设置别名,或者可通过<bean name="">设置多个别名(分隔符:,;)。class:类名+包名。import:导入自定义配置文件。
2.6 代理模式
即Proxy Pattern,23种java常用设计模式之一。代理模式的定义:对其他对象提供一种代理以控制对这个对象的访问。
原理:
代理模式的主要作用是为其他对象提供一种代理以控制对这个对象的访问。在某些情况下,一个对象不想或者不能直接引用另一个对象,而代理对象可以在客户端和目标对象之间起到中介的作用。
代理模式的思想是为了提供额外的处理或者不同的操作而在实际对象与调用者之间插入一个代理对象。这些额外的操作通常需要与实际对象进行通信。
2.6.1 静态代理
这里通过一个例子了解 静态代理 模式。
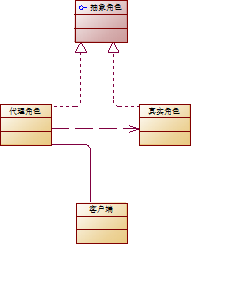
2.6.1.1 角色分析
- 抽象角色:接口或抽象类实现。(案例中,为
Rent()接口)。 - 真实角色:是被代理的角色。(案例中,为
Landlord()房东)。 - 代理角色:代理真实角色。(案例中,为
Intermediary()中介)。 - 客 户:通过代理角色,完成操作。(案例中,为
Client()客户)。
2.6.1.2 类图如下
2.6.1.3 实现代码
- 抽象角色
Rent.java
public interface Rent {
     void rent();
}
- 真实角色
Landlord.java
public class Landlord implements Rent {

    @Override
    public void rent() {
        System.out.println("房东:出租房屋。");
    }
}
- 代理角色
Intermediary.java
public class Intermediary implements Rent{
    private Landlord landlord;

    public Intermediary() {
    }

    public void setLandlord(Landlord landlord) {
        this.landlord = landlord;
    }

    /**
     * 租房
     */
    @Override
    public void rent() {
        System.out.print("中介:");
        lookHouse();
        landlord.rent();
        charge();
    }

    /**
     * 看房
     */
    private void lookHouse(){
        System.out.println("带客户看房");
    }

    /**
     * 收中介费
     */
    private void charge(){
        System.out.println("收取中介费");
    }
}
- 客户
Client.java
public class Client {
    public static void main(String[] args) {
        Landlord landlord = new Landlord();
        Intermediary intermediary =  new Intermediary();
        intermediary.setLandlord(landlord);
        intermediary.rent();
    }
}
- 运行结果
中介:带客户看房
房东:出租房屋。
收取中介费
2.6.1.4 静态代理的好处
- 真实角色处理的业务更加纯粹,不参杂公共事务。
- 公共的业务由代理完成,业务分工明确。
- 公共业务发生改变时,只需修改公共业务部分,不需要修改真实角色代码,使代码处理的更集中、方便。
2.6.1.5 静态代理的缺点
- 多了代理类,代码量变大。
2.6.2 动态代理
这里的动态代理沿用上面的案例。
2.6.2.1 角色分析
与上面的案例一致的。
2.6.2.2 详解
动态代理的代理类是 动态 生成。
- 基于接口动态代理–jdk动态代理
2.6.2.2.1 InvocationHandler接口
InvocationHandler接口
public interface InvocationHandlerInvocationHandler 是由代理实例的调用处理程序实现的接口 。
每个代理实例都有一个关联的调用处理程序。 当在代理实例上调用方法时,方法调用将被编码并分派到其调用处理程序的invoke方法。
| Modifier and Type | Method and Description |
|---|---|
| Object | invoke(Object proxy, 方法 method, Object[] args) 处理代理实例上的方法调用并返回结果。 |
方法详解
Object invoke(Object proxy,
              Method method,
              Object[] args)
              throws Throwable
处理代理实例上的方法调用并返回结果。 当在与之关联的代理实例上调用方法时,将在调用处理程序中调用此方法。
参数
proxy - 调用该方法的代理实例
method -所述方法对应于调用代理实例上的接口方法的实例。 方法对象的声明类将是该方法声明的接口,它可以是代理类继承该方法的代理接口的超级接口。
args -包含的方法调用传递代理实例的参数值的对象的阵列,或null如果接口方法没有参数。 原始类型的参数包含在适当的原始包装器类的实例中,例如java.lang.Integer或java.lang.Boolean 。
结果
从代理实例上的方法调用返回的值。 如果接口方法的声明返回类型是原始类型,则此方法返回的值必须是对应的基本包装类的实例; 否则,它必须是可声明返回类型的类型。 如果此方法返回的值是null和接口方法的返回类型是基本类型,那么NullPointerException将由代理实例的方法调用抛出。 如上所述,如果此方法返回的值,否则不会与接口方法的声明的返回类型兼容,一个ClassCastException将代理实例的方法调用将抛出。
异常
Throwable - 从代理实例上的方法调用抛出的异常。 异常类型必须可以分配给接口方法的throws子句中声明的任何异常类型java.lang.RuntimeException检查的异常类型java.lang.RuntimeException或java.lang.Error 。 如果检查的异常是由这种方法是不分配给任何的中声明的异常类型throws接口方法的子句,则一个UndeclaredThrowableException包含有由该方法抛出的异常将通过在方法调用抛出代理实例。
2.6.2.2.2 Proxy类
public class Proxy
extends Object
implements SerializableProxy
提供了创建动态代理类和实例的静态方法,它也是由这些方法创建的所有动态代理类的超类。
为某个接口创建代理Foo :
  InvocationHandler handler = new MyInvocationHandler(...);
     Class<?> proxyClass = Proxy.getProxyClass(Foo.class.getClassLoader(), Foo.class);
     Foo f = (Foo) proxyClass.getConstructor(InvocationHandler.class).
                     newInstance(handler);
或更简单地:
  Foo f = (Foo) Proxy.newProxyInstance(Foo.class.getClassLoader(),
                                          new Class<?>[] { Foo.class },
                                          handler);
主要方法
| Modifier and Type | Method and Description |
|---|---|
| static Object | newProxyInstance(ClassLoader loader, Class<?>[] interfaces, InvocationHandler h) 返回指定接口的代理类的实例,该接口将方法调用分派给指定的调用处理程序。 |
public static Object newProxyInstance(ClassLoader loader,
                                      Class<?>[] interfaces,
                                      InvocationHandler h)
                               throws IllegalArgumentException
返回指定接口的代理类的实例,该接口将方法调用分派给指定的调用处理程序
参数
loader - 类加载器来定义代理类
interfaces - 代理类实现的接口列表
h - 调度方法调用的调用处理函数
结果
具有由指定的类加载器定义并实现指定接口的代理类的指定调用处理程序的代理实例
异常
IllegalArgumentException - 如果对可能传递给 getProxyClass有任何 getProxyClass被违反
2.6.2.2.3 实现
Landord()类Rent()类与静态代理的一致UserService.java
public interface UserService {
    void add();
    void delete();
    void update();
    void select();
}
UserServiceImpl.java
public class UserServiceImpl implements UserService{
    @Override
    public void add() {
        System.out.println("增加");
    }

    @Override
    public void delete() {
        System.out.println("删除");
    }

    @Override
    public void update() {
        System.out.println("修改");
    }

    @Override
    public void select() {
        System.out.println("查询");
    }
}
ProxyInvocationHandler.java
public class ProxyInvocationHandler implements InvocationHandler {
    //真实对象
    private Object realObject;

    public void setRealObject(Object realObject) {
        this.realObject = realObject;
    }

    /**
     * 看房
     */
    private void lookHouse(){
        System.out.println("带客户看房");
    }

    /**
     * 收中介费
     */
    private void charge(){
        System.out.println("收取中介费");
    }

    /**
     *  生成代理类
     * @return 代理类
     */
    public Object getProxy(){
        return Proxy.newProxyInstance(this.getClass().getClassLoader(),
                realObject.getClass().getInterfaces(),
                this);
    }
    /**
     *
     * @param proxy 生成的代理类
     * @param method 代理类接口方法对象
     * @param args 包含的方法调用传递代理实例的参数值的对象的阵列
     * @return
     * @throws Throwable
     */
    @Override
    public Object invoke(Object proxy, Method method, Object[] args) throws Throwable {
        lookHouse();
        Object result = method.invoke(realObject,args);
        charge();
        return result;
    }
}
Client.java
public class Client {
    public static void main(String[] args) {
        ProxyInvocationHandler proxyInvocationHandler = new ProxyInvocationHandler();

        Rent rent = new Landlord();
        proxyInvocationHandler.setRealObject(rent);
        Rent proxy = (Rent) proxyInvocationHandler.getProxy();
        proxy.rent();

        System.out.println("--------------------------------------");

        UserService userService = new UserServiceImpl();
        proxyInvocationHandler.setRealObject(userService);
        UserService proxyUser = (UserService)proxyInvocationHandler.getProxy();
        proxyUser.add();
    }
}
- 运行结果
带客户看房
房东:出租房屋。
收取中介费
--------------------------------------
带客户看房
增加
收取中介费
- 基于类的动态代理–cglib
- 现在由
javasist生成动态代理
2.7 Spring核心-AOP
AOP:Aspect Oriented Programming 面向切面编程
Spring框架中AOP的应用:
- 提供声明式企业服务。此类服务中最重要的是 声明式事务管理。
- 让用户实现自定义切面,并通过AOP补充其对OOP的使用。
2.7.1 AOP概念
- Aspect(切面):涉及多个类别的关注点的模块化。在Spring AOP中,切面是通过使用常规类(基于模式的方法)或使用
@Aspect注释(@AspectJ样式)注释的常规类来实现的。 - Join point(连接点):程序执行过程中的一点,例如方法的执行或异常的处理。 在Spring AOP中,连接点始终代表方法的执行。
- Advice(通知):切面在特定的连接点处采取的操作。包括Spring在内的许多AOP框架都将通知建模为拦截器,并在连接点周围维护一系列拦截器。
- Pointcut(切入点):匹配连接点的谓词。通知与切入点表达式相关联,并在切入点匹配的任何连接点上运行(例如,具有特定名称的方法的执行)。由切入点表达式匹配的连接点的概念是AOP的核心:Spring在默认情况下使用AspectJ切入点表达式语言。
- Introduction(引入):代表类型声明其他方法或字段。Spring AOP允许向任何被通知的对象引入新的接口(以及相应的实现)。例如,您可以使用一个介绍使一个bean实现一个IsModified接口,以简化缓存。(在AspectJ社区中,介绍称为类型间声明。)
- Target object(目标对象):由一个或多个切面通知的对象。也称为被通知的对象。因为Spring AOP是通过使用运行时代理实现的,所以这个对象始终是一个代理对象。
- AOP proxy(AOP代理):由AOP框架创建的一个对象,用于实现切面契约(通知方法执行等)。 在Spring Framework中,AOP代理是JDK动态代理或CGLIB代理。
- Weaving(织入):将切面与其他应用程序类型或对象链接,以创建通知对象。这可以在编译时(例如使用AspectJ编译器)、加载时或运行时完成。与其他纯Java AOP框架一样,Spring AOP在运行时执行织入。
通知的类型如下:
- Before advice(前置通知):在连接点之前运行但无法阻止执行流程前进到连接点的通知(除非它引发异常)。
- After returning advice(后置通知):在连接点正常完成后要运行的通知(例如,如果返回一个方法而没有引发异常)。
- After throwing advice(异常通知):如果方法通过抛出异常而退出,则执行通知。
- After (finally) advice(最终通知):无论连接点退出的方式如何(正常或特殊返回),均应执行通知。
- Around advice(环绕通知):围绕连接点(如方法调用)的通知。这是最有力的通知。环绕通知可以在方法调用之前和之后执行自定义行为。它还负责选择是否继续执行连接点,还是通过返回自己的返回值或抛出异常来简化通知的方法执行。
2.7.2 Spring-AOP的实现
2.7.2.1 通过SpringAPI实现
pom.xml需要先导入AOP的依赖包
<!--AOP的依赖-->
    <!-- https://mvnrepository.com/artifact/org.aspectj/aspectjweaver -->
    <dependency>
        <groupId>org.aspectj</groupId>
        <artifactId>aspectjweaver</artifactId>
        <version>1.9.5</version>
    </dependency>

    <!-- https://mvnrepository.com/artifact/cglib/cglib -->
    <dependency>
        <groupId>cglib</groupId>
        <artifactId>cglib</artifactId>
        <version>3.3.0</version>
    </dependency>

    <!-- https://mvnrepository.com/artifact/aopalliance/aopalliance -->
    <dependency>
        <groupId>aopalliance</groupId>
        <artifactId>aopalliance</artifactId>
        <version>1.0</version>
    </dependency>
<!--AOP的依赖结束-->
- Log.java类(前置通知)
public class Log implements MethodBeforeAdvice {

    /**
     *
     * @param method:the method being invoked(被调用的方法)
     * @param objects:the arguments to the method(方法的参数)
     * @param o:the target of the method invocation. May be null.(方法调用的目标。 可能为空。)
     * @throws Throwable
     */
    @Override
    public void before(Method method, Object[] objects, Object o) throws Throwable {
        System.out.println(o.getClass().getName()+"的"+method.getName()+"方法有:"+objects.length+"参数");
    }
}
- UserService.java接口
public interface UserService {
    void add();
    void delete();
    void update();
    void select();
}
- UserServiceImpl.java实现类(目标对象)
public class UserServiceImpl implements UserService {
    @Override
    public void add() {
        System.out.println("增加");
    }

    @Override
    public void delete() {
        System.out.println("删除");
    }

    @Override
    public void update() {
        System.out.println("修改");
    }

    @Override
    public void select() {
        System.out.println("查询");
    }
}
- beans.xml配置文件
<?xml version="1.0" encoding="UTF-8"?>
<beans xmlns="http://www.springframework.org/schema/beans"
       xmlns:xsi="http://www.w3.org/2001/XMLSchema-instance"
       xmlns:p="http://www.springframework.org/schema/p"
       xmlns:c="http://www.springframework.org/schema/c"
       xmlns:aop="http://www.springframework.org/schema/aop"
       xsi:schemaLocation="http://www.springframework.org/schema/beans
       http://www.springframework.org/schema/beans/spring-beans.xsd
       http://www.springframework.org/schema/aop
       http://www.springframework.org/schema/aop/spring-aop.xsd">
    <!--AOP-->
    <bean id="userService" class="edu.mju.service.impl.UserServiceImpl"/>
    <bean id="log" class="edu.mju.log.Log"/>
    <aop:config>
        <!--execution(* edu.mju.service.impl.UserServiceImpl.*(..)) 表示所有方法,(..)表示所有 -->
        <aop:pointcut id="pointcut" expression="execution(* edu.mju.service.impl.UserServiceImpl.add())"/>
        <aop:advisor advice-ref="log" pointcut-ref="pointcut"/>
    </aop:config>
</beans>
- 测试类
public class TestAop {
    @Test
    public void TestAop(){
        ApplicationContext applicationContext = new ClassPathXmlApplicationContext("beans.xml");
        UserService userService = (UserService) applicationContext.getBean("userService");
        userService.add();
        userService.delete();
    }
}
- 运行结果
edu.mju.service.impl.UserServiceImpl的add方法有:0参数
增加
删除
2.7.2.2 自定义类实现
- 自定义通知类(CustomLog.java)
public class CustomLog {
    public void before(){
        System.out.println("方法执行前");
    }
    public void after(){
        System.out.println("方法执行后");
    }
}
- beans.xml配置
<!--AOP-->
    <bean id="userService" class="edu.mju.service.impl.UserServiceImpl"/>
    <bean id="customLog" class="edu.mju.log.CustomLog"/>
    <aop:config>
        <!--自定义类实现-->
        <aop:aspect ref="customLog">
            <aop:pointcut id="pointcut2" expression="execution(* edu.mju.service.impl.*.*(..))"/>
            <aop:before method="before" pointcut-ref="pointcut2"/>
            <aop:after method="after" pointcut-ref="pointcut2"/>
        </aop:aspect>
    </aop:config>
    <!--AOP结束-->
- 其他相关文件均与上一小节案例一致
- 运行结果
方法执行前
增加
方法执行后
方法执行前
删除
方法执行后
2.7.2.3 通过注解实现
- AnnotationLog.java
@Aspect
public class AnnotationLog {
    @Before("execution(* edu.mju.service.impl.UserServiceImpl.*(..))")
    public void before(){
        System.out.println("注解方式:方法执行前");
    }
    @After("execution(* edu.mju.service.impl.UserServiceImpl.*(..))")
    public void after(){
        System.out.println("注解方式:方法执行后");
    }
    @Around("execution(* edu.mju.service.impl.UserServiceImpl.update(..))")
    public Object around(ProceedingJoinPoint joinPoint) throws Throwable {
        System.out.println("环绕前");
        System.out.println("签名:"+joinPoint.getSignature());
        //执行目标方法
        Object object = joinPoint.proceed();
        System.out.println("环绕后");
        return object;
    }
}
@Aspect:将类声明为切面
- UserService.java
public interface UserService {
    void add();
    void delete();
    int update();
    void select();
}
- UserServiceImpl.java
public class UserServiceImpl implements UserService {
    @Override
    public void add() {
        System.out.println("增加");
    }

    @Override
    public void delete() {
        System.out.println("删除");
    }

    @Override
    public int update() {
        System.out.println("修改");
        return 1;
    }

    @Override
    public void select() {
        System.out.println("查询");
    }
}
- beans.xml配置
<?xml version="1.0" encoding="UTF-8"?>
<beans xmlns="http://www.springframework.org/schema/beans"
       xmlns:xsi="http://www.w3.org/2001/XMLSchema-instance"
       xmlns:p="http://www.springframework.org/schema/p"
       xmlns:c="http://www.springframework.org/schema/c"
       xmlns:aop="http://www.springframework.org/schema/aop"
       xsi:schemaLocation="http://www.springframework.org/schema/beans
       http://www.springframework.org/schema/beans/spring-beans.xsd
       http://www.springframework.org/schema/aop
       http://www.springframework.org/schema/aop/spring-aop.xsd">
<!--AOP-->
    <bean id="userService" class="edu.mju.service.impl.UserServiceImpl"/>
    <bean id="log" class="edu.mju.log.Log"/>
    <bean id="customLog" class="edu.mju.log.CustomLog"/>
    <bean id="annotationLog" class="edu.mju.log.AnnotationLog"/>
     <!--注解实现-->
    <aop:aspectj-autoproxy />
<!--AOP结束-->
</beans>
<aop:aspectj-autoproxy/>:开启aop注解
- 测试类
public class TestAop {
    @Test
    public void TestAop(){
        ApplicationContext applicationContext = new ClassPathXmlApplicationContext("beans.xml");
        UserService userService = (UserService) applicationContext.getBean("userService");
        userService.add();
        System.out.println("-----------------------");
        userService.delete();
        System.out.println("--------环绕签名--------");
        userService.update();
    }
}
- 运行结果
注解方式:方法执行前
增加
注解方式:方法执行后
-----------------------
注解方式:方法执行前
删除
注解方式:方法执行后
--------环绕签名--------
环绕前
签名:int edu.mju.service.UserService.update()
注解方式:方法执行前
修改
环绕后
注解方式:方法执行后
提示:环绕方式的结果——环绕是在before之前运行,在after之前结束。
喜欢的朋友,欢迎帮我点个star:docsify——gitee地址


 484
484


 被折叠的 条评论
为什么被折叠?
被折叠的 条评论
为什么被折叠?
 到【灌水乐园】发言


