


引言
考虑下面的一段没有实际用处的代码:
fun main() {
    val animalPrinter = AnimalPrinter()
    animalPrinter.printAnimal("CAT")
}

class AnimalPrinter {
    fun printAnimal(animal: String) {
        when (animal) {
            "CAT" -> printCat()
            "DOG" -> printDog()
            "PARROT" -> printParrot()
        }
    }

    private fun printCat() = println("I have a cat.")
    private fun printDog() = println("I have a dog")
    private fun printParrot() = println("I have a parrot")
}
当我们需要在 main 函数中输出其他的动物时,就需要在 AnimalPrinter#printAnimal 函数中添加新的动物以及对应的实现逻辑,同时在 AnimalPrinter 类中添加对应动物的打印函数,肯定会修改对应的源代码,但是这就违反了单一职责原则。
那么如果将这些算法或者策略抽象出来,提供一个统一的接口,不同的算法或者策略有不同的实现类,这样在程序客户端就可以通过注入不同的实现对象来实现算法或者策略的动态替换。
这种模式的可扩展性、可维护性也就更高,也就是我们所说的策略模式。
定义
策略模式定义了一系列的算法,并将每一个算法封装起来,而且使它们还可以相互替换。策略模式让算法独立于使用它的客户而独立变化。
策略模式主要用来分离算法,在相同的行为抽象下有不同的具体实现策略。
这个模式很好地演示了开闭原则,也就是定义抽象,注入不同的实现,从而达到很好的可扩展性。
使用场景
-
针对同一类型问题的多种处理方式,仅仅是具体行为有差别时。
-
需要安全地封装多种同一类型的操作时。
-
出现同一抽象类有多个子类,而又需要使用
if-else或者switch-case来选择具体子类时。
UML 类图
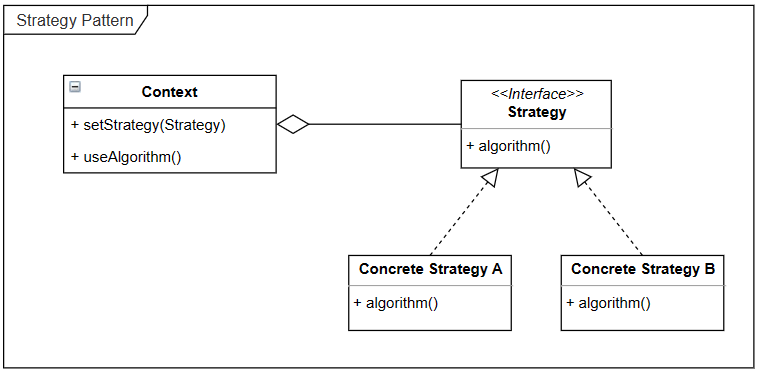
其中,上图中的类和接口的定义如下:
- Context:用来操作策略的上下文环境。
- Strategy:策略的抽象接口。
- Concrete Strategy A、Concrete Strategy B:具体的策略实现。
引言代码修改
fun main() {
    val animalPrinter = AnimalPrinter()
    // 配置策略
    animalPrinter.setAnimal(DogPrinter())
    // 调用接口中的功能
    animalPrinter.printAnimal()
}

// UML 类图中 Context 类
class AnimalPrinter {
    private lateinit var animal : IAnimalPrinter

    fun setAnimal(mIAnimalPrinter: IAnimalPrinter) {
        this.animal = mIAnimalPrinter
    }

    fun printAnimal() = animal.print()
}

// UML 类图中 Strategy 接口
interface IAnimalPrinter {
    fun print()
}

// 实现 Strategy 接口的具体实现类,即 Concrete Strategy 类
class CatPrinter : IAnimalPrinter {
    override fun print() = println("I have a cat.")
}

class DogPrinter : IAnimalPrinter {
    override fun print() = println("I have a dog.")
}

class ParrotPrinter : IAnimalPrinter {
    override fun print() = println("I have a parrot.")
}
通过策略模式,当我们需要添加新的动物的时候,通过创建一个实现了 IAnimalPrinter 接口的类并实现其中的方法,便可以直接在 main 函数中使用新动物了而不再需要修改任何已有的、相关的 AnimalPrinter 等类:
fun main() {
    val animalPrinter = AnimalPrinter()
    animalPrinter.setAnimal(RabbitPrinter())
    animalPrinter.printAnimal()
}

// 省略其他代码

class RabbitPrinter : IAnimalPrinter {
    override fun print() = println("I have a rabbit.")
}
Android 源码中的应用:属性动画
属性动画可以对任意对象的属性进行动画而不仅仅是 View。达到的效果是:在一个时间间隔内完成对象从一个属性值到另一个属性值的改变。
在属性动画的源码中,时间插值器(TimeInterpolator)就使用了策略模式。
插值器和估值器
插值器和估值器是实现非匀速动画的重要手段。
TimeInterpolator
时间插值器。作用为根据时间的流逝的百分比计算当前属性值改变的百分比。
预设的有多种插值器,常见的三种如下:
-
LinearInterpolator线性插值器:匀速动画
-
AccelerateDecelerateInterpolator加速减速插值器:动画两头慢中间快
-
DecelerateInterpolator减速插值器:动画越来越慢
三个类都实现了 Interpolator 接口,接口内部只有一个用来计算属性值的改变的百分比的 getInterpolation 方法需要实现。
更多插值器即其数值变化方式可以阅读: Android动画之Interpolator(插值器)_M-Ellen的博客-CSDN博客
TypeEvaluator
类型估值算法,也叫估值器。作用是根据属性值改变的百分比来计算改变后的属性值。
系统预置的有3种:
IntEvaluator:针对整形属性FloatEvaluator:针对浮点型属性ArgbEvaluator:针对 Color 属性
三个类都实现了 TypeEvalator 接口,接口内部只有一个用来计算改变后的属性值的 evaluate 方法需要实现。
计算顺序
系统会根据当前的帧所在时刻与动画播放的总时间求出时间的流逝的百分比,再通过插值器计算出当前属性值改变的百分比,后用此值通过估值器计算出当前的属性改变后的确定的值是多少并通过 set 方法对属性赋值。
故属性动画要求对象的该属性有 set 方法(必须有)和 get 方法(可选)。
自定义插值器和估值器
我们可以自定义插值器和估值器,来实现自己想要的动画效果。实现方式也很简单。
因为插值器和估值器都是一个接口,且内部都只有一个方法,所以我们只需要派生一个类并实现接口就可以了,然后就可以做出千奇百怪的动画效果了。即:
-
自定义插值器需要实现
Interpolator或者TimeInterpolator接口。public interface TimeInterpolator { /** * Maps a value representing the elapsed fraction of an animation to a value that represents * the interpolated fraction. This interpolated value is then multiplied by the change in * value of an animation to derive the animated value at the current elapsed animation time. * * @param input A value between 0 and 1.0 indicating our current point * in the animation where 0 represents the start and 1.0 represents * the end * @return The interpolation value. This value can be more than 1.0 for * interpolators which overshoot their targets, or less than 0 for * interpolators that undershoot their targets. */ float getInterpolation(float input); }/** * An interpolator defines the rate of change of an animation. This allows * the basic animation effects (alpha, scale, translate, rotate) to be * accelerated, decelerated, repeated, etc. */ public interface Interpolator extends TimeInterpolator { // A new interface, TimeInterpolator, was introduced for the new android.animation // package. This older Interpolator interface extends TimeInterpolator so that users of // the new Animator-based animations can use either the old Interpolator implementations or // new classes that implement TimeInterpolator directly. } -
自定义估值器需要实现
TypeEvaluator接口。
插值器使用方法
定义一个 Animation 对象后,使用 Animation#setInterpolator 方法进行插值器类型的选择:
animation.setInterpolator(new AccelerateInterpolator())
Animation#setInterpolatorInterpolator mInterpolator; // 插值器成员变量 /** * Sets the acceleration curve for this animation. Defaults to a linear * interpolation. * * @param i The interpolator which defines the acceleration curve * @attr ref android.R.styleable#Animation_interpolator */ public void setInterpolator(Interpolator i) { mInterpolator = i; }
源码分析
查看源码中何时使用了 Interpolator 对象。
通过查找 View#startAnimation -> View#draw -> View#drawAnimation -> Animation#getTransformation,可以看到插值器的使用。
Animation#getTransformation
Interpolator mInterpolator; // 插值器成员变量

/**
 * Gets the transformation to apply at a specified point in time. Implementations of this
 * method should always replace the specified Transformation or document they are doing
 * otherwise.
 *
 * @param currentTime Where we are in the animation. This is wall clock time.
 * @param outTransformation A transformation object that is provided by the
 *        caller and will be filled in by the animation.
 * @return True if the animation is still running
 */
public boolean getTransformation(long currentTime, Transformation outTransformation) {
    // ...

    float normalizedTime;
    // 1. 计算当前时间的流逝百分比
    if (duration != 0) {
        normalizedTime = ((float) (currentTime - (mStartTime + startOffset))) /
            (float) duration;
    } else {
        // time is a step-change with a zero duration
        normalizedTime = currentTime < mStartTime ? 0.0f : 1.0f;
    }
    // 动画是否已经完成
    final boolean expired = normalizedTime >= 1.0f || isCanceled();
    mMore = !expired;

    // ...
    if ((normalizedTime >= 0.0f || mFillBefore) && (normalizedTime <= 1.0f || mFillAfter)) {
        // ...
        // 2. 通过插值器获取动画执行百分比
        final float interpolatedTime = mInterpolator.getInterpolation(normalizedTime);
        // 3. 应用动画效果
        applyTransformation(interpolatedTime, outTransformation);
    }

    // 4.  如果动画执行完毕,那么出发动画完成的回调或者执行重复动画等操作
    // ...

    if (!mMore && mOneMoreTime) {
        mOneMoreTime = false;
        return true;
    }
    return mMore;
}
在上面代码的第 35 行,可以看到使用了 Interpolator 接口的 getInterpolation 方法进行了不同策略的执行。
优点
- 结构清晰明了、使用简单直观。
- 耦合度相对而言较低,扩展方便。
- 操作封装也更为彻底,数据更为安全。
缺点
- 随着策略的增加,子类也会变得繁多。
参考资料
-
《Android 源码设计模式解析与实战》
-
《Android 开发艺术探索》


 1084
1084

 被折叠的 条评论
为什么被折叠?
被折叠的 条评论
为什么被折叠?
 到【灌水乐园】发言


