


目录
环境版本说明:
Shiro----1.7.0
Idea----2020.1.4
JDK----1.8
1. 身份认证
身份认证:就是判断一个用户是否为合法用户的处理过程。最常用的简单身份认证方式是系统通过核对用户输入的用户名和口令,看其是否与系统中存储的该用户的用户名和口令一致,来判断用户身份是否正确。
1.1 shiro中认证的关键对象
在 shiro 中,用户需要提供 principals (身份)和 credentials(证明)给 shiro,从而应用能验证用户身份:
- Subject:主体
访问系统的用户,主体可以是用户、程序等,进行认证的都称为主体;
- Principal:身份信息
是主体(subject)进行身份认证的标识,标识必须具有唯一性,如用户名、手机号、邮箱地址等,一个主体可以有多个身份,但是必须有一个主身份(Primary Principal)。
- credential:凭证信息
是只有主体自己知道的安全信息,如密码、证书等。
证明 / 凭证,即只有主体知道的安全值,如密码 / 数字证书等。
最常见的 principal 和 credential组合就是用户名 / 密码了。
1.2 认证的流程

1.3 认证的开发
1.3.1 新建Maven项目和引入依赖
<dependencies>
    <dependency>
        <groupId>org.apache.shiro</groupId>
        <artifactId>shiro-core</artifactId>
        <version>1.7.0</version>
    </dependency>
</dependencies>
1.3.2 新建和编写shiro.ini配置文件

向shiro.ini中添加 用户身份 / 凭据。
1.3.3 认证测试例子
public class TestAuthenticator {
    public static void main(String[] args) {
        //创建securityManager
        DefaultSecurityManager defaultSecurityManager = new DefaultSecurityManager();
        defaultSecurityManager.setRealm(new IniRealm("classpath:shiro.ini"));
        //将安装工具类中设置默认安全管理器
        SecurityUtils.setSecurityManager(defaultSecurityManager);
        //获取主体对象
        Subject subject = SecurityUtils.getSubject();
        //创建token令牌
        UsernamePasswordToken token = new UsernamePasswordToken("Gangbb", "999");
        try {
            //用户登录
            subject.login(token);
            System.out.println("登录成功!!");
        } catch (UnknownAccountException e) {
            e.printStackTrace();
            System.out.println("用户名错误!!");
        }catch (IncorrectCredentialsException e){
            e.printStackTrace();
            System.out.println("密码错误!!");
        }

    }
}
运行结果:

更换shiro.ini中与Gangbb用户不对应的密码:

结果:

传入shiro.ini中没有记录的用户:

结果:

常见抛出异常:
- DisabledAccountException(帐号被禁用)
- LockedAccountException(帐号被锁定)
- ExcessiveAttemptsException(登录失败次数过多)
- ExpiredCredentialsException(凭证过期)
- UnknownAccountException(用户名错误)
- IncorrectCredentialsException(密码错误)
1.3.4 源码分析身份验证流程
1.3.4.1 源码Debug流程分析
首先大致的流程:

在认证的关键代码行打上断点:

Debug运行过程:


步骤三:
Subject.login(token)后进入了DelegatingSubject类并进入其login()方法,DelegatingSubject类的login()方法中又调用了securityManager的login()方法,传进去的this是subject对象信息,token是用户名/密码组成的令牌。
此时调用关系:
1.Subject.login(token)<—2.DelegatingSubject.login(token)<–3.securityManager.login(this=Subject, token)
**总要结论:首先调用
Subject.login(token)进行登录,其会自动委托给SecurityManager,调用之前必须通过 **

步骤四:
调用了securityManager的login()之后,来到是DefaultSecurityManager类,进入了该类中的login()方法。该方法中调用了本类(DefaultSecurityManager类)的authenticate()方法,传入了token值,下一步进入该方法
此时调用关系:
1.Subject.login(token)<—2.DelegatingSubject.login(token)<–3.securityManager.login(this=Subject, token)<–4.DefaultSecurityManager.authenticate(token)

步骤五:
来到了AuthenticatingSecurityManager类中,并进入了该类中的authenticate()方法,在该方法中又调用了Authenticator对象的authenticate()方法,继续进入Authenticator类的authenticate()方法。
此时调用关系:
1.Subject.login(token)<—2.DelegatingSubject.login(token)<–3.securityManager.login(this=Subject, token)<–4.DefaultSecurityManager.authenticate(token)<–5.AuthenticatingSecurityManager.authenticate(token)<–6.Authenticator.authenticate(token)
总要结论:
SecurityManager负责真正的身份验证逻辑;它会委托给Authenticator进行身份验证;Authenticator才是真正的身份验证者,Shiro API中核心的身份认证入口点,此处可以自定义插入自己的实现

可以发现进入了AbstractAuthenticator类的authenticate()方法。此时到一些校验不重要,跳过到关键代码

步骤六:
这行代码中,在AbstractAuthenticator类的authenticate()方法中又调用了本类的doAuthenticate()方法。进入该方法。
此时调用关系:
1.Subject.login(token)<—2.DelegatingSubject.login(token)<–3.securityManager.login(this=Subject, token)<–4.DefaultSecurityManager.authenticate(token)<–5.AuthenticatingSecurityManager.authenticate(token)<–6.Authenticator.authenticate(token)<–7.AbstractAuthenticator.doAuthenticate(token)

步骤七:
此时这一步来到ModularRealmAuthenticator类中,this.assertRealmsConfigured()表示一个断言,校验Realms(获取的数据源)是否配置正确,不是关键逻辑代码,不进入该方法,跳到下一行。

步骤八:
这一步调用本类(ModularRealmAuthenticator类)的getRealms()获取了所有当前配置的Realm。当前我们只配置了一个Realm。不进入getRealms(),跳过到下一行。如果有多Realm,则:
Authenticator 可能会委托给相应的 AuthenticationStrategy 进行多 Realm 身份验证,默认 ModularRealmAuthenticator 会调用 AuthenticationStrategy 进行多 Realm 身份验证;

步骤九:
此时根据上一行获取的Realm数量调用不同的处理方法,我们进入的是本类(ModularRealmAuthenticator类)中的doSingleRealmAuthentication()方法,进入该方法
此时调用关系:
1.Subject.login(token)<—2.DelegatingSubject.login(token)<–3.securityManager.login(this=Subject, token)<–4.DefaultSecurityManager.authenticate(token)<–5.AuthenticatingSecurityManager.authenticate(token)<–6.Authenticator.authenticate(token)<–7.AbstractAuthenticator.doAuthenticate(token)<–8.ModularRealmAuthenticator.doSingleRealmAuthentication(Realm, token)

步骤十:
该步骤进入ModularRealmAuthenticator.doSingleRealmAuthentication()方法中
1.先做了一个token的校验,合法生成的肯定没问题,跳过到下一行!
2.这一行调用了传入Realm类对象的的getAuthenticationInfo()方法,进入该方法。
此时调用关系:
1.Subject.login(token)<—2.DelegatingSubject.login(token)<–3.securityManager.login(this=Subject, token)<–4.DefaultSecurityManager.authenticate(token)<–5.AuthenticatingSecurityManager.authenticate(token)<–6.Authenticator.authenticate(token)<–7.AbstractAuthenticator.doAuthenticate(token)<–8.ModularRealmAuthenticator.doSingleRealmAuthentication(Realm, token)<–9.Realm.getAuthenticationInfo(token)

步骤十一:
此时进入AuthenticatingRealm类,并进入该类的getAuthenticationInfo()方法。在该方法中先是调用本类中的getCachedAuthenticationInfo()方法,从缓存中获取验证信息,因为第一次登录所以缓存中不会有认证信息,(不是主线任务)跳过到下一行。

步骤十二:
此时我们的info为null所以会进入到if的条件域中,并且调用本类(AuthenticatingRealm类)中的doGetAuthenticationInfo()方法。进入该方法
此时调用关系:
1.Subject.login(token)<—2.DelegatingSubject.login(token)<–3.securityManager.login(this=Subject, token)<–4.DefaultSecurityManager.authenticate(token)<–5.AuthenticatingSecurityManager.authenticate(token)<–6.Authenticator.authenticate(token)<–7.AbstractAuthenticator.doAuthenticate(token)<–8.ModularRealmAuthenticator.doSingleRealmAuthentication(Realm, token)<–9.Realm.getAuthenticationInfo(token)<–10.AuthenticatingRealm.doGetAuthenticationInfo(token)

步骤十三:
进入了SimpleAccountRealm类中,并进入了该类doGetAuthenticationInfo()方法,做以下处理
1.先把token强转成UsernamePasswordToken类型(无关紧要)。
2.通过调用本类(AuthenticatingRealm类)中的getUser()方法,用token中更多用户名获取用户赋值给account,此时account值等于用户名。
3.对得到的account(用户名),进行该account是否被锁定和对应密码是否过期的判断。
总要结论:用户名的校验是在SimpleAccountRealm类的doGetAuthenticationInfo()方法中完成。如果要把数据源换成数据库,就在doGetAuthenticationInfo()写实现的逻辑

可以看到SimpleAccountRealm类继承了AuthorizingRealm类,以后自己实现自定义Realm我们也要写一个类继承AuthorizingRealm类
然后继续跳过多次下一步到跳出该方法(此时账号认证完毕)。

步骤十四:
回到AuthenticatingRealm类中继续执行getAuthenticationInfo()方法。经过对获取的info和token校验(不重要跳过),跳到调用本类中的assertCredentialsMatch()方法这行,进入该方法。
此时调用关系:
1.Subject.login(token)<—2.DelegatingSubject.login(token)<–3.securityManager.login(this=Subject, token)<–4.DefaultSecurityManager.authenticate(token)<–5.AuthenticatingSecurityManager.authenticate(token)<–6.Authenticator.authenticate(token)<–7.AbstractAuthenticator.doAuthenticate(token)<–8.ModularRealmAuthenticator.doSingleRealmAuthentication(Realm, token)<–9.Realm.getAuthenticationInfo(token)<–10.AuthenticatingRealm.doGetAuthenticationInfo(token)<–11.AuthenticatingRealm.getAuthenticationInfo(token)<–AuthenticatingRealm.assertCredentialsMatch()

步骤十五:
进assertCredentialsMatch()方法后,
1.先获取了一个CredentialsMatcher密码匹配器。
2.调用CredentialsMatcher中的doCredentialsMatch()中密码匹配校验
(此时还在AuthenticatingRealm类中)
总要结论:密码的校验是在AuthenticatingRealm类的assertCredentialsMatch()方法中自动完成
源码流程分析结束!
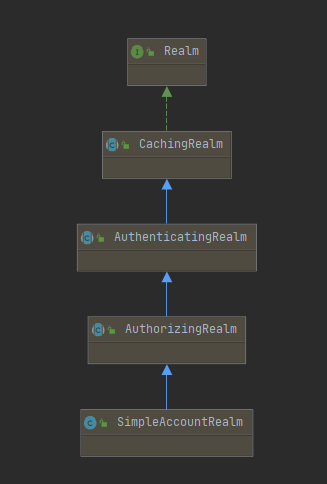
1.3.4.2 UML类关系图分析
xxRealm相关的类都是Realm接口的实现类

AuthenticatingRealm类中有一个抽象方法doGetAuthenticationInfo用于认证。所以AuthenticatingRealm类是一个
认证realm

AuthorizingRealm类中有一个抽象方法doGetAuthorizationInfo用作授权,所以AuthorizingRealm类是一个
授权realm

刚刚源码Debug分析过程中使用到的类:
SimpleAccountRealm类关键源码:
public class SimpleAccountRealm extends AuthorizingRealm {
		//.......省略
    protected AuthenticationInfo doGetAuthenticationInfo(AuthenticationToken token) throws AuthenticationException {
        UsernamePasswordToken upToken = (UsernamePasswordToken) token;
        SimpleAccount account = getUser(upToken.getUsername());

        if (account != null) {

            if (account.isLocked()) {
                throw new LockedAccountException("Account [" + account + "] is locked.");
            }
            if (account.isCredentialsExpired()) {
                String msg = "The credentials for account [" + account + "] are expired";
                throw new ExpiredCredentialsException(msg);
            }

        }

        return account;
    }

    protected AuthorizationInfo doGetAuthorizationInfo(PrincipalCollection principals) {
        String username = getUsername(principals);
        USERS_LOCK.readLock().lock();
        try {
            return this.users.get(username);
        } finally {
            USERS_LOCK.readLock().unlock();
        }
    }
}
总结:所以要自定义realm的话,需要像SimppleAccountRealm那样继承AuthorizingRealm,就会有上述的两个方法做认证(doGetAuthenticationInfo)和授权(doGetAuthorizationInfo)。
1.3.5 源码分析得出结论汇总
- 调用
Subject.login(token)进行登录,其会自动委托给SecurityManager处理,调用之前必须通过. SecurityManager负责真正的身份验证逻辑;它会委托给Authenticator进行身份验证;Authenticator才是真正的身份验证者,Shiro API中核心的身份认证入口点,此处可以自定义插入自己的实现。Authenticator会委托给相应的AuthenticationStrategy进行多Realm身份验证或单Realm身份验证。- 用户名的校验是在
SimpleAccountRealm类的doGetAuthenticationInfo()方法中完成。如果要把数据源换成数据库,就在doGetAuthenticationInfo()写实现的逻辑。 - 密码的校验是在
AuthenticatingRealm类的assertCredentialsMatch()方法中自动完成** SimpleAccountRealm类继承了AuthorizingRealm类完成了简单的认证和授权,以后自己实现自定义复杂的Realm我们也要写一个类继承AuthorizingRealm类AuthenticatingRealm类中有一个抽象方法doGetAuthenticationInfo用于认证。所以AuthenticatingRealm类是一个认证realmAuthorizingRealm类中有一个抽象方法doGetAuthorizationInfo用作授权,所以AuthorizingRealm类是一个授权realm- 自定义
realm的话,需要像SimppleAccountRealm那样继承AuthorizingRealm,就会有做认证(doGetAuthenticationInfo)和授权(doGetAuthorizationInfo)的方法。
2. 实现一个自定义realm
2.1 实现一个简单的realm
定义realm:
public class MyRealm extends AuthorizingRealm  {
    //授权方法
    @Override
    protected AuthorizationInfo doGetAuthorizationInfo(PrincipalCollection principals) {
        return null;
    }

    //认证方法
    @Override
    protected AuthenticationInfo doGetAuthenticationInfo(AuthenticationToken token) throws AuthenticationException {
        //从token中获取用户名
        String principal = (String) token.getPrincipal();
        //模拟根据身份信息通过JDBC、Mybatis等从数据库查询相关数据
        if("Gangbb".equals(principal)){
            //参数1:数据库中的账号 参数2:数据库中的密码 参数3:当前realm的名字
            return new SimpleAuthenticationInfo(principal,"123",this.getName());
        }
        return null;
    }
}
测试使用:
public class TestMyRealm {
    public static void main(String[] args) {
        //创建securityManager
        DefaultSecurityManager defaultSecurityManager = new DefaultSecurityManager();
        //IniRealm realm = new IniRealm("classpath:shiro.ini");
        //设置为自定义realm获取认证数据
        defaultSecurityManager.setRealm(new MyRealm());
        //将安装工具类中设置默认安全管理器
        SecurityUtils.setSecurityManager(defaultSecurityManager);
        //获取主体对象
        Subject subject = SecurityUtils.getSubject();
        //创建token令牌
        UsernamePasswordToken token = new UsernamePasswordToken("Gangbb", "999");
        try {
            //用户登录
            subject.login(token);
            System.out.println("登录成功~~");
        } catch (UnknownAccountException e) {
            e.printStackTrace();
            System.out.println("用户名错误!!");
        }catch (IncorrectCredentialsException e){
            e.printStackTrace();
            System.out.println("密码错误!!!");
        }
    }
}
2.2 实现一个带md5+salt+hash的realm
首先是一个处理常规的流程:

定义realm:
public class SaltMD5Realm extends AuthorizingRealm {
    //授权方法
    @Override
    protected AuthorizationInfo doGetAuthorizationInfo(PrincipalCollection principals) {
        return null;
    }

    /**
     * 给传入密码做md5加密
     * @param password
     * @return
     */
    public String Md5Util(String password){
        Md5Hash md5Hash = new Md5Hash(password);
        return md5Hash.toHex();
    }

    /**
     * 给传入密码做md5+salt加密
     * @param password
     * @param salt
     * @return
     */
    public String Md5SaltUtil(String password, String salt){
        Md5Hash md5Hash = new Md5Hash(password, salt);
        return md5Hash.toHex();
    }

    /**
     * 给传入密码做md5+salt+hash散列次数 加密
     * @param password
     * @param salt
     * @param hash
     * @return
     */
    public String Md5SaltHashUtil(String password, String salt, Integer hash){
        Md5Hash md5Hash = new Md5Hash(password, salt, hash);
        return md5Hash.toHex();
    }

    //认证方法
    @Override
    protected AuthenticationInfo doGetAuthenticationInfo(AuthenticationToken token) throws AuthenticationException {
        String principal = (String) token.getPrincipal();
        if ("Gangbb".equals(principal)) {
            //只是用md5加密
            //String password = this.Md5Util("999");
            //return new SimpleAuthenticationInfo(principal, password, this.getName());

            //使用md5+salt+hash
            String salt = "Gangbb-salt";
            Integer hash = 1024;
            String password1 = this.Md5SaltUtil("999", salt);
            String password2 = this.Md5SaltHashUtil("999", salt, hash);
            // 参数1:从数据源获取的用户名 参数2:从数据源获取的Md5+salt密码 参数3:密码处理的盐值 参数4:使用的realm的名字
            return new SimpleAuthenticationInfo(principal, password2, ByteSource.Util.bytes(salt), this.getName());

        }
        return null;
    }

}
测试:
public class TestSaltMD5Realm {
    public static void main(String[] args) {
        //创建安全管理器securityManager
        DefaultSecurityManager defaultSecurityManager = new DefaultSecurityManager();
        //IniRealm realm = new IniRealm("classpath:shiro.ini");
        //设置为自定义realm获取认证数据
        SaltMD5Realm saltMD5Realm = new SaltMD5Realm();
        //定义密码匹配器
        HashedCredentialsMatcher credentialsMatcher = new HashedCredentialsMatcher();
        //给密码匹配器设置md5校验
        credentialsMatcher.setHashAlgorithmName("MD5");
        //给密码匹配器设置散列次数
        credentialsMatcher.setHashIterations(1024);
        //把 md5+salt+hash 密码匹配器装入saltMD5Realm
        saltMD5Realm.setCredentialsMatcher(credentialsMatcher);
        //把saltMD5Realm交给defaultSecurityManager完成校验
        defaultSecurityManager.setRealm(saltMD5Realm);
        //将安装工具类中设置安全管理器
        SecurityUtils.setSecurityManager(defaultSecurityManager);
        //获取主体对象
        Subject subject = SecurityUtils.getSubject();
        //创建token令牌
        UsernamePasswordToken token = new UsernamePasswordToken("Gangbb", "999");
        try {
            //用户登录
            subject.login(token);
            System.out.println("登录成功~~");
        } catch (UnknownAccountException e) {
            e.printStackTrace();
            System.out.println("用户名错误!!");
        }catch (IncorrectCredentialsException e){
            e.printStackTrace();
            System.out.println("密码错误!!!");
        }

    }
}


 8682
8682

 被折叠的 条评论
为什么被折叠?
被折叠的 条评论
为什么被折叠?
 到【灌水乐园】发言


