


Vue 项目打包、组件打包使用
vue-cli 脚手架项目打包步骤
使用 vue-cli 脚手架新建项目
新建
vue项目的过程见:https://blog.csdn.net/qq_37248504/article/details/107169812
打包配置说明
- 打包的配置在
build下 - 常量
config在vue/config/index.js文件下配置 - 需要修改
vue/config/index.js文件下的将build对象下的assetsPublicPath中的/,改为./
采用npm run build
- 使用
npm run build命令打包
打包成功标志
- 会在
dist文件夹下面生成打包的文件

- 打包的
dist文件夹下面会生成css、js、主页面(index.html)文件 - 在浏览器中打开打包生成的
index.html,在路径的最后面加上路由地址可以访问对应的页面

-
浏览器打开
dist文件下的index.html后,页面正常,则说明打包成功了,可以发布到服务器上。 -
index.html会加载所有打包的内容

webpack中mainifest.js vendor.js app.js 三者的区别
-
app.js:app.js就是app.vue或者其它类似vue文件的js业务代码 -
webpack打包后会在build过程中产生Runtime的部分(运行时的一部分代码)会被添加进入vendor.js中
Webpack 打包工具
Webpack是当下最热门的前端资源模块化管理和打包工具。它可以将许多松散的模块按照依赖和规则打包成符合生产环境部署的前端资源。还可以将按需加载的模块进行代码分隔,等到实际需要的时候再异步加载。通过loader的转换,任何形式的资源都可以视作模块,比如CommonJs模块、AMD模块、ES6模块、CSS、图片、JSON、Coffeescript、LESS等。
webpack 使用前提
- 安装了
node.js
安装 webpack
- 本地安装
npm install --save-dev webpack
npm install --save-dev webpack@<version>
- 全局安装
npm install --global webpack
- 注意如果
npm安装较慢,可以切换为cnpm安装
webpack 使用
基本使用
-
创建示例代码
webpack 配置文件
const path = require('path');

module.exports = {
  entry: './src/index.js',
  output: {
    filename: 'bundle.js',
    path: path.resolve(__dirname, 'dist')
  }
};
NPM 脚本(NPM Scripts)
- 考虑到用
CLI这种方式来运行本地的webpack不是特别方便,我们可以设置一个快捷方式。在package.json*添加一个 npm 脚本(npm script):
"scripts": {
    "test": "echo \"Error: no test specified\" && exit 1",
    "build":"webpack"
},
- 增加完脚本之后,可以使用
npm run build命令,来替代我们之前使用的npx命令。
管理资源
webpack最出色的功能之一就是,除了JavaScript,还可以通过loader引入任何其他类型的文件。也就是说,以上列出的那些JavaScript的优点(例如显式依赖),同样可以用来构建网站或web应用程序中的所有非JavaScript内容。
加载css
- 为了从 JavaScript 模块中
import一个 CSS 文件,你需要在module配置中安装并添加style-loader和css-loader
npm install --save-dev style-loader css-loader
使用 source map 源码映射
-
JavaScript提供了source map功能,将编译后的代码映射回原始源代码。如果一个错误来自于b.js,source map就会明确的告诉你。 -
在
webpack.config.js中增加devtool: 'inline-source-map',

使用本地依赖包进行调试
调试 JS 库
- 假设有两个模块:模块
vue-demo和模块vue-demo-two,模块vue-demo依赖模块vue-demo-two,如果vue-demo-two包已经发布到npm仓库中了,那么直接npm install vue-demo-two如果还没有发布使用本地的模块,那么使用npm installvue-demo-two的绝对路径,依赖成功之后修改vue-demo-two中main后面的地址,这个地址是vue-demo-two的入口地址。 vue-demo依赖本地的vue-demo-two之后package.json如下:
"vue-demo-two": "file:../vue-demo-two",
vue-demo-two中pacakge.json main的信息如下:testone.js是下面示例中的js
"main": "src/utils/testone.js",
示例
- 使用
vue-demo-two封装的工具类/src/utils/testone.js
const log = function log (sth) {
  return sth
}
const strOne = '张三'
const strTwo = '李四'

export default{
  log,
  strOne,
  strTwo
}

export function one () {
  console.log('one')
}

export function two () {
  console.log('two')
}
npm installvue-demo-two的本地地址之后,修改vue-demo-two中main后面的地址
"main": "src/utils/testone.js",
- 然后就可以在本地进行源码调试
package.json 中 main 属性
- 此属性定义了当我们引用依赖时的文件地址。
- 平时开发中基本用不到,只有我们在引用或者开发某个依赖包的时候才派上用场。不使用
main属性的话我们可能需要这样写引用:require("some-module/dist/app.js"),如果我们在main属性中指定了dist/app.js的话,我们就可以直接引用依赖就可以了:require("some-module")
调试组件包
开发组件包 vue-demo-one
- 测试组件
TestInput.vue
<template>
  <div>
        <el-input placeholder="我是测试组件" v-model="inputvalue" ></el-input>
  </div>
</template>
<script>

export default{
  name: 'TestInput',
  props: {
    test: String
  },
  data: function () {
    return {
      inputvalue: '123'
    }
  },
  computed: {
  }
}
</script>
- 组件包中导出 所有的组件
lib.js
// 导出所有组件
import TestInput from './components/TestInput.vue'

// 所有组件列表
const components = {
  TestInput
}

// 定义install方法,接收Vue作为参数
const install = function (Vue) {
  // 判断是否安装,安装过就不继续往下执行
  if (install.installed) return
  install.installed = true
  // 遍历注册所有组件
  components.map((component) => Vue.use(component))
}

// 检测到Vue才执行,毕竟我们是基于Vue的
if (typeof window !== 'undefined' && window.Vue) {
  install(window.Vue)
}

export default{
  ...components,
  // 所有组件,必须具有install,才能使用Vue.use()
  install
}
vue-demo-onepackage.json中main的路径是lib.js的路径
vue-demo 本地 install 调试
- 直接使用:在
vscode中 输入<test-input></test-input>组件就可以使用
<template>
  <div>
    <h1>测试页面</h1>
    <input-one :test="test"></input-one>
    <h2>测试引入的组件</h2>
    <test-input></test-input>
  </div>
</template>
<script>
// eslint-disable-next-line import/no-duplicates
import Test from 'vue-demo-two'
// eslint-disable-next-line import/no-duplicates
import strTwo from 'vue-demo-two'
// eslint-disable-next-line import/no-duplicates
import { one, two } from 'vue-demo-two'
import TestInput from '../../../vue-demo-one/src/components/TestInput.vue'

export default {
  components: { TestInput },
  data: function () {
    return {
      test: '张三'
    }
  },
  methods: {
    testOne () {
      console.log(Test.strOne)
      console.log(strTwo)
      one()
      two()
    }
  },
  created () {
    this.testOne()
  }
}
</script>
Js、组件包打包发布使用
前期准备
注册 npm 账号
- 进入 https://www.npmjs.com/ 这个网址注册,后面改为命令注册
修改本地 npm 仓库为可发布包的仓库
npm config set registry https://registry.npmjs.org/
使用命令行登录
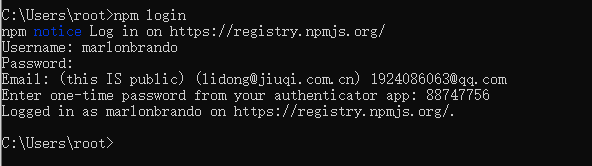
Js 工具包打包发布使用
package.json主要信息
"private": false,
// 使用自己的打包配置文件
"build": "node build/build.js",
// 构建生成js
"main": "lib/index.js",
"files": ["/lib/*"],
webpack 打包主要配置
vue-cli脚手架项目默认打包的配置配置了mainifest.js vendor.js app.js这些文件的配置,可以使用,也可以自己定义打包的配置- 配置文件主要包含入口
js,构建的js的地址
entry: './src/lib.js',
output: {
    path: path.resolve(__dirname, '../lib'),
    filename: 'index.js',
    chunkFilename: '[id].js',
    library: 'DemoTwo',
    libraryTarget: 'umd',
    libraryExport: 'default',
    umdNamedDefine: true
},
发布
- 当配置完打包信息之后,现在本地
npm run build看是否构建成功,如果构建成功 - 使用
npm publish命令将包发布到远端仓库
发布的包校验
- 登录上面注册账号的网站 https://www.npmjs.com/ 找到发布的包,点击 下图中的按钮

- 校验包界面:没有报错则说明打的包正确,直接使用

使用
npm remove:先排除本地测试的包npm install vue-demo-two:重新安装从远端仓库拉去最新的使用- 直接导入使用
import Test from 'vue-demo-two'
import strTwo from 'vue-demo-two'
import { one, two } from 'vue-demo-two'
- 完整项目见 :https://gitee.com/Marlon_Brando/qianduanxuexi 下的
vue-demo和vue-demo-two
组件包打包发布
开发组件 vue-demo-one
-
vue项目局部注册组件请看:# Vue 知识点详细学习_MarlonBrando-CSDN博客 -
目前开发组件包,供别的项目安装使用
-
注意自己写的组件包在本地先进行测试
-
项目结构如下

webpack 打包配置
package.json 修改
- 修改入口
main:构建输出的js的地址
"main": "lib/main.js",
"files": [
    "lib/*"
 ],
- 定义发布私有的包
"private": false,
- 增加
npm scripts
"scripts": {
  	"build-lib": "node build/build-lib.js --report"
}
打包配置修改
-
使用
vue-cli脚手架新建的工程,排除一下没用的配置 -
build-lib.js
'use strict'
require('./check-versions')()
process.env.NODE_ENV = 'production'
const ora = require('ora')
const rm = require('rimraf')
const path = require('path')
const chalk = require('chalk')
const webpack = require('webpack')
const config = require('../config')
const webpackConfig = require('./webpack.lib.conf')
const spinner = ora('building for production...')
spinner.start()

rm(path.join(config.build.assetsRoot, config.build.assetsSubDirectory), err => {
  if (err) throw err
  webpack(webpackConfig, (err, stats) => {
    spinner.stop()
    if (err) throw err
    process.stdout.write(stats.toString({
      colors: true,
      modules: false,
      children: false,
      chunks: false,
      chunkModules: false
    }) + '\n\n')

    if (stats.hasErrors()) {
      console.log(chalk.red('  Build failed with errors.\n'))
      process.exit(1)
    }
    console.log(chalk.cyan('  Build complete.\n'))
    console.log(chalk.yellow(
      '  Tip: built files are meant to be served over an HTTP server.\n' +
      '  Opening index.html over file:// won\'t work.\n'
    ))
  })
})
webpack.lib.conf
'use strict'
const path = require('path')
const utils = require('./utils')
const webpack = require('webpack')
const config = require('../config')
const merge = require('webpack-merge')
const baseWebpackConfig = require('./webpack.base.lib.conf')
const CopyWebpackPlugin = require('copy-webpack-plugin')
const ExtractTextPlugin = require('extract-text-webpack-plugin')
const OptimizeCSSPlugin = require('optimize-css-assets-webpack-plugin')
const UglifyJsPlugin = require('uglifyjs-webpack-plugin')

const env = process.env.NODE_ENV === 'testing'
  ? require('../config/test.env')
  : require('../config/prod.env')

const webpackConfig = merge(baseWebpackConfig, {
  module: {
    rules: utils.styleLoaders({
      sourceMap: config.build.productionSourceMap,
      extract: true,
      usePostCSS: true
    })
  },
  devtool: config.build.productionSourceMap ? config.build.devtool : false,
  entry: './src/lib.js',
  // 配置输出构建位置
  output: {
    path: path.resolve(__dirname, '../lib'),
    filename: '[name].js',
    chunkFilename: '[id].js',
    library: 'DemoTest',
    libraryTarget: 'umd',
    libraryExport: 'default',
    umdNamedDefine: true
  },
  plugins: [
    new webpack.DefinePlugin({
      'process.env': env
    }),
    new UglifyJsPlugin({
      uglifyOptions: {
        compress: {
          warnings: false
        }
      },
      sourceMap: config.build.productionSourceMap,
      parallel: true
    }),
    new ExtractTextPlugin({
      filename: 'css/[name].css',
      allChunks: true
    }),
    new OptimizeCSSPlugin({
      cssProcessorOptions: config.build.productionSourceMap
        ? { safe: true, map: { inline: false } }
        : { safe: true }
    }),
    new webpack.HashedModuleIdsPlugin(),
    new webpack.optimize.ModuleConcatenationPlugin(),

    new CopyWebpackPlugin([
      {
        from: path.resolve(__dirname, '../static'),
        to: config.build.assetsSubDirectory,
        ignore: ['.*']
      }
    ])
  ]
})

if (config.build.productionGzip) {
  const CompressionWebpackPlugin = require('compression-webpack-plugin')

  webpackConfig.plugins.push(
    new CompressionWebpackPlugin({
      asset: '[path].gz[query]',
      algorithm: 'gzip',
      test: new RegExp(
        '\\.(' +
        config.build.productionGzipExtensions.join('|') +
        ')$'
      ),
      threshold: 10240,
      minRatio: 0.8
    })
  )
}

if (config.build.bundleAnalyzerReport) {
  const BundleAnalyzerPlugin = require('webpack-bundle-analyzer').BundleAnalyzerPlugin
  webpackConfig.plugins.push(new BundleAnalyzerPlugin())
}
module.exports = webpackConfig
webpack.base.lib.conf
'use strict'
const path = require('path')
const utils = require('./utils')
const config = require('../config')
const vueLoaderConfig = require('./vue-loader.conf')

function resolve (dir) {
  return path.join(__dirname, '..', dir)
}

const createLintingRule = () => ({
  test: /\.(js|vue)$/,
  loader: 'eslint-loader',
  enforce: 'pre',
  include: [resolve('src'), resolve('test')],
  options: {
    formatter: require('eslint-friendly-formatter'),
    emitWarning: !config.dev.showEslintErrorsInOverlay
  }
})

module.exports = {
  context: path.resolve(__dirname, '../'),
  output: {
    path: config.build.assetsRoot,
    filename: '[name].js',
    publicPath: process.env.NODE_ENV === 'production'
      ? config.build.assetsPublicPath
      : config.dev.assetsPublicPath
  },
  resolve: {
    extensions: ['.js', '.vue', '.json'],
    alias: {
      'vue$': 'vue/dist/vue.esm.js',
      '@': resolve('src')
    }
  },
  module: {
    rules: [
      ...(config.dev.useEslint ? [createLintingRule()] : []),
      {
        test: /\.vue$/,
        loader: 'vue-loader',
        options: vueLoaderConfig
      },
      {
        test: /\.js$/,
        loader: 'babel-loader',
        include: [resolve('src'), resolve('test'), resolve('node_modules/webpack-dev-server/client')]
      },
      {
        test: /\.(png|jpe?g|gif|svg)(\?.*)?$/,
        loader: 'url-loader',
        options: {
          limit: 10000,
          name: utils.assetsPath('img/[name].[hash:7].[ext]')
        }
      },
      {
        test: /\.(mp4|webm|ogg|mp3|wav|flac|aac)(\?.*)?$/,
        loader: 'url-loader',
        options: {
          limit: 10000,
          name: utils.assetsPath('media/[name].[hash:7].[ext]')
        }
      },
      {
        test: /\.(woff2?|eot|ttf|otf)(\?.*)?$/,
        loader: 'url-loader',
        options: {
          limit: 10000,
          name: utils.assetsPath('fonts/[name].[hash:7].[ext]')
        }
      }
    ]
  },
  node: {
    setImmediate: false,
    dgram: 'empty',
    fs: 'empty',
    net: 'empty',
    tls: 'empty',
    child_process: 'empty'
  }
}
导出组件
- 定义测试组件
<template>
  <div>
      <el-input placeholder="我是测试组件" v-model="inputvalue" ></el-input>
  </div>
</template>
<script>

export default{
  name: 'my-test-input',
  props: {
    test: String
  },
  data: function () {
    return {
      inputvalue: '123'
    }
  },
  computed: {
  }
}
</script>
- 先定义单独导组件的
index.js
// 导入组件,组件必须声明 name
import MyTestInput  from './TestInput.vue'

// 为组件提供 install 安装方法,供按需引入
MyTestInput.install = function (Vue) {
	console.log('导出组件的名称为:'+MyTestInput.name)
  Vue.component(MyTestInput.name, MyTestInput)
}

// 默认导出组件
export default MyTestInput
- 定义整个项目中所有组件的导出方法
lib.js
// 导出所有组件
import MyTestInput from './components/TestInput.vue'

// 所有组件列表
const components = [
  MyTestInput
]
// 定义install方法,接收Vue作为参数
const install = Vue => {
  if (install.installed) { return }
  install.installed = true
  components.map(component => { Vue.component(component.name, component) })
}
// 判断是否是直接引入文件
if (typeof window !== 'undefined' && window.Vue) {
  install(window.Vue)
}
export default{
  install,
  ...components
}
注册组件
修改main.js
import Vue from 'vue'
import App from './App'
import router from './router'

import ElementUI from 'element-ui'
// 引入elementui
import 'element-ui/lib/theme-chalk/index.css'

import MyTestInput from './lib'

Vue.use(ElementUI)
Vue.config.productionTip = false
Vue.use(MyTestInput)

/* eslint-disable no-new */
new Vue({
  el: '#app',
  router,
  components: { App },
  template: '<App/>'
})
npm run build-lib
-
使用
webpack打包,在lib下面生成相应的组件 -
打包成功后就可以发布使用了
vue-demo 使用 vue-demo-one 中的组件
- 安装
vue-demo-one最新依赖
npm i vue-demo-one
vue-demo 注册组件使用
main.js
import MyTestInput from 'vue-demo-one'
Vue.use(MyTestInput)
test.vue直接使用<my-test-input></my-test-input>
<template>
  <div>
    <h1>测试页面</h1>
    <input-one :test="test"></input-one>
    <h2>测试引入的组件</h2>
    <my-test-input></my-test-input>
  </div>
</template>
<script>
// eslint-disable-next-line import/no-duplicates
import Test from 'vue-demo-two'
// eslint-disable-next-line import/no-duplicates
import strTwo from 'vue-demo-two'
// eslint-disable-next-line import/no-duplicates
import { one, two } from 'vue-demo-two'

export default {
  components: {},
  data: function () {
    return {
      test: '张三'
    }
  },
  methods: {
    testOne () {
      console.log(Test)
      console.log(strTwo)
      one()
      two()
    }
  },
  created () {
    this.testOne()
  }
}
</script>


 1935
1935


 被折叠的 条评论
为什么被折叠?
被折叠的 条评论
为什么被折叠?
 到【灌水乐园】发言


