


学习了贾志刚老师OpenCv的课程后,对人像抠图产生了兴趣,加之到照相馆换照片的背景颜色,每次都要一二十元,于是萌发了自己做一个小程序的想法。经过一年多在网上搜索的背景颜色素材,还有在照相馆里师傅们修图后的电子版照片,一共整理了14组背景颜色的数据。最近单位出差期间,晚上抽空将自己的想法变成了现实,很开心,现将代码发出来供朋友们借鉴。
在此,首先要声明的是:背景颜色BGR的数据都是个人整理,仅供参考,若有侵犯您的知识产权,请联系我删帖,并请多多原谅! 背景图来自与豆包AI生成,同样真心希望也不要产生侵权等情况...... 在这方面我真的不懂是否存在错误,确实好担心的......
好了,闲话不说,直接上完整代码:(文件名:main_backColorPhoto.py 同文件夹 inPhoto 和文件夹 outPhoto 三项内容放到一个文件夹下。)
import cv2 as cv
import numpy as np
from tkinter import filedialog

# 0输入照片的纵向、1横向像素大小,2待选背景纵向像素长度,3c_int,
# 4选中背景代码,5选择背景计算开关,6B,7G,8R,9打开或保存标记,
# 10显示图像高宽像素限制,11HSV数值幅宽
rc_ext = [0, 0, 0, 0, 0, 0, 0, 0, 0, 0, 500, 30]
hvs_set = [100, 120, 150, 150, 255, 255, 0, 0, 0]  # hvs 像素值设置

# 将RGB颜色转换为HSV颜色
def rgb_to_hsv(r, g, b):
    rgb = np.uint8([[[r, g, b]]])
    hsv = cv.cvtColor(rgb, cv.COLOR_BGR2HSV)
    return hsv[0][0]

# 图片上鼠标响应
def mouse_callback(event, x, y, flags, param):  # 图片上鼠标左键单击处取像素坐标
    if event == cv.EVENT_LBUTTONDOWN:  # 左键按下时触发该事件
        if y >= 5 and y <= rc_ext[2] and x >= (rc_ext[3] + 5) and x <= (rc_ext[3] + 25):
            rc_ext[4] = 1
            rc_ext[6] = 175
            rc_ext[7] = 141
            rc_ext[8] = 81
        if y >= 5 and y <= rc_ext[2] and x >= (rc_ext[3] + 30) and x <= (rc_ext[3] + 50):
            rc_ext[4] = 2
            rc_ext[6] = 212
            rc_ext[7] = 141
            rc_ext[8] = 91
        if y >= 5 and y <= rc_ext[2] and x >= (rc_ext[3] + 55) and x <= (rc_ext[3] + 75):
            rc_ext[4] = 3
            rc_ext[6] = 236
            rc_ext[7] = 179
            rc_ext[8] = 124
        if y >= 5 and y <= rc_ext[2] and x >= (rc_ext[3] + 80) and x <= (rc_ext[3] + 100):
            rc_ext[4] = 4
            rc_ext[6] = 245
            rc_ext[7] = 95
            rc_ext[8] = 34
        if y >= 5 and y <= rc_ext[2] and x >= (rc_ext[3] + 105) and x <= (rc_ext[3] + 125):
            rc_ext[4] = 5
            rc_ext[6] = 245
            rc_ext[7] = 134
            rc_ext[8] = 34
        if y >= 5 + rc_ext[2] and y <= rc_ext[2] * 2 and x >= (rc_ext[3] + 5) and x <= (rc_ext[3] + 25):
            rc_ext[4] = 6
            rc_ext[6] = 233
            rc_ext[7] = 167
            rc_ext[8] = 2
        if y >= 5 + rc_ext[2] and y <= rc_ext[2] * 2 and x >= (rc_ext[3] + 30) and x <= (rc_ext[3] + 50):
            rc_ext[4] = 7
            rc_ext[6] = 244
            rc_ext[7] = 188
            rc_ext[8] = 33
        if y >= 5 + rc_ext[2] and y <= rc_ext[2] * 2 and x >= (rc_ext[3] + 55) and x <= (rc_ext[3] + 75):
            rc_ext[4] = 8
            rc_ext[6] = 10
            rc_ext[7] = 10
            rc_ext[8] = 210
        if y >= 5 + rc_ext[2] and y <= rc_ext[2] * 2 and x >= (rc_ext[3] + 80) and x <= (rc_ext[3] + 100):
            rc_ext[4] = 9
            rc_ext[6] = 33
            rc_ext[7] = 37
            rc_ext[8] = 245
        if y >= 5 + rc_ext[2] and y <= rc_ext[2] * 2 and x >= (rc_ext[3] + 105) and x <= (rc_ext[3] + 125):
            rc_ext[4] = 10
            rc_ext[6] = 35
            rc_ext[7] = 50
            rc_ext[8] = 230
        if y >= 5 + rc_ext[2] * 2 and y <= rc_ext[2] * 3 and x >= (rc_ext[3] + 5) and x <= (rc_ext[3] + 25):
            rc_ext[4] = 11
            rc_ext[6] = 34
            rc_ext[7] = 142
            rc_ext[8] = 244
        if y >= 5 + rc_ext[2] * 2 and y <= rc_ext[2] * 3 and x >= (rc_ext[3] + 30) and x <= (rc_ext[3] + 50):
            rc_ext[4] = 12
            rc_ext[6] = 228
            rc_ext[7] = 229
            rc_ext[8] = 227
        if y >= 5 + rc_ext[2] * 2 and y <= rc_ext[2] * 3 and x >= (rc_ext[3] + 55) and x <= (rc_ext[3] + 75):
            rc_ext[4] = 13
            rc_ext[6] = 0
            rc_ext[7] = 0
            rc_ext[8] = 0
        if y >= 5 + rc_ext[2] * 2 and y <= rc_ext[2] * 3 and x >= (rc_ext[3] + 80) and x <= (rc_ext[3] + 100):
            rc_ext[4] = 14
            rc_ext[6] = 255
            rc_ext[7] = 255
            rc_ext[8] = 255
        if y >= 5 + rc_ext[2] * 2 and y <= rc_ext[2] * 3 and x >= (rc_ext[3] + 105) and x <= (rc_ext[3] + 125):
            rc_ext[4] = 15  # 自定义背景颜色

            num_b = input("请输入表示blue的数值: ")  # 提示用户输入blue数值
            try:  # 将输入的字符串转换为整数
                num_b = int(num_b)
                print("你输入的blue值是: ", num_b)
            except ValueError:
                print("输入的blue数值不是有效的数字,请重新输入。")

            num_g = input("请输入表示green的数值: ")  # 提示用户输入green数值
            try:  # 将输入的字符串转换为整数
                num_g = int(num_g)
                print("你输入的green值是: ", num_g)
            except ValueError:
                print("输入的green数值不是有效的数字,请重新输入。")

            num_r = input("请输入表示red的数值: ")  # 提示用户输入red数值
            try:  # 将输入的字符串转换为整数
                num_r = int(num_r)
                print("你输入的red值是: ", num_r)
            except ValueError:
                print("输入的red数值不是有效的数字,请重新输入。")

            if rc_ext[6] != num_b or rc_ext[7] != num_g or rc_ext[8] != num_r:  # 重复使用自定义背景色
                rc_ext[6] = num_b
                rc_ext[7] = num_g
                rc_ext[8] = num_r
                rc_ext[5] = 25

        if y >= 5 + rc_ext[2] * 3 and y <= rc_ext[2] * 4 - 5 and x >= (rc_ext[3] + 5) and x <= (rc_ext[3] + 62):
            rc_ext[9] = 16
        if y >= 5 + rc_ext[2] * 3 and y <= rc_ext[2] * 4 - 5 and x >= (rc_ext[3] + 69) and x <= (rc_ext[3] + 125):
            rc_ext[9] = 17

    # if event == cv.EVENT_RBUTTONDBLCLK:  # 右键双击
    # if enent == cv.EVENT_RBUTTONDOWN: # 右键单击

# 主程序-图片背景颜色更换
def backColorPhoto_demo():
    frame = cv.imread("./inPhoto/1724078664489.png")  # 不用摄像头,转到调入图片
    dst_out = frame.copy()  # 建立一个结果的图片
    cv.namedWindow("Change the background color of the color", cv.WINDOW_AUTOSIZE)  # 显示帧画面和结果画面的窗口
    r_int = 0  # 设置内部变量用于存储显示图像纵向像素值
    c_int = 0  # 设置内部变量用于存储显示图像横向像素值

    while (1):  # 手动操作更换人像背景
        if rc_ext[9] == 16:  # 选择一个图片
            file_path = filedialog.askopenfilename(filetypes=[('图片', '.jpg .jpeg .bmp .png'),  ('All Files', '*')])
            frame = cv.imread(file_path)
            dst_out = frame.copy()  # 建立一个结果的图片
            print("图片", file_path, "加载完成!")
            rc_ext[9] = 0  # 关闭本if循环
            rc_ext[4] = 0  # 打开程序初始化开关

        elif rc_ext[9] == 17:  # 保存结果
            cv.imwrite('./outPhoto/' + str(rc_ext[4]) +'.png', dst_out)
            print("图像保存在:/outPhoto/文件夹当中,文件名为:" + str(rc_ext[4]) + ".png")
            rc_ext[9] = 0  # 关闭本if循环

        elif rc_ext[4] == 0:  # 程序初始化
            rc_ext[0], rc_ext[1], channels = frame.shape  # 图像纵向、横向、深度像素值

            # 以下13行为本代码核心部分-2
            pix_val1 = frame[50, 50]
            pix_val2 = frame[50, (rc_ext[1] - 50)]
            hvs_set[6] = int(pix_val1[0] / 2 + pix_val2[0] / 2)
            hvs_set[7] = int(pix_val1[1] / 2 + pix_val2[1] / 2)
            hvs_set[8] = int(pix_val1[2] / 2 + pix_val2[2] / 2)
            hsv = rgb_to_hsv(hvs_set[6], hvs_set[7], hvs_set[8])
            # print(f"HSV value for red: H={hsv[0]}, S={hsv[1]}, V={hsv[2]}")
            hvs_set[0] = hsv[0] - rc_ext[11]
            hvs_set[3] = hsv[0] + rc_ext[11]
            hvs_set[1] = hsv[1] - rc_ext[11]
            hvs_set[4] = hsv[1] + rc_ext[11]
            hvs_set[2] = hsv[2] - rc_ext[11]
            hvs_set[5] = hsv[2] + rc_ext[11]

            if rc_ext[0] >= rc_ext[1]:  # 图像为高大于宽的纵向图像
                r_int = int((rc_ext[0] * rc_ext[10]) / rc_ext[1])  # 显示图像纵向像素值
                c_int = rc_ext[10]  # 显示图像横向像素值
            else:  # 图像为高小于宽的横向图像
                r_int = rc_ext[10]  # 显示图像纵向像素值
                c_int = int((rc_ext[1] * rc_ext[10]) / rc_ext[0])  # 显示图像横向像素值

            # 创建接近半黑底色的空图像
            dstImg = np.zeros((r_int, (c_int * 2 + 130), 3), dtype=np.uint8)  # 参数分别表示高度、宽度和通道数
            dstImg[:] = [80, 80, 80]  # 半黑色底
            rc_ext[2] = int(r_int / 4)
            rc_ext[3] = c_int
            dstImg[5:rc_ext[2], (c_int + 5):(c_int + 25), :] = [175, 141, 81]
            dstImg[5:rc_ext[2], (c_int + 30):(c_int + 50), :] = [212, 141, 91]
            dstImg[5:rc_ext[2], (c_int + 55):(c_int + 75), :] = [236, 179, 124]
            dstImg[5:rc_ext[2], (c_int + 80):(c_int + 100), :] = [245, 95, 34]
            dstImg[5:rc_ext[2], (c_int + 105):(c_int + 125), :] = [245, 134, 34]

            dstImg[5 + rc_ext[2]:rc_ext[2] * 2, (c_int + 5):(c_int + 25), :] = [233, 167, 2]
            dstImg[5 + rc_ext[2]:rc_ext[2] * 2, (c_int + 30):(c_int + 50), :] = [244, 188, 33]
            dstImg[5 + rc_ext[2]:rc_ext[2] * 2, (c_int + 55):(c_int + 75), :] = [10, 10, 210]
            dstImg[5 + rc_ext[2]:rc_ext[2] * 2, (c_int + 80):(c_int + 100), :] = [33, 37, 245]
            dstImg[5 + rc_ext[2]:rc_ext[2] * 2, (c_int + 105):(c_int + 125), :] = [35, 50, 230]

            dstImg[5 + rc_ext[2] * 2:rc_ext[2] * 3, (c_int + 5):(c_int + 25), :] = [34, 142, 244]
            dstImg[5 + rc_ext[2] * 2:rc_ext[2] * 3, (c_int + 30):(c_int + 50), :] = [228, 229, 227]
            dstImg[5 + rc_ext[2] * 2:rc_ext[2] * 3, (c_int + 55):(c_int + 75), :] = [0, 0, 0]
            dstImg[5 + rc_ext[2] * 2:rc_ext[2] * 3, (c_int + 80):(c_int + 100), :] = [255, 255, 255]

            dstImg[5 + rc_ext[2] * 3:rc_ext[2] * 4 - 5, (c_int + 5):(c_int + 62), :] = [0, 255, 255]
            dstImg[5 + rc_ext[2] * 3:rc_ext[2] * 4 - 5, (c_int + 69):(c_int + 125), :] = [0, 255, 0]

            frame_B = cv.resize(frame, (c_int, r_int))  # 此时参数为(cols,rows)
            dstImg[:, (c_int + 130):(c_int * 2 + 130), :] = frame_B[:, :, :]  #
            rc_ext[4] = 20  # 关闭本if循环

        elif rc_ext[4] > 0 and rc_ext[4] < 16 and rc_ext[5] != rc_ext[4]:  # 根据鼠标点击选择进行背景更换
            if rc_ext[4] == 15:
                dstImg[5 + rc_ext[2] * 2:rc_ext[2] * 3, (c_int + 105):(c_int + 125), :] = [rc_ext[6], rc_ext[7], rc_ext[8]]

            # 以下14行为本代码核心部分-1
            hsvimg = cv.cvtColor(frame, cv.COLOR_BGR2HSV)
            lower_red = np.array([hvs_set[0], hvs_set[1], hvs_set[2]])
            upper_red = np.array([hvs_set[3], hvs_set[4], hvs_set[5]])
            hbimg = cv.inRange(hsvimg, lower_red, upper_red)  # 生成黑白人像抠图

            k = np.ones((5, 5), np.uint8)
            r = cv.morphologyEx(hbimg, cv.MORPH_CLOSE, k)

            print("正在更换背景," + str(rc_ext[4]) + "请稍后......")
            rows, cols, channels = dst_out.shape
            for i in range(rows):
                for j in range(cols):
                    if r[i, j] == 255:
                        dst_out[i, j] = (rc_ext[6], rc_ext[7], rc_ext[8])

            dst_A = cv.resize(dst_out, (c_int, r_int))  # 此时参数为(cols,rows)
            dstImg[:, :c_int, :] = dst_A[:, :, :]  # 加载换底后图像
            rc_ext[5] = rc_ext[4]  # 关闭本if循环
            print("背景更换完成!")

        cv.setMouseCallback("Change the background color of the color", mouse_callback, dstImg)  # 鼠标响应操作
        cv.imshow("Change the background color of the color", dstImg)  # 显示合成后图像

        c = cv.waitKey(1)  # 点击 ESC 退出程序
        if c == 27:
            break
    cv.destroyAllWindows()  # 关闭所有窗口并释放资源

# 程序入口
if __name__ == '__main__':
    backColorPhoto_demo()

# 参考资料
# https://blog.csdn.net/weixin_69553582/article/details/130327057
# 给照片换底色(python+opencv)
# https://www.5axxw.com/questions/content/dk51ik
# 在Python中,如何使用filedialog.askopenfilename()仅获取文件名本身
实例原图:(文件名: 1724078664489.png 豆包生成的,懒得改了。放到inPhoto文件夹下,主要为了文件夹里面的界面干净。)

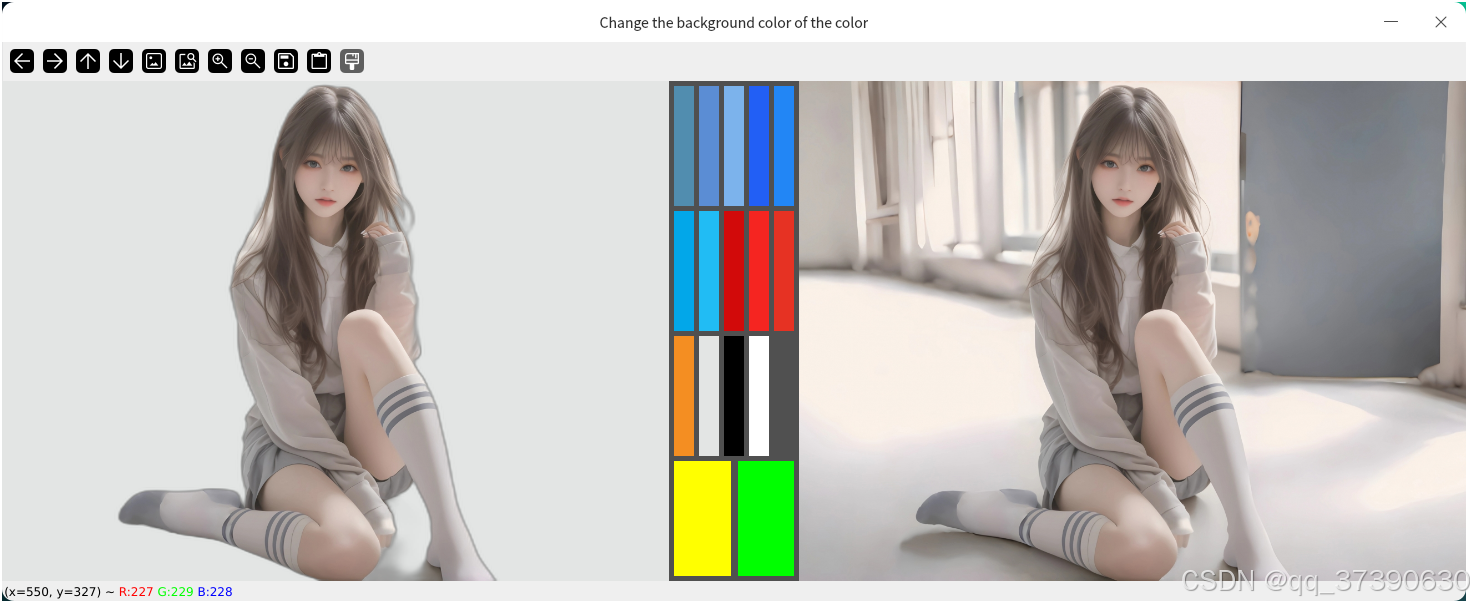
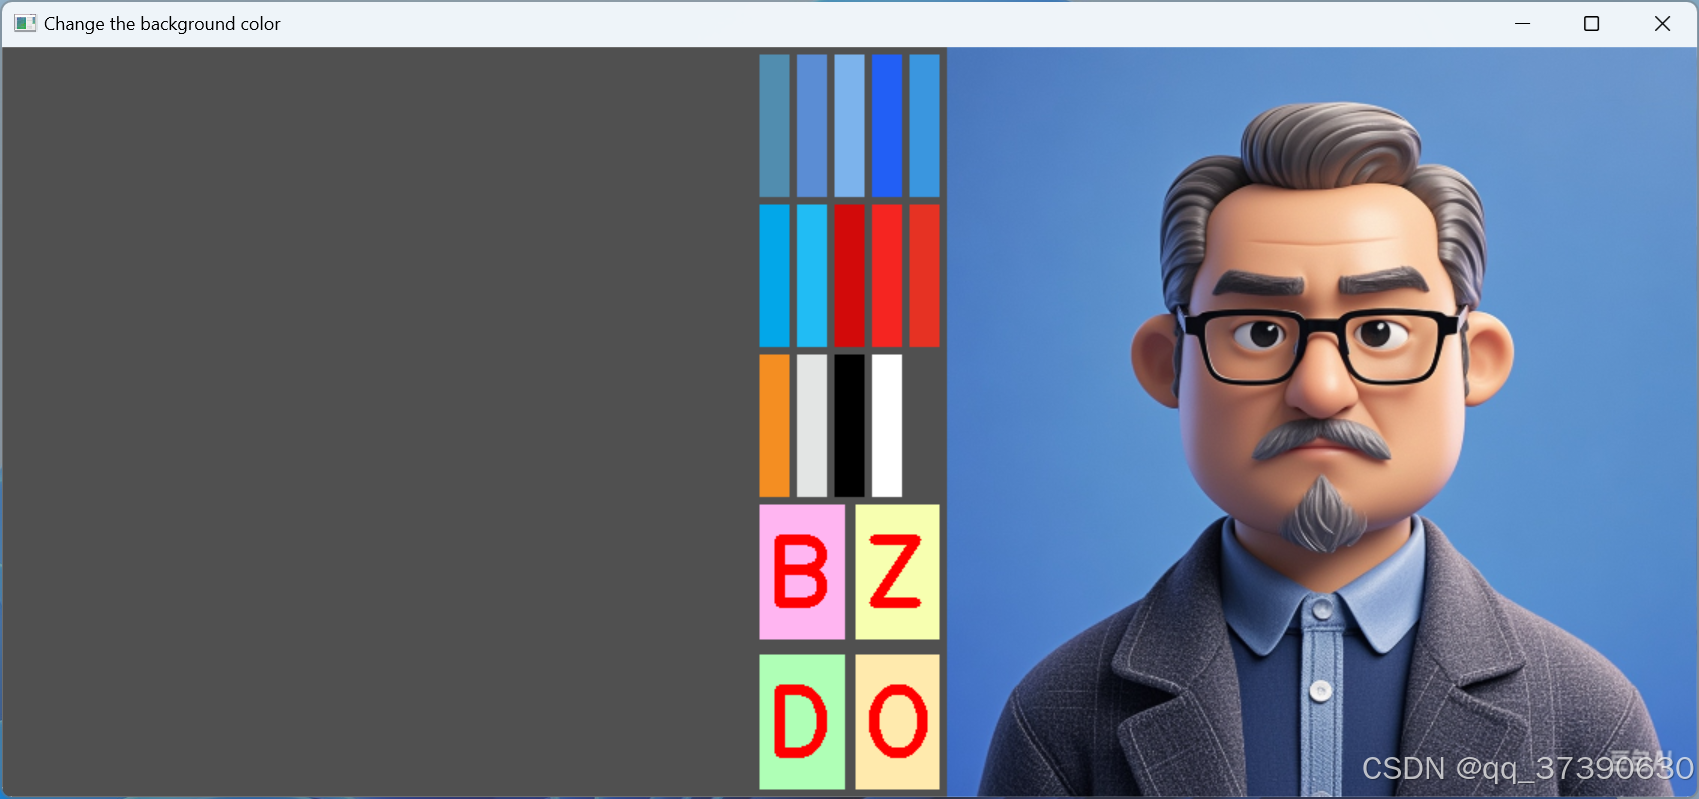
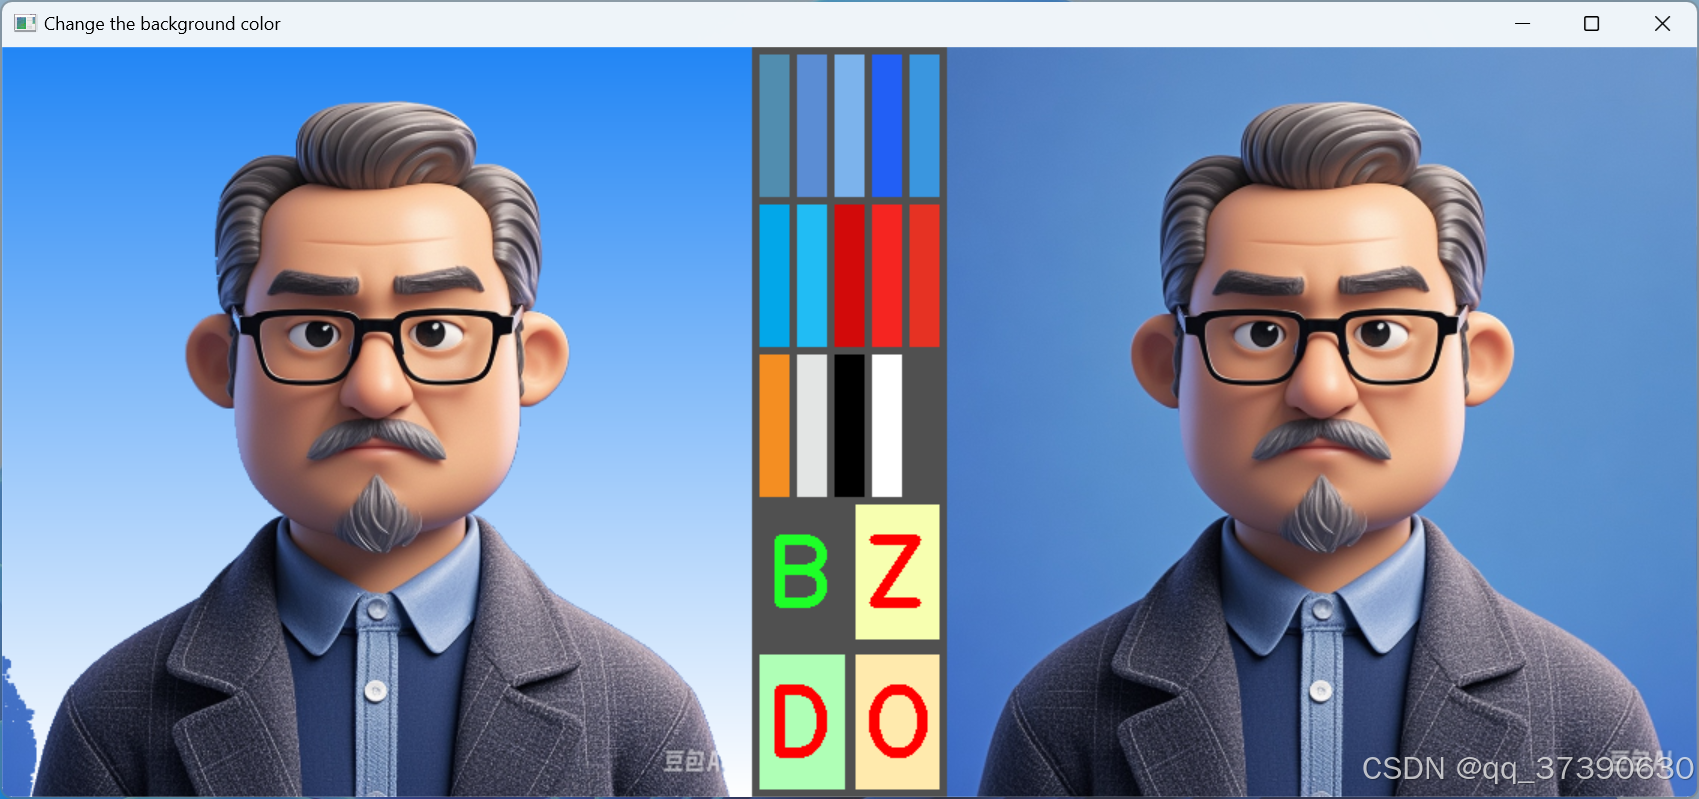
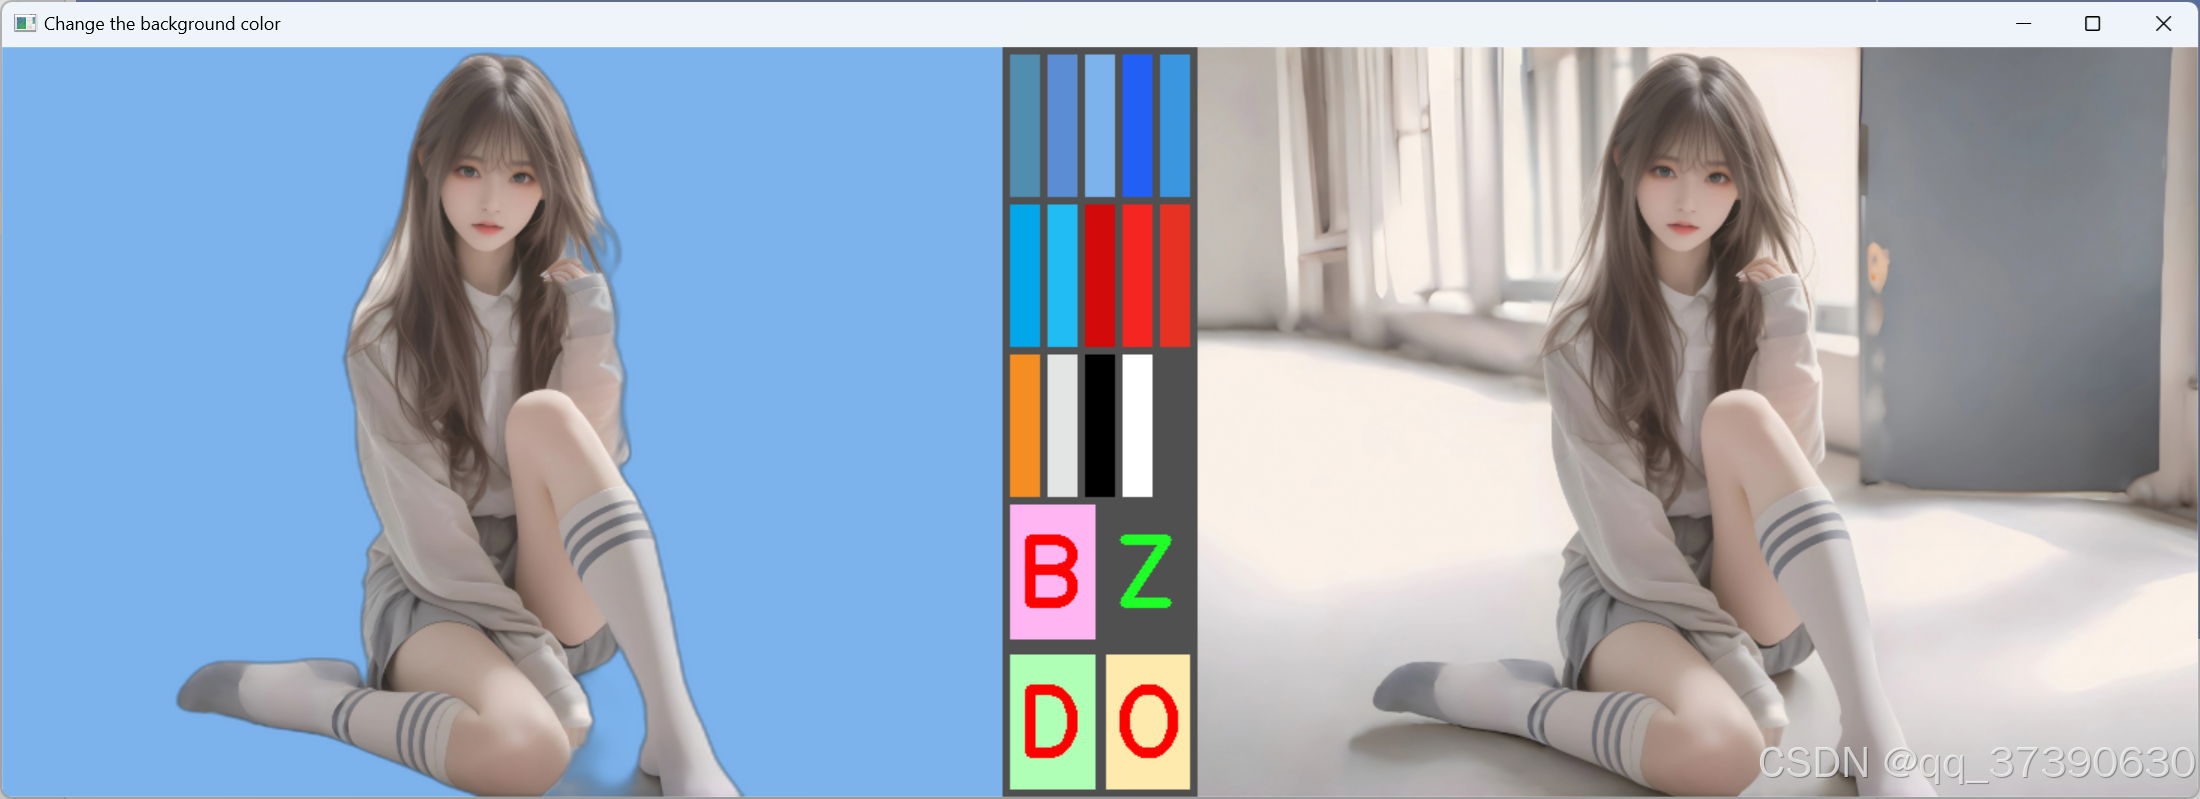
文档布局:

运行初始界面:

更换红色界面效果:

更换自定义背景颜色:

下面对程序相关情况说明如下:
1.界面中间共四行带色块的鼠标点击区域,上面三行是背景选择色块,初始设置有14个色块可选择(从上到下,从左到右默认编号是1到14),点击哪个颜色就更换成哪个颜色的背景。第三行最右侧是自定义色块(默认编号15),点击后手工输入blue、green、red三个颜色值后进行背景颜色更换。 界面最下面一行两个色块,左边黄色的是打开图像功能,右侧绿色是保存图像功能(没有添加文字标识,自己知道是咋回事,也是懒得添加了),默认保存更改完成的照片到 outPhoto 文件夹里面,文件名为默认编号加 .png 。
2.数组 rc_ext = [0, 0, 0, 0, 0, 0, 0, 0, 0, 0, 500, 30] 的最后一项30是自己的经验值,表示的是 lower_red 和 upper_red 对应数值差的一半,在实例图片上效果算是最佳平衡点。用真人照片测试,这个数值放成40效果不错。用 lower_red = np.array([100, 120, 150]) 和 upper_red = np.array([150, 255, 255]) 对蓝色背景原图的背景更换没有问题,但对其他颜色原图背景则毫无用处。 数组倒数第二项 500 这个数值,控制显示效果上每个图片的高或宽不能超过500像素,朋友们可以视情况自行调整。
3.此代码不同机器上更换背景需要的时间也不同。本文截图在Linux环境下生成,代码在Windows和Linux环境下都能运行。这个代码还有不完善的地方,比如:实例图更改背景后,左下角还没没被修改的地方;真人照片更换背景后,人的轮廓旁边一圈还有没被修改的地方;只能对单一背景颜色的图片修改,背景上下颜色不一致,以及有其他内容的时候,修改效果就很不好等等。我感觉 核心代码-1 的部分如果换成深度学习人像识别模块应该效果会更好,贾志刚老师的课程中有相关内容,但我还学得不精,浅尝辄止,非常惭愧,受自己知识和能力的限制,没有办法采用此种方法...... 所以上面代码作为我自己的一个兴趣,就仅供参考了。
4.在代码编写的过程中,参考了很多前辈的文章和经验,请原谅在此不再一一列出了,向各位前辈表示感谢!
2024年9月9日对代码做了调整,加入了Python的抠图神器rembg库。rembg库首次运行时会自动下载一个u2net的神经网络算法文件,并自动拷贝到系统默认位置,Windows和Linux系统都是如此,Linux系统下载的时间好像会快一点。闲话不说,还是先看代码( 文件名: main_backColorPhoto_rembg.py)。
import cv2 as cv
import numpy as np
import io
from tkinter import filedialog
from rembg import remove
from PIL import Image

# 0输入照片的纵向、1横向像素大小,2待选背景纵向像素长度,3c_int,
# 4选中背景代码,5选择背景计算开关,6B,7G,8R,9打开或保存标记,
# 10显示图像高宽像素限制,
rc_ext = [0, 0, 0, 0, 0, 0, 0, 0, 0, 0, 500]
InOutPath = ['./inPhoto/ab23a.jpeg', './outPhoto/']  # 存储调入和保存图片路径

def remove_background_and_set_white(input_path):  # (input_path, output_path):
    with open(InOutPath[0], 'rb') as i:  # 读取输入图像
        input_data = i.read()

    output_data = remove(input_data)   # 使用 rembg 移除背景
    image = Image.open(io.BytesIO(output_data))  # 将输出数据转换为 PIL Image 对象
    # 创建一个指定颜色背景
    white_background = Image.new('RGBA', image.size, (rc_ext[8], rc_ext[7], rc_ext[6], 255))
    white_background.paste(image, (0, 0), image)  # 将原图粘贴到指定颜色背景上
    final_image = white_background.convert('RGB')  # 转换为 RGB 模式(去除 alpha 通道)
    final_image.save("./inPhoto/temp.png")  # 保存临时结果供显示窗口调用
    # final_image.show()  # 显示图片
    final_image.save(InOutPath[1] + str(rc_ext[4]) + ".png")  # 保存结果
    print(rc_ext[4],"背景更换完成!同时以",rc_ext[4], ".png 为文件名保存在/outPhoto/文件夹下")
    rc_ext[4] = 20

# 图片上鼠标响应
def mouse_callback(event, x, y, flags, param):  # 图片上鼠标左键单击处取像素坐标
    if event == cv.EVENT_LBUTTONDOWN:  # 左键按下时触发该事件
        if y >= 5 and y <= rc_ext[2] and x >= (rc_ext[3] + 5) and x <= (rc_ext[3] + 25):
            rc_ext[4] = 1
            rc_ext[6] = 175
            rc_ext[7] = 141
            rc_ext[8] = 81
        if y >= 5 and y <= rc_ext[2] and x >= (rc_ext[3] + 30) and x <= (rc_ext[3] + 50):
            rc_ext[4] = 2
            rc_ext[6] = 212
            rc_ext[7] = 141
            rc_ext[8] = 91
        if y >= 5 and y <= rc_ext[2] and x >= (rc_ext[3] + 55) and x <= (rc_ext[3] + 75):
            rc_ext[4] = 3
            rc_ext[6] = 236
            rc_ext[7] = 179
            rc_ext[8] = 124
        if y >= 5 and y <= rc_ext[2] and x >= (rc_ext[3] + 80) and x <= (rc_ext[3] + 100):
            rc_ext[4] = 4
            rc_ext[6] = 245
            rc_ext[7] = 95
            rc_ext[8] = 34
        if y >= 5 and y <= rc_ext[2] and x >= (rc_ext[3] + 105) and x <= (rc_ext[3] + 125):
            rc_ext[4] = 5
            rc_ext[6] = 245
            rc_ext[7] = 134
            rc_ext[8] = 34
        if y >= 5 + rc_ext[2] and y <= rc_ext[2] * 2 and x >= (rc_ext[3] + 5) and x <= (rc_ext[3] + 25):
            rc_ext[4] = 6
            rc_ext[6] = 233
            rc_ext[7] = 167
            rc_ext[8] = 2
        if y >= 5 + rc_ext[2] and y <= rc_ext[2] * 2 and x >= (rc_ext[3] + 30) and x <= (rc_ext[3] + 50):
            rc_ext[4] = 7
            rc_ext[6] = 244
            rc_ext[7] = 188
            rc_ext[8] = 33
        if y >= 5 + rc_ext[2] and y <= rc_ext[2] * 2 and x >= (rc_ext[3] + 55) and x <= (rc_ext[3] + 75):
            rc_ext[4] = 8
            rc_ext[6] = 10
            rc_ext[7] = 10
            rc_ext[8] = 210
        if y >= 5 + rc_ext[2] and y <= rc_ext[2] * 2 and x >= (rc_ext[3] + 80) and x <= (rc_ext[3] + 100):
            rc_ext[4] = 9
            rc_ext[6] = 33
            rc_ext[7] = 37
            rc_ext[8] = 245
        if y >= 5 + rc_ext[2] and y <= rc_ext[2] * 2 and x >= (rc_ext[3] + 105) and x <= (rc_ext[3] + 125):
            rc_ext[4] = 10
            rc_ext[6] = 35
            rc_ext[7] = 50
            rc_ext[8] = 230
        if y >= 5 + rc_ext[2] * 2 and y <= rc_ext[2] * 3 and x >= (rc_ext[3] + 5) and x <= (rc_ext[3] + 25):
            rc_ext[4] = 11
            rc_ext[6] = 34
            rc_ext[7] = 142
            rc_ext[8] = 244
        if y >= 5 + rc_ext[2] * 2 and y <= rc_ext[2] * 3 and x >= (rc_ext[3] + 30) and x <= (rc_ext[3] + 50):
            rc_ext[4] = 12
            rc_ext[6] = 228
            rc_ext[7] = 229
            rc_ext[8] = 227
        if y >= 5 + rc_ext[2] * 2 and y <= rc_ext[2] * 3 and x >= (rc_ext[3] + 55) and x <= (rc_ext[3] + 75):
            rc_ext[4] = 13
            rc_ext[6] = 0
            rc_ext[7] = 0
            rc_ext[8] = 0
        if y >= 5 + rc_ext[2] * 2 and y <= rc_ext[2] * 3 and x >= (rc_ext[3] + 80) and x <= (rc_ext[3] + 100):
            rc_ext[4] = 14
            rc_ext[6] = 255
            rc_ext[7] = 255
            rc_ext[8] = 255
        if y >= 5 + rc_ext[2] * 2 and y <= rc_ext[2] * 3 and x >= (rc_ext[3] + 105) and x <= (rc_ext[3] + 125):
            rc_ext[4] = 15  # 自定义背景颜色

            num_b = input("请输入表示blue的数值: ")  # 提示用户输入blue数值
            try:  # 将输入的字符串转换为整数
                num_b = int(num_b)
                print("你输入的blue值是: ", num_b)
            except ValueError:
                print("输入的blue数值不是有效的数字,请重新输入。")

            num_g = input("请输入表示green的数值: ")  # 提示用户输入green数值
            try:  # 将输入的字符串转换为整数
                num_g = int(num_g)
                print("你输入的green值是: ", num_g)
            except ValueError:
                print("输入的green数值不是有效的数字,请重新输入。")

            num_r = input("请输入表示red的数值: ")  # 提示用户输入red数值
            try:  # 将输入的字符串转换为整数
                num_r = int(num_r)
                print("你输入的red值是: ", num_r)
            except ValueError:
                print("输入的red数值不是有效的数字,请重新输入。")

            if rc_ext[6] != num_b or rc_ext[7] != num_g or rc_ext[8] != num_r:  # 重复使用自定义背景色
                rc_ext[6] = num_b
                rc_ext[7] = num_g
                rc_ext[8] = num_r
                rc_ext[5] = 25

        if y >= 5 + rc_ext[2] * 3 and y <= rc_ext[2] * 4 - 5 and x >= (rc_ext[3] + 5) and x <= (rc_ext[3] + 62):
            rc_ext[9] = 16
        if y >= 5 + rc_ext[2] * 3 and y <= rc_ext[2] * 4 - 5 and x >= (rc_ext[3] + 69) and x <= (rc_ext[3] + 125):
            rc_ext[9] = 17

    # if event == cv.EVENT_RBUTTONDBLCLK:  # 右键双击
    # if enent == cv.EVENT_RBUTTONDOWN: # 右键单击

# 主程序-图片背景颜色更换
def backColorPhoto_demo():
    frame = cv.imread(InOutPath[0])  #./inPhoto/1724078664489.png")  # 不用摄像头,转到调入图片
    cv.namedWindow("Change the background color of the color", cv.WINDOW_AUTOSIZE)  # 显示帧画面和结果画面的窗口
    r_int = 0  # 设置内部变量用于存储显示图像纵向像素值
    c_int = 0  # 设置内部变量用于存储显示图像横向像素值

    while (1):  # 手动操作截取图像
        if rc_ext[9] == 16:  # 选择一个图片
            InOutPath[0] = filedialog.askopenfilename(filetypes=[('图片', '.jpg .jpeg .bmp .png'),  ('All Files', '*')])
            frame = cv.imread(InOutPath[0])

            print("图片", InOutPath[0], "加载完成!")
            rc_ext[9] = 0  # 关闭本if循环
            rc_ext[4] = 0  # 打开初程序始化开关

        # elif rc_ext[9] == 17:  # 保存结果
        #     cv.imwrite('./outPhoto/' + str(rc_ext[4]) +'.png', dst_out)
        #     print("图像保存在:/outPhoto/文件夹当中,文件名为:" + str(rc_ext[4]) + ".png")
        #     rc_ext[9] = 0  # 关闭本if循环

        elif rc_ext[4] == 0:  # 程序初始化
            rc_ext[0], rc_ext[1], channels = frame.shape  # 图像纵向、横向、深度像素值

            if rc_ext[0] >= rc_ext[1]:  # 图像为高大于宽的纵向图像
                r_int = int((rc_ext[0] * rc_ext[10]) / rc_ext[1])  # 设置内部变量用于存储显示图像纵向像素值
                c_int = rc_ext[10]  # 设置内部变量用于存储显示图像横向像素值
            else:  # 图像为高小于宽的横向图像
                r_int = rc_ext[10]  # 设置内部变量用于存储显示图像纵向像素值
                c_int = int((rc_ext[1] * rc_ext[10]) / rc_ext[0])  # 设置内部变量用于存储显示图像横向像素值

            # 创建接近半黑底色的空图像
            dstImg = np.zeros((r_int, (c_int * 2 + 130), 3), dtype=np.uint8)  # 参数分别表示高度、宽度和通道数
            dstImg[:] = [80, 80, 80]  # 半黑色底
            rc_ext[2] = int(r_int / 4)
            rc_ext[3] = c_int
            dstImg[5:rc_ext[2], (c_int + 5):(c_int + 25), :] = [175, 141, 81]
            dstImg[5:rc_ext[2], (c_int + 30):(c_int + 50), :] = [212, 141, 91]
            dstImg[5:rc_ext[2], (c_int + 55):(c_int + 75), :] = [236, 179, 124]
            dstImg[5:rc_ext[2], (c_int + 80):(c_int + 100), :] = [245, 95, 34]
            dstImg[5:rc_ext[2], (c_int + 105):(c_int + 125), :] = [245, 134, 34]

            dstImg[5 + rc_ext[2]:rc_ext[2] * 2, (c_int + 5):(c_int + 25), :] = [233, 167, 2]
            dstImg[5 + rc_ext[2]:rc_ext[2] * 2, (c_int + 30):(c_int + 50), :] = [244, 188, 33]
            dstImg[5 + rc_ext[2]:rc_ext[2] * 2, (c_int + 55):(c_int + 75), :] = [10, 10, 210]
            dstImg[5 + rc_ext[2]:rc_ext[2] * 2, (c_int + 80):(c_int + 100), :] = [33, 37, 245]
            dstImg[5 + rc_ext[2]:rc_ext[2] * 2, (c_int + 105):(c_int + 125), :] = [35, 50, 230]

            dstImg[5 + rc_ext[2] * 2:rc_ext[2] * 3, (c_int + 5):(c_int + 25), :] = [34, 142, 244]
            dstImg[5 + rc_ext[2] * 2:rc_ext[2] * 3, (c_int + 30):(c_int + 50), :] = [228, 229, 227]
            dstImg[5 + rc_ext[2] * 2:rc_ext[2] * 3, (c_int + 55):(c_int + 75), :] = [0, 0, 0]
            dstImg[5 + rc_ext[2] * 2:rc_ext[2] * 3, (c_int + 80):(c_int + 100), :] = [255, 255, 255]

            dstImg[5 + rc_ext[2] * 3:rc_ext[2] * 4 - 5, (c_int + 5):(c_int + 62), :] = [0, 255, 255]
            dstImg[5 + rc_ext[2] * 3:rc_ext[2] * 4 - 5, (c_int + 69):(c_int + 125), :] = [0, 255, 0]

            frame_B = cv.resize(frame, (c_int, r_int))  # 此时参数为(cols,rows)
            dstImg[:, (c_int + 130):(c_int * 2 + 130), :] = frame_B[:, :, :]  # 此处想修改成:dstImg[:,cols + 5:cols * 2 + 5,:]  未能成功。
            rc_ext[4] = 20  # 关闭本if循环

        elif rc_ext[4] > 0 and rc_ext[4] < 16 and rc_ext[5] != rc_ext[4]:  # 根据鼠标点击选择进行背景更换
            if rc_ext[4] == 15:
                dstImg[5 + rc_ext[2] * 2:rc_ext[2] * 3, (c_int + 105):(c_int + 125), :] = [rc_ext[6], rc_ext[7], rc_ext[8]]

            remove_background_and_set_white(InOutPath[0])
            dst_out = cv.imread("./inPhoto/temp.png")

            dst_A = cv.resize(dst_out, (c_int, r_int))  # 此时参数为(cols,rows)
            dstImg[:, :c_int, :] = dst_A[:, :, :]  # 加载换底后图像
            rc_ext[5] = rc_ext[4]  # 关闭本if循环,防止在同一颜色上重复运算

        cv.setMouseCallback("Change the background color of the color", mouse_callback, dstImg)  # 鼠标响应操作
        cv.imshow("Change the background color of the color", dstImg)  # 显示合成后图像

        c = cv.waitKey(1)  # 点击 ESC 退出程序
        if c == 27:
            break
    cv.destroyAllWindows()  # 关闭所有窗口并释放资源

# 程序入口
if __name__ == '__main__':
    backColorPhoto_demo()

# https://blog.csdn.net/weixin_69553582/article/details/130327057
# 给照片换底色(python+opencv)
# https://www.5axxw.com/questions/content/dk51ik
# 在Python中,如何使用filedialog.askopenfilename()仅获取文件名本身
# https://blog.csdn.net/2301_79728896/article/details/141142303
# Python图像背景去除
# https://juejin.cn/post/7389057936737353738
# 【python】rembg一键替换证件照背景-bysking
# https://blog.51cto.com/u_15127593/4219019
# pytorch读取一张图像进行分类预测需要注意的问题(opencv、PIL) 转载
测试图片下载自网页 Python图像背景去除_python 图片去背景-CSDN博客 ,运行效果见下图,感觉效果还不错。
用这种方法发现一个问题,处理背景颜色复杂的图片效果可以,处理背景颜色单一的图片,比如照相馆处理好的证件照时,人像衣服颜色会连同被换成背景颜色,效果不好。
2024年 12月13日对代码进行了调整。本周单位要蓝底渐变色背景照片,想想自己的这个小程序还没有这个功能。在网上查了一下,貌似也不大复杂,索性就试着做了一下,没想到还成了。于是乎就同时更改了界面,把上一次带有rembg库的背景更换部分,连同单一背景更换、渐变色背景更换一次性整合到一个代码文件中,更能方便使用。还是闲话不说,直接上代码:
import cv2 as cv
import numpy as np
import io
from tkinter import filedialog
from rembg import remove
from PIL import Image

# 0输入照片的纵向、1横向像素大小,2待选背景纵向像素长度,3c_int,
# 4选中背景代码,5选择背景计算开关,6B,7G,8R,9打开或保存标记,
# 10显示图像高宽像素限制,11HSV数值幅宽 12.渐变色开关判断。
# 13.智能换底开关判断。 14.读取文件。15.未定义功能开关判断。
rc_ext = [0, 0, 0, 0, 0, 0, 0, 0, 0, 0, 500, 30, 0, 0, 0, 0]
hvs_set = [100, 120, 150, 150, 255, 255, 0, 0, 0]  # hvs 像素值设置
InOutPath = ['./inPhoto/ab23a.jpeg', './outPhoto/']  # 存储调入和保存图片路径,请换成自己的路径及文件。 ab23a.jpeg # 1724078664489.png

# 将RGB颜色转换为HSV颜色
def rgb_to_hsv(r, g, b):
    rgb = np.uint8([[[r, g, b]]])
    hsv = cv.cvtColor(rgb, cv.COLOR_BGR2HSV)
    return hsv[0][0]

# 图片上鼠标响应
def mouse_callback(event, x, y, flags, param):  # 图片上鼠标左键单击处取像素坐标
    if event == cv.EVENT_LBUTTONDOWN:  # 左键按下时触发该事件
        if y >= 5 and y <= rc_ext[2] and x >= (rc_ext[3] + 5) and x <= (rc_ext[3] + 25):
            rc_ext[4] = 1
            rc_ext[6] = 175
            rc_ext[7] = 141
            rc_ext[8] = 81
        if y >= 5 and y <= rc_ext[2] and x >= (rc_ext[3] + 30) and x <= (rc_ext[3] + 50):
            rc_ext[4] = 2
            rc_ext[6] = 212
            rc_ext[7] = 141
            rc_ext[8] = 91
        if y >= 5 and y <= rc_ext[2] and x >= (rc_ext[3] + 55) and x <= (rc_ext[3] + 75):
            rc_ext[4] = 3
            rc_ext[6] = 236
            rc_ext[7] = 179
            rc_ext[8] = 124
        if y >= 5 and y <= rc_ext[2] and x >= (rc_ext[3] + 80) and x <= (rc_ext[3] + 100):
            rc_ext[4] = 4
            rc_ext[6] = 245
            rc_ext[7] = 95
            rc_ext[8] = 34
        if y >= 5 and y <= rc_ext[2] and x >= (rc_ext[3] + 105) and x <= (rc_ext[3] + 125):
            rc_ext[4] = 5
            rc_ext[6] = 245
            rc_ext[7] = 134
            rc_ext[8] = 34
        if y >= 5 + rc_ext[2] and y <= rc_ext[2] * 2 and x >= (rc_ext[3] + 5) and x <= (rc_ext[3] + 25):
            rc_ext[4] = 6
            rc_ext[6] = 233
            rc_ext[7] = 167
            rc_ext[8] = 2
        if y >= 5 + rc_ext[2] and y <= rc_ext[2] * 2 and x >= (rc_ext[3] + 30) and x <= (rc_ext[3] + 50):
            rc_ext[4] = 7
            rc_ext[6] = 244
            rc_ext[7] = 188
            rc_ext[8] = 33
        if y >= 5 + rc_ext[2] and y <= rc_ext[2] * 2 and x >= (rc_ext[3] + 55) and x <= (rc_ext[3] + 75):
            rc_ext[4] = 8
            rc_ext[6] = 10
            rc_ext[7] = 10
            rc_ext[8] = 210
        if y >= 5 + rc_ext[2] and y <= rc_ext[2] * 2 and x >= (rc_ext[3] + 80) and x <= (rc_ext[3] + 100):
            rc_ext[4] = 9
            rc_ext[6] = 33
            rc_ext[7] = 37
            rc_ext[8] = 245
        if y >= 5 + rc_ext[2] and y <= rc_ext[2] * 2 and x >= (rc_ext[3] + 105) and x <= (rc_ext[3] + 125):
            rc_ext[4] = 10
            rc_ext[6] = 35
            rc_ext[7] = 50
            rc_ext[8] = 230
        if y >= 5 + rc_ext[2] * 2 and y <= rc_ext[2] * 3 and x >= (rc_ext[3] + 5) and x <= (rc_ext[3] + 25):
            rc_ext[4] = 11
            rc_ext[6] = 34
            rc_ext[7] = 142
            rc_ext[8] = 244
        if y >= 5 + rc_ext[2] * 2 and y <= rc_ext[2] * 3 and x >= (rc_ext[3] + 30) and x <= (rc_ext[3] + 50):
            rc_ext[4] = 12
            rc_ext[6] = 228
            rc_ext[7] = 229
            rc_ext[8] = 227
        if y >= 5 + rc_ext[2] * 2 and y <= rc_ext[2] * 3 and x >= (rc_ext[3] + 55) and x <= (rc_ext[3] + 75):
            rc_ext[4] = 13
            rc_ext[6] = 0
            rc_ext[7] = 0
            rc_ext[8] = 0
        if y >= 5 + rc_ext[2] * 2 and y <= rc_ext[2] * 3 and x >= (rc_ext[3] + 80) and x <= (rc_ext[3] + 100):
            rc_ext[4] = 14
            rc_ext[6] = 255
            rc_ext[7] = 255
            rc_ext[8] = 255
        if y >= 5 + rc_ext[2] * 2 and y <= rc_ext[2] * 3 and x >= (rc_ext[3] + 105) and x <= (rc_ext[3] + 125):
            rc_ext[4] = 15  # 自定义背景颜色

            num_b = input("请输入表示blue的数值: ")  # 提示用户输入blue数值
            try:  # 将输入的字符串转换为整数
                num_b = int(num_b)
                print("你输入的blue值是: ", num_b)
            except ValueError:
                print("输入的blue数值不是有效的数字,请重新输入。")

            num_g = input("请输入表示green的数值: ")  # 提示用户输入green数值
            try:  # 将输入的字符串转换为整数
                num_g = int(num_g)
                print("你输入的green值是: ", num_g)
            except ValueError:
                print("输入的green数值不是有效的数字,请重新输入。")

            num_r = input("请输入表示red的数值: ")  # 提示用户输入red数值
            try:  # 将输入的字符串转换为整数
                num_r = int(num_r)
                print("你输入的red值是: ", num_r)
            except ValueError:
                print("输入的red数值不是有效的数字,请重新输入。")

            if rc_ext[6] != num_b or rc_ext[7] != num_g or rc_ext[8] != num_r:  # 重复使用自定义背景色
                rc_ext[6] = num_b
                rc_ext[7] = num_g
                rc_ext[8] = num_r
                rc_ext[5] = 25

        if y >= 5 + rc_ext[2] * 3 and y <= rc_ext[2] * 4 - 5 and x >= (rc_ext[3] + 5) and x <= (rc_ext[3] + 62):
            rc_ext[4] = 16
            if rc_ext[12] == 0:
                rc_ext[12] = 10
                rc_ext[13] = 0
            else:
                rc_ext[12] = 0

        if y >= 5 + rc_ext[2] * 3 and y <= rc_ext[2] * 4 - 5 and x >= (rc_ext[3] + 69) and x <= (rc_ext[3] + 125):
            rc_ext[4] = 17
            if rc_ext[13] == 0:
                rc_ext[13] = 10
                rc_ext[12] = 0
            else:
                rc_ext[13] = 0

        if y >= 5 + rc_ext[2] * 4 and y <= rc_ext[2] * 5 - 5 and x >= (rc_ext[3] + 5) and x <= (rc_ext[3] + 62):
            rc_ext[9] = 18
        if y >= 5 + rc_ext[2] * 4 and y <= rc_ext[2] * 5 - 5 and x >= (rc_ext[3] + 69) and x <= (rc_ext[3] + 125):
            rc_ext[9] = 19

    # if enent == cv.EVENT_RBUTTONDOWN: # 右键单击,
    # if event == cv.EVENT_RBUTTONDBLCLK:  # 右键双击,

# 主程序-图片背景颜色更换
def backColorPhoto_demo():
    frame = cv.imread(InOutPath[0])  # 调入源图图片
    dst_out = frame.copy()  # 建立一个保存结果的图片

    # 创建渐变色背板空图像
    f_h, f_w, _ = dst_out.shape
    gra_img = np.zeros((f_h, f_w, 3), dtype=np.uint8)

    cv.namedWindow("Change the background color", cv.WINDOW_AUTOSIZE)  # 定义主界面窗口
    r_int = 0  # 设置内部变量用于存储显示图像纵向像素值
    c_int = 0  # 设置内部变量用于存储显示图像横向像素值

    while (1):  # 手动操作截取图像
        if rc_ext[9] == 18:  # 选择一个图片
            InOutPath[0] = filedialog.askopenfilename(filetypes=[('图片', '.jpg .jpeg .bmp .png'), ('All Files', '*')])
            frame = cv.imread(InOutPath[0])
            dst_out = frame.copy()  # 建立一个保存结果的图片

            # 创建渐变色背板空图像
            f_h, f_w, _ = dst_out.shape
            gra_img = np.zeros((f_h, f_w, 3), dtype=np.uint8)  # 渐变背景空图。

            print("图片", InOutPath[0], "加载完成!")
            rc_ext[12] = 0  # 渐变更换背景功能关闭
            rc_ext[13] = 0  # 智能更换背景功能关闭
            rc_ext[9] = 0  # 关闭本if循环
            rc_ext[4] = 0  # 打开初程序始化开关

        elif rc_ext[4] == 0:  # 程序初始化
            rc_ext[0], rc_ext[1], channels = frame.shape  # 图像纵向、横向、深度像素值

            # 准备HSV相关数值
            pix_val1 = frame[50, 50]  # 获取源图一点的RGB颜色值。
            pix_val2 = frame[50, (rc_ext[1] - 50)]  # 获取源图另一点的RGB颜色值。
            hvs_set[6] = int(pix_val1[0] / 2 + pix_val2[0] / 2)  # 获取源图两点RGB颜色值和的均值。
            hvs_set[7] = int(pix_val1[1] / 2 + pix_val2[1] / 2)  # 获取源图两点RGB颜色值和的均值。
            hvs_set[8] = int(pix_val1[2] / 2 + pix_val2[2] / 2)  # 获取源图两点RGB颜色值和的均值。
            hsv = rgb_to_hsv(hvs_set[6], hvs_set[7], hvs_set[8])  # 获取源图测点RGB颜色值转HSV值。
            # print(f"HSV value for red: H={hsv[0]}, S={hsv[1]}, V={hsv[2]}")
            hvs_set[0] = hsv[0] - rc_ext[11]
            hvs_set[3] = hsv[0] + rc_ext[11]
            hvs_set[1] = hsv[1] - rc_ext[11]
            hvs_set[4] = hsv[1] + rc_ext[11]
            hvs_set[2] = hsv[2] - rc_ext[11]
            hvs_set[5] = hsv[2] + rc_ext[11]

            if rc_ext[0] >= rc_ext[1]:  # 图像为高大于宽的纵向图像
                r_int = int((rc_ext[0] * rc_ext[10]) / rc_ext[1])  # 设置内部变量用于存储显示图像纵向像素值
                c_int = rc_ext[10]  # 设置内部变量用于存储显示图像横向像素值
            else:  # 图像为高小于宽的横向图像
                r_int = rc_ext[10]  # 设置内部变量用于存储显示图像纵向像素值
                c_int = int((rc_ext[1] * rc_ext[10]) / rc_ext[0])  # 设置内部变量用于存储显示图像横向像素值

            # 创建接近半黑底色的主界面空图像
            dstImg = np.zeros((r_int, (c_int * 2 + 130), 3), dtype=np.uint8)  # 参数分别表示高度、宽度和通道数
            dstImg[:] = [80, 80, 80]  # 半黑色底
            rc_ext[2] = int(r_int / 5)
            rc_ext[3] = c_int
            dstImg[5:rc_ext[2], (c_int + 5):(c_int + 25), :] = [175, 141, 81]
            dstImg[5:rc_ext[2], (c_int + 30):(c_int + 50), :] = [212, 141, 91]
            dstImg[5:rc_ext[2], (c_int + 55):(c_int + 75), :] = [236, 179, 124]
            dstImg[5:rc_ext[2], (c_int + 80):(c_int + 100), :] = [245, 95, 34]
            dstImg[5:rc_ext[2], (c_int + 105):(c_int + 125), :] = [223, 150, 58] # [215, 130, 45] # [223, 150, 58] #[218, 133, 47] #[245, 134, 34]

            dstImg[5 + rc_ext[2]:rc_ext[2] * 2, (c_int + 5):(c_int + 25), :] = [233, 167, 2]
            dstImg[5 + rc_ext[2]:rc_ext[2] * 2, (c_int + 30):(c_int + 50), :] = [244, 188, 33]
            dstImg[5 + rc_ext[2]:rc_ext[2] * 2, (c_int + 55):(c_int + 75), :] = [10, 10, 210]
            dstImg[5 + rc_ext[2]:rc_ext[2] * 2, (c_int + 80):(c_int + 100), :] = [33, 37, 245]
            dstImg[5 + rc_ext[2]:rc_ext[2] * 2, (c_int + 105):(c_int + 125), :] = [35, 50, 230]

            dstImg[5 + rc_ext[2] * 2:rc_ext[2] * 3, (c_int + 5):(c_int + 25), :] = [34, 142, 244]
            dstImg[5 + rc_ext[2] * 2:rc_ext[2] * 3, (c_int + 30):(c_int + 50), :] = [228, 229, 227]
            dstImg[5 + rc_ext[2] * 2:rc_ext[2] * 3, (c_int + 55):(c_int + 75), :] = [0, 0, 0]
            dstImg[5 + rc_ext[2] * 2:rc_ext[2] * 3, (c_int + 80):(c_int + 100), :] = [255, 255, 255]

            dstImg[5 + rc_ext[2] * 3:rc_ext[2] * 4 - 5, (c_int + 5):(c_int + 62), :] = [241, 181, 255]
            dstImg[5 + rc_ext[2] * 3:rc_ext[2] * 4 - 5, (c_int + 69):(c_int + 125), :] = [176, 255, 247]
            cv.putText(dstImg, "B", (c_int + 10 , r_int - int(1.3 * rc_ext[2])), cv.FONT_HERSHEY_SIMPLEX, 2, (0, 0, 255), 6)
            cv.putText(dstImg, "Z", (c_int + 75, r_int - int(1.3 * rc_ext[2])), cv.FONT_HERSHEY_SIMPLEX, 2, (0, 0, 255), 6)

            dstImg[5 + rc_ext[2] * 4:rc_ext[2] * 5 - 5, (c_int + 5):(c_int + 62), :] = [182, 255, 175]
            dstImg[5 + rc_ext[2] * 4:rc_ext[2] * 5 - 5, (c_int + 69):(c_int + 125), :] = [173, 234, 255]
            cv.putText(dstImg, "D", (c_int + 10, r_int - int(0.3 * rc_ext[2])), cv.FONT_HERSHEY_SIMPLEX, 2, (0, 0, 255), 6)
            cv.putText(dstImg, "O", (c_int + 75, r_int - int(0.3 * rc_ext[2])), cv.FONT_HERSHEY_SIMPLEX, 2, (0, 0, 255), 6)

            frame_B = cv.resize(frame, (c_int, r_int))  # 此时参数为(cols宽,rows高)
            dstImg[:, (c_int + 130):(c_int * 2 + 130), :] = frame_B[:, :, :]

            rc_ext[4] = 20  # 关闭本if循环

        elif rc_ext[4] == 16 or rc_ext[4] == 17:  # 根据鼠标点击选择单色、渐变、智能更换功能
            if rc_ext[12] == 10:
                dstImg[5 + rc_ext[2] * 3:rc_ext[2] * 4 - 5, (c_int + 5):(c_int + 62), :] = [80, 80, 80]
                cv.putText(dstImg, "B", (c_int + 10 , r_int - int(1.3 * rc_ext[2])), cv.FONT_HERSHEY_SIMPLEX, 2, (40, 255, 30), 6)
            else:
                dstImg[5 + rc_ext[2] * 3:rc_ext[2] * 4 - 5, (c_int + 5):(c_int + 62), :] = [241, 181, 255]
                cv.putText(dstImg, "B", (c_int + 10 , r_int - int(1.3 * rc_ext[2])), cv.FONT_HERSHEY_SIMPLEX, 2, (0, 0, 255), 6)

            if rc_ext[13] == 10:
                dstImg[5 + rc_ext[2] * 3:rc_ext[2] * 4 - 5, (c_int + 69):(c_int + 125), :] = [80, 80, 80]
                cv.putText(dstImg, "Z", (c_int + 75, r_int - int(1.3 * rc_ext[2])), cv.FONT_HERSHEY_SIMPLEX, 2, (40, 255, 30), 6)
            else:
                dstImg[5 + rc_ext[2] * 3:rc_ext[2] * 4 - 5, (c_int + 69):(c_int + 125), :] = [176, 255, 247]
                cv.putText(dstImg, "Z", (c_int + 75, r_int - int(1.3 * rc_ext[2])), cv.FONT_HERSHEY_SIMPLEX, 2, (0, 0, 255), 6)

        elif rc_ext[4] > 0 and rc_ext[4] < 16 and rc_ext[5] != rc_ext[4]:  # 根据鼠标点击选择进行背景更换
            if rc_ext[4] == 15:
                dstImg[5 + rc_ext[2] * 2:rc_ext[2] * 3, (c_int + 105):(c_int + 125), :] = [rc_ext[6], rc_ext[7], rc_ext[8]]

            # 运用HSV颜色生成黑白人像抠图
            hsvimg = cv.cvtColor(frame, cv.COLOR_BGR2HSV)
            lower_hsv = np.array([hvs_set[0], hvs_set[1], hvs_set[2]])
            upper_hsv = np.array([hvs_set[3], hvs_set[4], hvs_set[5]])
            hbimg = cv.inRange(hsvimg, lower_hsv, upper_hsv)  # 生成黑白人像抠图

            k = np.ones((5, 5), np.uint8)
            r = cv.morphologyEx(hbimg, cv.MORPH_CLOSE, k)

            if rc_ext[12] == 0 and rc_ext[13] == 0:
                print("正在更换单一颜色背景," + str(rc_ext[4]) + " 请稍后......")
                for i in range(f_h):
                    for j in range(f_w):
                        if r[i, j] == 255:
                            dst_out[i, j] = (rc_ext[6], rc_ext[7], rc_ext[8])

                dst_A = cv.resize(dst_out, (c_int, r_int))  # 此时参数为(cols宽,rows高)
                dstImg[:, :c_int, :] = dst_A[:, :, :]  # 加载换底后图像
                cv.imwrite(InOutPath[1] + str(rc_ext[4]) + '.png', dst_out)
                print("背景更换完成!图像保存在:/outPhoto/文件夹当中,文件名为:" + str(rc_ext[4]) + ".png")

            if rc_ext[12] == 10: # and rc_ext[13] == 0:
                print("正在更换渐变颜色背景," + str(rc_ext[4]) + " 请稍后......")
                for i in range(f_h):
                    for j in range(f_w):
                        gra_img[i][j][0] = int((rc_ext[6] * (f_h - i) + 255 * i) / f_h)
                        gra_img[i][j][1] = int((rc_ext[7] * (f_h - i) + 255 * i) / f_h)
                        gra_img[i][j][2] = int((rc_ext[8] * (f_h - i) + 255 * i) / f_h)

                for i in range(f_h):
                    for j in range(f_w):
                        if r[i, j] == 255:
                            dst_out[i][j][0] = gra_img[i][j][0]
                            dst_out[i][j][1] = gra_img[i][j][1]
                            dst_out[i][j][2] = gra_img[i][j][2]

                dst_A = cv.resize(dst_out, (c_int, r_int))  # 此时参数为(cols,rows)
                dstImg[:, :c_int, :] = dst_A[:, :, :]  # 加载换底后图像
                cv.imwrite(InOutPath[1] + str(rc_ext[4]) + '_B.png', dst_out)
                print("渐变背景更换完成!图像保存在:/outPhoto/文件夹当中,文件名为:" + str(rc_ext[4]) + "_B.png")

            if rc_ext[13] == 10:  #  and
                print("正在智能更换单一颜色背景," + str(rc_ext[4]) + " 请稍后......")
                with open(InOutPath[0], 'rb') as i:  # 读取输入图像
                    input_data = i.read()

                output_data = remove(input_data)  # 使用 rembg 移除背景
                image = Image.open(io.BytesIO(output_data))  # 将输出数据转换为 PIL Image 对象
                white_background = Image.new('RGBA', image.size, (rc_ext[8], rc_ext[7], rc_ext[6], 255))
                white_background.paste(image, (0, 0), image)  # 将原图粘贴到指定颜色背景上
                final_image = white_background.convert('RGB')  # 转换为 RGB 模式(去除 alpha 通道)
                final_image.save("./inPhoto/temp.png")  # 保存临时结果供显示窗口调用
                final_image.save(InOutPath[1] + str(rc_ext[4]) + "_Z.png")  # 保存结果

                dst_out = cv.imread("./inPhoto/temp.png")
                dst_A = cv.resize(dst_out, (c_int, r_int))  # 此时参数为(cols,rows)
                dstImg[:, :c_int, :] = dst_A[:, :, :]  # 加载换底后图像
                print("单一背景颜色智能更换完成!同时以 " + str(rc_ext[4]) + "_Z.png 为文件名保存在/outPhoto/文件夹下")

            # if rc_ext[12] == 10 and rc_ext[13] == 10:
            #     print("if rc_ext[12] == 10 and rc_ext[13] == 10: 另外功能待开发......")

            rc_ext[5] = rc_ext[4]  # 关闭本if循环

        cv.setMouseCallback("Change the background color", mouse_callback, dstImg)  # 鼠标响应操作
        cv.imshow("Change the background color", dstImg)  # 显示合成后图像

        c = cv.waitKey(1)  # 点击 ESC 退出程序
        if c == 27:
            break
    cv.destroyAllWindows()  # 关闭所有窗口并释放资源

# 程序入口
if __name__ == '__main__':
    backColorPhoto_demo()


# 参考资料:
# https://blog.csdn.net/weixin_69553582/article/details/130327057
# 给照片换底色(python+opencv)
# https://www.5axxw.com/questions/content/dk51ik
# 在Python中,如何使用filedialog.askopenfilename()仅获取文件名本身
# https://blog.csdn.net/2301_79728896/article/details/141142303
# Python图像背景去除
# https://juejin.cn/post/7389057936737353738
# 【python】rembg一键替换证件照背景-bysking
# https://blog.51cto.com/u_15127593/4219019
# pytorch读取一张图像进行分类预测需要注意的问题(opencv、PIL) 转载
# https://blog.51cto.com/u_16213334/7737652
# python opencv 渐变色
更改后界面如下。 界面下半部分 B 部分表示渐变色选项,选中后背景色为深灰色,字体为淡绿色; Z 部分表示rembg库背景更换选项,选中后背景色为深灰色,字体为淡绿色;D 部分表示读取新图片选项; O 部分无任何作用。
选择 B 选项执行渐变色背景更换操作:
选择 Z 选项执行 rembg库背景更换操作:
操作说明:点击 D ,选择好要更换背景的图片后,再点击 B或Z ,然后再点击上方色块进行背景更换操作。 不点击 B及Z ,直接点击上面色块即进行单一颜色背景更换。 更换完成后自动保存到 outPhoto 文件夹中。


 873
873

 被折叠的 条评论
为什么被折叠?
被折叠的 条评论
为什么被折叠?
 到【灌水乐园】发言


