


文章目录
- xxx Vue
- 前端常用组件说明
- JDate 日期组件 使用文档
- JSuperQuery 高级查询 使用文档
- JEllipsis 字符串超长截取省略号显示
- JCheckbox 使用文档
- JCodeEditor 使用文档
- JAreaLinkage 使用文档
- JMarkdownEditor 使用文档
- JCategorySelect 使用文档
- JImageUpload 使用文档
- JFormContainer 使用文档
- JSwitch 使用文档
- JTime使用文档
- JUpload使用文档
- JSelectBizComponent
- jTree使用文档
- JSelectDepart 部门选择组件
- JSelectMultiUser 用户多选组件
- JSelectUserByDep 根据部门选择用户
- JModal 使用文档
- JImportModal 使用文档
- JSelectMultiple 多选下拉组件
- JSlider 滑块验证码
- JTreeSelect 树形下拉组件
- JEditableTable 帮助文档
- JPopup 弹窗选择组件
- Table 重封装组件说明
- JDictSelectTag 组件用法
- JDictSelectUtil.js 列表字典函数用法
- JMultiSelectTag 多选组件
- JSearchSelectTag 字典表的搜索组件
- 下拉选项滚动错位的解决方法
- 路由/菜单说明
xxx Vue
当前最新版本: 1.0.0(发布日期:2020-01-27)
Overview
基于 Ant Design of Vue 实现的 Ant Design Pro Vue 版
xxxx前端页面代码和后端功能代码一键生成,不需要写任何代码。
前端技术
- 基础框架:ant-design-vue - Ant Design Of Vue 实现
- JavaScript框架:Vue
- Webpack
- node
- yarn
- eslint
- @vue/cli 3.2.1
项目下载和运行
- 拉取项目代码
    业务项目
    xxxx

    基础项目
    xxxx
- 安装依赖
    1、在xxx项目dos窗口中执行yarn install
    2、在xxxx 项目dos窗口中执行npm link,然后切换到xxxx,执行npm link xxxx
- 开发模式运行
yarn run serve
- 编译项目
yarn run build
- Lints and fixes files
yarn run lint
前端常用组件说明
| 编号 | 组件名称 | 说明 | 适用场景 |
|---|---|---|---|
| 1 | JDate | 日期组件,可获取多种的日期格式 | 填写生日、创建时间、通知时间等我们会看到日期控件 |
| 2 | JSuperQuery | 高级查询通用组件,条件可以选择等于,包含,范围,不等于,开头字符,结尾字符,为空等。 | 根据需要添加对应的查询条件对table数据进行过滤。 适用于表格查询条件筛选 |
| 3 | JEllipsis | 遇到超长文本展示,通过此标签可以截取省略号显示,鼠标放置会提示全文本 | 遇到超长文本展示,通过此标签可以截取省略号显示,鼠标放置会提示全文本 |
| 4 | JCheckbox | 多选checkbox组件 | 适用于自定义传参的多选checkbox |
| 5 | JCodeEditor | 代码编辑器 | 高亮显示的编辑器 |
| 6 | JAreaLinkage | 省市三级联动组件 | 适用于选择省、市、县三级联动功能 |
| 7 | JMarkdownEditor | markDown编辑器 | 编辑器 |
| 8 | JCategorySelect | 分类树选择组件 | 适用加载分类字典功能。 |
| 9 | JImageUpload | 图片上传组件 | 适用上传照片、图片附件功能。 |
| 10 | JFormContainer | 表单禁用组件 | 适用详情页禁止修改表单页面。 |
| 11 | JSwitch | 开关组件 | 适用表单页面有状态需要显示启用、禁用。 |
| 12 | JTime | 时间组件 | 适用取时分秒 |
| 13 | JUpload | 文件上传组件 | 适用文件附件上传、下载。 |
| 14 | jTree | 异步树控件 | 适用与机构数据、设备分类带有层级关系的场景 |
| 15 | JSelectDepart | 部门选择组件 | 适用弹窗选择部门的场景 |
| 16 | JSelectMultiUser | 用户选择组件 | 适用弹窗选择用户的场景 |
| 17 | JSelectUserByDep | 根据部门选择用户组件 | 适用弹窗根据部门选择用户的场景 |
| 18 | JSearchSelectTag | 字典表的搜索组件 | 适用于数据字典结合带模糊查找功能,加载下拉选择。 |
| 19 | JModal | 弹窗组件 | |
| 20 | JSelectMultiple | 多选下拉组件 | 适用自定义多选参数 |
| 21 | JSlider | 滑动验证码 | 适用于滑动验证 |
| 22 | JTreeSelect | 树形下拉组件 | 适用于异步加载数据字典下拉选择。 |
| 23 | JEditableTable | 带行编辑功能的table组件 | 适用于table行编辑功能。 |
| 24 | JPopup | 弹窗选择组件` | 适用于动态加载table列、加载table数据。 |
| 25 | JDictSelectTag | 字典下拉选择组件 | 适用于数据字典结合,加载下拉选择(单选)。 |
| 26 | JMultiSelectTag | 字典多选checkbox组件 | 适用于数据字典结合,加载下拉选择(多选)。 |
JDate 日期组件 使用文档
说明: antd-vue日期组件需要用moment中转一下,用起来不是很方便,特二次封装,使用时只需要传字符串即可
参数配置
| 参数 | 类型 | 必填 | 说明 |
|---|---|---|---|
| placeholder | string | placeholder | |
| readOnly | boolean | true/false 默认false | |
| value | string | 绑定v-model或是v-decorator后不需要设置 | |
| showTime | boolean | 是否展示时间true/false 默认false | |
| dateFormat | string | 日期格式 默认’YYYY-MM-DD’ 若showTime设置为true则需要将其设置成对应的时间格式(如:YYYY-MM-DD HH:mm:ss) | |
| triggerChange | string | 触发组件值改变的事件是否是change,当使用v-decorator时且没有设置decorator的option.trigger为input需要设置该值为true |
使用示例
1.组件带有v-model的使用方法
<j-date v-model="dateStr"></j-date>
2.组件带有v-decorator的使用方法
a).设置trigger-change属性为true
<j-date :trigger-change="true" v-decorator="['dateStr',{}]"></j-date>
b).设置decorator的option.trigger为input
<j-date v-decorator="['dateStr',{trigger:'input'}]"></j-date>
3.其他使用
添加style
<j-date v-model="dateStr" style="width:100%"></j-date>
添加placeholder
<j-date v-model="dateStr" placeholder="请输入dateStr"></j-date>
添加readOnly
<j-date v-model="dateStr" :read-only="true"></j-date>
备注:
script内需引入jdate
<script>
  import JDate from '@lone/lone-vue/src/components/jeecg/JDate'
  export default {
    name: "demo",
    components: {
      JDate
    }
    //...
  }
</script>
JSuperQuery 高级查询 使用文档
参数配置
| 参数 | 类型 | 必填 | 说明 |
|---|---|---|---|
| fieldList | array | ✔ | 需要查询的列集合示例如下,type类型有:date/datetime/string/int/number |
| callback | array | 回调函数名称(非必须)默认handleSuperQuery |
fieldList结构示例:
  const superQueryFieldList=[{
    type:"date",
    value:"birthday",
    text:"生日"
  },{
    type:"string",
    value:"name",
    text:"用户名"
  },{
    type:"int",
    value:"age",
    text:"年龄"
  }]
页面代码概述:
1.import之后再components之内声明
import JSuperQuery from '@lone/lone-vue/src/components/jeecg/JSuperQuery.vue';
  export default {
    name: "JeecgDemoList",
    components: {
      JSuperQuery
    },
2.页面引用
  <!-- 高级查询区域 -->
  <j-super-query :fieldList="fieldList" ref="superQueryModal" @handleSuperQuery="handleSuperQuery"></j-super-query>
3.list页面data中需要定义三个属性:
  fieldList:superQueryFieldList,
  superQueryFlag:false,
  superQueryParams:""
4.list页面声明回调事件handleSuperQuery(与组件的callback对应即可)
//高级查询方法
handleSuperQuery(arg) {
  if(!arg){
    this.superQueryParams=''
    this.superQueryFlag = false
  }else{
    this.superQueryFlag = true
    this.superQueryParams=JSON.stringify(arg)
  }
  this.loadData()
},
5.改造list页面方法
  // 获取查询条件
  getQueryParams() {
    let sqp = {}
    if(this.superQueryParams){
      sqp['superQueryParams']=encodeURI(this.superQueryParams)
    }
    var param = Object.assign(sqp, this.queryParam, this.isorter);
    param.field = this.getQueryField();
    param.pageNo = this.ipagination.current;
    param.pageSize = this.ipagination.pageSize;
    return filterObj(param);
  },
6.打开弹框调用show方法:
this.$refs.superQueryModal.show();
JEllipsis 字符串超长截取省略号显示
说明: 遇到超长文本展示,通过此标签可以截取省略号显示,鼠标放置会提示全文本
参数配置
| 参数 | 类型 | 必填 | 说明 |
|---|---|---|---|
| value | string | 必填 | 字符串文本 |
| length | number | 非必填 | 默认25 |
使用示例
1.组件带有v-model的使用方法
<j-ellipsis :value="text"/>


# Modal弹框实现最大化功能

1.定义modal的宽度:
```vue
  <a-modal
    :width="modalWidth"


    />
2.自定义modal的title,居右显示切换图标
  <template slot="title">
    <div style="width: 100%;">
      <span>{{ title }}</span>
      <span style="display:inline-block;width:calc(100% - 51px);padding-right:10px;text-align: right">
        <a-button @click="toggleScreen" icon="appstore" style="height:20px;width:20px;border:0px"></a-button>
      </span>
    </div>
  </template>
3.定义toggleScreen事件,用于切换modal宽度
  toggleScreen(){
      if(this.modaltoggleFlag){
        this.modalWidth = window.innerWidth;
      }else{
        this.modalWidth = 800;
      }
      this.modaltoggleFlag = !this.modaltoggleFlag;
    },
4.data中声明上述用到的属性
    data () {
      return {
        modalWidth:800,
        modaltoggleFlag:true,
JCheckbox 使用文档
说明: antd-vue checkbox组件处理的是数组,用起来不是很方便,特二次封装,使用时只需处理字符串即可
参数配置
| 参数 | 类型 | 必填 | 说明 |
|---|---|---|---|
| options | array | ✔ | checkbox需要配置的项,是个数组,数组中每个对象包含两个属性:label(用于显示)和value(用于存储) |
使用示例
<template>
  <a-form :form="form">
    <a-form-item label="v-model式用法">
      <j-checkbox v-model="sport" :options="sportOptions"></j-checkbox><span>{{ sport }}</span>
    </a-form-item>

    <a-form-item label="v-decorator式用法">
      <j-checkbox v-decorator="['sport']" :options="sportOptions"></j-checkbox><span>{{ getFormFieldValue('sport') }}</span>
    </a-form-item>
  </a-form>
</template>

<script>
  import JCheckbox from '@lone/lone-vue/src/components/jeecg/JCheckbox'
  export default {
    components: {JCheckbox},
    data() {
      return {
        form: this.$form.createForm(this),
        sport:'',
        sportOptions:[
          {
            label:"足球",
            value:"1"
          },{
            label:"篮球",
            value:"2"
          },{
            label:"乒乓球",
            value:"3"
          }]
      }
    },
    methods: {
     getFormFieldValue(field){
       return this.form.getFieldValue(field)
     }
    }
  }
</script>
JCodeEditor 使用文档
说明: 一个简易版的代码编辑器,支持语法高亮
参数配置
| 参数 | 类型 | 必填 | 说明 |
|---|---|---|---|
| language | string | 是 | 表示当前编写代码的类型 javascript/html/css/sql |
| placeholder | string | 是 | placeholder |
| lineNumbers | Boolean | 否 | 是否显示行号 |
| fullScreen | Boolean | 是 | 是否显示全屏按钮 |
| zIndex | string | 否 | 全屏以后的z-index |
使用示例
<template>
  <div>
    <j-code-editor
      language="javascript"
      v-model="editorValue"
      :fullScreen="true" //是否显示全屏按钮
      style="min-height: 100px"/>
    {{ editorValue }}
  </div>
</template>

<script>
  import JCodeEditor from '@lone/lone-vue/src/components/jeecg/JCodeEditor'
  export default {
    components: {JCodeEditor},
    data() {
      return {
        form: this.$form.createForm(this),
        editorValue:'',//双向绑定的参数
      }
    }
  }
</script>
JAreaLinkage 使用文档
说明: 省市县三级联动组件
参数配置
| 参数 | 类型 | 默认值 | 必填 | 说明 |
|---|---|---|---|---|
| value(v-modal) | string | 绑定值 | 是 | 绑定值 |
| type | string | cascader | 是 | 控件的显示类型 |
| width | Boolean | 否 | 控件的宽度 |
使用示例
        <!-- 省市县级联 -->
        <a-row :gutter="24">
          <a-col :span="12">
            <a-form-item label="省市县级联">
              <j-area-linkage v-model="formData.areaLinkage1" type="cascader"/>
            </a-form-item>
          </a-col>
          <a-col :span="12">输入的值(v-model):{{ formData.areaLinkage1 }}</a-col>
        </a-row>


        <!-- 省市县级联 -->
        <a-row :gutter="24">
          <a-col :span="12">
            <a-form-item label="省市县级联">
              <j-area-linkage v-model="formData.areaLinkage2" type="select"/>
            </a-form-item>
          </a-col>
          <a-col :span="12">输入的值(v-model):{{ formData.areaLinkage2 }}</a-col>
        </a-row>
JMarkdownEditor 使用文档
说明: 一个牛逼的MarkDown编辑器,支持语法高亮
使用示例
<template>
  <div>
    <a-form-item label="MarkdownEditor" style="min-height: 300px">
      <j-markdown-editor v-model="content"></j-markdown-editor>
    </a-form-item>
           实时显示{{ content }}
  </div>
</template>

<script>
  import JMarkdownEditor from '@/components/jeecg/JMarkdownEditor/index'
  export default {
    name: JMarkDownEditerDemo,
    components: {
      JMarkdownEditor
    },
     data () {
      return {
          content:"",
         }
     }
  }
</script>
JCategorySelect 使用文档
说明: 分类字典树选择
参数配置
| 参数 | 类型 | 默认值 | 必填 | 说明 |
|---|---|---|---|---|
| value(v-modal) | string | 是 | 绑定值 | |
| placeholder | string | 请选择 | 否 | 表单预期值的提示信息 |
| disabled | boolean | false | 否 | 禁用分类字典选择器 |
| multiple | Boolean | false | 否 | 是否支持多选 |
| pid | string | 否 | 分类树节点父节点Id | |
| pCode | string | 是 | 分类树节点父编码 |
使用示例
<template>
   <!-- 分类字典树 -->
    <a-row :gutter="24">
      <a-col :span="12">
          <j-category-select
          v-model="selectCategory"
          pcode="A01"         //分类节点父编码
          :multiple="true">   //多选
          </j-category-select>
      </a-col>
      <a-col :span="12">选中的值(v-model):{{ selectCategory }}</a-col>
    </a-row>
</template>

<script>
  import JCategorySelect from '@/components/jeecg/JCategorySelect'
  export default {
    name: JCategorySelect,
    components: {
      JCategorySelect
    },
     data () {
      return {
          selectCategory:"",
         }
     }
  }
</script>
JImageUpload 使用文档
说明: 一款图片上传组件
参数配置
| 参数 | 类型 | 默认值 | 必填 | 说明 |
|---|---|---|---|---|
| bui-id | string | 是 | 所属业务ID | |
| docId | string(array) | 是 | 对应mongodb文件ID | |
| class-code | string | 否 | java实体类编码 | |
| class-type | string | 是 | 文件所属分类 |
使用示例
<template>
   <!-- 图片上传组件 -->
    <a-row :gutter="24">
      <a-col :span="12">
         <j-image-upload
          class="avatar-uploader"
          @change="avatarChange"
          text="上传"
          :bui-id="this.uuid"
          :docId="this.fileList"
          :class-type="'user'">
         </j-image-upload>
      </a-col>
    </a-row>
</template>

<script>
  import JImageUpload from '@lone/lone-vue/src/components/jeecg/JImageUpload'
  export default {
    name: test,
    components: {
      JImageUpload
    },
     data () {
      return {
         fileList:[],
         model:{}
         }
     },
     computed:{
      uuid:function () {
        if (this.model && this.model.id) {
          return this.model.id;
        } else {
          return null;
        }

      }
    },
    method: {
        //上传头像之后 把上传到mongodb返回的地址 绑定到filelist
        avatarChange(avatar){
            this.fileList = avatar;
        },
        //关闭页面时清空图片
        close(){
            this.fileList = []
        }
    }
  }
</script>
JFormContainer 使用文档
说明: 暂用于表单禁用
使用示例
<!-- 在form下直接写这个组件,设置disabled为true就能将此form中的控件禁用 -->
  <a-form layout="inline" :form="form" >
    <j-form-container disabled>
      <!-- 表单内容省略..... -->
    </j-form-container>
  </a-form>
JSwitch 使用文档
说明: 一款封装的Switch开发插件
参数配置
| 参数 | 类型 | 默认值 | 必填 | 说明 |
|---|---|---|---|---|
| query | Boolean | false | 否 | 控制显示下拉框或者Switch开关(是、否) |
| options | array | [‘Y’,‘N’] | 否 | 自定义显示参数( [‘Y’,‘N’] ) |
| disabled | boolean | false | 否 | 是否禁用Switch开关 |
| value | string(number) | 是 | 参数 |
使用示例
  <a-form layout="inline" :form="form" >
       <a-row :gutter="24">
          <a-col :span="12">
            <a-form-item label="JSwitch示例">
              <j-switch v-model="formData.jSwitch" />
            </a-form-item>
          </a-col>
          <a-col :span="12">选择的值(v-model):{{ formData.jSwitch }}</a-col>
        </a-row>
  </a-form>
JTime使用文档
说明: 一款封装的时间处理插件
参数配置
| 参数 | 类型 | 默认值 | 必填 | 说明 |
|---|---|---|---|---|
| placeholder | String | 是 | placeholder | |
| dateFormat | String | HH:mm:ss | 是 | 日期格式化 |
| disabled | boolean | false | 否 | 是否禁用日期开关 |
| value | string(number) | 是 | 参数 | |
| readOnly | boolean | 否 | 是否只读 | |
| getCalendarContainer | function | 否 | 定义浮层的容器,默认为 body 上新建 div |
使用示例
    <!-- JTime示例 -->
        <a-row :gutter="24">
          <a-col :span="12">
            <a-form-item label="JTime示例">
              <j-time v-model="formData.jTime"/>
            </a-form-item>
          </a-col>
          <a-col :span="12">选择的值(v-model):{{ formData.jTime }}</a-col>
        </a-row>
JUpload使用文档
说明: 一款封装文件上传插件
参数配置
| 参数 | 类型 | 默认值 | 必填 | 说明 |
|---|---|---|---|---|
| fileList | array | 是 | mongodb文件Id(如果是返回多个文件,是需要返回多个iD) |
使用示例
    <!-- 文件上传插件示例 -->
    <a-row :gutter="24">
      <a-col :span="12">
        <a-form-item label="文件上传">
          <j-upload v-model="fileList"></j-upload>
        </a-form-item>
      </a-col>
    </a-row>

import JUpload from '@lone/lone-vue/src/components/jeecg/JUpload'
components: { JUpload }
JSelectBizComponent
Jeecg 选择组件的公共可复用组件
引用方式
import JSelectBizComponent from '@/src/components/jeecgbiz/JSelectBizComponent'

export default {
  components: { JSelectBizComponent }
}
参数
配置参数
| 参数名 | 类型 | 必填 | 默认值 | 备注 |
|---|---|---|---|---|
| rowKey | String | “id” | 唯一标识的字段名 | |
| value(v-model) | String | “” | 默认选择的数据,多个用半角逗号分割 | |
| name | String | “” | 显示名字,例如选择用户就填写"用户" | |
| listUrl | String | 是 | 数据请求地址,必须是封装了分页的地址 | |
| valueUrl | String | “” | 获取显示文本的地址,例如存的是 username,可以通过该地址获取到 realname | |
| displayKey | String | null | 显示在标签上的字段 key ,不传则直接显示数据 | |
| returnKeys | Array | [‘id’, ‘id’] | v-model 绑定的 keys,是个数组,默认使用第二项,当配置了 returnId=true 就返回第一项 | |
| returnId | Boolean | false | 返回ID,设为true后将返回配置的 returnKeys 中的第一项 | |
| selectButtonText | String | “选择” | 选择按钮的文字 | |
| queryParamText | String | null | 查询条件显示文字,不传则使用 name | |
| columns | Array | 是 | 列配置项,与antd的table的配置完全一致。列的第一项会被配置成右侧已选择的列表上 | |
| columns[0].widthRight | String | null | 仅列的第一项可以应用此配置,表示右侧已选择列表的宽度,建议 70%,不传则应用width | |
| placeholder | String | “请选择” | 占位符 | |
| disabled | Boolean | false | 是否禁用 | |
| multiple | Boolean | false | 是否可多选 | |
| buttons | Boolean | true | 是否显示"选择"按钮,如果不显示,可以直接点击文本框打开选择界面 |
jTree使用文档
说明: 一款封装的时间处理插件
参数配置
| 参数 | 类型 | 默认值 | 必填 | 说明 |
|---|---|---|---|---|
| permissionKeys | array | 否 | 控制按钮是否显示 | |
| permissionData | array | 否 | 按钮权限控制 | |
| url | array | 是 | 异步树控件所需要的后端接口 | |
| buttonTitle | string | 是 | 按钮动态名称 | |
| placeholder | string | 是 | placeholder | |
| selectedKeyData | string | 是 | 选中节点是否开始回调 | |
| dbClick | string | 是 | 单击节点时事件 | |
| icon | array | 是 | 配置父子节点图标样式、背景色、类型 | |
| checkable | boolean | 是 | 是否开启复选树形节点 | |
| onClearSelectedDis | boolean | 是 | 清除输入框的内容 |
方法介绍
| 方法名 | 说明 |
|---|---|
| handleTreeDelete | 树形控件删除节点方法 |
| handleTreeEdit | 树形控件编辑节点方法 |
| handleTreeAdd | 树形控件添加节点方法 |
| modalFormOk | 树形控件重新刷新页面方法 |
| rightHandle | 树形控件右键功能 |
| dropStatus | 树形控件右键节点下拉框事件 |
| closeDrop | 树形控件关闭下拉方法 |
使用示例
<!--机构弹窗选择通用组件  - -->
<template>
  <!-- 树控件区域-->
  <a-card style="height: calc(100vh);width: 100%; float: left;overflow: auto">
    <j-tree ref="jtree"
            :url="url"
            :dropTrigger="dropTrigger"
            :buttonTitle="buttonTitle"
            :permissionData="permissionData"
            :permissionKeys="permissionKeys"
            :placeholder="placeholder"
            :icon="icon"
            :selectedKeyData="selectedKeyData"
            :checkable=checkableDis
            @rightHandle="rightHandle"
            @dropStatus="dropStatus"
            @handleTreeAdd="handleTreeAdd"
            @handleTreeEdit="handleTreeEdit"
            @handleTreeDelete="handleTreeDelete"//树删除
            @closeDrop="closeDrop"
            @onSelect="onSelect"
            :autoLoad=this.autoLoad
            :multiple=this.multiple
            :isSearchDisabled=false
            :onCheckKey="'yes'"
            @onCheck="onCheckKey"
            @onDbSelect="onDbSelect"
            @onClearSelect="emptyCurrForm"
            :onClearSelectedDis="onClearSelectedDis"
            :dbClick="'Y'"></j-tree>
  </a-card>

</template>

<script>
  import JTree from '@lone/lone-vue/src/components/jeecg/JTree'
  import { getAction } from '@lone/lone-vue/src/api/manage'
  import { JeecgTreeMixin } from '@lone/lone-vue/src/mixins/JeecgTreeMixin'

  export default {
    name:'SelectDepartTreeFilterModal',
    mixins: [JeecgTreeMixin],
    components: {
      JTree
    },
    data() {
      return {
        buttonName: '机构',
        loading: false,
        title: '机构选择',
        visible: false,
        confirmLoading: false,
        destoryClose: true,
        autoLoad: false,
        modalWidth: 800,
        dropTrigger: 'contextmenu',
        rightClickSelectedKey: '',
        url: [
          {
            delete: '/sysdepart/sysDepart/delete',
            edit: '/sysdepart/sysDepart/edit',
            list: '/system/safe/queryTreeList',
            search: '/sysdepart/sysDepart/searchBy'
          }
        ],
        //控制按钮是否显示  增删改,0 1 2 默认开启,
        permissionKeys: [
          {
            addKey: '4',
            editKey: '4',
            deleteKey: '4',
            refreshKey: '4'
          }
        ],
        //按钮权限控制
        permissionData: [
          {
            dataPermissionAdd: '',
            dataPermissionEdit: '',
            dataPermissionDelete: '',
            dataPermissionRefresh: ''
          }
        ],
        //按钮内容
        buttonTitle: '单位分类',
        placeholder: '请输入查找的单位名称',
        onSelectKey: 'no',
        //树形控件定制图标
        icon: [
          {
            //叶子节点
            slot: 'smile',//图标分模块化
            linkType: 'pic-right',//图标类型
            style: 'color:green' //图标显示颜色
          }, {
            //非叶子结点
            slot: 'meh',//图标分模块化
            linkType: 'pic-left',//图标类型
            style: 'color:red' //图标显示颜色
          }
        ],
        selectedKeyData: 'yes',
        //保存选中的Key
        selectKeys: '',
        num:''
      }
    },
    created(){
        //初始化加载异步树
      this.initData()
    },
    methods: {
        //页面关闭时调用此方法
      handleCancel() {
        this.close()
      },
      //清除搜索栏参数 回调此方法
      emptyCurrForm(){
        if(this.onClearSelectedDis){
          this.$emit("emptyData")
        }
      },
      //关闭页面 调用此方法
      close() {
        this.$refs.jtree.dataSource = []
        this.visible = false
        this.orgType = ""
      },
      //初始化加载异步树
      initData(key = null, first = true, url = this.url[0].list) {
        getAction(url, { key, orgType: this.orgType }).then((res) => {
          if (res.success) {
            this.$refs.jtree.dataSource = res.result
            this.$refs.jtree.loading = false
          }
        })
      },
      //选择树节点回调此方法
      onCheckKey(selectKey){
        if(selectKey){
          this.$emit("onCheckKey",selectKey)
        }
      },
      //双击节点回调到此方法
      onDbSelect(selectKey){
        if(selectKey){
          this.$emit("onCheckKey",selectKey)
        }
      },
    }
  }
</script>
JSelectDepart 部门选择组件
选择部门组件,存储部门ID,显示部门名称
参数配置
| 参数 | 类型 | 必填 | 说明 |
|---|---|---|---|
| modalWidth | Number | 弹框宽度 默认500 | |
| multi | Boolean | 是否多选 默认false | |
| rootOpened | Boolean | 是否展开根节点 默认true | |
| disabled | Boolean | 是否禁用 默认false |
使用示例
<template>
  <a-form :form="form">
    <a-form-item label="部门选择v-decorator" style="width: 300px">
      <j-select-depart v-decorator="['bumen']"/>
      {{ getFormFieldValue('bumen') }}
    </a-form-item>

    <a-form-item label="部门选择v-model" style="width: 300px">
      <j-select-depart v-model="bumen"/>
      {{ bumen }}
    </a-form-item>

    <a-form-item label="部门多选v-model" style="width: 300px">
      <j-select-depart v-model="bumens" :multi="true"/>
      {{ bumens }}
    </a-form-item>

  </a-form >
</template>

<script>
  import JSelectDepart from '@lone/lone-vue/src/components/jeecgbiz/JSelectDepart'
  export default {
    components: {JSelectDepart},
    data() {
      return {
        form: this.$form.createForm(this),
        bumen:"",
        bumens:""
      }
    },
    methods:{
      getFormFieldValue(field){
        return this.form.getFieldValue(field)
      }
    }
  }
</script>
JSelectMultiUser 用户多选组件
使用示例
<template>
  <a-form :form="form">
    <a-form-item label="用户选择v-decorator" style="width: 500px">
      <j-select-multi-user v-decorator="['users']"/>
      {{ getFormFieldValue('users') }}
    </a-form-item>

    <a-form-item label="用户选择v-model" style="width: 500px">
      <j-select-multi-user v-model="users" ></j-select-multi-user> //双向绑定用法
      {{ users }}
    </a-form-item>

  </a-form >
</template>

<script>
  import JSelectMultiUser from '@lone/lone-vue/src/components/jeecgbiz/JSelectMultiUser'
  export default {
    components: {JSelectMultiUser},
    data() {
      return {
        form: this.$form.createForm(this),
        users:"",
      }
    },
    methods:{
      getFormFieldValue(field){
        return this.form.getFieldValue(field)
      }
    }
  }
</script>
JSelectUserByDep 根据部门选择用户
参数配置
| 参数 | 类型 | 必填 | 说明 |
|---|---|---|---|
| modalWidth | Number | 弹框宽度 默认1250 | |
| disabled | Boolean | 是否禁用 |
使用示例
<template>
  <a-form :form="form">
    <a-form-item label="用户选择v-decorator" style="width: 500px">
      <j-select-user-by-dep v-decorator="['users']"/>
      {{ getFormFieldValue('users') }}
    </a-form-item>

    <a-form-item label="用户选择v-model" style="width: 500px">
      <j-select-user-by-dep v-model="users" ></j-select-user-by-dep>
      {{ users }}
    </a-form-item>

  </a-form >
</template>

<script>
  import JSelectUserByDep from '@lone/lone-vue/src/components/jeecgbiz/JSelectUserByDep'
  export default {
    components: {JSelectUserByDep},
    data() {
      return {
        form: this.$form.createForm(this),
        users:"",
      }
    },
    methods:{
      getFormFieldValue(field){
        return this.form.getFieldValue(field)
      }
    }
  }
</script>
JModal 使用文档
说明: 用于弹窗功能配置
使用示例
 <template>
  <j-modal
    :title="title"     //弹窗高度
    :width="width"     //弹窗宽度
    :visible="visible" //是否显示弹窗
    switchFullscreen  // 是否允许切换全屏(允许后右上角会出现一个按钮)
    @ok="handleOk"
    :okButtonProps="{ class:{'jee-hidden': disableSubmit} }"
    @cancel="handleCancel"       // 点击关闭按钮的时候是否关闭弹窗
    cancelText="关闭">

  </j-modal>
</template>
<script>
  export default {
    name: 'JModalDemo',
    components: {
    },
    data () {
      return {
        title:'我是一个弹窗',
        width:800,
        visible: false,
        disableSubmit: false
      }
    },
    method:{
        handleOk(){
            console.log("这是一个handleOk方法")
        },
        handleCancel(){
            this.visible = false
            console.log("这是一个handleCancel方法")
        }
    }

    }
    </script>
JImportModal 使用文档
说明: 用于列表页面导入excel功能
使用示例
<template>
  <!--  此处省略部分代码...... -->
  <a-button @click="handleImportXls" type="primary" icon="upload">导入</a-button>
  <!--  此处省略部分代码...... -->
  <j-import-modal ref="importModal" :url="getImportUrl()" @ok="importOk"></j-import-modal>
  <!--  此处省略部分代码...... -->
</template>

<script>
  import JCodeEditor from '@lone/lone-vue/src/components/jeecg/JCodeEditor'
  export default {
    components: {JCodeEditor},
    data() {
      return {
        //省略代码......
      }
    },
    methods:{
      //省略部分代码......
      handleImportXls(){
        this.$refs.importModal.show()
      },
      getImportUrl(){
         return '你自己处理上传业务的后台地址'
      },
      importOk(){
        this.loadData(1)
      }
    }
  }
</script>
JSelectMultiple 多选下拉组件
online用 实际开发请使用components/dict/JMultiSelectTag
JSlider 滑块验证码
使用示例
<template>
  <div style="width: 300px">
    <j-slider @onSuccess="sliderSuccess"></j-slider>
  </div>
</template>

<script>
  import JSlider from '@lone/lone-vue/src/components/jeecg/JSlider'
  export default {
    components: {JSlider},
    data() {
      return {
        form: this.$form.createForm(this),
        editorValue:'',
      }
    },
    methods:{
      sliderSuccess(){
        console.log("验证完成")
      }
    }
  }
</script>
JTreeSelect 树形下拉组件
异步加载的树形下拉组件
参数配置
| 参数 | 类型 | 必填 | 说明 |
|---|---|---|---|
| placeholder | string | placeholder | |
| dict | string | ✔ | 表名,显示字段名,存储字段名拼接的字符串 |
| pidField | string | ✔ | 父ID的字段名 |
| pidValue | string | 根节点父ID的值 默认’0’ 不可以设置为空,如果想使用此组件,而数据库根节点父ID为空,请修改之 | |
| multiple | boolean | 是否支持多选 |
使用示例
<template>
  <a-form>
    <a-form-item label="树形下拉测试" style="width: 300px">
      <j-tree-select
        v-model="departId"
        placeholder="请选择部门"
        dict="sys_depart,depart_name,id"
        pidField="parent_id">
      </j-tree-select>
      {{ departId }}
    </a-form-item>
  </a-form >
</template>

<script>
  import JTreeSelect from '@lone/lone-vue/src/components/jeecg/JTreeSelect'
  export default {
    components: {JTreeSelect},
    data() {
      return {
        departId:""
      }
    }
  }
</script>
JEditableTable 帮助文档
参数配置
| 参数 | 类型 | 必填 | 说明 |
|---|---|---|---|
| columns | array | ✔️ | 表格列的配置描述,具体项见下表 |
| dataSource | array | ✔️ | 表格数据 |
| loading | boolean | 是否正在加载,加载中不会显示任何行,默认false | |
| actionButton | boolean | 是否显示操作按钮,包括"新增"、“删除”,默认false | |
| rowNumber | boolean | 是否显示行号,默认false | |
| rowSelection | boolean | 是否可选择行,默认false | |
| dragSort | boolean | 是否可拖动排序,默认false | |
| dragSortKey | string | 拖动排序存储的Key,无需定义在columns内也能在getValues()时获取到值,默认orderNum | |
| maxHeight | number | 设定最大高度(px),默认400 | |
| disabledRows | object | 设定禁用的行,被禁用的行无法被选择和编辑,配置方法可以查看示例 | |
| disabled | boolean | 是否禁用所有行,默认false |
columns 参数详解
| 参数 | 类型 | 必填 | 说明 |
|---|---|---|---|
| title | string | ✔️ | 表格列头显示的问题 |
| key | string | ✔️ | 列数据在数据项中对应的 key,必须是唯一的 |
| type | string | ✔️ | 表单的类型,可以通过JEditableTableUtil.FormTypes赋值 |
| width | string | 列的宽度,可以是百分比,也可以是px或其他单位,建议设置为百分比,且每一列的宽度加起来不应超过100%,否则可能会不能达到预期的效果。留空会自动计算百分比 | |
| placeholder | string | 表单预期值的提示信息,可以使用${...}变量替换文本(详见${...} 变量使用方式) | |
| defaultValue | string | 默认值,在新增一行时生效 | |
| validateRules | array | 表单验证规则,配置方式见validateRules 配置规则 | |
| props | object | 设置添加给表单元素的自定义属性,例如:props:{title: 'show title'} | |
| disabled | boolean | 是否禁用当前列,默认false |
当 type=checkbox 时所需的参数
| 参数 | 类型 | 必填 | 说明 |
|---|---|---|---|
| defaultChecked | boolean | 默认值是否选中 | |
| customValue | array | 自定义值,checkbox需要的是boolean值,如果数据是其他值(例如'Y' or 'N')时,就会导致错误,所以提供了该属性进行转换,例:customValue: ['Y','N'],会将true转换为'Y',false转换为'N',反之亦然 |
当 type=select 时所需的参数
| 参数 | 类型 | 必填 | 说明 |
|---|---|---|---|
| options | array | ✔️ | 下拉选项列表,详见下表 |
| allowInput | boolean | 是否允许用户输入内容,并创建新的内容 | |
| dictCode | String | 数据字典Code,若options也有值,则拼接在options后面 |
options 所需参数
| 参数 | 类型 | 必填 | 说明 |
|---|---|---|---|
| text | string | ✔️ | 显示标题 |
| value | string | ✔️ | 真实值 |
当 type=upload 时所需的参数
| 参数 | 类型 | 必填 | 说明 |
|---|---|---|---|
| action | string | ✔️ | 上传文件路径 |
| token | boolean | 上传的时候是否传递token | |
| responseName | string | ✔️ | 若要从上传成功后从response中取出返回的文件名,那么这里填后台返回的包含文件名的字段名 |
当 type=slot 时所需的参数
| 参数 | 类型 | 必填 | 说明 |
|---|---|---|---|
| slotName | string | ✔️ | slot的名称 |
validateRules 配置规则
validateRules 需要的是一个数组,数组里每项都是一个规则,规则是object类型,规则的各个参数如下
required是否必填,可选值为trueorfalsepattern正则表达式验证,只有成功匹配该正则的值才能成功通过验证handler自定义函数校验,使用方法请见示例五message当验证未通过时显示的提示文本,可以使用${...}变量替换文本(详见${...} 变量使用方式)- 配置示例请看示例二
事件
| 事件名 | 触发时机 | 参数 |
|---|---|---|
| added | 当添加行操作完成后触发 | |
| deleted | 当删除行操作完成后触发(批量删除操作只会触发一次) | deleteIds 被逻辑删除的id |
| selectRowChange | 当行被选中或取消选中时触发 | selectedRowIds 被选中行的id |
| valueChange | 当数据发生改变的时候触发的事件 | { type, row, column, value, target } Event对象 |
方法
关于方法的如何调用的问题,请在FAQ中查看方法如何调用
initialize
用于初始化表格(清空表格)
参数:无返回值:无
resetScrollTop
重置滚动条Top位置
参数:
| 参数名 | 类型 | 必填 | 说明 |
|---|---|---|---|
| top | number | 新top位置,留空则滚动到上次记录的位置,用于解决切换tab选项卡时导致白屏以及自动将滚动条滚动到顶部的问题 |
返回值:无
add
主动添加行,默认情况下,当用户的滚动条已经在底部的时候,会将滚动条固定在底部,即添加后无需用户手动滚动,而会自动滚动到底部
参数:
| 参数名 | 类型 | 必填 | 说明 |
|---|---|---|---|
| num | number | 添加几行,默认为1 | |
| forceScrollToBottom | boolean | 是否在添加后无论用户的滚动条在什么位置都强制滚动到底部,默认为false |
返回值:无
removeRows
主动删除一行或多行
参数:
| 参数名 | 类型 | 必填 | 说明 |
|---|---|---|---|
| id | string 或 array | ✔️ | 被删除行的id。如果要删除一个,可以直接传id,如果要删除多个,需要将多个id封装成一个数组传入 |
返回值:无
removeSelectedRows
主动删除被选中的行
参数:无返回值:无
getValues
用于获取表格里所有表单的值,可进行表单验证
参数:
| 参数名 | 类型 | 必填 | 说明 |
|---|---|---|---|
| callback | function | ✔️ | 获取值的回调方法,会传入error和values两个参数。error:未通过验证的数量,当等于0时代表验证通过;values:获取的值(即使未通过验证该字段也有数据) |
| validate | boolean | 是否进行表单验证,默认为true,设为false则代表忽略表单验证 | |
| rowIds | array | 默认返回所有行的数据,如果传入了rowIds,那么就会只返回与该rowIds相匹配的数据,如果没有匹配的数据,就会返回空数组 |
返回值:无
getValuesSync
getValues的同步版,会直接将获取到的数据返回
参数:
| 参数名 | 类型 | 必填 | 说明 |
|---|---|---|---|
| options | object | 选项,详见下方所需参数 |
-
options所需参数
| 参数名 | 类型 | 必填 | 说明 |
|---|---|---|---|
| validate | boolean | 是否进行表单验证,默认为true,设为false则代表忽略表单验证 | |
| rowIds | array | 默认返回所有行的数据,如果传入了rowIds,那么就会只返回与该rowIds相匹配的数据,如果没有匹配的数据,就会返回空数组 |
-
返回值:objecterror未通过验证的数量,当等于0时代表验证通过values获取的值(即使未通过验证该字段也有数据)
-
使用示例
let { error, values } = this.$refs.editableTable.getValuesSync({ validate: true, rowIds: ['rowId1', 'rowId2'] })
if (error === 0) {
    console.log('表单验证通过,数据:', values);
} else {
    console.log('未通过表单验证,数据:', values);
}
getValuesPromise
getValues的promise版,会在resolve中传入获取到的值,会在reject中传入失败原因,例如VALIDATE_NO_PASSED
参数:
| 参数名 | 类型 | 必填 | 说明 |
|---|---|---|---|
| validate | boolean | 同getValues的validate参数 | |
| rowIds | array | 默认返回所有行的数据,如果传入了rowIds,那么就会只返回与该rowIds相匹配的数据,如果没有匹配的数据,就会返回空数组 |
返回值:Promise
getDeleteIds
用于获取被逻辑删除的行的id,返回一个数组,用户可将该数组传入后台,并进行批量删除
参数:无返回值:array
getAll
获取所有的数据,包括values、deleteIds
会在resolve中传入获取到的值:{values, deleteIds}
会在reject中传入失败原因,例如VALIDATE_NO_PASSED
参数:
| 参数名 | 类型 | 必填 | 说明 |
|---|---|---|---|
| validate | boolean | 同getValues的validate参数 |
返回值:Promise
setValues
主动设置表格中某行某列的值
参数:
| 参数名 | 类型 | 必填 | 说明 |
|---|---|---|---|
| values | array | 传入一个数组,数组中的每项都是一行的新值,具体见下面的示例 |
返回值:无示例:
setValues([
    {
        rowKey: id1, // 行的id
        values: { // 在这里 values 中的 name 是你 columns 中配置的 key
            'name': 'zhangsan',
            'age': '20'
        }
    },
    {
        rowKey: id2,
        values: {
            'name': 'lisi',
            'age': '23'
        }
    }
])
clearSelection
主动清空选择的行
参数:无返回值:无
内置插槽
| 插槽名 | 说明 |
|---|---|
| buttonBefore | 在操作按钮的前面插入插槽,不受actionButton属性的影响 |
| buttonAfter | 在操作按钮的后面插入插槽,不受actionButton属性的影响 |
${…} 变量使用方式
在placeholder和message这两个属性中可以使用${...}变量来替换文本
在示例二中,配置了title为名称的一列,而placeholder配置成了请输入${title},那么最终显示效果为请输入名称
这就是${...}变量的使用方式,在${}中可以使用的变量有title、key、defaultValue这三个属性的值
JEditableTableUtil 使用说明
在之前配置columns时提到过JEditableTableUtil这个工具类,那么如果想要知道详细的使用说明就请看这里
export 的常量
FormTypes
这是配置columns.type时用到的常量值,其中包括
normal默认,直接显示值,不渲染表单input显示输入框inputNumber显示数字输入框checkbox显示多选框select显示选择器(下拉框)date日期选择器datetime日期时间选择器upload上传组件(文件域)slot自定义插槽
VALIDATE_NO_PASSED
在判断表单验证是否通过时使用,如果 reject 的值 === VALIDATE_NO_PASSED 则代表表单验证未通过,你可以做相应的其他处理,反之则可能是发生了报错,可以使用 console.error 输出
封装的方法
validateTables
当你的页面中存在多个JEditableTable实例的时候,如果要获取每个实例的值、判断表单验证是否通过,就会让代码变得极其冗余、繁琐,于是我们就将该操作封装成了一个函数供你调用,它可以同时获取并验证多个JEditableTable实例的值,只有当所有实例的表单验证都通过后才会返回值,否则将会告诉你具体哪个实例没有通过验证。具体使用方法请看下面的示例
参数:
| 参数名 | 类型 | 必填 | 说明 |
|---|---|---|---|
| cases | array | 传入一个数组,数组中的每项都是一个JEditableTable的实例 |
返回值:Promise示例:
import { validateTables, VALIDATE_NO_PASSED } from '@lone/lone-vue/src/utils/JEditableTableUtil'
// 封装cases
let cases = []
cases.push(this.$refs.editableTable1)
cases.push(this.$refs.editableTable2)
cases.push(this.$refs.editableTable3)
cases.push(this.$refs.editableTable4)
cases.push(this.$refs.editableTable5)
// 同时验证并获取多个实例的值
validateTables(cases).then((all) => {
    // all 是一个数组,每项都对应传入cases的下标,包含values和deleteIds
    console.log('所有实例的值:', all)
}).catch((e = {}) => {
    // 判断表单验证是否未通过
    if (e.error === VALIDATE_NO_PASSED) {
        console.log('未通过验证的实例下标:', e.index)
    } else {
        console.error('发生异常:', e)
    }
})
FAQ
方法如何调用?
在示例一中,设定了一个 ref="editableTable" 的属性,那么在vue中就可以使用this.$refs.editableTable获取到该表格的实例,并调取其中的方法。
假如我要调取initialize方法,就可以这么写:this.$refs.editableTable.initialize()
如何获取表单的值?
使用getValue方法进行获取,详见示例三
如何进行表单验证?
在获取值的时候默认会进行表单验证操作,用户在输入的时候也会对正在输入的表单进行验证,只要配置好规则就可以了
如何添加或删除一行?
该功能已封装到组件中,你只需要将 actionButton 设置为 true 即可,当然你也可以在代码中主动调用新增方法或修改,具体见上方的方法介绍。
为什么使用了ATab组件后,切换选项卡会导致白屏或滚动条位置会归零?
在ATab组件中确实会导致滚动条位置归零,且不会触发onscroll方法,所以无法动态加载行,导致白屏的问题出现。
解决方法是在ATab组件的onChange事件触发时执行实例提供的resetScrollTop()方法即可,但是需要注意的是:代码主动改变ATab的activeKey不会触发onChange事件,还需要你手动调用下。
示例
<template>
    <a-tabs @change="handleChangeTab">
        <a-tab-pane tab="表格1" :forceRender="true" key="1">
            <j-editable-table
                ref="editableTable1"
                :loading="tab1.loading"
                :columns="tab1.columns"
                :dataSource="tab1.dataSource"/>
        </a-tab-pane>
        <a-tab-pane tab="表格2" :forceRender="true" key="2">
            <j-editable-table
                ref="editableTable2"
                :loading="tab2.loading"
                :columns="tab2.columns"
                :dataSource="tab2.dataSource"/>
        </a-tab-pane>
    </a-tabs>
</template>
/*--- 忽略部分代码片段 ---*/
methods: {

      /** 切换tab选项卡的时候重置editableTable的滚动条状态 */
      handleChangeTab(key) {
        this.$refs[`editableTable${key}`].resetScrollTop()
      }

}
/*--- 忽略部分代码片段 ---*/
slot(自定义插槽)如何使用?
代码示例请看:示例四(slot)
示例一
<j-editable-table
    ref="editableTable"
    :loading="loading"
    :columns="columns"
    :dataSource="dataSource"
    :rowNumber="true"
    :rowSelection="true"
    :actionButton="true"
    style="margin-top: 8px;"
    @selectRowChange="handleSelectRowChange"/>
示例二
import { FormTypes } from '@lone/lone-vue/src/utils/JEditableTableUtil'

/*--- 忽略部分代码片断 ---*/
columns: [
    {
        title: '名称',
        key: 'name',
        type: FormTypes.input,
        placeholder: '请输入${title}',
        defaultValue: '称名',
        // 表单验证规则
        validateRules: [
            {
                required: true, // 必填
                message: '${title}不能为空' // 提示的文本
            },
            {
                pattern: /^[a-z|A-Z][a-z|A-Z\d_-]{0,}$/, // 正则
                message: '${title}必须以字母开头,可包含数字、下划线、横杠'
            }
        ]
    },
    {
        title: '年龄',
        key: 'age',
        type: FormTypes.inputNumber,
        placeholder: '请输入${title}',
        defaultValue: 18,
        validateRules: [{required: true, message: '${title}不能为空'}]
    }
]
/*--- 忽略部分代码片断 ---*/
示例三
// 获取被逻辑删除的字段id
let deleteIds = this.$refs.editableTable.getDeleteIds();
// 获取所有表单的值,并进行验证
this.$refs.editableTable.getValues((error, values) => {
    // 错误数 = 0 则代表验证通过
    if (error === 0) {
        this.$message.success('验证通过')
        // 将通过后的数组提交到后台或自行进行其他处理
        console.log(deleteIds, values)
    } else {
        this.$message.error('验证未通过')
    }
})
示例四(slot)
<template>
    <j-editable-table :columns="columns" :dataSource="dataSource">
        <!-- 定义插槽 -->
        <!-- 这种定义插槽的写法是vue推荐的新版写法(https://cn.vuejs.org/v2/guide/components-slots.html#具名插槽),旧版已被废弃的写法不再支持 -->
        <!-- 若webstorm这样写报错,请看这篇文章:https://blog.csdn.net/lxq_9532/article/details/81870651 -->
        <template v-slot:action="props">
            <a @click="handleDelete(props)">删除</a>
        </template>
    </j-editable-table>
</template>
<script>
    import { FormTypes } from '@lone/lone-vue/src/utils/JEditableTableUtil'
    import JEditableTable from '@lone/lone-vue/src/components/jeecg/JEditableTable'
    export default {
        components: { JEditableTable },
        data() {
            return {
                columns: [
                    // ...
                    {
                        title: '操作',
                        key: 'action',
                        width: '8%',
                        type: FormTypes.slot, // 定义该列为 自定义插值列
                        slotName: 'action' // slot 的名称,对应 v-slot 冒号后面和等号前面的内容
                    }
                ]
            }
        },
        methods: {
            /* a 标签的点击事件,删除当前选中的行 */
            handleDelete(props) {
                // 参数解释
                // props.index :当前行的下标
                // props.text :当前值,可能是defaultValue定义的值,也可能是从dataSource中取出的值
                // props.rowId :当前选中行的id,如果是新增行则是临时id
                // props.column :当前操作的列
                // props.getValue :这是一个function,执行后可以获取当前行的所有值(禁止在template中使用)
                //                  例:const value = props.getValue()
                // props.target :触发当前事件的实例,可直接调用该实例内的方法(禁止在template中使用)
                //                  例:target.add()

                // 使用实例:删除当前操作的行
                let { rowId, target } = props
                target.removeRows(rowId)
            }
        }
    }
</script>
示例五
// 该示例是自定义函数校验
columns: [
    {
        title: '字段名称',
        key: 'dbFieldName',
        type: FormTypes.input,
        defaultValue: '',
        validateRules: [
            {
                // 自定义函数校验 handler
                handler(type, value, row, column, callback, target) {
                    // type 触发校验的类型(input、change、blur)
                    // value 当前校验的值
                    // callback(flag, message) 方法必须执行且只能执行一次
                    //          flag = 是否通过了校验,不填写或者填写 null 代表不进行任何操作
                    //          message = 提示的类型,默认使用配置的 message
                    // target 行编辑的实例对象

                    if (type === 'blur') {

                        if (value === 'abc') {
                            callback(false, '${title}不能是abc') // false = 未通过,可以跟自定义提示
                            return
                        }

                        let { values } = target.getValuesSync({ validate: false })
                        let count = 0
                        for (let val of values) {
                            if (val['dbFieldName'] === value) {
                                if (++count >= 2) {
                                    callback(false, '${title}不能重复')
                                    return
                                }
                            }
                        }
                        callback(true) // true = 通过验证
                    } else {
                        callback() // 不填写或者填写 null 代表不进行任何操作
                    }
                },
                message: '${title}默认提示'
            }
        ]
    },
]
JPopup 弹窗选择组件
参数配置
| 参数 | 类型 | 必填 | 说明 |
|---|---|---|---|
| placeholder | string | placeholder | |
| code | string | online报表编码 | |
| orgFields | string | online报表中显示的列,多个以逗号隔开 | |
| destFields | string | 回调对象的属性,多个以逗号隔开,其顺序和orgFields一一对应 | |
| field | string | v-model模式专用,表示从destFields中选择一个属性的值返回给当前组件 | |
| triggerChange | Boolean | v-decorator模式下需设置成true | |
| callback(事件) | function | 回调事件,v-decorator模式下用到,用于设置form控件的值 |
使用示例
<template>
  <a-form :form="form">
    <a-form-item label="v-model模式指定一个值返回至当前组件" style="width: 300px">
      <j-popup
        v-model="selectValue"
        code="user_msg"
        org-fields="username,realname"
        dest-fields="popup,other"
        field="popup"/>
      {{ selectValue }}
    </a-form-item>

    <a-form-item label="v-decorator模式支持回调多个值至当前表单" style="width: 300px">
      <j-popup
        v-decorator="['one']"
        :trigger-change="true"
        code="user_msg"
        org-fields="username,realname"
        dest-fields="one,two"
        @callback="popupCallback"/>
      {{ getFormFieldValue('one') }}
    </a-form-item>

    <a-form-item label="v-decorator模式被回调的值" style="width: 300px">
      <a-input v-decorator="['two']"></a-input>
    </a-form-item>


  </a-form >
</template>

<script>
  export default {
    data() {
      return {
        form: this.$form.createForm(this),
        selectValue:"",
      }
    },
    methods:{
      getFormFieldValue(field){
        return this.form.getFieldValue(field)
      },
      popupCallback(row){
        this.form.setFieldsValue(row)
      }
    }
  }
</script>
Table 重封装组件说明
封装说明
基础的使用方式与 API 与 官方版(Table) 本一致,在其基础上,封装了加载数据的方法。
你无需在你是用表格的页面进行分页逻辑处理,仅需向 Table 组件传递绑定
:data="Promise"对象即可
例子1
(基础使用)
<template>
  <s-table
    ref="table"
    :rowKey="(record) => record.data.id"
    size="default"
    :columns="columns"
    :data="loadData"
  >
  </s-table>
</template>

<script>
  import STable from '@lone/lone-vue/src/components/table/'

  export default {
    components: {
      STable
    },
    data() {
      return {
        columns: [
          {
            title: '规则编号',
            dataIndex: 'no'
          },
          {
            title: '描述',
            dataIndex: 'description'
          },
          {
            title: '服务调用次数',
            dataIndex: 'callNo',
            sorter: true,
            needTotal: true,
            customRender: (text) => text + ' 次'
          },
          {
            title: '状态',
            dataIndex: 'status',
            needTotal: true
          },
          {
            title: '更新时间',
            dataIndex: 'updatedAt',
            sorter: true
          }
        ],
        // 查询条件参数
        queryParam: {},
        // 加载数据方法 必须为 Promise 对象
        loadData: parameter => {
          return this.$http.get('/service', {
            params: Object.assign(parameter, this.queryParam)
          }).then(res => {
            return res.result
          })
        },
      }
    }
  }
</script>
例子2
(简单的表格,最后一列是各种操作)
<template>
  <s-table
    ref="table"
    size="default"
    :columns="columns"
    :data="loadData"
  >
    <span slot="action" slot-scope="text, record">
      <a>编辑</a>
      <a-divider type="vertical"/>
      <a-dropdown>
        <a class="ant-dropdown-link">
          更多 <a-icon type="down"/>
        </a>
        <a-menu slot="overlay">
          <a-menu-item>
            <a href="javascript:;">1st menu item</a>
          </a-menu-item>
          <a-menu-item>
            <a href="javascript:;">2nd menu item</a>
          </a-menu-item>
          <a-menu-item>
            <a href="javascript:;">3rd menu item</a>
          </a-menu-item>
        </a-menu>
      </a-dropdown>
    </span>
  </s-table>
</template>

<script>
  import STable from '@lone/lone-vue/src/components/table/'

  export default {
    components: {
      STable
    },
    data() {
      return {
        columns: [
          {
            title: '规则编号',
            dataIndex: 'no'
          },
          {
            title: '描述',
            dataIndex: 'description'
          },
          {
            title: '服务调用次数',
            dataIndex: 'callNo',
          },
          {
            title: '状态',
            dataIndex: 'status',
          },
          {
            title: '更新时间',
            dataIndex: 'updatedAt',
          },
          {
            table: '操作',
            dataIndex: 'action',
            scopedSlots: {customRender: 'action'},
          }
        ],
        // 查询条件参数
        queryParam: {},
        // 加载数据方法 必须为 Promise 对象
        loadData: parameter => {
          return this.$http.get('/service', {
            params: Object.assign(parameter, this.queryParam)
          }).then(res => {
            return res.result
          })
        },
      }
    },
    methods: {
      edit(row) {
        // axios 发送数据到后端 修改数据成功后
        // 调用 refresh() 重新加载列表数据
        // 这里 setTimeout 模拟发起请求的网络延迟..
        setTimeout(() => {
          this.$refs.table.refresh()
        }, 1500)

      }
    }
  }
</script>
内置方法
通过 this.$refs.table 调用
this.$refs.table.refresh() 刷新列表 (用户新增/修改数据后,重载列表数据)
注意:要调用
refresh()需要给表格组件设定ref值
注意事项
你可能需要为了与后端提供的接口返回结果一致而去修改以下代码:
(需要注意的是,这里的修改是全局性的,意味着整个项目所有使用该 table 组件都需要遵守这个返回结果定义的字段。)
修改 @lone/lone-vue/src/components/table/index.js 第 106 行起
result.then(r => {
  this.localPagination = Object.assign({}, this.localPagination, {
    current: r.pageNo,  // 返回结果中的当前分页数
    total: r.totalCount, // 返回结果中的总记录数
    showSizeChanger: this.showSizeChanger,
    pageSize: (pagination && pagination.pageSize) ||
      this.localPagination.pageSize
  });

  !r.totalCount && ['auto', false].includes(this.showPagination) && (this.localPagination = false)
  this.localDataSource = r.data; // 返回结果中的数组数据
  this.localLoading = false
});
返回 JSON 例子:
{
  "message": "",
  "result": {
    "data": [{
        id: 1,
        cover: 'https://gw.alipayobjects.com/zos/rmsportal/WdGqmHpayyMjiEhcKoVE.png',
        title: 'Alipay',
        description: '那是一种内在的东西, 他们到达不了,也无法触及的',
        status: 1,
        updatedAt: '2018-07-26 00:00:00'
      },
      {
        id: 2,
        cover: 'https://gw.alipayobjects.com/zos/rmsportal/zOsKZmFRdUtvpqCImOVY.png',
        title: 'Angular',
        description: '希望是一个好东西,也许是最好的,好东西是不会消亡的',
        status: 1,
        updatedAt: '2018-07-26 00:00:00'
      },
      {
        id: 3,
        cover: 'https://gw.alipayobjects.com/zos/rmsportal/dURIMkkrRFpPgTuzkwnB.png',
        title: 'Ant Design',
        description: '城镇中有那么多的酒馆,她却偏偏走进了我的酒馆',
        status: 1,
        updatedAt: '2018-07-26 00:00:00'
      },
      {
        id: 4,
        cover: 'https://gw.alipayobjects.com/zos/rmsportal/sfjbOqnsXXJgNCjCzDBL.png',
        title: 'Ant Design Pro',
        description: '那时候我只会想自己想要什么,从不想自己拥有什么',
        status: 1,
        updatedAt: '2018-07-26 00:00:00'
      },
      {
        id: 5,
        cover: 'https://gw.alipayobjects.com/zos/rmsportal/siCrBXXhmvTQGWPNLBow.png',
        title: 'Bootstrap',
        description: '凛冬将至',
        status: 1,
        updatedAt: '2018-07-26 00:00:00'
      },
      {
        id: 6,
        cover: 'https://gw.alipayobjects.com/zos/rmsportal/ComBAopevLwENQdKWiIn.png',
        title: 'Vue',
        description: '生命就像一盒巧克力,结果往往出人意料',
        status: 1,
        updatedAt: '2018-07-26 00:00:00'
      }
    ],
    "pageSize": 10,
    "pageNo": 0,
    "totalPage": 6,
    "totalCount": 57
  },
  "status": 200,
  "timestamp": 1534955098193
}
JDictSelectTag 组件用法
- 从字典表获取数据,dictCode格式说明: 字典code
<j-dict-select-tag  v-model="queryParam.sex" placeholder="请输入用户性别"
                  dictCode="sex"/>
v-decorator用法:
gantt
dateFormat YYYY-MM-DD
section S1
T1: 2014-01-01, 9d
section S2
T2: 2014-01-11, 9d
section S3
T3: 2014-01-02, 9d
<j-dict-select-tag  v-decorator="['sex', {}]" :triggerChange="true" placeholder="请输入用户性别"
                  dictCode="sex"/>
- 从数据库表获取字典数据,dictCode格式说明: 表名,文本字段,取值字段
<j-dict-select-tag v-model="queryParam.username" placeholder="请选择用户名称"
                   dictCode="sys_user,realname,id"/>
JDictSelectUtil.js 列表字典函数用法
- 第一步: 引入依赖方法
import {initDictOptions, filterDictText} from '@lone/lone-vue/src/components/dict/JDictSelectUtil'
- 第二步: 在created()初始化方法执行字典配置方法
      //初始化字典配置
      this.initDictConfig();
- 第三步: 实现initDictConfig方法,加载列表所需要的字典(列表上有多个字典项,就执行多次initDictOptions方法)
      initDictConfig() {
        //初始化字典 - 性别
        initDictOptions('sex').then((res) => {
          if (res.success) {
            this.sexDictOptions = res.result;
          }
        });
      },
- 第四步: 实现字段的customRender方法
     customRender: (text, record, index) => {
       //字典值替换通用方法
       return filterDictText(this.sexDictOptions, text);
     }
JMultiSelectTag 多选组件
下拉/checkbox
参数配置
| 参数 | 类型 | 必填 | 说明 |
|---|---|---|---|
| placeholder | string | placeholder | |
| disabled | Boolean | 是否禁用 | |
| type | string | 多选类型 select/checkbox 默认是select | |
| dictCode | string | 数据字典编码或者表名,显示字段名,存储字段名拼接而成的字符串,如果提供了options参数 则此参数可不填 | |
| options | Array | 多选项,如果dictCode参数未提供,可以设置此参数加载多选项 |
使用示例
<template>
  <a-form>
    <a-form-item label="下拉多选" style="width: 300px">
      <j-multi-select-tag
        v-model="selectValue"
        :options="dictOptions"
        placeholder="请做出你的选择">
      </j-multi-select-tag>
      {{ selectValue }}
    </a-form-item>

    <a-form-item label="checkbox">
      <j-multi-select-tag
        v-model="checkboxValue"
        :options="dictOptions"
        type="checkbox">
      </j-multi-select-tag>
      {{ checkboxValue }}
    </a-form-item>
  </a-form >
</template>

<script>
  import JMultiSelectTag from '@lone/lone-vue/src/components/dict/JMultiSelectTag'
  export default {
    components: {JMultiSelectTag},
    data() {
      return {
        selectValue:"",
        checkboxValue:"",
        dictOptions:[{
          label:"选项一",
          value:"1"
        },{
          label:"选项二",
          value:"2"
        },{
          label:"选项三",
          value:"3"
        }]
      }
    }
  }
</script>
JSearchSelectTag 字典表的搜索组件
下拉搜索组件,支持异步加载,异步加载用于大数据量的字典表
参数配置
| 参数 | 类型 | 必填 | 说明 |
|---|---|---|---|
| placeholder | string | placeholder | |
| disabled | Boolean | 是否禁用 | |
| dict | string | 表名,显示字段名,存储字段名拼接而成的字符串,如果提供了dictOptions参数 则此参数可不填 | |
| dictOptions | Array | 多选项,如果dict参数未提供,可以设置此参数加载多选项 | |
| async | Boolean | 是否支持异步加载,设置成true,则通过输入的内容加载远程数据,否则在本地过滤数据,默认false |
使用示例
<template>
  <a-form>
    <a-form-item label="下拉搜索" style="width: 300px">
      <j-search-select-tag
        placeholder="请做出你的选择"
        v-model="selectValue"
        :dictOptions="dictOptions">
      </j-search-select-tag>
      {{ selectValue }}
    </a-form-item>

    <a-form-item label="异步加载" style="width: 300px">
      <j-search-select-tag
        placeholder="请做出你的选择"
        v-model="asyncSelectValue"
        dict="sys_depart,depart_name,id"
        :async="true">
      </j-search-select-tag>
      {{ asyncSelectValue }}
    </a-form-item>
  </a-form >
</template>

<script>
  import JSearchSelectTag from '@lone/lone-vue/src/components/dict/JSearchSelectTag'
  export default {
    components: {JSearchSelectTag},
    data() {
      return {
        selectValue:"",
        asyncSelectValue:"",
        dictOptions:[{
          text:"选项一",
          value:"1"
        },{
          text:"选项二",
          value:"2"
        },{
          text:"选项三",
          value:"3"
        }]
      }
    }
  }
</script>
下拉选项滚动错位的解决方法
问题描述
当使用了 a-modal 或其他带有滚动条的组件时,使用a-select组件并打开下拉框时滚动滚动条,就会导致错位的问题产生。
解决方法
大多数情况下,在 a-select 上添加一个 getPopupContainer 属性,值为node => node.parentNode即可解决。
但是如果遇到 a-select 标签层级过深的情况,可能仍然会显示异常,只需要多加几个.parentNode (例:node => node.parentNode.parentNode.parentNode)多尝试几次直到解决问题即可。
代码示例
<a-select
    placeholder="请选择展示模板"
    :options="dicts.displayTemplate"
    :getPopupContainer="node => node.parentNode"
/>
路由/菜单说明
配置文件路径
@/config/router.config.js
格式和说明
/**
 * 路由配置说明:
 * 建议:sider menu 请不要超过三级菜单,若超过三级菜单,则应该设计为顶部主菜单 配合左侧次级菜单
 *
 **/
 {
  redirect: noredirect,
  name: 'router-name',
  hidden: true,
  meta: {
    title: 'title',
    icon: 'a-icon',
    keepAlive: true,
    hiddenHeaderContent: true,
  }
}
{ Route } 对象
| 参数 | 说明 | 类型 | 默认值 |
|---|---|---|---|
| hidden | 控制路由是否显示在 sidebar | boolean | falase |
| redirect | 重定向地址, 访问这个路由时,自定进行重定向 | string | - |
| name | 路由名称, 建议设置,且不能重名 | string | - |
| meta | 路由元信息(路由附带扩展信息) | object | {} |
{ Meta } 路由元信息对象
| 参数 | 说明 | 类型 | 默认值 |
|---|---|---|---|
| title | 路由标题, 用于显示面包屑, 页面标题 *推荐设置 | string | - |
| icon | 路由在 menu 上显示的图标 | string | - |
| keepAlive | 缓存该路由 | boolean | false |
| hiddenHeaderContent | *特殊 隐藏 PageHeader 组件中的页面带的 面包屑和页面标题栏 | boolean | false |
| permission | 与项目提供的权限拦截匹配的权限,如果不匹配,则会被禁止访问该路由页面 | array | [] |
路由例子
const asyncRouterMap = [
  {
    path: '/',
    name: 'index',
    component: BasicLayout,
    meta: { title: '首页' },
    redirect: '/dashboard/analysis',
    children: [
      {
        path: '/dashboard',
        component: Layout,
        name: 'dashboard',
        redirect: '/dashboard/workplace',
        meta: {title: '仪表盘', icon: 'dashboard', permission: ['dashboard']},
        children: [
          {
            path: '/dashboard/analysis',
            name: 'Analysis',
            component: () => import('@lone/lone-vue/src/views/dashboard/Analysis'),
            meta: {title: '分析页', permission: ['dashboard']}
          },
          {
            path: '/dashboard/monitor',
            name: 'Monitor',
            hidden: true,
            component: () => import('@lone/lone-vue/src/views/dashboard/Monitor'),
            meta: {title: '监控页', permission: ['dashboard']}
          },
          {
            path: '/dashboard/workplace',
            name: 'Workplace',
            component: () => import('@lone/lone-vue/src/views/dashboard/Workplace'),
            meta: {title: '工作台', permission: ['dashboard']}
          }
        ]
      },

      // result
      {
        path: '/result',
        name: 'result',
        component: PageView,
        redirect: '/result/success',
        meta: { title: '结果页', icon: 'check-circle-o', permission: [ 'result' ] },
        children: [
          {
            path: '/result/success',
            name: 'ResultSuccess',
            component: () => import(/* webpackChunkName: "result" */ '@lone/lone-vue/src/views/result/Success'),
            // 该页面隐藏面包屑和页面标题栏
            meta: { title: '成功', hiddenHeaderContent: true, permission: [ 'result' ] }
          },
          {
            path: '/result/fail',
            name: 'ResultFail',
            component: () => import(/* webpackChunkName: "result" */ '@lone/lone-vue/src/views/result/Error'),
            // 该页面隐藏面包屑和页面标题栏
            meta: { title: '失败', hiddenHeaderContent: true, permission: [ 'result' ] }
          }
        ]
      },
      ...
    ]
  },
]
- 请注意
component: () => import('..')方式引入路由的页面组件为 懒加载模式。具体可以看 Vue 官方文档- 增加新的路由应该增加在 ‘/’ (index) 路由的
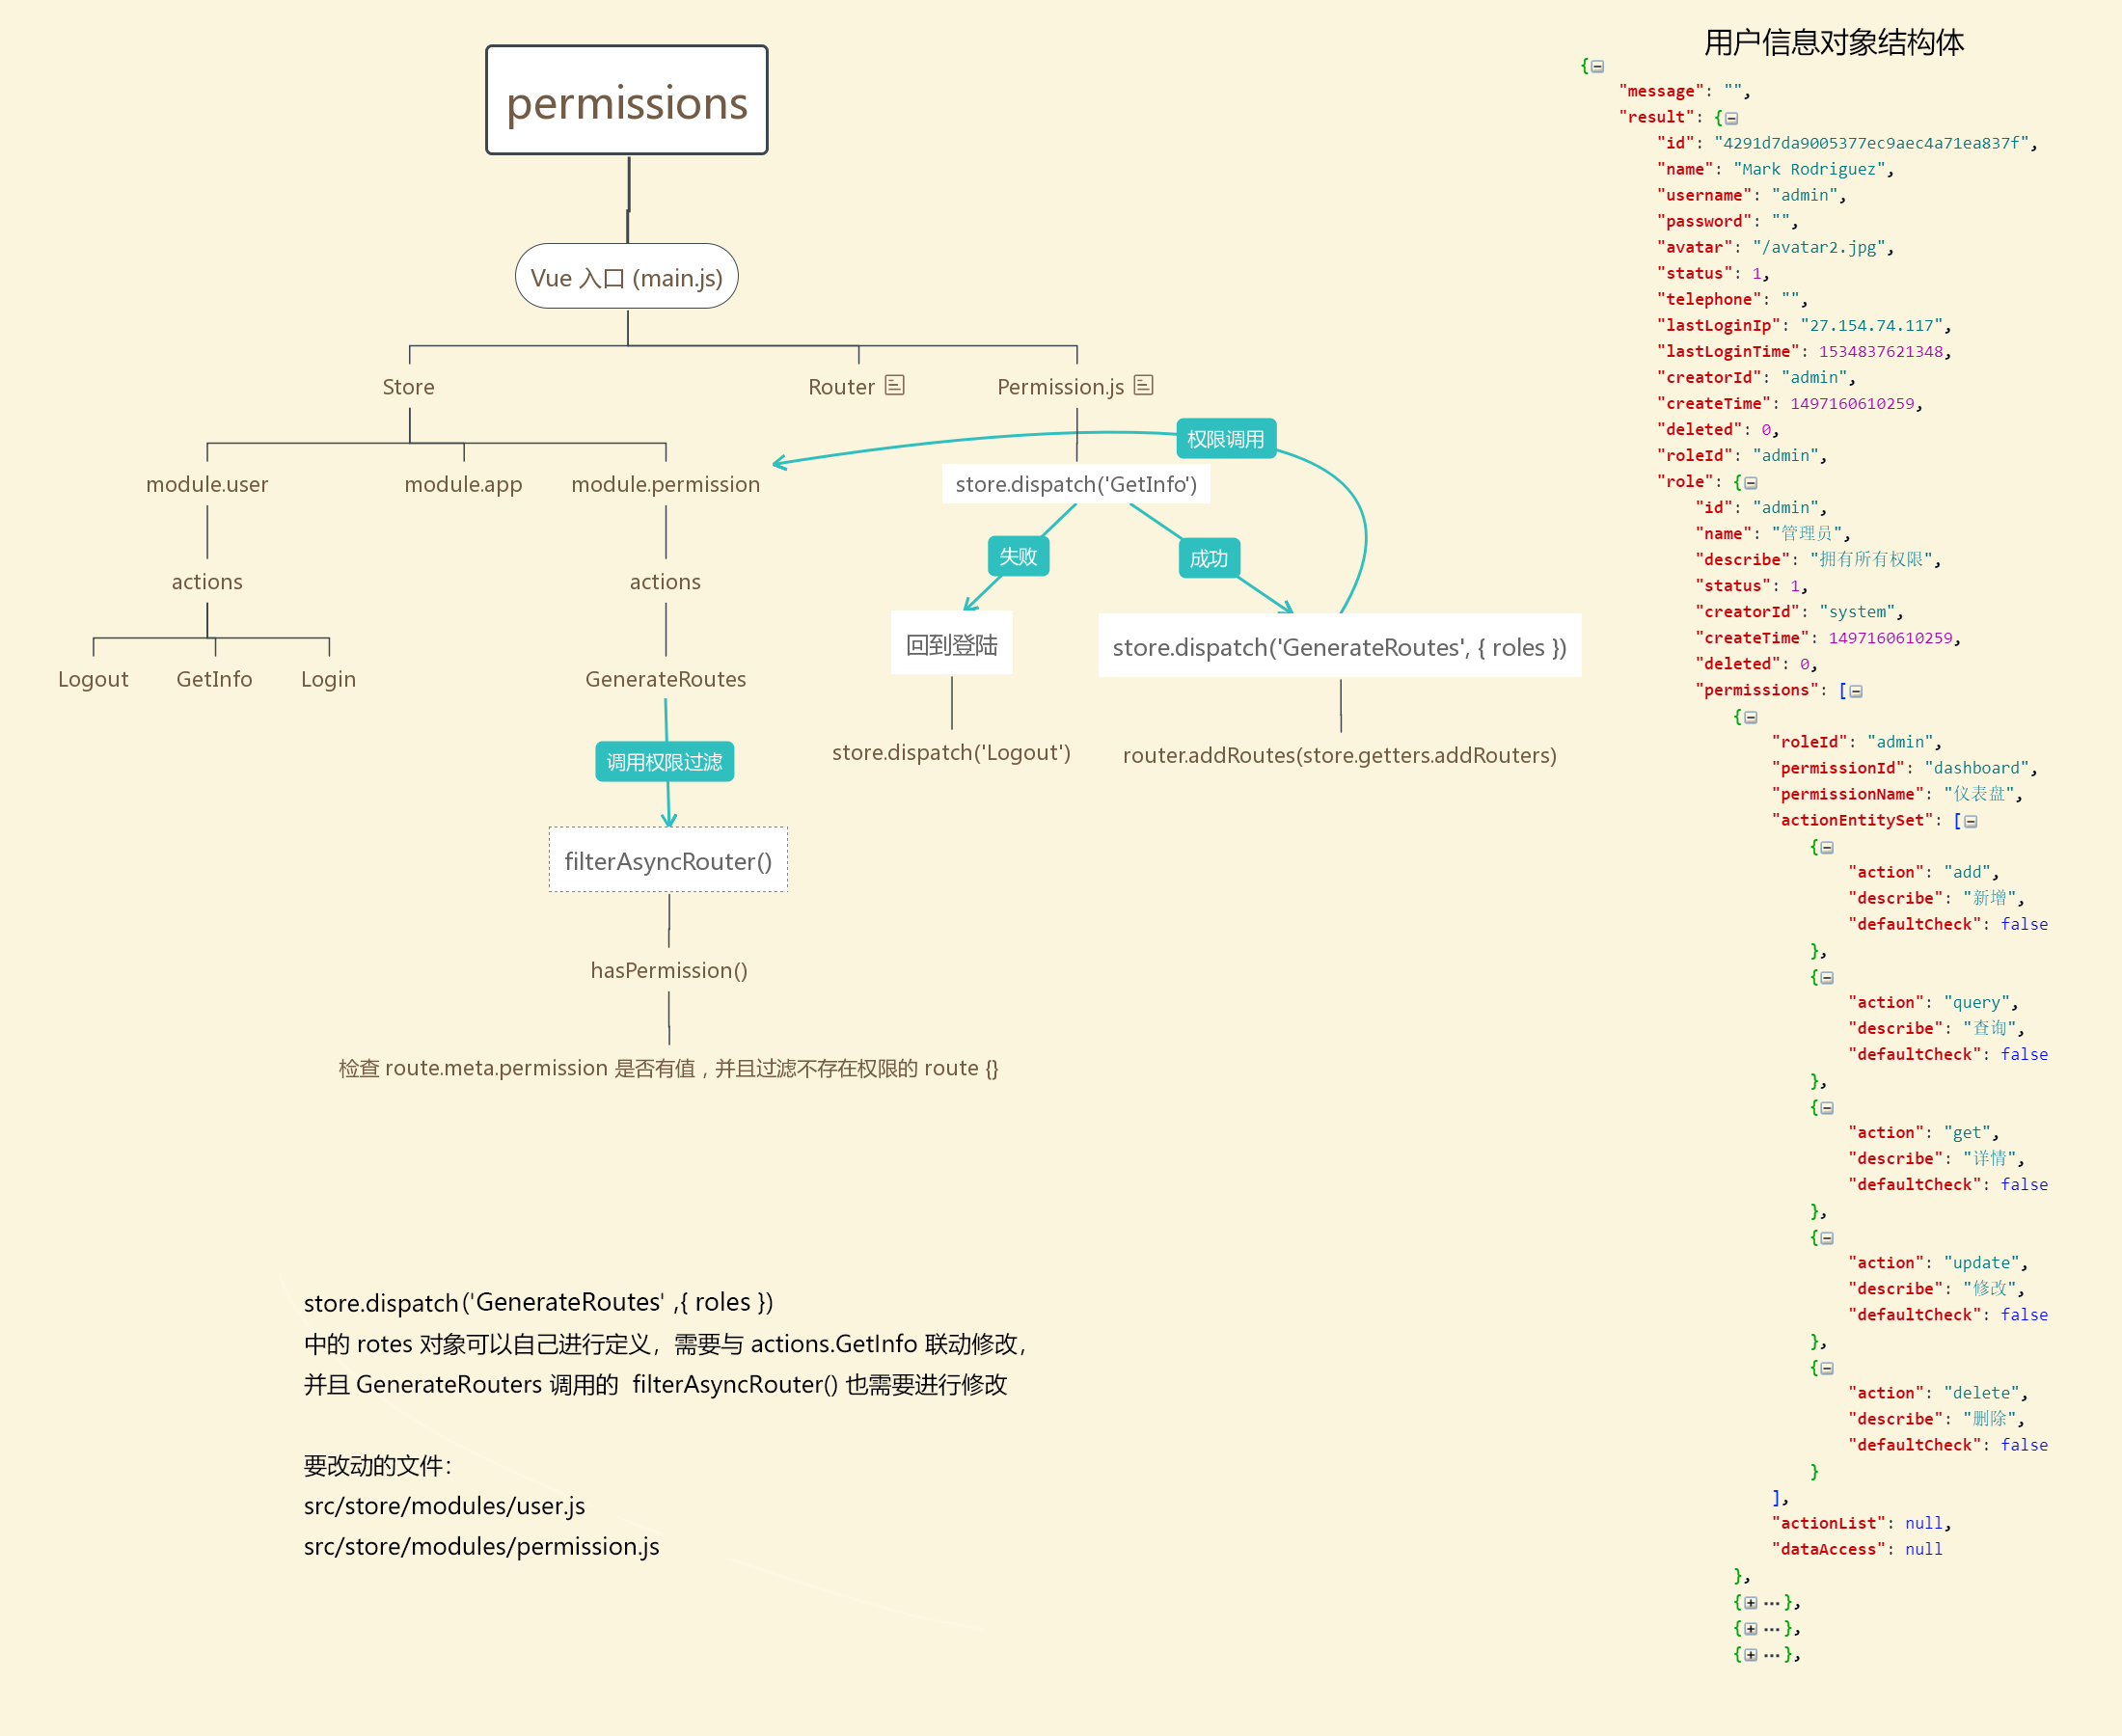
children内permission可以进行自定义修改,只需要对这个模块进行自定义修改即可 src/store/modules/permission.js#L10
附权限路由结构:
irect: ‘/dashboard/analysis’,
children: [
{
path: ‘/dashboard’,
component: Layout,
name: ‘dashboard’,
redirect: ‘/dashboard/workplace’,
meta: {title: ‘仪表盘’, icon: ‘dashboard’, permission: [‘dashboard’]},
children: [
{
path: ‘/dashboard/analysis’,
name: ‘Analysis’,
component: () => import(’@lone/lone-vue/src/views/dashboard/Analysis’),
meta: {title: ‘分析页’, permission: [‘dashboard’]}
},
{
path: ‘/dashboard/monitor’,
name: ‘Monitor’,
hidden: true,
component: () => import(’@lone/lone-vue/src/views/dashboard/Monitor’),
meta: {title: ‘监控页’, permission: [‘dashboard’]}
},
{
path: ‘/dashboard/workplace’,
name: ‘Workplace’,
component: () => import(’@lone/lone-vue/src/views/dashboard/Workplace’),
meta: {title: ‘工作台’, permission: [‘dashboard’]}
}
]
},
  // result
  {
    path: '/result',
    name: 'result',
    component: PageView,
    redirect: '/result/success',
    meta: { title: '结果页', icon: 'check-circle-o', permission: [ 'result' ] },
    children: [
      {
        path: '/result/success',
        name: 'ResultSuccess',
        component: () => import(/* webpackChunkName: "result" */ '@lone/lone-vue/src/views/result/Success'),
        // 该页面隐藏面包屑和页面标题栏
        meta: { title: '成功', hiddenHeaderContent: true, permission: [ 'result' ] }
      },
      {
        path: '/result/fail',
        name: 'ResultFail',
        component: () => import(/* webpackChunkName: "result" */ '@lone/lone-vue/src/views/result/Error'),
        // 该页面隐藏面包屑和页面标题栏
        meta: { title: '失败', hiddenHeaderContent: true, permission: [ 'result' ] }
      }
    ]
  },
  ...
]
},
]
> 1. 请注意 `component: () => import('..') ` 方式引入路由的页面组件为 懒加载模式。具体可以看 [Vue 官方文档](https://router.vuejs.org/zh/guide/advanced/lazy-loading.html)
> 2. 增加新的路由应该增加在 '/' (index) 路由的 `children` 内
> 3. `permission` 可以进行自定义修改,只需要对这个模块进行自定义修改即可 [src/store/modules/permission.js#L10](https://github.com/sendya/ant-design-pro-vue/blob/master/src/store/modules/permission.js#L10)


附权限路由结构:

[外链图片转存中...(img-3biB5kA2-1619232607863)]


 4335
4335


 被折叠的 条评论
为什么被折叠?
被折叠的 条评论
为什么被折叠?
 到【灌水乐园】发言


