首先需要在vue环境下安装 jointjs 和 jquery
npm install jquery --save
npm install jointjs
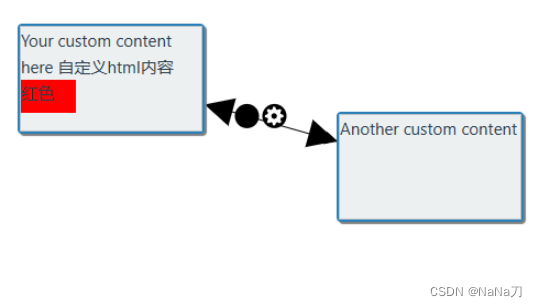
以下就是在vue中使用 jointjs 3.x 创建自定义html节点的代码, 以下代码可以在vue中正常运行
<template>
    <div id="paper-html-elements" ref="canvas"></div>
</template>

<script>
import $ from 'jquery';
import * as joint from 'jointjs';
window.joint = joint;

export default {
    data() {
        return {
            paper: null,
            customDivContent: '', // 自定义html内容的容器
        };
    },
    mounted() {
        this.init();
    },
    methods: {
        init() {
            let namespace = joint.shapes;
            let graph = new joint.dia.Graph({}, { cellNamespace: namespace });

            this.parper = new joint.dia.Paper({
                el: this.$refs.canvas, // 使用ref绑定页面上的div标签
                width: 650,
                height: 400,
                gridSize: 1,
                model: graph,
                cellViewNamespace: namespace,
            });

            joint.shapes.html = {};
            joint.shapes.html.Element = joint.shapes.basic.Rect.extend({
                defaults: joint.util.defaultsDeep(
                    {
                        type: 'html.Element',
                        attrs: {
                            rect: { stroke: 'none', 'fill-opacity': 0 },
                        },
                    },
                    joint.shapes.basic.Rect.prototype.defaults
                ),
            });

            joint.shapes.html.ElementView = joint.dia.ElementView.extend({
                // 设置v-html可以把自定义的实例写入
                template: `
                    <div class="html-element">
                        <div class="custom-div" v-html="customDivContent"></div>
                    </div>
                `,

                initialize() {
                    joint.dia.ElementView.prototype.initialize.apply(this, arguments);
                    this.$box = $(this.template); // 使用 jQuery 直接创建节点
                },
                render: function () {
                    joint.dia.ElementView.prototype.render.apply(this, arguments);
                    this.paper.$el.prepend(this.$box);
                    this.updateBox();
                    return this;
                },
                updateBox: function () {
                    var bbox = this.model.getBBox();
                    this.$box.find('.custom-div').html(this.model.get('customDivContent')); // 更新 customDiv 的内容
                    this.$box.css({
                        width: bbox.width,
                        height: bbox.height,
                        left: bbox.x,
                        top: bbox.y,
                        transform: 'rotate(' + (this.model.get('angle') || 0) + 'deg)',
                    });
                },
                removeBox: function (evt) {
                    this.$box.remove();
                },
            });

            var el1 = new joint.shapes.html.Element({
                position: { x: 80, y: 80 },
                size: { width: 170, height: 100 },
            });

            var el2 = new joint.shapes.html.Element({
                position: { x: 370, y: 160 },
                size: { width: 170, height: 100 },
            });

            // 设置 customDivContent 的值
            this.customDivContent = '<div>Your custom content here</div><div class="red">红色</div>';
            el1.set('customDivContent', this.customDivContent);

            this.customDivContent = '<div>Another custom content</div>';
            el2.set('customDivContent', this.customDivContent);

            graph.addCells([el1, el2]);

            // 创建 Link 并连接两个节点
            var link = new joint.dia.Link({
                source: { id: el1.id },
                target: { id: el2.id },
                attrs: {
                    '.marker-target': { d: 'M 10 0 L 0 5 L 10 10 z' },
                },
            });

            graph.addCell(link);

            el1.findView(this.parper).updateBox(); // 调用视图对象的 updateBox 方法
            el2.findView(this.parper).updateBox(); // 调用视图对象的 updateBox 方法

        },
    },
};
</script>

<style>
#paper-html-elements {
    position: relative;
    border: 1px solid gray;
    display: inline-block;
    background: transparent;
    overflow: hidden;
}
#paper-html-elements svg {
    background: transparent;
}
#paper-html-elements svg .link {
    z-index: 2;
}

.html-element {
    position: absolute;
    background: #3498DB;
    pointer-events: none;
    -webkit-user-select: none;
    border-radius: 4px;
    border: 2px solid #2980B9;
    box-shadow: inset 0 0 5px black, 2px 2px 1px gray;
    box-sizing: border-box;
    z-index: 2;
}
.html-element div {
    pointer-events: auto;
}
.html-element .custom-div {
    margin: 0px;
    padding: 0px;
    width: 100%;
    height: 100%;
    background-color: #ECF0F1;
    border: 1px solid #BDC3C7;
}
.red {
    width: 50px;
    height: 30px;
    background-color: red;
}
</style>


 1万+
1万+


 被折叠的 条评论
为什么被折叠?


