


用element 中Dialog 对话框加Tree 树形控件做的一个components
1、代码
<template>
  <div class="vcid">
    <el-button @click="handleStart">选择类目</el-button>

    <el-dialog title="提示" :visible.sync="dialogVisible" width="30%" :before-close="handleClose">
      <meltree
        node-key="id"
        lazy
        :load="loadNode"
        ref="tree"
        highlight-current
        :props="defaultProps"
        :show-checkbox="true"
      ></meltree>

      <span slot="footer" class="dialog-footer">
        <el-button @click="dialogVisible = false">取 消</el-button>
        <el-button type="primary" @click="dialogVisible = false">确 定</el-button>
      </span>
    </el-dialog>
  </div>
</template>

<script>
import meltree from "./tree/src/tree.vue";
export default {
  components: { meltree},
  data() {
    return {
      dialogVisible: false,
      //tree   defaultProps
      defaultProps: {
        label: "name",
        children: "children"
      },
      //上面部分为请求数据  下面两个为设置tree控件数据
      ciddata: {
        id: 0,
        isParent: 0,
        name: "",
        parentId: 0,
        sortOrder: "",
        state: "",
        status: 9,
        text: "",
        updated: 10,

        isLeaf: true,
        showCheckbox:true
      }
    };
  },

  methods: {
    //dialog组件
    handleStart: function() {
      this.dialogVisible = true;
    },
    handleClose(done) {
      this.$confirm("确认关闭?")
        .then(_ => {
          done();
        })
        .catch(_ => {});
    },
    // tree 组件
    loadNode(node, resolve) {
      console.log("node----------", node);
      // console.log("resolve" + resolve);
      const _this = this;
      let murl = "";
      if (node.level === 0) {
        murl = "http://wengufan.xxx.com:8086/item/cat/list";
      } else if (node.level >= 1) {
        murl = "http://wengufan.xxx.com:8086/item/cat/list?id=" + node.key;
      }
      //访问item/cat/list地址得到一级标签
      _this.$axios.get(murl).then(ref => {
        // resolve(ref.data);
        _this.ciddata = ref.data;
        resolve(_this.ciddata);
  for(let i =0; i<node.childNodes.length;i++){
     let tf =true ;
          if (_this.ciddata[i].isParent) {
            tf = false;
          }
      node.childNodes[i].isLeaf=tf
      _this.ciddata[i]["showCheckbox"] = tf;
  }
      });
    }
  }
};
</script>
<style >
</style>
这段代码花了我两天,showCheckbox神坑,70%都在解决showCheckbox显示问题
2、tree控件 showCheckbox显示问题
修改element-ui中tree的checkbox
https://www.jianshu.com/p/5290ef00829f
1、将node_modules文件夹中 element-ui 文件夹的 packages 中的 tree 文件夹复制出来。
2、修改 tree-node.vue文件,在标签中修改 v-if 的内容
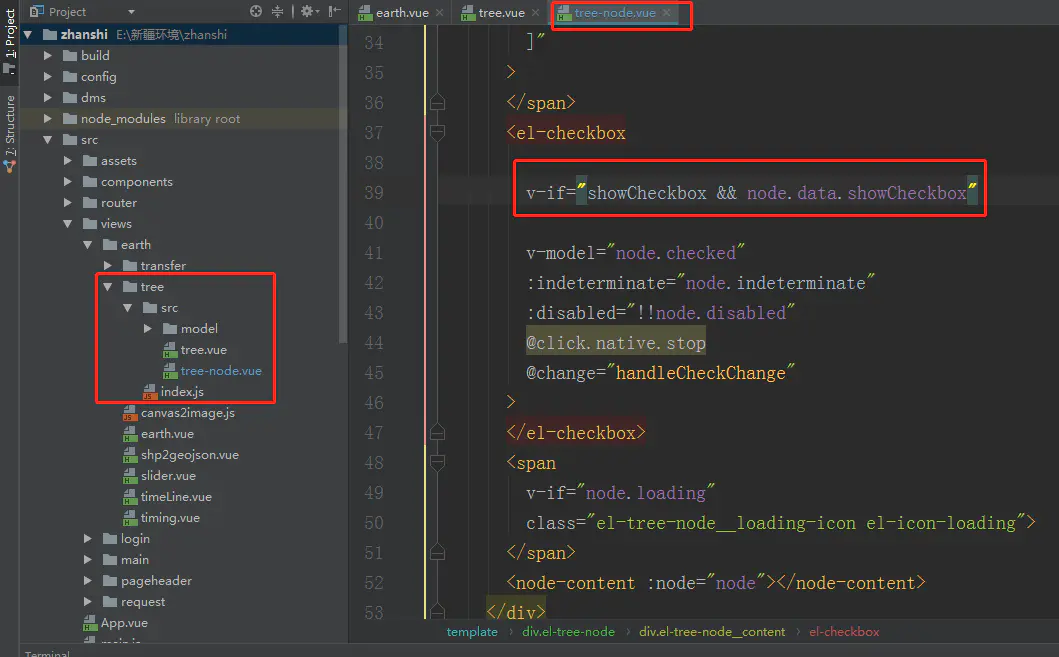
3、使用自定义的tree组件
3、最后结果对比
这个是用element自带的el-tree 和根据第2点修改后的结果对比

花的时间太多了,新手新手新手
单选还没实现


 1973
1973


 被折叠的 条评论
为什么被折叠?
被折叠的 条评论
为什么被折叠?
 到【灌水乐园】发言


