


背景
在开发工作中,会遇到一种场景,做完某一件事情以后,需要广播一些消息或者通知,告诉其他的模块进行一些事件处理,一般来说,可以一个一个发送请求去通知,但是有一种更好的方式,那就是事件监听,事件监听也是设计模式中 发布-订阅模式、观察者模式的一种实现。
观察者模式:简单的来讲就是你在做事情的时候身边有人在盯着你,当你做的某一件事情是旁边观察的人感兴趣的事情的时候,他会根据这个事情做一些其他的事,但是盯着你看的人必须要到你这里来登记,否则你无法通知到他(或者说他没有资格来盯着你做事情)。
对于 Spring 容器的一些事件,可以监听并且触发相应的方法。通常的方法有 2 种,ApplicationListener 接口和**@EventListener** 注解。
简介
要想顺利的创建监听器,并起作用,这个过程中需要这样几个角色:
1、事件(event)可以封装和传递监听器中要处理的参数,如对象或字符串,并作为监听器中监听的目标。
2、监听器(listener)具体根据事件发生的业务处理模块,这里可以接收处理事件中封装的对象或字符串。
3、事件发布者(publisher)事件发生的触发者。
ApplicationListener 接口
ApplicationListener 接口的定义如下:
public interface ApplicationListener<E extends ApplicationEvent> extends EventListener {

/**
* Handle an application event.
* @param event the event to respond to
*/
void onApplicationEvent(E event);
}
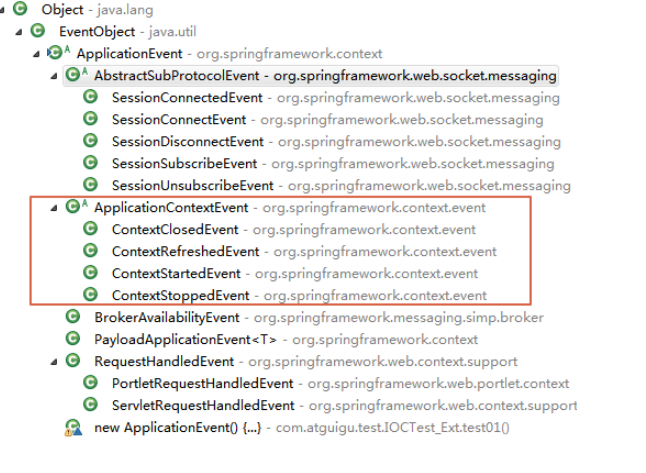
它是一个泛型接口,泛型的类型必须是 ApplicationEvent 及其子类,只要实现了这个接口,那么当容器有相应的事件触发时,就能触发 onApplicationEvent 方法。ApplicationEvent 类的子类有很多,Spring 框架自带的如下几个。
简单使用
使用方法很简单,就是实现一个 ApplicationListener 接口,并且将加入到容器中就行。
@Component
public class MyApplicationListener implements ApplicationListener<ApplicationEvent> {

@Override
public void onApplicationEvent(ApplicationEvent event) {
  System.out.println("事件触发:"+event.getClass().getName());
}
然后启动自己的springboot项目:
@SpringBootApplication
public class ApplicationListenerDemoApplication {

    public static void main(String[] args) {
        SpringApplication.run(ApplicationListenerDemoApplication.class, args);
    }
}
可以看到控制台输出:
事件触发:org.springframework.context.event.ContextRefreshedEvent
2021-01-24 22:09:20.113  INFO 9228 --- [           main] o.s.b.w.embedded.tomcat.TomcatWebServer  : Tomcat started on port(s): 8080 (http) with context path ''
事件触发:org.springframework.boot.web.servlet.context.ServletWebServerInitializedEvent
2021-01-24 22:09:20.116  INFO 9228 --- [           main] c.n.ApplicationListenerDemoApplication   : Started ApplicationListenerDemoApplication in 1.221 seconds (JVM running for 1.903)
事件触发:org.springframework.boot.context.event.ApplicationStartedEvent
事件触发:org.springframework.boot.context.event.ApplicationReadyEvent
这样就触发了spring默认的一些事件。
自定义事件以及监听
定义事件
首先,我们需要定义一个事件(MyTestEvent),需要继承Spring的ApplicationEvent
public class MyTestEvent extends ApplicationEvent{
    /**
     *
     */
    private static final long serialVersionUID = 1L;

    private String msg ;

    public MyTestEvent(Object source,String msg) {
        super(source);
        this.msg = msg;
    }

    public String getMsg() {
        return msg;
    }

    public void setMsg(String msg) {
        this.msg = msg;
    }
}
定义监听器
需要定义一下监听器,自己定义的监听器需要实现ApplicationListener,同时泛型参数要加上自己要监听的事件Class名,在重写的方法onApplicationEvent中,添加自己的业务处理:
@Component
public class MyNoAnnotationListener implements ApplicationListener<MyTestEvent> {

    @Override
    public void onApplicationEvent(MyTestEvent event) {
        System.out.println("非注解监听器:" + event.getMsg());
    }

}
事件发布
有了事件,有了事件监听者,那么什么时候触发这个事件呢?每次想让监听器收到事件通知的时候,就可以调用一下事件发布的操作。首先在类里自动注入了ApplicationEventPublisher,这个也就是我们的ApplicationCOntext,它实现了这个接口。
@Component
public class MyTestEventPubLisher {
    @Autowired
    private ApplicationEventPublisher applicationEventPublisher;

    /**
     *  事件发布方法
      */
    public void pushListener(String msg) {
        applicationEventPublisher.publishEvent(new MyTestEvent(this, msg));
    }

}
测试
用一个HTTP请求来模拟:
@RestController
public class TestEventListenerController {

    @Autowired
    private MyTestEventPubLisher publisher;

    @RequestMapping(value = "/test/testPublishEvent1" )
    public void testPublishEvent(){
        publisher.pushListener("我来了!");
    }
}
启动项目,可以看到控制台输出,测试完成:
事件触发:com.njit.personal.unannotation.MyTestEvent
非注解监听器:我来了!
@EventListener 注解
简单使用
除了通过实现接口,还可以使用@EventListener 注解,实现对任意的方法都能监听事件。
在任意方法上标注@EventListener 注解,指定 classes,即需要处理的事件类型,一般就是 ApplicationEven 及其子类,可以设置多项。
@Configuration
public class Config {
    @EventListener(classes = {ApplicationEvent.class})
    public void listen(ApplicationEvent event) {
        System.out.println("事件触发:" + event.getClass().getName());
    }
}
启动项目
可以看到控制台和之前的输出是一样的:
事件触发:org.springframework.context.event.ContextRefreshedEvent
2021-01-24 22:39:13.647  INFO 16072 --- [           main] o.s.b.w.embedded.tomcat.TomcatWebServer  : Tomcat started on port(s): 8080 (http) with context path ''
事件触发:org.springframework.boot.web.servlet.context.ServletWebServerInitializedEvent
2021-01-24 22:39:13.650  INFO 16072 --- [           main] c.n.ApplicationListenerDemoApplication   : Started ApplicationListenerDemoApplication in 1.316 seconds (JVM running for 2.504)
事件触发:org.springframework.boot.context.event.ApplicationStartedEvent
事件触发:org.springframework.boot.context.event.ApplicationReadyEvent
自定义事件以及监听
使用注解的好处是不用每次都去实现ApplicationListener,可以在一个class中定义多个方法,用@EventListener来做方法级别的注解。
和上面类似,事件以及事件发布不需要改变,只要这样定义监听器即可。
@Component
public class MyAnnotationListener {

    @EventListener
    public void listener1(MyTestEvent event) {
        System.out.println("注解监听器1:" + event.getMsg());
    }
}
此时,就可以有一个发布,两个监听器监听到发布的消息了,一个是注解方式,一个是非注解方式
结果:
事件触发:com.njit.personal.unannotation.MyTestEvent
注解监听器1:我来了!
非注解监听器:我来了!
我们可以发现,注解形式的监听器的执行走在了非注解的前面。
原理
其实上面添加@EventListener注解的方法被包装成了ApplicationListener对象,上面的类似于下面这种写法,这个应该比较好理解。
@Component
public class MyAnnotationListener implements ApplicationListener<MyTestEvent> {

	@Override
	public void onApplicationEvent(MyTestEvent event) {
		 System.out.println("注解监听器1:" + event.getMsg());
	}
}
那么Spring是什么时候做这件事的呢?
查看SpringBoot的源码,找到下面的代码,因为我是Tomcat环境,这里创建的ApplicationContext是org.springframework.bootweb.servlet.context.AnnotationConfigServletWebServerApplicationContext
protected ConfigurableApplicationContext createApplicationContext() {
		Class<?> contextClass = this.applicationContextClass;
		if (contextClass == null) {
			try {
				switch (this.webApplicationType) {
				case SERVLET:
					contextClass = Class.forName(DEFAULT_SERVLET_WEB_CONTEXT_CLASS);
					break;
				case REACTIVE:
					contextClass = Class.forName(DEFAULT_REACTIVE_WEB_CONTEXT_CLASS);
					break;
				default:
					contextClass = Class.forName(DEFAULT_CONTEXT_CLASS);
				}
			}
			catch (ClassNotFoundException ex) {
				throw new IllegalStateException(
						"Unable create a default ApplicationContext, " + "please specify an ApplicationContextClass",
						ex);
			}
		}
		return (ConfigurableApplicationContext) BeanUtils.instantiateClass(contextClass);
	}
他的构造方法如下:
public AnnotationConfigServletWebServerApplicationContext() {
		this.reader = new AnnotatedBeanDefinitionReader(this);
		this.scanner = new ClassPathBeanDefinitionScanner(this);
	}
进到AnnotatedBeanDefinitionReader里面
public AnnotatedBeanDefinitionReader(BeanDefinitionRegistry registry, Environment environment) {
		Assert.notNull(registry, "BeanDefinitionRegistry must not be null");
		Assert.notNull(environment, "Environment must not be null");
		this.registry = registry;
		this.conditionEvaluator = new ConditionEvaluator(registry, environment, null);
		AnnotationConfigUtils.registerAnnotationConfigProcessors(this.registry);
	}
再进到AnnotationConfigUtils的方法里面,省略了一部分代码,可以看到他注册了一个EventListenerMethodProcessor类到工厂了。这是一个BeanFactory的后置处理器。
public static Set<BeanDefinitionHolder> registerAnnotationConfigProcessors(
			BeanDefinitionRegistry registry, @Nullable Object source) {

		DefaultListableBeanFactory beanFactory = unwrapDefaultListableBeanFactory(registry);
	......
    .....
    ......

	if (!registry.containsBeanDefinition(EVENT_LISTENER_PROCESSOR_BEAN_NAME)) {
			RootBeanDefinition def = new RootBeanDefinition(EventListenerMethodProcessor.class);
			def.setSource(source);
			beanDefs.add(registerPostProcessor(registry, def, EVENT_LISTENER_PROCESSOR_BEAN_NAME));
		}

    ......
    ......

		return beanDefs;
	}
查看这个BeanFactory的后置处理器EventListenerMethodProcessor,下面方法,他会遍历所有bean,找到其中带有@EventListener的方法,将它包装成ApplicationListenerMethodAdapter,注册到工厂里,这样就成功注册到Spring的监听系统里了。
	@Override
	public void afterSingletonsInstantiated() {
		ConfigurableListableBeanFactory beanFactory = this.beanFactory;
		Assert.state(this.beanFactory != null, "No ConfigurableListableBeanFactory set");
		String[] beanNames = beanFactory.getBeanNamesForType(Object.class);
		for (String beanName : beanNames) {
			if (!ScopedProxyUtils.isScopedTarget(beanName)) {
				Class<?> type = null;
				try {
					type = AutoProxyUtils.determineTargetClass(beanFactory, beanName);
				}
				catch (Throwable ex) {
					// An unresolvable bean type, probably from a lazy bean - let's ignore it.
					if (logger.isDebugEnabled()) {
						logger.debug("Could not resolve target class for bean with name '" + beanName + "'", ex);
					}
				}
				if (type != null) {
					if (ScopedObject.class.isAssignableFrom(type)) {
						try {
							Class<?> targetClass = AutoProxyUtils.determineTargetClass(
									beanFactory, ScopedProxyUtils.getTargetBeanName(beanName));
							if (targetClass != null) {
								type = targetClass;
							}
						}
						catch (Throwable ex) {
							// An invalid scoped proxy arrangement - let's ignore it.
							if (logger.isDebugEnabled()) {
								logger.debug("Could not resolve target bean for scoped proxy '" + beanName + "'", ex);
							}
						}
					}
					try {
						processBean(beanName, type);
					}
					catch (Throwable ex) {
						throw new BeanInitializationException("Failed to process @EventListener " +
								"annotation on bean with name '" + beanName + "'", ex);
					}
				}
			}
		}
	}


private void processBean(final String beanName, final Class<?> targetType) {
		if (!this.nonAnnotatedClasses.contains(targetType) &&
				!targetType.getName().startsWith("java") &&
				!isSpringContainerClass(targetType)) {

			Map<Method, EventListener> annotatedMethods = null;
			try {
				annotatedMethods = MethodIntrospector.selectMethods(targetType,
						(MethodIntrospector.MetadataLookup<EventListener>) method ->
								AnnotatedElementUtils.findMergedAnnotation(method, EventListener.class));
			}
			catch (Throwable ex) {
				// An unresolvable type in a method signature, probably from a lazy bean - let's ignore it.
				if (logger.isDebugEnabled()) {
					logger.debug("Could not resolve methods for bean with name '" + beanName + "'", ex);
				}
			}

			if (CollectionUtils.isEmpty(annotatedMethods)) {
				this.nonAnnotatedClasses.add(targetType);
				if (logger.isTraceEnabled()) {
					logger.trace("No @EventListener annotations found on bean class: " + targetType.getName());
				}
			}
			else {
				// Non-empty set of methods
				ConfigurableApplicationContext context = this.applicationContext;
				Assert.state(context != null, "No ApplicationContext set");
				List<EventListenerFactory> factories = this.eventListenerFactories;
				Assert.state(factories != null, "EventListenerFactory List not initialized");
				for (Method method : annotatedMethods.keySet()) {
					for (EventListenerFactory factory : factories) {
						if (factory.supportsMethod(method)) {
							Method methodToUse = AopUtils.selectInvocableMethod(method, context.getType(beanName));
							ApplicationListener<?> applicationListener =
									factory.createApplicationListener(beanName, targetType, methodToUse);
							if (applicationListener instanceof ApplicationListenerMethodAdapter) {
								((ApplicationListenerMethodAdapter) applicationListener).init(context, this.evaluator);
							}
							context.addApplicationListener(applicationListener);
							break;
						}
					}
				}
				if (logger.isDebugEnabled()) {
					logger.debug(annotatedMethods.size() + " @EventListener methods processed on bean '" +
							beanName + "': " + annotatedMethods);
				}
			}
		}
	}
由方法生成Listener的逻辑由EventListenerFactory完成的,这又分为两种,一种是普通的@EventLintener 另一种是@TransactionalEventListener ,是由两个工厂处理的。
总结
上面介绍了@EventListener的原理,其实上面方法里还有一个@TransactionalEventListener注解,其实原理是一模一样的,只是这个监听者可以选择在事务完成后才会被执行,事务执行失败就不会被执行。
这两个注解的逻辑是一模一样的,并且@TransactionalEventListener本身就被标记有@EventListener,
只是最后生成监听器时所用的工厂不一样而已。


 4033
4033


 被折叠的 条评论
为什么被折叠?
被折叠的 条评论
为什么被折叠?
 到【灌水乐园】发言


