


一、背景介绍
在使用Selenium+TestNG做WebUI自动化测试时,被测试系统文件上传采用的是file类型的input实现的文件上传。前端代码如下:
<input type="file" accept="" multiple="" style="display: none;">
说到这里,你肯定会想,那不是很简单吗?直接按照下面用sendKeys方法直接上传就可以了吗?
driver.findElement(By.xpath("//input[@type='file']")).sendKeys("D:\\upload_file.txt");
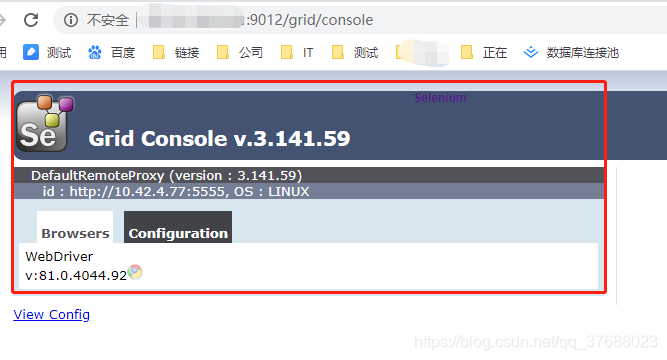
但是如果事情这么简单,那就不会有这篇博客了。事情的原因是:项目上用Selenium Gird运行测试。关于Selenium Gird,这里就不多说了,直接参考这篇博客:https://www.jianshu.com/p/7d0f5acd5e02。
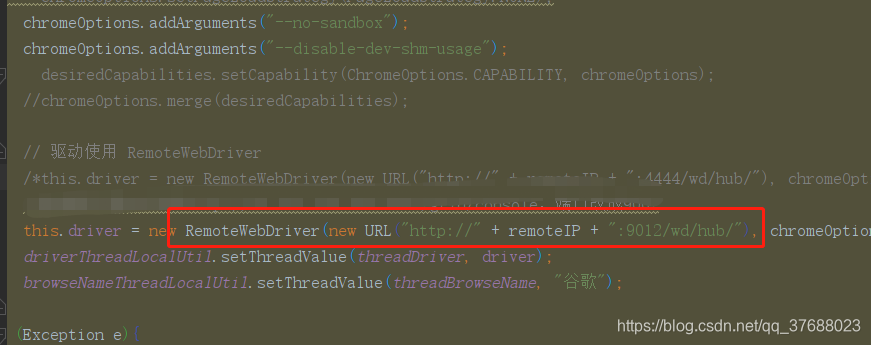
实际情况就是使用Docker+Rancher在服务器上创建了Jenkins、Selenium-Hub、node-chrome的容器,然后Jenkins拉取项目代码运行测试,测试代码使用RemoteWebDriver触发Hub节点下的node节点运行测试,也就是实际测试是在node-Chrome这个容器内。那么问题来了,文件上传时,文件路径怎么写呢?

二、文件上传方法封装
项目代码中封装了文件上传的方法,分为了Windows本地和Linux服务器两种情况。Windows本地这个比较好理解,也就是将文件上传所需要的文件都存在在项目指定文件夹download下。而Linux下,原理也是一样,就是将download文件夹放在文件夹下:/opt/autotest/download/。
那么说到这里,就是需要将项目中download文件夹复制到node-chrome容器的/opt/autotest文件夹下,后续代码执行测试时就能正常访问到路径并成功上传文件。
项目封装方法如下:
/**
     * 上传文件,传入被点击按钮中的 input 和文件名(无需给 input 改状态)
     *
     * @param inputBy  上传文件当中 input 定位
     * @param fileName 上传文件名,实际上是上传的文件相对于 download 文件夹的相对路径,比如xxx/xxx.png
     */
    synchronized protected void uploadFiles(By inputBy, String fileName) throws Exception {
        // 若是 Windows 系统允许上传文件操作
        if (System.getProperty("os.name").contains("Windows")) {
            JavascriptExecutor javascriptExecutor = (JavascriptExecutor) driver;
            WebElement webElement = driver.findElement(inputBy);
            javascriptExecutor.executeScript("arguments[0].setAttribute('style','display:block;');", webElement);
            // 上传文件(绝对路径)
            String projectPath = this.getClass().getClassLoader().getResource("./").getPath();
            String absolutePath = new File(projectPath + "../../src/test/resources/download/" + fileName).getCanonicalPath();
            webElement.sendKeys(absolutePath);
            // 回车
            Actions actions = new Actions(driver);
            actions.sendKeys(Keys.ENTER).build().perform();
            // 还原 inputBy 的样式
            WebElement webElement2 = driver.findElement(inputBy);
            javascriptExecutor.executeScript("arguments[0].setAttribute('style','display:none;');", webElement2);
        } else if (System.getProperty("os.name").contains("Linux")) {
            String filePath = null;
            // 更改 inputBy 的元素为 block
            JavascriptExecutor javascriptExecutor = (JavascriptExecutor) driver;
            WebElement webElement = driver.findElement(inputBy);
            javascriptExecutor.executeScript("arguments[0].setAttribute('style','display:block;');", webElement);
            filePath = "/opt/autotest/download/"+ fileName;
            log.info("文件docker路径是" + filePath);
            webElement.sendKeys(filePath);
            // 回车
            Actions actions = new Actions(driver);
            actions.sendKeys(Keys.ENTER).build().perform();
            // 还原 inputBy 的样式
            WebElement webElement2 = driver.findElement(inputBy);
            javascriptExecutor.executeScript("arguments[0].setAttribute('style','display:none;');", webElement2);
        }
        log.info("上传成功");
    }
}
三、低级方法-复制文件夹
初级方法就是使用docker cp命令将download文件夹复制到node-chrome容器中。执行步骤就是如下:
- 将Windows本地项目中的download文件夹通过Xftp复制到node-chrome容器所在的主机服务器上。
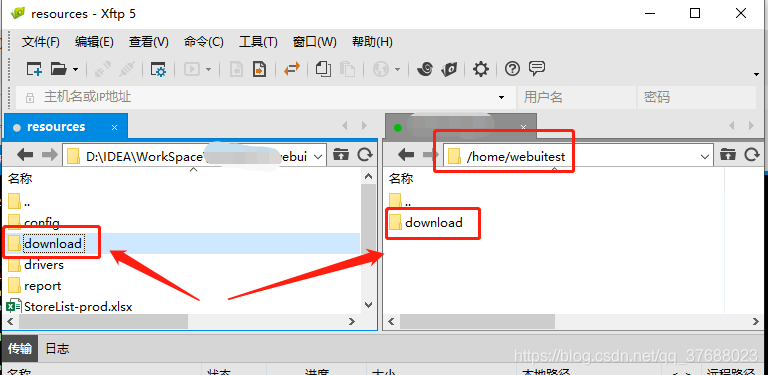
- 通过docker cp命令复制主机服务器上的文件到node-chrome容器中。
//1.先进入node-chrome容器中,在opt目录下创建autotest文件夹 113397102d05为容器id
[rzh@hcf-web3 ~]$ docker exec -u 0 -it 113397102d05  /bin/bash
root@hub-6655d8f4d8-b6s7j:/# ls
bin  boot  dev  etc  home  lib  lib64  media  mnt  opt  proc  root  run  sbin  srv  sys  tmp  usr  var
root@hub-6655d8f4d8-b6s7j:/# cd /opt/
root@hub-6655d8f4d8-b6s7j:/opt# ls
bin  selenium
root@hub-6655d8f4d8-b6s7j:/opt# mkdir autotest
root@hub-6655d8f4d8-b6s7j:/opt# ls
autotest  bin  selenium

//2.在容器主机服务器上执行docker cp命令,将服务器中的download文件夹复制到容器中
[rzh@hcf-web3 ~]$ docker cp /home/webuitest/download 113397102d05:/opt/autotest/download

//3.进入容器中就可以看到download文件夹
root@hub-6655d8f4d8-b6s7j:/opt# cd autotest/
root@hub-6655d8f4d8-b6s7j:/opt/autotest# ls
download
关于docker cp命令可以参考下面链接:https://www.cnblogs.com/areyouready/p/8973495.html。若该上面这个链接失效,可以参考我之前博客:https://blog.csdn.net/qq_37688023/article/details/105936792,其中也涉及到docker cp命令使用。但是这种方法有以下几个问题:
- 如果download文件夹中文件有变化,就得重写执行一遍这个操作
- Rancher中重启node-chrome服务后,之前复制过来的文件夹消失了,且生成的容器的容器id也发生了变化(目前不太了解Rancher,有知道的朋友可以在下面解释下)。
四、高级方法-Jenkins执行shell脚本
由于上面这种方法存在的问题,后面想到另一种方法:在Jenkins项目构建时利用Shell命令执行docker cp命令将Jenkins容器拉取的项目代码复制到服务器,再使用docker cp将服务器中文件夹复制到node-chrome容器中。
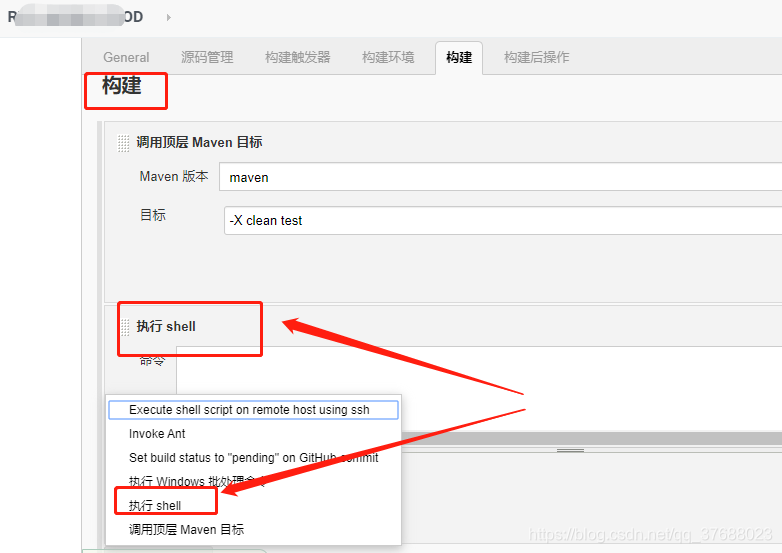
但是有个致命的问题,就是Docker搭建的Jenkins中,Jenkins项目中执行shell的路径默认为容器内,但是docker cp命令只能在宿主机上执行。
后来查阅到,Docker容器中虽然不能执行docker cp命令,但是可以执行shell脚本,也就是.sh文件,就想到新的方法:在Jenkins项目构建中添加执行命令,执行宿主机上的shell文件,shell文件的操作分两部:一步为将Jenkins容器中的文件夹复制到宿主机上,另一个就是将刚才宿主机复制出来的文件夹复制到node-chrome容器中。
最后,由于暂时Shell脚本不太会,准备学习shell:https://www.runoob.com/linux/linux-shell.html。只能暂时先使用上面这种方法,看完shell再来写这个脚本。


 382
382


 被折叠的 条评论
为什么被折叠?
被折叠的 条评论
为什么被折叠?
 到【灌水乐园】发言


