


npm install react-table
如果想要引用react-table/react-table.css,那么建议下载V6版本的react-table
简单示例代码:
import React, { Component } from "react";
import ReactTable from "react-table";
import "react-table/react-table.css";
const tableData = [
  { id: "1", value: "test1" },
  { id: "2", value: "test2" },
  { id: "3", value: "test3" },
  { id: "4", value: "test4" },
  { id: "5", value: "test5" },
  { id: "6", value: "test6" }
]
class App extends Component {
  render() {
    return (
      <div className="boxlistcontainer">
        <ReactTable
          data={tableData}
          filterable
          defaultFilterMethod={(filter, row) =>
            String(row[filter.id]) === filter.value
          }
          columns={[
            {
              Header: "test",
              accessor: "id",
              sortable: false,
              filterable: false
            }
          ]}
          defaultPageSize={20}
          className="-striped -highlight"
          minRows={0}
        />
      </div>
    );
  }
}
export default App;
遇到的问题
解决办法,下载react-tableV6,按照下面链接这样
import ReactTable from 'react-table-v6'
import 'react-table-v6/react-table.css'
然后npm install react-table-v6
https://github.com/tannerlinsley/react-table/tree/v6
1.学习react-table网址
https://react-table.js.org/#/story/readme
2.分页处隐藏多余rows

将minRows = {0}加到设置页码处
defaultPageSize={20}
className="-striped -highlight"
minRows = {0}
3.添加样式,可以将style写到对应的colums下方。同时,可以利用react-table自带的maxwidth或者width,修改默认的宽度还有其他样式变化
columns={[
            {
              Header: "ID",
              columns: [
                {
                  Header: "ID",
                  accessor: "Id",
                  maxWidth: 60,
                  style:{color:'red'},
效果图
4.如果想要设置react-table的Header文本换行,只能在css文件中添加
white-space: normal;5.如果想要设置react-table的Header文本垂直居中,只能在css文件中,为文本的父元素添加
align-items:center;display: -webkit-flex;justify-content:center;6.如果想要对数据进行一些操作
学习文档中是这样引入数据的
  render() {
    const { data } = this.state;
    return (
      <div>
        <ReactTable
          data={data}
          filterable
          defaultFilterMethod={(filter, row) =>
            String(row[filter.id]) === filter.value}
          columns={[
我们可以这样
  render() {
    return (
      <div>
        <ReactTable
          data={this.props.list.map(p => {
            const myDate = new Date();
            const myTime = myDate.getTime()
            return {
              ... p,
              myTime
            };
          })}
          filterable
          defaultFilterMethod={(filter, row) =>
            String(row[filter.id]) === filter.value}
          columns={[
7.react-table某一列的serch和filter还有sort失效

解决,只粘贴重要代码
columns: [
        {
          sortable:false,
          filterable:false,
8.设置打开时的默认排序或者默认筛选
defaultSorted={[
{
    id: "needReview",
    desc: false
}
]}
defaultFiltered={[
{
   id:"needReview",
   value:"Yes"
}
]}
defaultPageSize={20}
9.当需要传入多个值时
    return (
      <div>
        <ReactTable
          data={this.props.userBoxList.map(userBox => {
            let boxListDiv = []
            let boxLen = 0
            }
            return {
              boxLen,
              boxListDiv
            };
          })}
          filterable
          defaultFilterMethod={(filter, row) =>
            String(row[filter.id]) === filter.value}
          columns={[
{
columns: [
{
Header: "",
accessor: "boxListDiv",
sortable: false,
filterable: false,
Cell: props => {
return (
<div>
<span>{props.original.boxLen}</span><br/>
<List>
{props.original.boxListDiv}
</List>
</div>
)
},
filterMethod: (filter, row) =>
row[filter.id].startsWith(filter.value) &&
row[filter.id].endsWith(filter.value)
}
]
},上面只粘贴部分重要代码,虽然accessor只能够传入一个值,但是可以通过cell:props去调用前面定义的值,同时,通过在return内console.log(props)可以查看到该数据结构,从而引用数据
10.使表头固定
defaultPageSize={20}
style={{
height: "700px" // This will force the table body to overflow and scroll, since there is not enough room
}}
className="-striped -highlight"
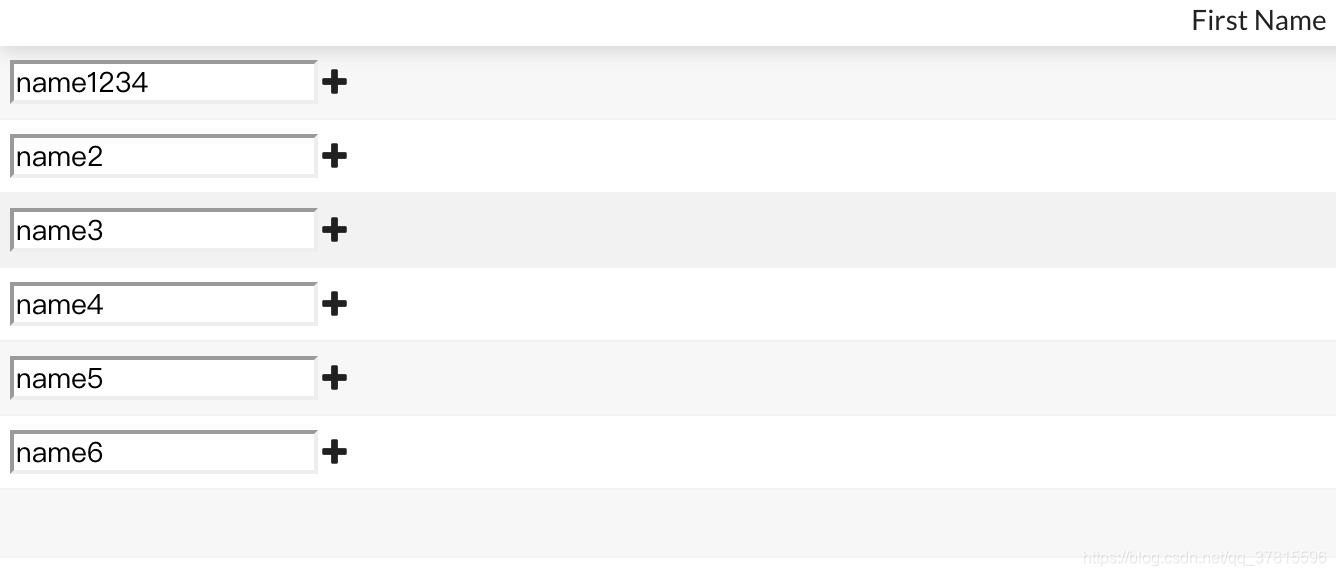
minRows={0}11.react-table Editable content 实现编辑修改内容
import React, { Component } from "react";
import ReactTable from "react-table";
import "react-table/react-table.css";
import { Icon } from "semantic-ui-react";
import "semantic-ui-css/semantic.min.css";
class App extends Component {
  constructor() {
    super();
    this.renderEditable = this.renderEditable.bind(this);
    this.add = this.add.bind(this);
    this.state={
      data : [
        { firstName: "name1" },
        { firstName: "name2" },
        { firstName: "name3" },
        { firstName: "name4" },
        { firstName: "name5" },
        { firstName: "name6" }
      ]
    }
  }
  handleInputChange = (cellInfo, event) => {
    let data = [...this.state.data];
    data[cellInfo.index].firstName = event.target.value;
    this.setState({ data });
  };
  add() {
    const newvalue = {
      // userId: this.props.item.userId,
      value: this.state.data
    };
    console.log('newvalue',newvalue)
  }
  renderEditable = cellInfo => {
    const cellIndex = cellInfo.index;
    const cellValue = this.state.data[cellIndex].firstName;
    return (
      <div>
        <input name="input" type="text"
          onChange={this.handleInputChange.bind(null, cellInfo)}
          value={cellValue} />
          <Icon as="i" name="add" className="edit" onClick={this.add} />
      </div>
    );
  };

  render() {
    return (
      <div>
        <ReactTable
          data={this.state.data}
          columns={[
            {
              Header: "First Name",
              accessor: "firstName",
              Cell: this.renderEditable
            }
          ]}
          defaultPageSize={10}
          className="-striped -highlight"
        >
        </ReactTable>
      </div>
    );
  }
}

export default App;
12.截取部分重要代码:react-table Editable content 实际应用
import React, { Component } from "react";
import { connect } from "react-redux";
import { Icon } from "semantic-ui-react";
import "semantic-ui-css/semantic.min.css";
import ReactTable from "react-table";
import "react-table/react-table.css";
import { getTrialList } from "../action/patientAction";
import {
  getAddTrialPatient
} from "../action/addAction";
class DeviceList extends Component {
  constructor(props) {
    super(props);
    this.state = {
      data: [],
      patientId: "",
      siteId: ""
    };
    this.renderEditable = this.renderEditable.bind(this);
    this.addPatienNo = this.addPatienNo.bind(this);
  }
  componentDidMount() {
    const { getTrialList } = this.props;
    getTrialList(this);
  }
  renderEditable = cellInfo => {
    let remotePatientId = cellInfo.original.patientId
      ? cellInfo.original.patientId
      : "";
    return (
      <div>
        <input
          name="input"
          type="text"
          onChange={this.handleInputChange.bind(null, cellInfo)}
          defaultValue={remotePatientId}
        />
        <Icon
          as="i"
          name="check"
          className="check"
          onClick={this.addPatienNo.bind(null, cellInfo)}
          style={{ color: "#6699CC" }}
        />
      </div>
    );
  };
  renderEditsiteId = cellInfo => {
    let remotesiteId = cellInfo.original.siteId ? cellInfo.original.siteId : "";
    return (
      <div>
        <input
          name="input"
          type="text"
          onChange={this.handleInputChange2.bind(null, cellInfo)}
          defaultValue={remotesiteId}
        />
        <Icon
          as="i"
          name="check"
          className="check"
          onClick={this.addPatienNo.bind(null, cellInfo)}
          style={{ color: "#6699CC" }}
        />
      </div>
    );
  };
  handleInputChange = (cellInfo, event) => {
    const patientId = event.target.value;
    this.setState({ patientId });
  };
  handleInputChange2 = (cellInfo, event) => {
    const siteId = event.target.value;
    this.setState({ siteId });
  };
  addPatienNo = cellInfo => {
    const { getAddTrialPatient } = this.props;
    const patientId =
      this.state.patientId === ""
        ? cellInfo.original.patientId
        : this.state.patientId;
    const siteId =
      this.state.siteId === "" ? cellInfo.original.siteId : this.state.siteId;
    const addValue = {
      userId: cellInfo.original.userId,
      patientId: patientId,
      siteId: siteId
    };
    getAddTrialPatient(addValue);
    if (this.state.siteId !== "" && this.state.patientId !== "") {
      let ifchange = [...this.state.ifchange];
      const ifchangeValue = [
        {
          bool: true,
          index: cellInfo.index
        }
      ];
      ifchange.push(ifchangeValue);
      this.setState({ ifchange });
    }
  };
  render() {
    return (
      <div>
        <ReactTable
          id="sessionTable"
          data={this.props.trialuser}
          colums = {
            [
              {
                Header: "Patient No",
                accessor: "patientId",
                minWidth: 180,
                filterable: false,
                Cell: this.renderEditable
              },
              {
                Header: "siteId",
                accessor: "siteId",
                minWidth: 180,
                filterable: false,
                Cell: this.renderEditsiteId
              }
            ]
          }
          defaultPageSize={20}
          className="-striped -highlight"
          minRows={0}
        />
      </div>
    );
  }
}

const mapStateToProp = state => ({
  trialuser: state.patientsListStore.trialuser,
});
const mapDispatchToProp = dispatch => ({
  getTrialList: self => dispatch(getTrialList(self)),
  getAddTrialPatient: addValue => dispatch(getAddTrialPatient(addValue))
});
export default connect(
  mapStateToProp,
  mapDispatchToProp
)(DeviceList);
13.在输入框内设置回车键搜索,和onchange事件搜索
{
  Header: "test",
  accessor: "test",
  maxWidth: 60,
  Filter: ({ filter, onChange }) => {
    return (
      <input
        type="text"
        style={{ width: "100%" }}
        onKeyPress={event => {
          if (event.keyCode === 13 || event.which === 13) {
            onChange(event.target.value);
          }
        }}
        onChange={event => {
          onChange(event.target.value);
        }}
      />
    );
  },
  filterMethod: (filter, row) => {
    return String(row[filter.id]).includes(filter.value);
  }
},
14.实现头部不为文字,而是复选框或者其他组件
// Header: "Actions",
                  Header: props => {
                    return (
                      <Checkbox
                        onChange={this.handleCheckAll}
                        checked={this.state.checkedAll}
                        name="selectAll"
                        className="billCheck_all"
                      />
                    );
                  },
15.实现在顶端增加页码和滚动条

showPaginationTop={true}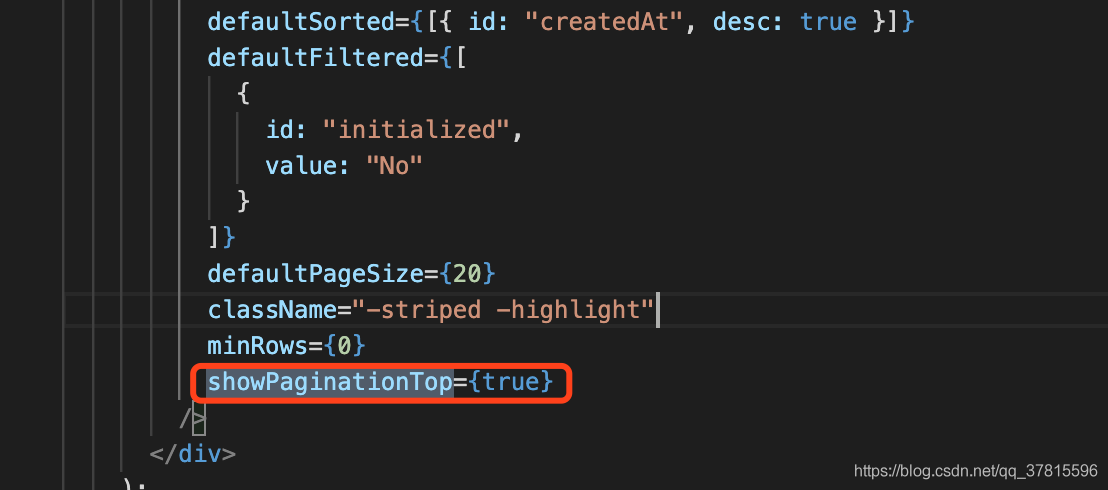
16.控制列的显示与隐藏
方法一:先定义一个state,然后在表格列表中通过this.state.hasColunm.displayColunm&&判断显示和隐藏,然后在数组末尾添加.filter(Boolean)
constructor(props) {
    super(props);
    this.state = {
      hasColunm: {displayColunm: false}
    };
  }
render() {
return (
<div className="device-list-container">
<ReactTable
data={
this.props.searchList &&
this.props.searchList.map(p => {
return {
...p
};
})
}
filterable
defaultFilterMethod={(filter, row) =>
String(row[filter.id]) === filter.value
}
columns={[
this.state.hasColunm.displayColunm&&
{
Header: "Email",
accessor: "email",
filterMethod: (filter, row) => {
let rowfilterfullname = row._original.email
? row[filter.id].toLowerCase()
: "";
let filterfullname = filter.value.toLowerCase();
return rowfilterfullname.includes(filterfullname);
}
},
{
columns: [
{
Header: "Cell Phone",
accessor: "phone",
maxWidth: 200,
filterMethod: (filter, row) =>
row._original.phone &&
matchPhone(row[filter.id]).includes(filter.value)
}
]
}
].filter(Boolean)}
defaultPageSize={20}
className="-striped -highlight"
minRows={0}
/>
</div>
);
}
}方法二:
先定义一个state
constructor(props) {
    super(props);
    this.state = {
      hasColunm: {emailDisplay: false}
    };
  }
再定义函数getColumns
getColumns(this.state.hasColunm) {
    const columns = []
    for (const key in this.state.hasColumn) {
      switch (email) {
        case "emailDisplay":
          this.state.hasColunm[key]&&columns.push({
            Header: "Email",
            accessor: "email",
            filterMethod: (filter, row) => {
              return String(row[filter.id]).includes(filter.value);
            }
          })
          break;
        default:
          break;
      }
    }
    return columns
  }
然后再表格处写入函数
render() {
    return (
      <div className="device-list-container">
        <ReactTable
          data={
            this.props.searchList &&
            this.props.searchList.map(p => {
              return {
                ...p
              };
            })
          }
          filterable
          defaultFilterMethod={(filter, row) =>
            String(row[filter.id]) === filter.value
          }
          columns={this.getColumns}
          defaultPageSize={20}
          className="-striped -highlight"
          minRows={0}
        />
      </div>
    );
  }
}
17.react-table实现一个行的效果(暂时没找到更好的方法,如果有更好的方法,请留言评论,感谢)
通过添加footer,然后设置背景颜色统一,比如白色。然后将border取消

columns={[
            {
              Header: "Key",
              accessor: "key",
              width: 200,
              style:{padding:0,border:0},
              filterMethod: (filter, row) => {
                return String(row[filter.id]).includes(filter.value);
              },
              Footer: (
                <span className="tableFooterRow"></span>
              )
            },
            {
              Header: "Value",
              accessor: "value",
              style:{padding:0,border:0},
              filterMethod: (filter, row) => {
                return String(row[filter.id]).includes(filter.value);
              },
              Footer: (
                <span className="tableFooterRow">TOTAL TIME</span>
              )
            }
.tableFooterRow{width: 100%;height: 50px;line-height: 50px;display: inline-table;color:white;font-weight:600;background-color:rgb(45, 1, 114)}直接在column后面加Footer
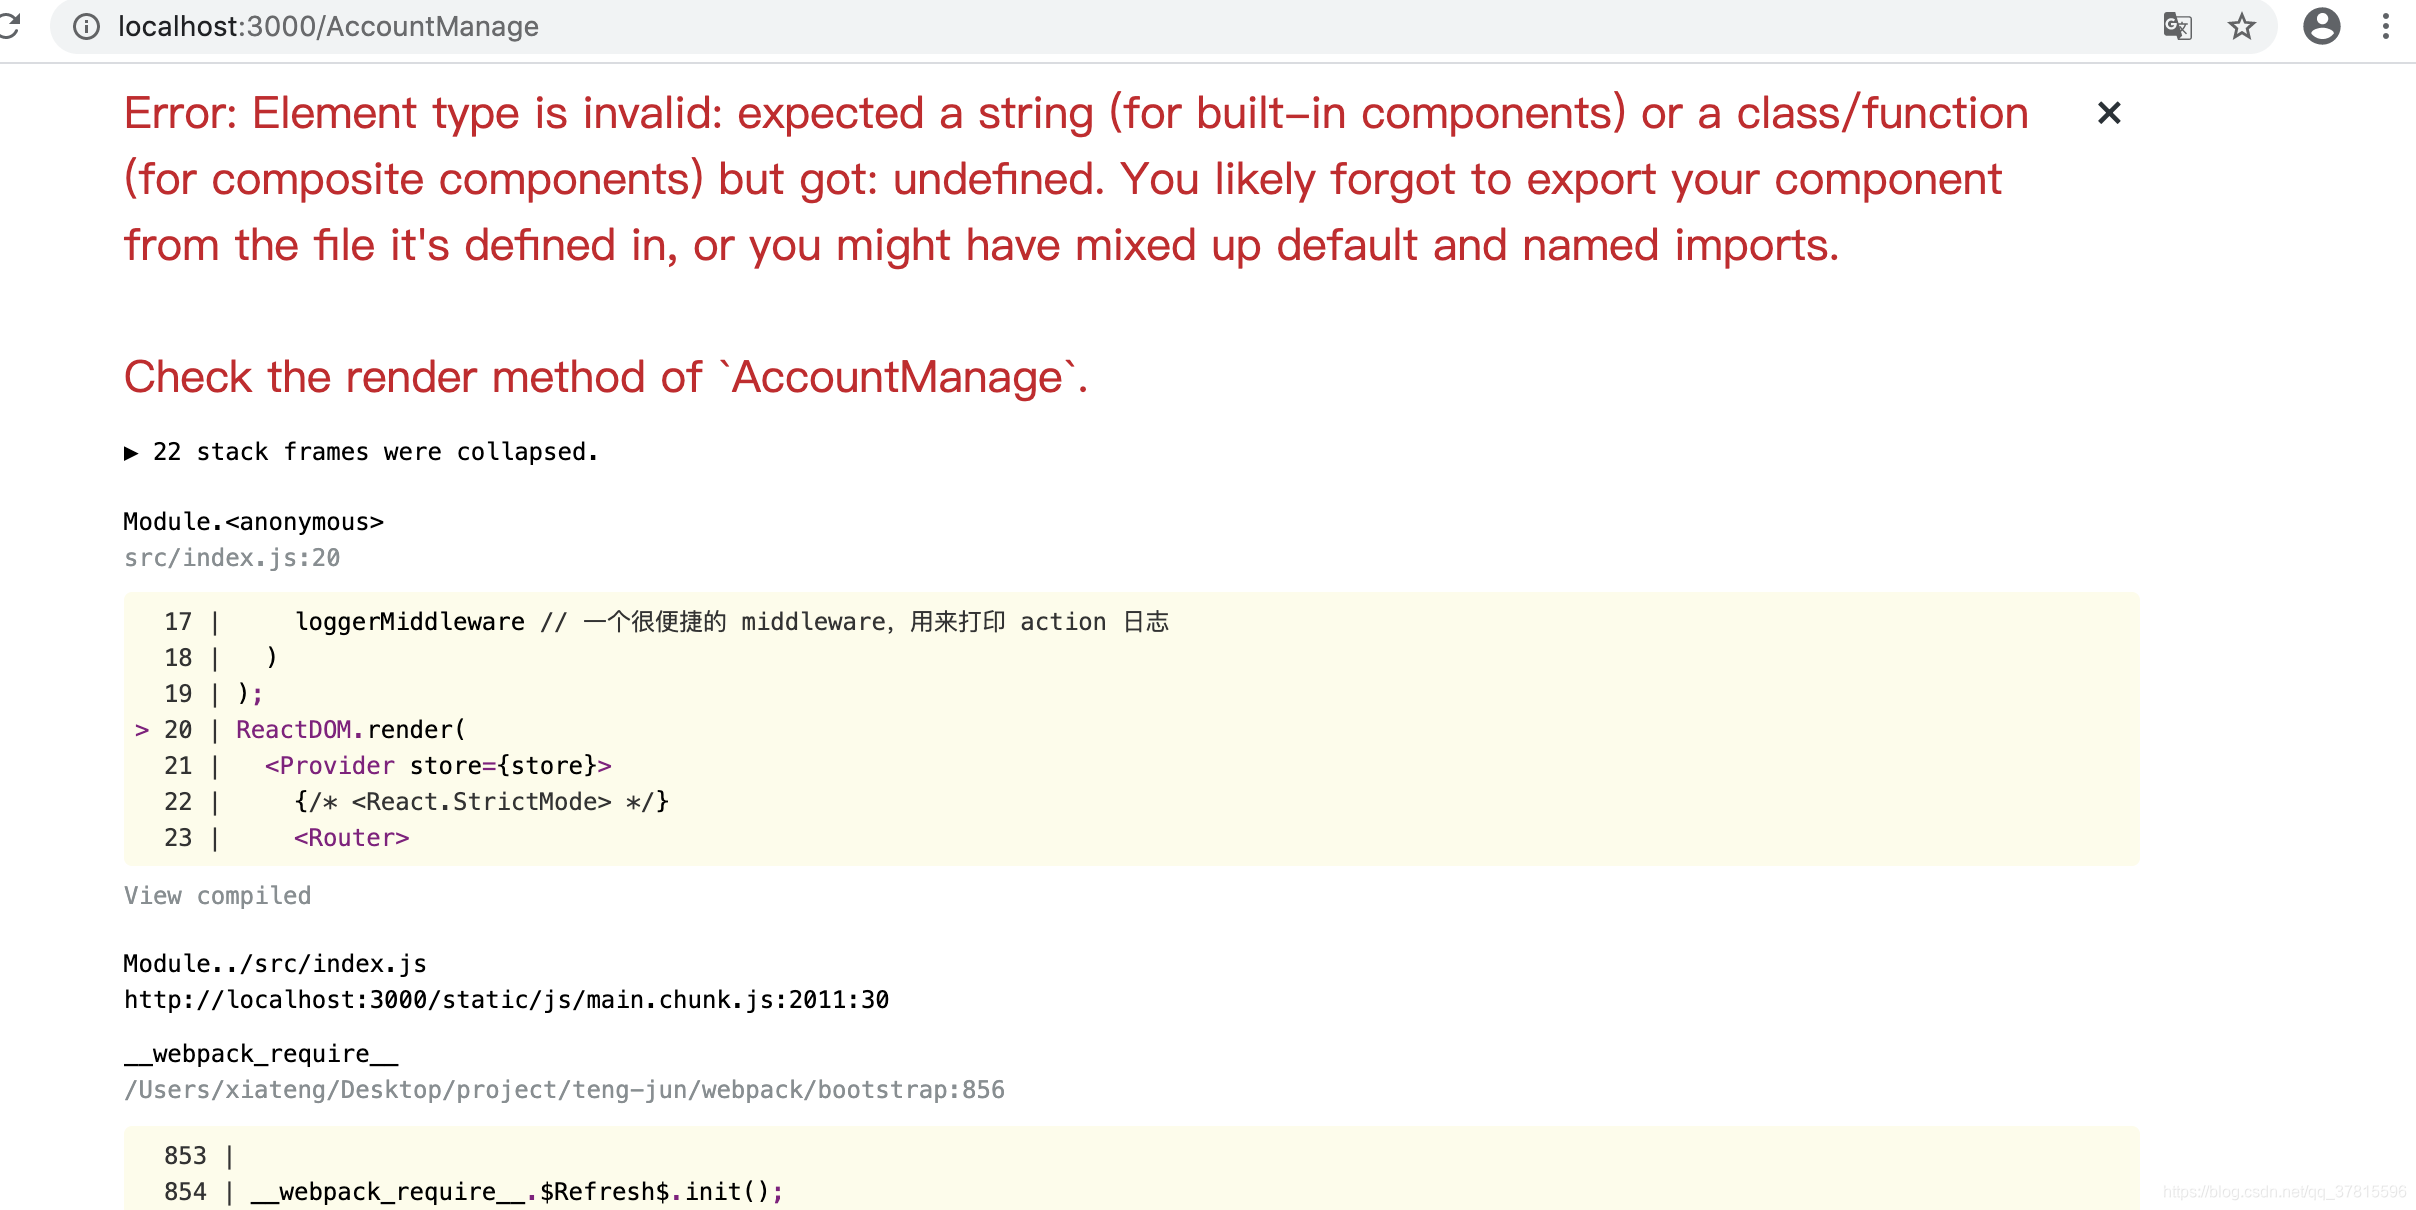
18.报错:Element type is invalid: expected a string (for built-in components) or a class/function (for composite components) but got: object.
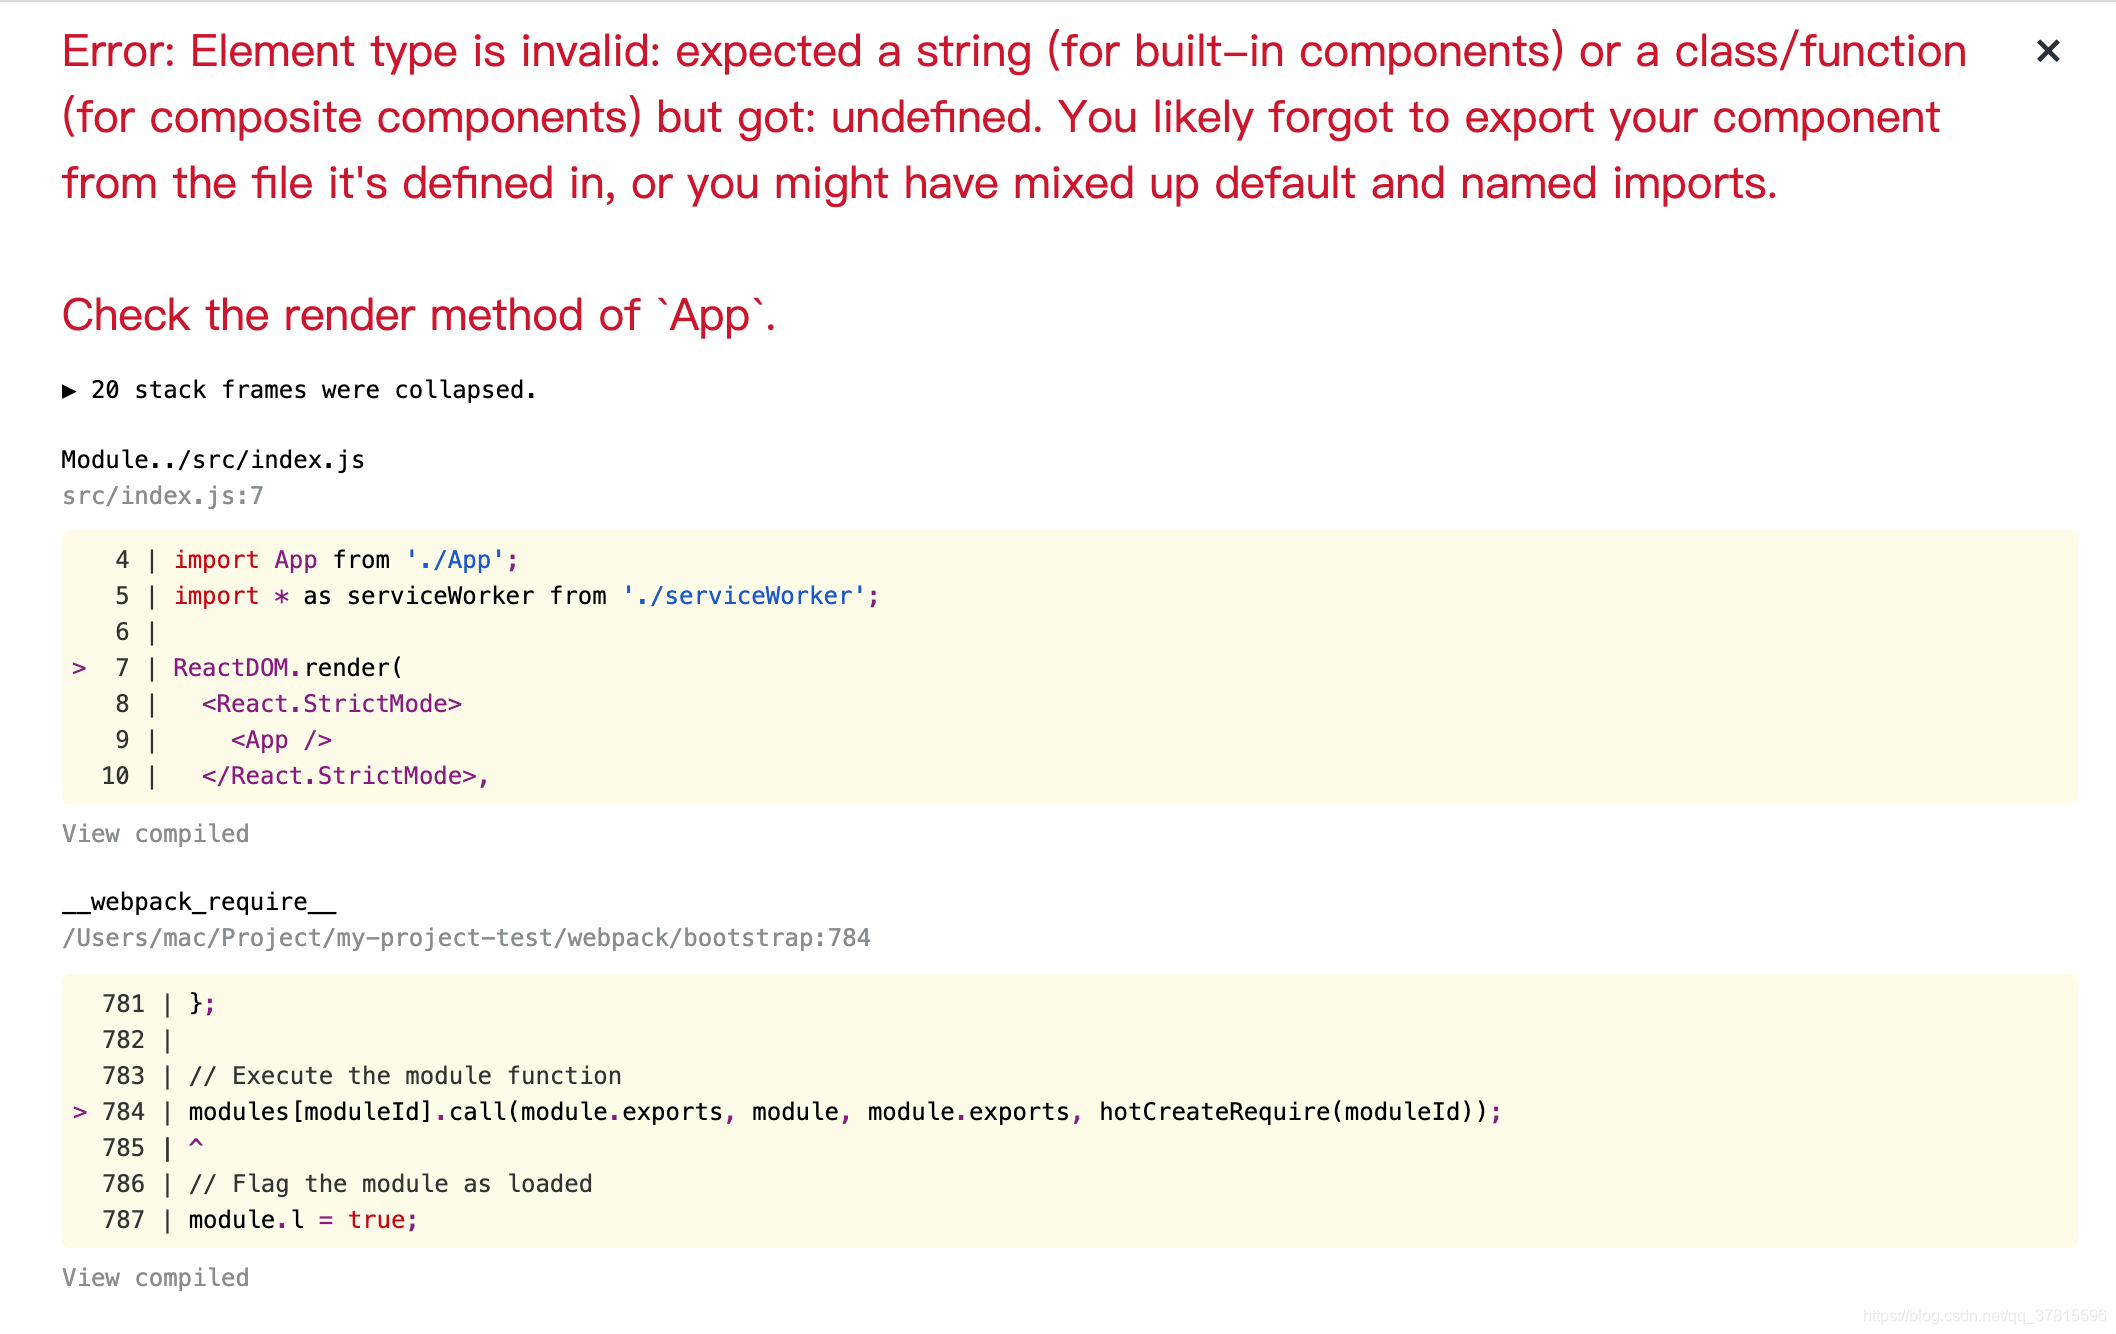
解决办法:版本问题,卸载目前版本
npm uninstall react-table --save重新安装指定版本的react-table
npm install react-table@6.10.319.react-table点击增加行
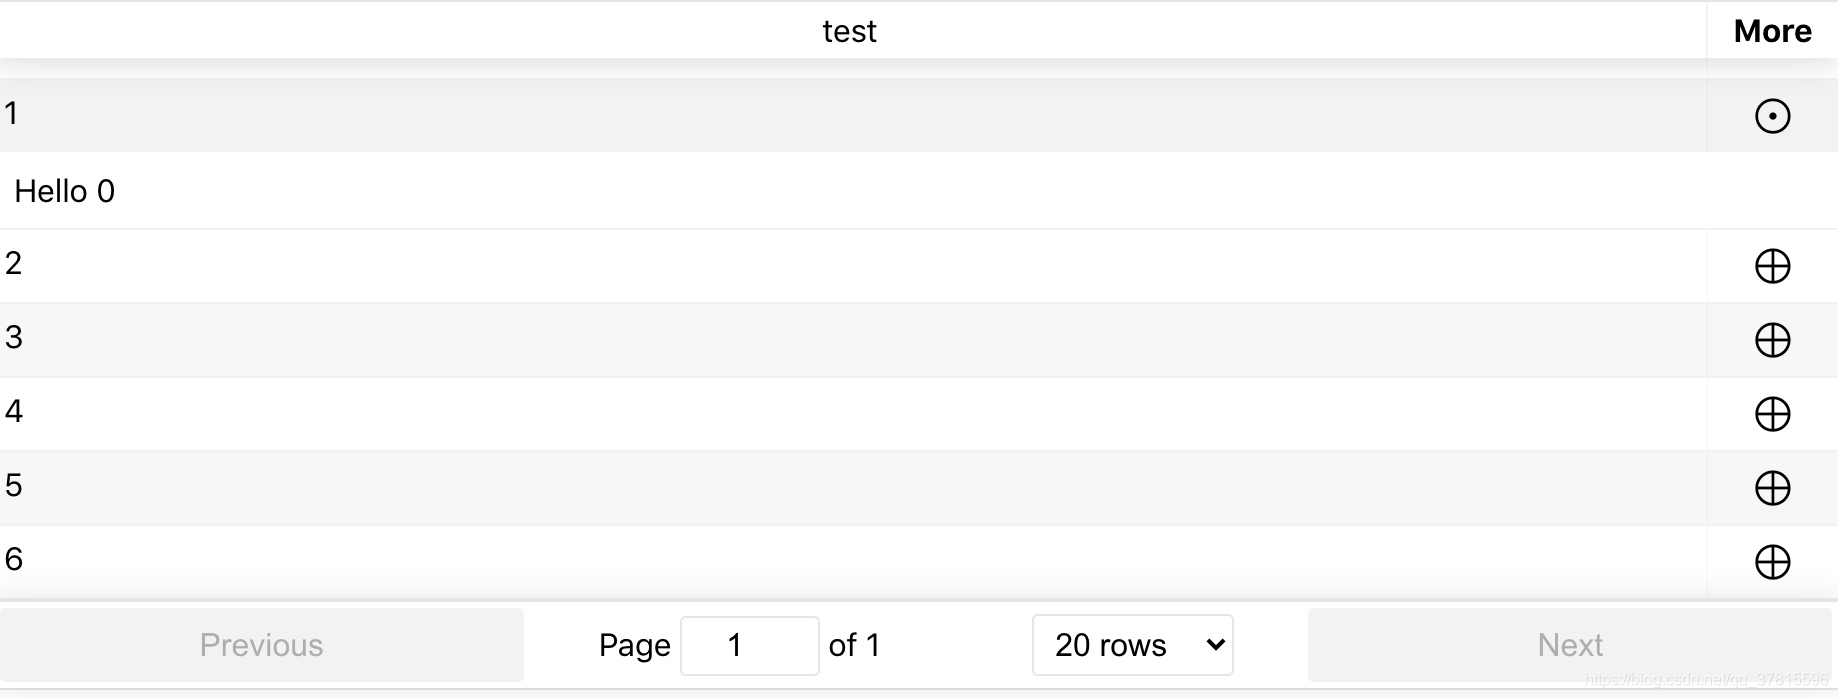
import React, { Component } from "react";
import ReactTable from "react-table";
import "react-table/react-table.css";
import "./App.css";
const tableData = [
{ id: "1", value: "test1" },
{ id: "2", value: "test2" },
{ id: "3", value: "test3" },
{ id: "4", value: "test4" },
{ id: "5", value: "test5" },
{ id: "6", value: "test6" }
]
class App extends Component {
render() {
return (
<div className="boxlistcontainer">
<ReactTable
data={tableData}
filterable
defaultFilterMethod={(filter, row) =>
String(row[filter.id]) === filter.value
}
columns={[
{
Header: "test",
accessor: "id",
sortable: false,
filterable: false
},
{
expander: true,
Header: () => <strong>More</strong>,
width: 65,
Expander: ({ isExpanded, ...rest }) =>
<div>
{isExpanded
? <span>⊙</span>
: <span>⊕</span>}
</div>,
style: {
cursor: "pointer",
fontSize: 25,
padding: "0",
textAlign: "center",
userSelect: "none"
}
}
]}
SubComponent={(v) => <div style={{ padding: '10px' }}>Hello {v.row._index}</div>}
defaultPageSize={20}
className="-striped -highlight"
minRows={0}
showPaginationTop={false}
/>
</div>
);
}
}
export default App;
还可以使用semantic-ui-react实现该效果:https://blog.csdn.net/qq_37815596/article/details/102524063文章
20.对奇偶行进行不一样的样式设置
/*(偶数行)*/
.details_table_container .rt-tr-group:nth-child(even) {}
/*(奇数行)*/
.details_table_container .rt-tr-group:nth-child(odd) {background-image: linear-gradient(#044664,#0b184a,#044664);}
21.更改sort排序的那根线的颜色

源代码:
.ReactTable .rt-thead .rt-th.-sort-asc, .ReactTable .rt-thead .rt-th.-sort-asc {
    box-shadow: inset 0 3px 0 0 rgba(255,255,255,0.6);
}
.ReactTable .rt-thead .rt-th.-sort-desc, .ReactTable .rt-thead .rt-td.-sort-desc {
    box-shadow: inset 0 -3px 0 0 rgba(0,0,0,0.6);
}
修改之后:
.details_table_container .rt-thead .rt-th.-sort-asc,
.details_table_container .rt-thead .rt-td.-sort-asc {
  box-shadow: inset 0 3px 0 0 rgba(255, 255, 255) !important;
}
.details_table_container .rt-thead .rt-th.-sort-desc,
.details_table_container .rt-thead .rt-td.-sort-desc {
  box-shadow: inset 0 -3px 0 0 rgba(255, 255, 255) !important;
}
22.页数选择
defaultPageSize={20},结果如下方所示,仍然可以选择其他页数

pageSize={20},则不能再选择其他页数
showPageSizeOptions={false}可以实现不显示选择page size
23.页码切换事件
onPageChange={this.onPageChange}

onPageChange = (pageIndex) => {
    console.log("pageIndex", pageIndex);
  };
24.通过下拉选择执行查询

                  filterMethod: (filter, row) => {
                    if (filter.value === "all") {
                      return true;
                    }
                    if (filter.value === "true") {
                      return row[filter.id] >= 21;
                    }
                    return row[filter.id] < 21;
                  },
                  Filter: ({ filter, onChange }) =>
                    <select
                      onChange={event => onChange(event.target.value)}
                      style={{ width: "100%" }}
                      value={filter ? filter.value : "all"}
                    >
                      <option value="all">Show All</option>
                      <option value="true">Can Drink</option>
                      <option value="false">Can't Drink</option>
                    </select>


 379
379


 被折叠的 条评论
为什么被折叠?
被折叠的 条评论
为什么被折叠?
 到【灌水乐园】发言


