


路由简介
SPA单页面应用。导航区和展示区
- 单页Web应用
- 整个应用只有一个完整的页面
- 点击页面中的导航连接不会刷新页面,只会做页面的局部更新
- 数据需要通过ajax请求获取
路由:路由就是一组映射关系,服务器接收到请求时,根据请求路径找到匹配的函数处理请求,返回响应数据
基本路由
main.js
import Vue from 'vue'
import App from './App.vue'

//1.下载vue-router模块到当前工程,版本3.6.5
//2.引入
import VueRouter from 'vue-router'

import ViewA from './views/ViewA.vue'
import ViewAA from './views/ViewAA.vue'
import ViewB from './views/ViewB.vue'
import ViewBB from './views/ViewBB.vue'

Vue.config.productionTip = false
//3.安装注册
Vue.use(VueRouter)
//4.创建路由对象
const router=new VueRouter({
  routes:[
    {
      path: '/viewA',
      component :ViewA,
      children:
      [
        {
          path:'/viewAA',
          component:ViewAA
        }
      ]
    },
    {
      path:'/viewB',
      component:ViewB,
      children:
      [
        {
          path:'/viewBB',
          component: ViewBB
        }
      ]
    }
  ]
})

new Vue({
  render: h => h(App),
  //5.注册,将路由对象引入new Vue实例中,建立链接
  router
}).$mount('#app')
views/ViewA.vue
<template>
  <div>
    <h1>ViewA页面</h1>
    <a href="#/viewAA">ViewAA页面</a>
    <router-view></router-view>
  </div>
</template>

<script>
export default {
  name:'ViewPageA'
}
</script>

<style>

</style>
views/ViewAA.vue
<template>
  <div>
    <h1>ViewAA页面</h1>
  </div>
</template>

<script>
export default {
  name:'ViewPageAA'
}
</script>

<style>

</style>
views/ViewB.vue
<template>
  <div>
    <h1>ViewB页面</h1>
    <a href="#/viewBB">ViewBB页面</a>
    <router-view></router-view>
  </div>
</template>

<script>
export default {
  name:'ViewPageB'
}
</script>

<style>

</style>
views/ViewBB.vue
<template>
  <div>
    <h1>ViewBB页面</h1>
  </div>
</template>

<script>
export default {
  name:'ViewPageBB'
}
</script>

<style>

</style>
App.vue
<template>
  <div>
    <div>
      <a href="#/viewA">ViewA页面</a>
      <a href="#/viewB">ViewB页面</a>
    </div>
    <router-view></router-view>
  </div>
</template>

<script>
export default {

}
</script>

<style>

</style>
路由封装
1.将路由封装到一个js文件
2.模块导入改成绝对路径
注:ViewA.vue ViewAA.vue ViewB.vue ViewBB.vue App.vue与上面一样
封装 router/index.js
import Vue from 'vue'
import VueRouter from 'vue-router'
import ViewA from '@/views/ViewA.vue'
import ViewAA from '@/views/ViewAA.vue'
import ViewB from '@/views/ViewB.vue'
import ViewBB from '@/views/ViewBB.vue'
Vue.use(VueRouter)
const router = new VueRouter({
  routes: [
    {
      path: '/viewA',
      component: ViewA,
      children:
        [
          {
            path: '/viewAA',
            component: ViewAA
          }
        ]
    },
    {
      path: '/viewB',
      component: ViewB,
      children:
        [
          {
            path: '/viewBB',
            component: ViewBB
          }
        ]
    }
  ]
})
export default router
main.js
import Vue from 'vue'
import App from './App.vue'
import router  from '@/router/index'

console.log(router);

Vue.config.productionTip = false

new Vue({
  router,
  render: h => h(App)
}).$mount('#app')
router-link控件
router-link控件,用于代替a标签,里面有两个高亮类名 router-link-active 模糊匹配(用的多) router-link-exact-active 精准匹配 也可以自定义高亮类名
1.router-link-active
模糊匹配(用的多)
to=“/my” 可以匹配 /my /my/a /my/b …
只要是以/my开头的路径 都可以和 to="/my"匹配到
2.router-link-exact-active
精确匹配
to=“/my” 仅可以匹配 /my
const router = new VueRouter(
{
routes:
[
 { path: '/my', component: My },
 { path: '/find', component: Find }
],
    // 模糊匹配,重新定义类名
    linkActiveClass: 'active',
    // 精确匹配,重新定义类名
    linkExactActiveClass: 'exact-active'
})
声明式导航-跳转传参
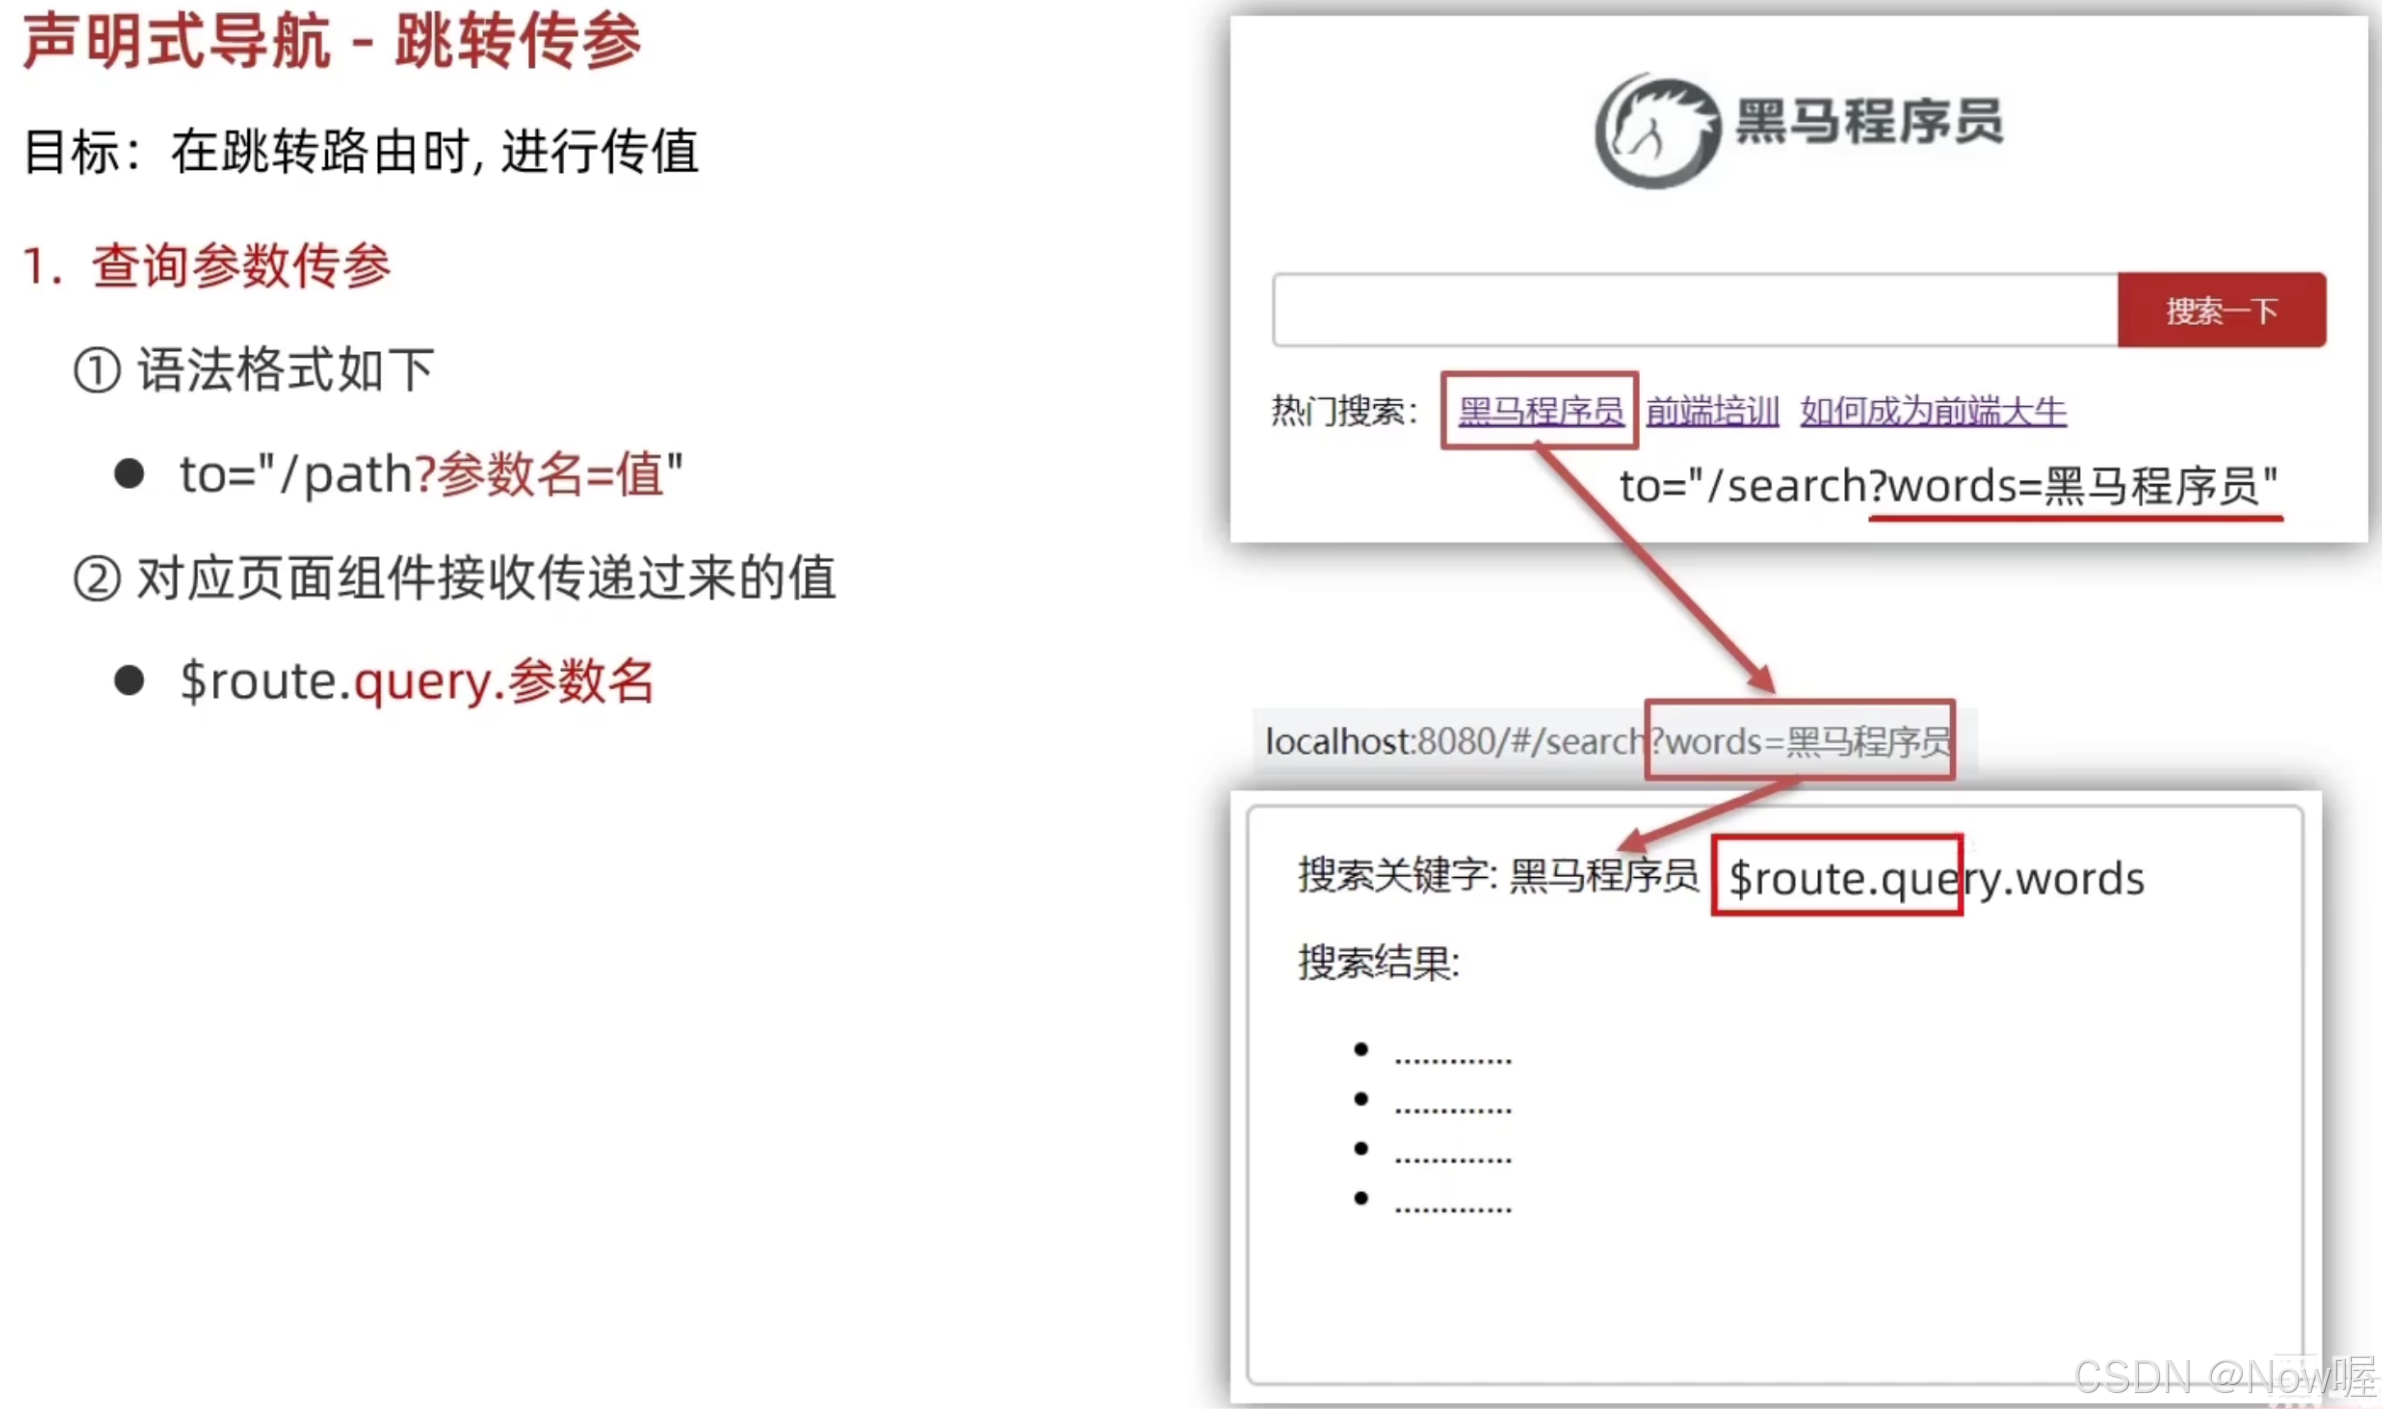
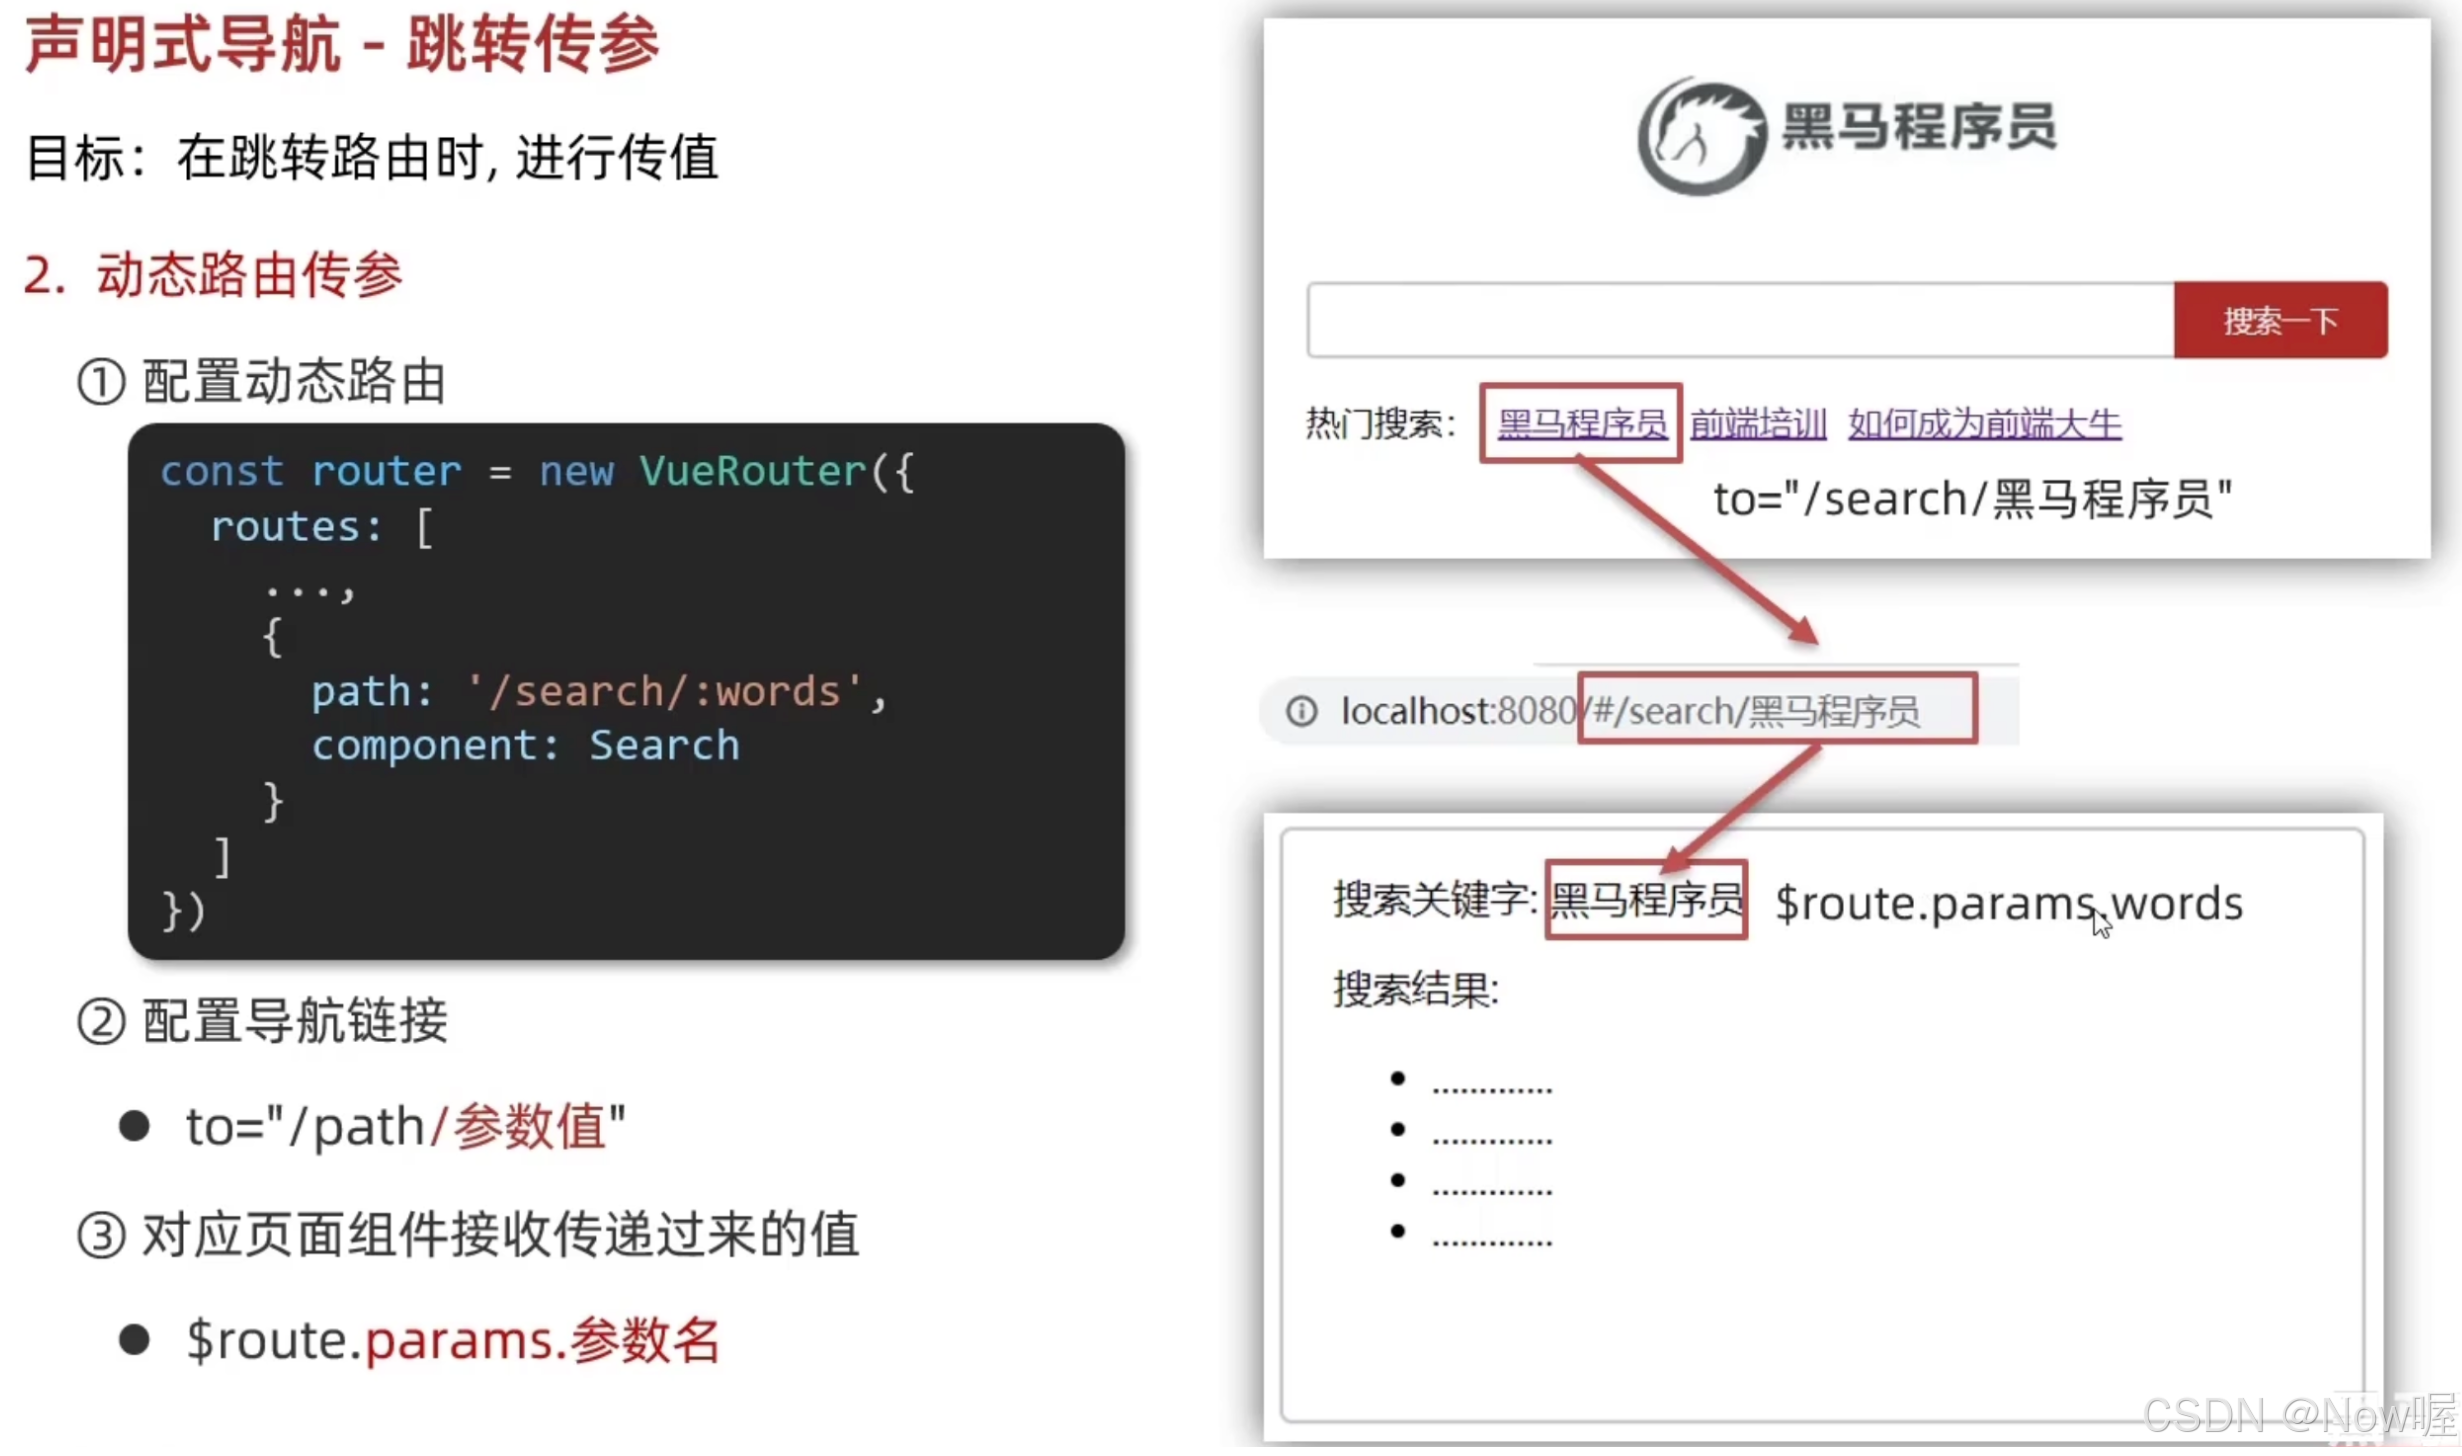
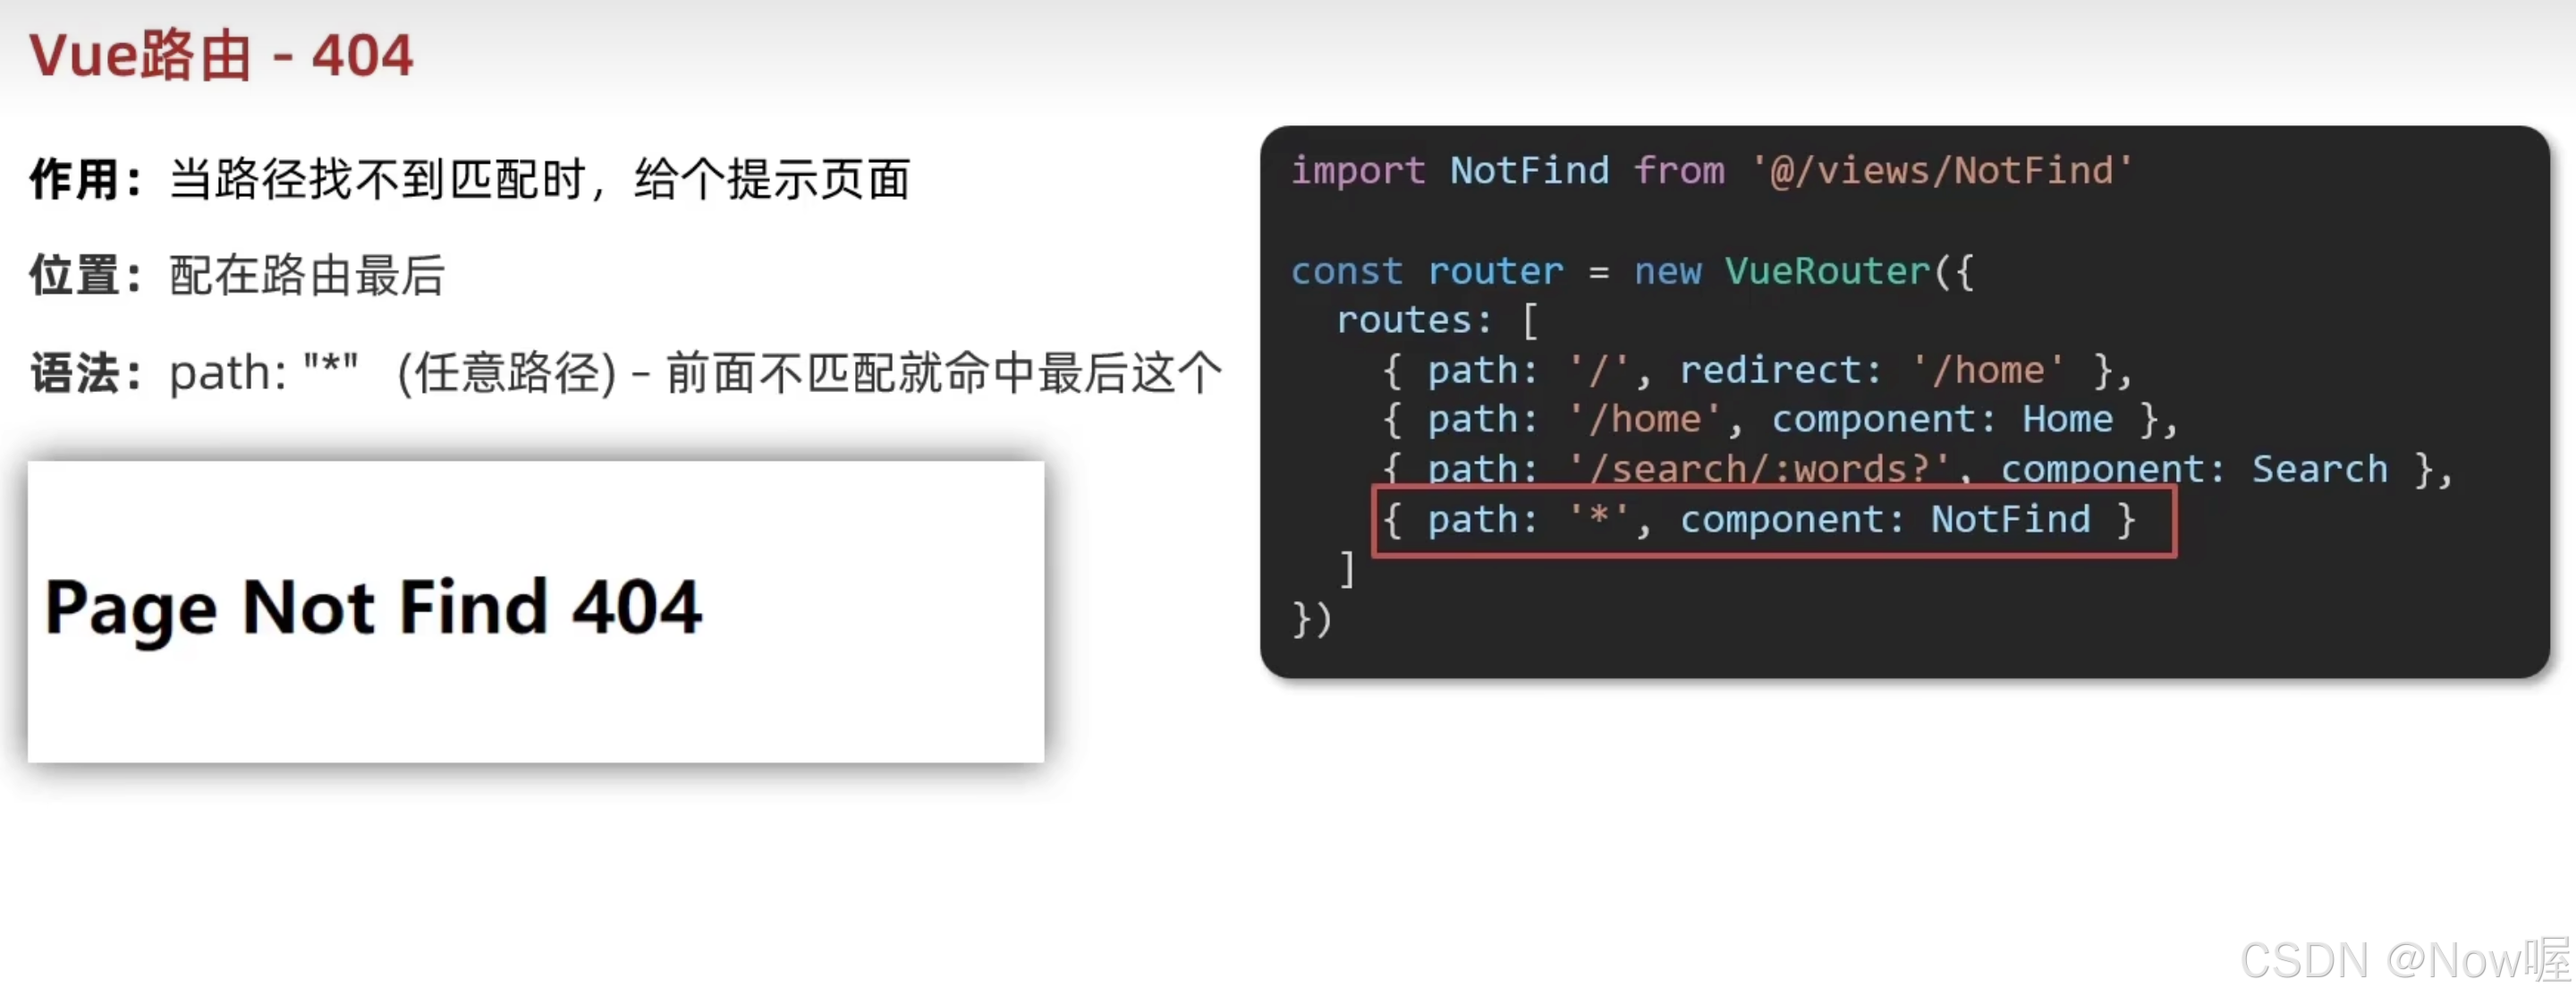
注:遇到页面可能需要参数可能不需要参数path写法-> path:'/search/:words?'
编程式导航
this.$router.push('路径?参数名1=参数值')
获取值写法: this.$route.query.参数名1
this.$router.push({ path:'/路径', params:{ 参数名1:'参数值1', 参数名2:'参数值2' } })
获取值写法:
this.$route.params.参数名1
this.$route.params.参数名2
路由设置
组件缓存keep-alive
keep-alive用于对组件进行缓存,不在此进行重新加载 keep-alive的三个属性
1.include:组件名数组,只有匹配的组件会被缓存
2.exclude:组件名数组,任何匹配的组件都不会被缓存
3.最多可以缓存多少组件实例
4.使用会触发两个生命周期函数 activated:当组件被激活使用的时候触发->进入页面触发 deactivated:当组件不被使用的时候触发->离开页面触发,注:activated、deactivated两个方法在缓存组件创建
views/ViewA.vue
<template>
  <div>
    <h1>ViewA页面</h1>
  </div>
</template>

<script>
export default {
  name:'ViewPageA',
  created(){
    console.log('创建了A');
  },
  activated(){
    console.log('activated');
  },
  deactivated(){
    console.log('deactivated');
  }
}
</script>

<style>

</style>
views/ViewB.vue
<template>
  <div>
    <h1>ViewB页面</h1>
  </div>
</template>

<script>
export default {
  name: 'ViewPageB',
  created() {
    console.log('创建了B');
  }
}
</script>

<style>

</style>
App.vue
<template>
  <div>
    <div>
      <a href="#/viewA">ViewA页面</a>
      <a href="#/viewB">ViewB页面</a>
    </div>
    <keep-alive :include="['ViewPageA']">
      <router-view></router-view>
    </keep-alive>
  </div>
</template>

<script>
export default {
  data() {
    return {
      checked: true
    }
  }
}
</script>

<style></style>


 2545
2545


 被折叠的 条评论
为什么被折叠?
被折叠的 条评论
为什么被折叠?
 到【灌水乐园】发言


