


前言
threejs中提供了shaderMaterial和RawShaderMaterial两种材质,开发者可以自定义顶点着色器和片元着色器,这种做法相当于从头开始写shader,但是在某些场景中,我们希望在threejs自带的材质的基础上增加其它的显示效果,典型的如对导入的三维白膜加入特殊的可视化效果,或者保留某些特殊的特效,threejs Material类的onBeforeCompile方法为我们提供了添加shader的手段。
onBeforeCompile用法
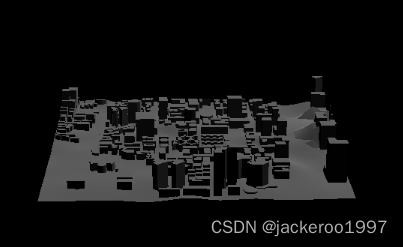
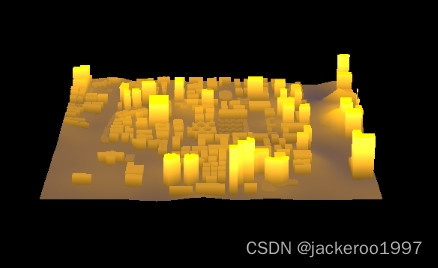
从网上找到一份开源的gltf数据,将其导入,默认材质是MeshStandardMaterial,为它赋予一个默认颜色。
const gltfLoader = new GLTFLoader()
  gltfLoader.load(city, (gltf) => { // gltfLoader
    gltf.scene.traverse((meshItem) => {
      if (item.material) { // 去除非Mesh的Object3D对象
        item.material.color =  new THREE.Color("#00094d")
        console.log(meshItem);
        handleDealyMaterial(meshItem);
      }
    });
    scene.add(gltf.scene);
  });
  });
.onBeforeCompile会自动获取材质的shader,参考官网的例子,打印shader查看其数据结构,发现有很多属性,主要用到了其中的vertexShader,fragmentShader,uniforms三项,与自定义着色器材质一样:
const handleDealyMaterial= (mesh) => {
  mesh.material.onBeforeCompile = (shader) => {
    console.log('shader------', shader);
    console.log('vertexShader------', shader.vertexShader);
    console.log('fragmentShader------', shader.fragmentShader);
  };
}
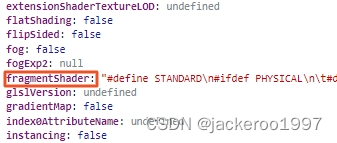
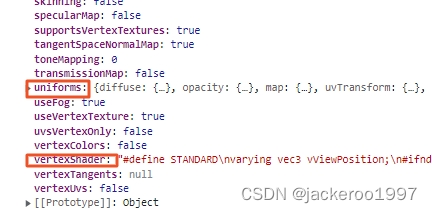
由上图可知顶点着色器和片元着色器都是以字符串的形式存储的,打印后如下,由于截图太长就将它们放在代码块中。
vertexShader------
 #define STANDARD
varying vec3 vViewPosition;
#ifndef FLAT_SHADED
	varying vec3 vNormal;
	#ifdef USE_TANGENT
		varying vec3 vTangent;
		varying vec3 vBitangent;
	#endif
#endif
#include <common>
#include <uv_pars_vertex>
#include <uv2_pars_vertex>
#include <displacementmap_pars_vertex>
#include <color_pars_vertex>
#include <fog_pars_vertex>
#include <morphtarget_pars_vertex>
#include <skinning_pars_vertex>
#include <shadowmap_pars_vertex>
#include <logdepthbuf_pars_vertex>
#include <clipping_planes_pars_vertex>
void main() {
	#include <uv_vertex>
	#include <uv2_vertex>
	#include <color_vertex>
	#include <beginnormal_vertex>
	#include <morphnormal_vertex>
	#include <skinbase_vertex>
	#include <skinnormal_vertex>
	#include <defaultnormal_vertex>
#ifndef FLAT_SHADED
	vNormal = normalize( transformedNormal );
	#ifdef USE_TANGENT
		vTangent = normalize( transformedTangent );
		vBitangent = normalize( cross( vNormal, vTangent ) * tangent.w );
	#endif
#endif
	#include <begin_vertex>
	#include <morphtarget_vertex>
	#include <skinning_vertex>
	#include <displacementmap_vertex>
	#include <project_vertex>
	#include <logdepthbuf_vertex>
	#include <clipping_planes_vertex>
	vViewPosition = - mvPosition.xyz;
	#include <worldpos_vertex>
	#include <shadowmap_vertex>
	#include <fog_vertex>
}

fragmentShader------
#define STANDARD
#ifdef PHYSICAL
	#define REFLECTIVITY
	#define CLEARCOAT
	#define TRANSMISSION
#endif
uniform vec3 diffuse;
uniform vec3 emissive;
uniform float roughness;
uniform float metalness;
uniform float opacity;
#ifdef TRANSMISSION
	uniform float transmission;
#endif
#ifdef REFLECTIVITY
	uniform float reflectivity;
#endif
#ifdef CLEARCOAT
	uniform float clearcoat;
	uniform float clearcoatRoughness;
#endif
#ifdef USE_SHEEN
	uniform vec3 sheen;
#endif
varying vec3 vViewPosition;
#ifndef FLAT_SHADED
	varying vec3 vNormal;
	#ifdef USE_TANGENT
		varying vec3 vTangent;
		varying vec3 vBitangent;
	#endif
#endif
#include <common>
#include <packing>
#include <dithering_pars_fragment>
#include <color_pars_fragment>
#include <uv_pars_fragment>
#include <uv2_pars_fragment>
#include <map_pars_fragment>
#include <alphamap_pars_fragment>
#include <aomap_pars_fragment>
#include <lightmap_pars_fragment>
#include <emissivemap_pars_fragment>
#include <transmissionmap_pars_fragment>
#include <bsdfs>
#include <cube_uv_reflection_fragment>
#include <envmap_common_pars_fragment>
#include <envmap_physical_pars_fragment>
#include <fog_pars_fragment>
#include <lights_pars_begin>
#include <lights_physical_pars_fragment>
#include <shadowmap_pars_fragment>
#include <bumpmap_pars_fragment>
#include <normalmap_pars_fragment>
#include <clearcoat_pars_fragment>
#include <roughnessmap_pars_fragment>
#include <metalnessmap_pars_fragment>
#include <logdepthbuf_pars_fragment>
#include <clipping_planes_pars_fragment>
void main() {
	#include <clipping_planes_fragment>
	vec4 diffuseColor = vec4( diffuse, opacity );
	ReflectedLight reflectedLight = ReflectedLight( vec3( 0.0 ), vec3( 0.0 ), vec3( 0.0 ), vec3( 0.0 ) );
	vec3 totalEmissiveRadiance = emissive;
	#ifdef TRANSMISSION
		float totalTransmission = transmission;
	#endif
	#include <logdepthbuf_fragment>
	#include <map_fragment>
	#include <color_fragment>
	#include <alphamap_fragment>
	#include <alphatest_fragment>
	#include <roughnessmap_fragment>
	#include <metalnessmap_fragment>
	#include <normal_fragment_begin>
	#include <normal_fragment_maps>
	#include <clearcoat_normal_fragment_begin>
	#include <clearcoat_normal_fragment_maps>
	#include <emissivemap_fragment>
	#include <transmissionmap_fragment>
	#include <lights_physical_fragment>
	#include <lights_fragment_begin>
	#include <lights_fragment_maps>
	#include <lights_fragment_end>
	#include <aomap_fragment>
	vec3 outgoingLight = reflectedLight.directDiffuse + reflectedLight.indirectDiffuse + reflectedLight.directSpecular + reflectedLight.indirectSpecular + totalEmissiveRadiance;
	#ifdef TRANSMISSION
		diffuseColor.a *= mix( saturate( 1. - totalTransmission + linearToRelativeLuminance( reflectedLight.directSpecular + reflectedLight.indirectSpecular ) ), 1.0, metalness );
	#endif
	gl_FragColor = vec4( outgoingLight, diffuseColor.a );
	#include <tonemapping_fragment>
	#include <encodings_fragment>
	#include <fog_fragment>
	#include <premultiplied_alpha_fragment>
	#include <dithering_fragment>
}
以上即为MeshStandardMaterial所对应的顶点着色器和片元着色器,那么他们在threejs底层是如何调用的呢。
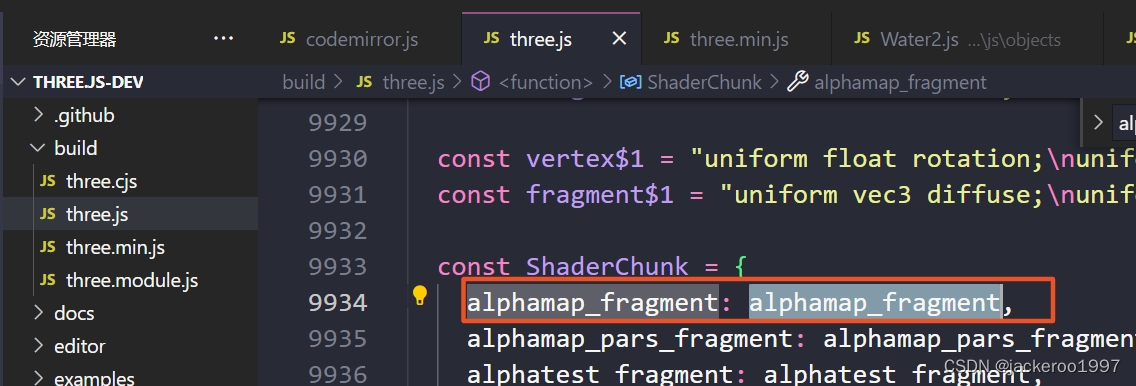
首先,threejs存储了一个名为shaderChunck的映射,为不同的材质赋予不同的shader。
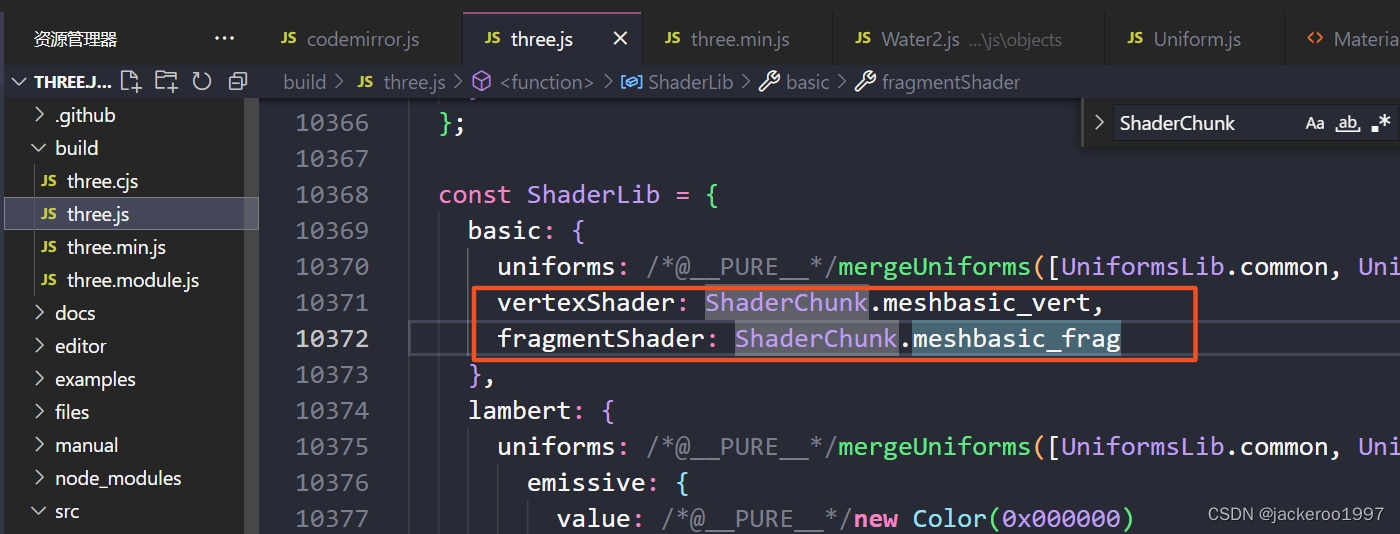
shaderChunck中的每对key-val都存储了一段着色器字符串。它们可以是单一的着色器代码,也可能是包括了其它的引用。

或者


使用时,使用replace方法将要新增的代码加进去,同字符串的replace方法一样
 shader.fragmentShader = shader.fragmentShader.replace(
    "#include <common>",
    `
      #include <common>
      // 自定义shader
    `
  );
使用示例
更改白膜
将原本的gltf模型根据高度设置一个渐变色,过程参考之前的文章,需要注意以下几点:
- varying声明的变量需要在顶点着色器和片元着色器中同时声明,将顶点着色器的信息传达给片元。varying的传递在main函数外,变量传递在main函数中
- uiform变量将外部的变量(js中定义的)传递给片元着色器,同样是在main函数外接收uiform变量,main函数中使用变量
- 使用replace方法时,最好把新加入的着色器放在最后面,防止新增的shader被抵消(个人踩坑经历)
在handleDealyMaterial中加入以下函数,根据打印的着色器shader决定在何处指向replace方法,代码如下:
const changeShaderByHeight = (shader, mesh) => {
  // 计算几何的边界框,更新boundingBox属性
  mesh.geometry.computeBoundingBox();
  // console.log(mesh.geometry.boundingBox); => Box3包围盒
  const { min, max } = mesh.geometry.boundingBox;
  // 物体的高度范围
  const uHeight = max.y - min.y;
  shader.uniforms.uHeight = {
    value: uHeight,
  };
  // 顶部颜色
  shader.uniforms.uTopColor = {
    value: new THREE.Color("#eca729"),
  };

  // 顶点着色器传递模型坐标给片元坐标系
  shader.vertexShader = shader.vertexShader.replace(
    "#include <common>",
    `
      #include <common>
      varying vec3 vPosition;
      `
  );
  // 在顶点着色器的主函数中为将要传递给片元着色器的varying变量赋值
  // position 是threejs底层定义好的模型坐标
  shader.vertexShader = shader.vertexShader.replace(
    "#include <fog_vertex>",
    `
      #include <fog_vertex>
      vPosition = position;
  `
  );

  // 片元着色器接收: 1 外部传入的uniform变量;2 来自顶点着色器的varying变量
  shader.fragmentShader = shader.fragmentShader.replace(
    "#include <common>",
    `
      #include <common>
      uniform vec3 uTopColor;
      uniform float uHeight;
      varying vec3 vPosition;
    `
  );
  // 在片元着色器的主函数中
  shader.fragmentShader = shader.fragmentShader.replace(
    "#include <dithering_fragment>",
    `
      #include <dithering_fragment>
      vec4 distGradColor = gl_FragColor;
      // 设置渐变色比例
      float gradMix = (vPosition.y+uHeight/2.0)/uHeight;
      // 设置渐变效果 mix(a,b,r) = (1-r)*a + br
      vec3 gradMixColor = mix(distGradColor.xyz,uTopColor,gradMix);
      // 片元赋色
      gl_FragColor = vec4(gradMixColor,1);
      // next
      `
  );
}
修改前后:
添加扩散效果
1 使用shaderMaterial实现
使用shaderMaterial主要是通过定义CylinderBufferGeometry几何体,然后根据时间不断改变它的scale,光圈根据距离和高度修改透明度。这里把它封装为一个类,将scene、光圈半径、高度、位置传入构造器,使用requestAnimationFrame方法进行动画渲染。
类lightRing:
import * as THREE from 'three'

export default class LightRing {
  /**
   * @param {*} scene threejs 场景
   * @param {*} radius 光圈半径
   * @param {*} height 光圈高度
   * @param {*} position 中心坐标
   */
  constructor(scene, radius, height = 1, position) {
    this.cylinderGeom = new THREE.CylinderBufferGeometry(
      radius, radius, height, 64
    )

    this.scene = scene;
    // 默认增加半径
    this.cylinderRadius = 0;

    // 光圈中心坐标
    this.x = position.x;
    this.y = height / 2;
    this.z = position.z;

    // 设置材质
    this.material = new THREE.ShaderMaterial({
      vertexShader: `
      varying vec3 vPosition;

      void main(){
          vec4 viewPosition = viewMatrix * modelMatrix *vec4(position,1);
          gl_Position = projectionMatrix * viewPosition;
          vPosition = position;
      }
      `,
      fragmentShader: `
      varying vec3 vPosition;
      uniform float uHeight;
      void main(){
        float gradMix = (vPosition.y+uHeight/2.0)/uHeight;
        gl_FragColor = vec4(1,0,0,1.0-gradMix);
      }
      `,
      transparent: true,
      side: THREE.DoubleSide,
    })
    // 设置模型、位置
    this.lightRingMesh = new THREE.Mesh(this.cylinderGeom, this.material);
    this.lightRingMesh.position.set(this.x, this.y, this.z);

    this.lightRingMesh.geometry.computeBoundingBox();

    const { min, max } = this.lightRingMesh.geometry.boundingBox;
    //  设置物体高差
    let uHeight = max.y - min.y;
    this.material.uniforms.uHeight = {
      value: uHeight,
    };

    scene.add(this.lightRingMesh)
    // 存储计时器
    this.timer = null;

    this.render()
  }

  // 动画函数
  animate() {
    // 每帧都让它的半径增加0.005
    this.cylinderRadius += 0.005;
    // 当半径大于1时,重新开始
    if (this.cylinderRadius > 1) {
      this.cylinderRadius = 0;
    }
    if (this.lightRingMesh) { // 进行缩放半径扩大,y轴不变
      this.lightRingMesh.scale.set(this.cylinderRadius, 1, this.cylinderRadius);
    }
  }

  // 渲染入口
  render() {
    this.timer = requestAnimationFrame(() => { this.render() })
    this.animate()
  }

  // 移除光墙
  remove() {
    this.scene.remove(this.lightRingMesh);
    this.cylinderGeom.dispose();
    this.material.dispose();
  }
}
效果:

2 使用onBeforeCompile方法
直接上代码,把addLightRing方法放在handleDealMaterial中即可,代码如下:
const handleDealMaterial = (mesh) => {
mesh.material.onBeforeCompile = (shader) => {
console.log('shader------', shader);
console.log('vertexShader------', shader.vertexShader);
console.log('fragmentShader------', shader.fragmentShader);
...
changeShaderByHeight(shader, mesh);
addLightRing(shader);
...
};
}
...
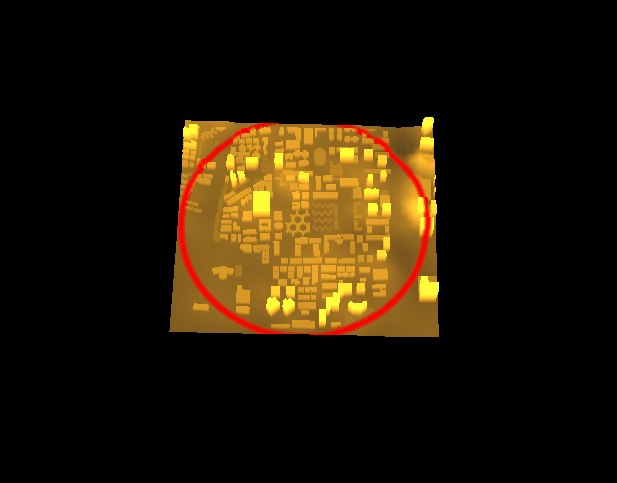
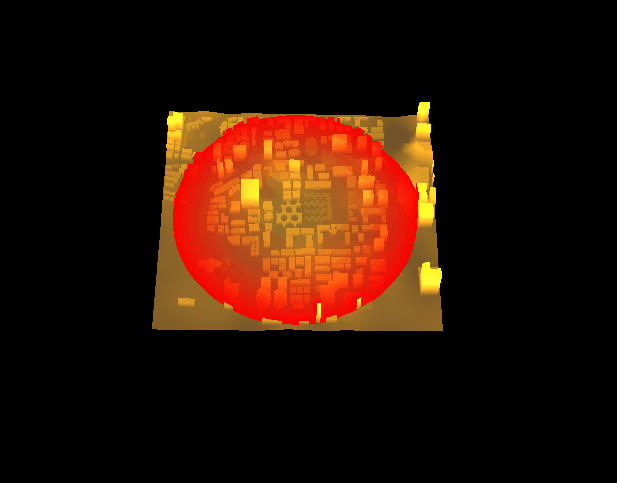
const addLightRing = (shader, center = new THREE.Vector2(0, 0)) => {
// 设置扩散的中心点
shader.uniforms.u_Center = { value: center };
// 扩散的时间
shader.uniforms.u_Time = { value: 0 };
// 设置条带的宽度
shader.uniforms.u_Width = { value: 1000 };
// 设置半径
shader.uniforms.R = { value: 0 };
// main函数外接收外部变量
shader.fragmentShader = shader.fragmentShader.replace(
"#include <common>",
`
#include <common>
uniform vec2 u_Center;
uniform float u_Time;
uniform float u_Width;
uniform float R;
`
);
// 效果一 圆环扩散
shader.fragmentShader = shader.fragmentShader.replace(
"// next",
`
float radius = distance(vPosition.xz,u_Center);
// 扩散范围的函数
float spreadIndex = -(radius-u_Time) * (radius-u_Time) + radius;
float a = pow(spreadIndex / radius, 2.0);
if(spreadIndex > 0.0) {
gl_FragColor = mix(gl_FragColor,vec4(1,0,0,1),a);
}
// next
`
);
// 效果二 圆形扩散,内部透明度渐变
// shader.fragmentShader = shader.fragmentShader.replace(
// "// next",
// `
// float R_ = R;
// float radius = distance(vPosition.xz,u_Center);
// if(radius < R_) {
// float a = radius / R_;
// a = pow(a , 2.0);
// gl_FragColor = mix(gl_FragColor,vec4(1,0,0,1),a);
// }
// // next
// `
// );
// 这里使用了gsap这个轻量库
gsap.to(shader.uniforms.u_Time, {
value: 1000, // 从初始值到该值为界限范围
duration: 5, // 5s一个周期
ease: "power1.out", // 扩散速率函数
repeat: -1, // 不断重复这个效果
});
gsap.to(shader.uniforms.R, {
value: 500,
duration: 5,
ease: "power1.out",
repeat: -1,
});
}
效果一
效果二
参考
老陈打码threejs
https://blog.csdn.net/qw8704149/article/details/117869186;


 459
459


 被折叠的 条评论
为什么被折叠?
被折叠的 条评论
为什么被折叠?
 到【灌水乐园】发言


