


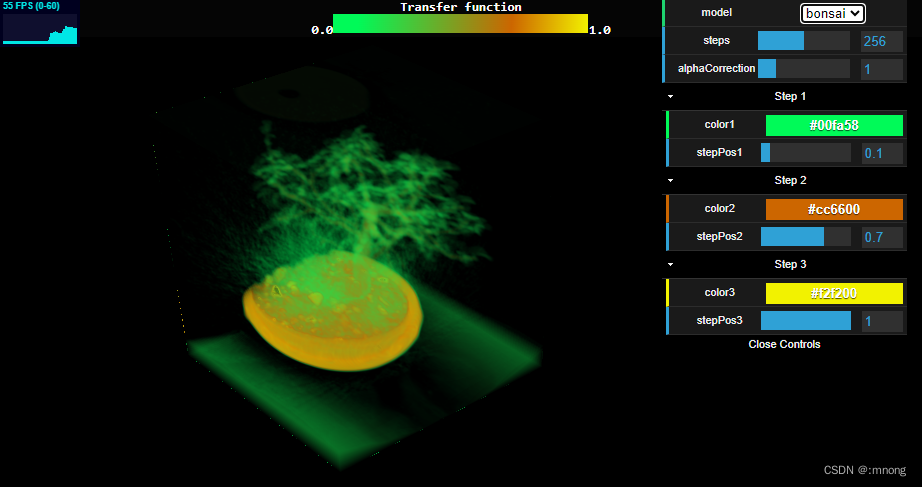
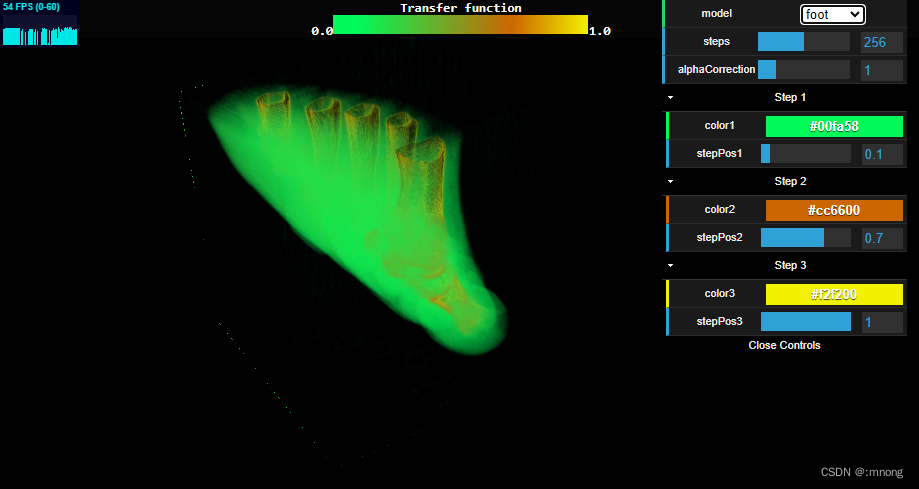
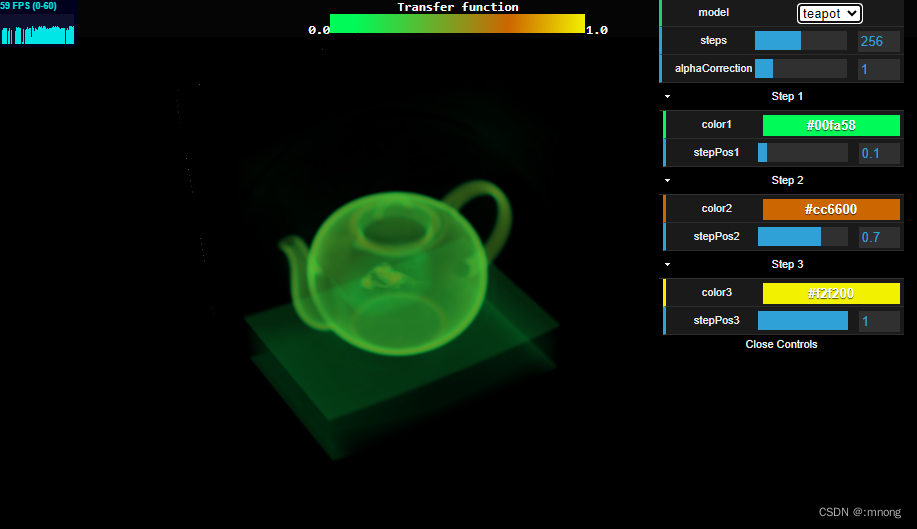
界面效果
代码结构

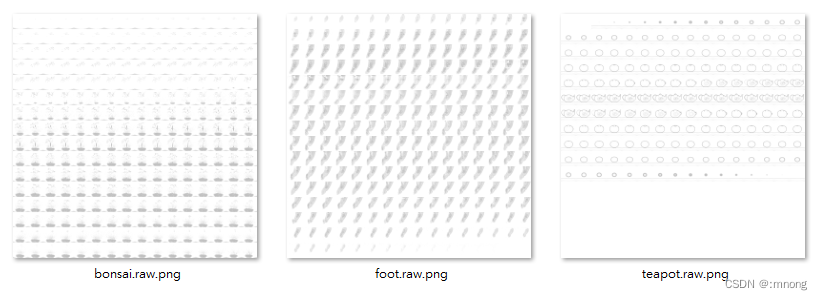
模型素材类似CT (Computed Tomography),即电子计算机断层扫描,它是利用精确准直的X线束、γ射线、超声波等,与灵敏度极高的探测器一同围绕物体的某一部位作一个接一个的断面扫描。
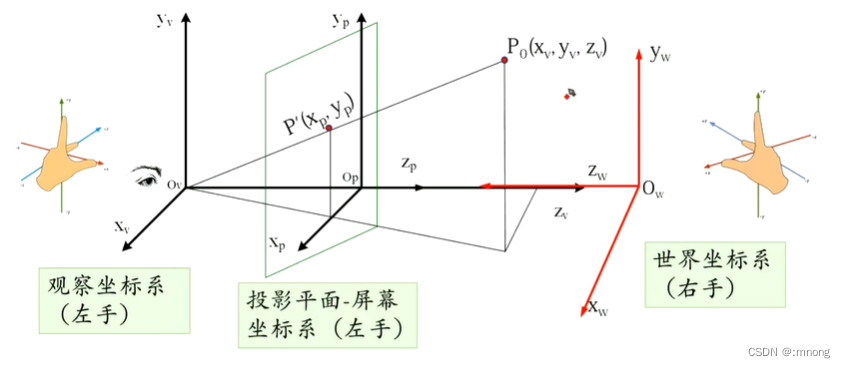
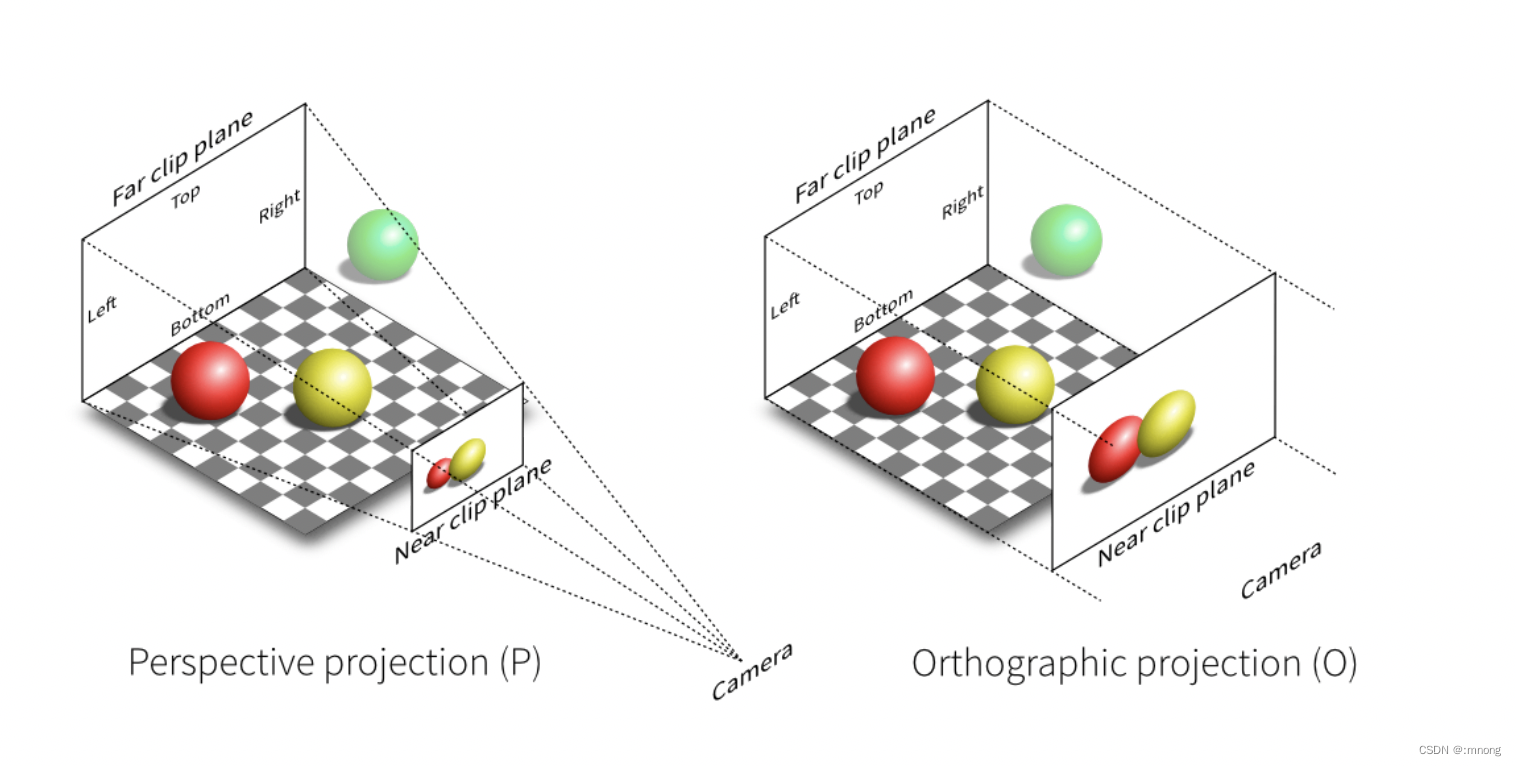
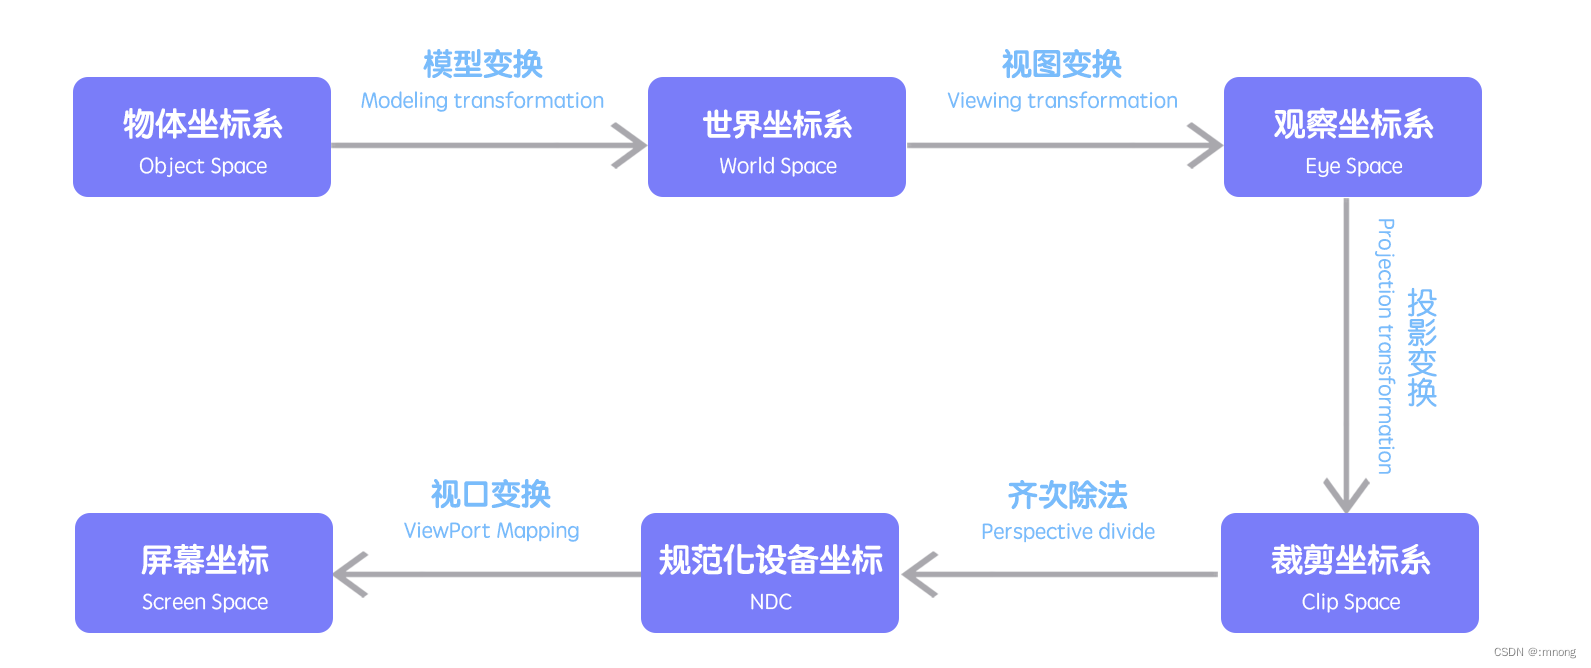
坐标系统
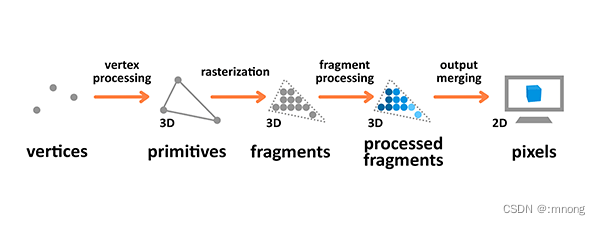
渲染流程
渲染流程是个将之前准备好的模型输出到屏幕的过程。3D 渲染流程会接受使用顶点描述 3D 物体的原始数据作为输入用于处理,并计算其片段 (fragment), 然后渲染为像素 (pixels) 输出到屏幕。
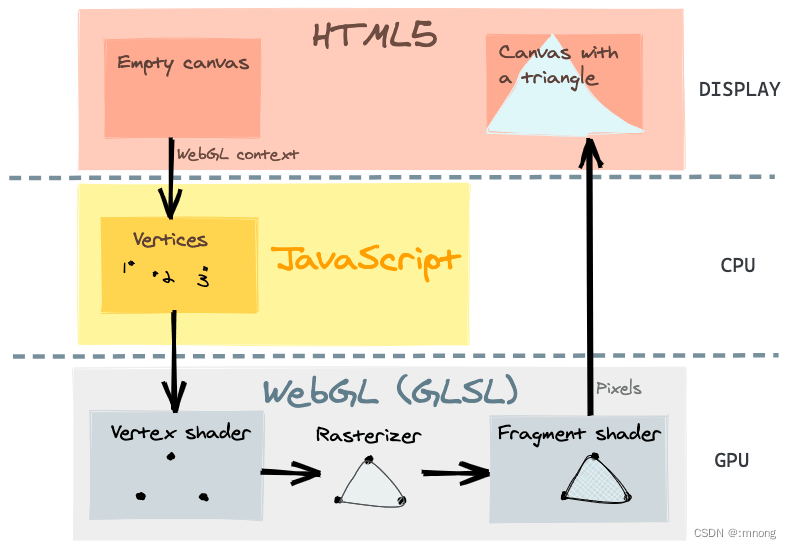
着色器
使用 GLSL 的着色器(shader),GLSL 是一门特殊的有着类似于 C 语言的语法,在图形管道 (graphic pipeline) 中直接可执行的 OpenGL 着色语言。着色器有两种类型——顶点着色器 (Vertex Shader) 和片段着色器(Fragment Shader)。前者是将形状转换到真实的 3D 绘制坐标中,后者是计算最终渲染的颜色和其他属性用的。
GLSL 不同于 JavaScript, 它是强类型语言,并且内置很多数学公式用于计算向量和矩阵。快速编写着色器非常复杂,但创建一个简单的着色器并不难。
一个着色器实际上就是一个绘制东西到屏幕上的函数。着色器运行在 GPU 中,它对这些操作进行了很多的优化,这样你就可以卸载很多不必要的 CPU, 然后集中处理能力去执行你自己的代码。
顶点着色器操作 3D 空间的坐标并且每个顶点都会调用一次这个函数。其目的是设置 gl_Position 变量——这是一个特殊的全局内置变量,它是用来存储当前顶点的位置。
片段 (或者纹理) 着色器 在计算时定义了每像素的 RGBA 颜色 — 每个像素只调用一次片段着色器。这个着色器的作用是设置 gl_FragColor 变量,也是一个 GLSL 内置变量。
        <script id="fragmentShaderFirstPass" type="x-shader/x-fragment">
			varying vec3 worldSpaceCoords;

			void main()
			{
				//The fragment's world space coordinates as fragment output.
				gl_FragColor = vec4( worldSpaceCoords.x , worldSpaceCoords.y, worldSpaceCoords.z, 1 );
			}
		</script>

		<script id="vertexShaderFirstPass" type="x-shader/x-vertex">
			varying vec3 worldSpaceCoords;

			void main()
			{
				//Set the world space coordinates of the back faces vertices as output.
				worldSpaceCoords = position + vec3(0.5, 0.5, 0.5); //move it from [-0.5;0.5] to [0,1]
				gl_Position = projectionMatrix * modelViewMatrix * vec4( position, 1.0 );
			}
		</script>

		<script id="fragmentShaderSecondPass" type="x-shader/x-fragment">
			varying vec3 worldSpaceCoords;
			varying vec4 projectedCoords;
			uniform sampler2D tex, cubeTex, transferTex;
			uniform float steps;
			uniform float alphaCorrection;
			// The maximum distance through our rendering volume is sqrt(3).
			// The maximum number of steps we take to travel a distance of 1 is 512.
			// ceil( sqrt(3) * 512 ) = 887
			// This prevents the back of the image from getting cut off when steps=512 & viewing diagonally.
			const int MAX_STEPS = 887;

			//Acts like a texture3D using Z slices and trilinear filtering.
			vec4 sampleAs3DTexture( vec3 texCoord )
			{
				vec4 colorSlice1, colorSlice2;
				vec2 texCoordSlice1, texCoordSlice2;

				//The z coordinate determines which Z slice we have to look for.
				//Z slice number goes from 0 to 255.
				float zSliceNumber1 = floor(texCoord.z  * 255.0);

				//As we use trilinear we go the next Z slice.
				float zSliceNumber2 = min( zSliceNumber1 + 1.0, 255.0); //Clamp to 255

				//The Z slices are stored in a matrix of 16x16 of Z slices.
				//The original UV coordinates have to be rescaled by the tile numbers in each row and column.
				texCoord.xy /= 16.0;

				texCoordSlice1 = texCoordSlice2 = texCoord.xy;

				//Add an offset to the original UV coordinates depending on the row and column number.
				texCoordSlice1.x += (mod(zSliceNumber1, 16.0 ) / 16.0);
				texCoordSlice1.y += floor((255.0 - zSliceNumber1) / 16.0) / 16.0;

				texCoordSlice2.x += (mod(zSliceNumber2, 16.0 ) / 16.0);
				texCoordSlice2.y += floor((255.0 - zSliceNumber2) / 16.0) / 16.0;

				//Get the opacity value from the 2D texture.
				//Bilinear filtering is done at each texture2D by default.
				colorSlice1 = texture2D( cubeTex, texCoordSlice1 );
				colorSlice2 = texture2D( cubeTex, texCoordSlice2 );

				//Based on the opacity obtained earlier, get the RGB color in the transfer function texture.
				colorSlice1.rgb = texture2D( transferTex, vec2( colorSlice1.a, 1.0) ).rgb;
				colorSlice2.rgb = texture2D( transferTex, vec2( colorSlice2.a, 1.0) ).rgb;

				//How distant is zSlice1 to ZSlice2. Used to interpolate between one Z slice and the other.
				float zDifference = mod(texCoord.z * 255.0, 1.0);

				//Finally interpolate between the two intermediate colors of each Z slice.
				return mix(colorSlice1, colorSlice2, zDifference) ;
			}


			void main( void ) {

				//Transform the coordinates it from [-1;1] to [0;1]
				vec2 texc = vec2(((projectedCoords.x / projectedCoords.w) + 1.0 ) / 2.0,
								((projectedCoords.y / projectedCoords.w) + 1.0 ) / 2.0 );

				//The back position is the world space position stored in the texture.
				vec3 backPos = texture2D(tex, texc).xyz;

				//The front position is the world space position of the second render pass.
				vec3 frontPos = worldSpaceCoords;

				//The direction from the front position to back position.
				vec3 dir = backPos - frontPos;

				float rayLength = length(dir);

				//Calculate how long to increment in each step.
				float delta = 1.0 / steps;

				//The increment in each direction for each step.
				vec3 deltaDirection = normalize(dir) * delta;
				float deltaDirectionLength = length(deltaDirection);

				//Start the ray casting from the front position.
				vec3 currentPosition = frontPos;

				//The color accumulator.
				vec4 accumulatedColor = vec4(0.0);

				//The alpha value accumulated so far.
				float accumulatedAlpha = 0.0;

				//How long has the ray travelled so far.
				float accumulatedLength = 0.0;

				//If we have twice as many samples, we only need ~1/2 the alpha per sample.
				//Scaling by 256/10 just happens to give a good value for the alphaCorrection slider.
				float alphaScaleFactor = 25.6 * delta;

				vec4 colorSample;
				float alphaSample;

				//Perform the ray marching iterations
				for(int i = 0; i < MAX_STEPS; i++)
				{
					//Get the voxel intensity value from the 3D texture.
					colorSample = sampleAs3DTexture( currentPosition );

					//Allow the alpha correction customization.
					alphaSample = colorSample.a * alphaCorrection;

					//Applying this effect to both the color and alpha accumulation results in more realistic transparency.
					alphaSample *= (1.0 - accumulatedAlpha);

					//Scaling alpha by the number of steps makes the final color invariant to the step size.
					alphaSample *= alphaScaleFactor;

					//Perform the composition.
					accumulatedColor += colorSample * alphaSample;

					//Store the alpha accumulated so far.
					accumulatedAlpha += alphaSample;

					//Advance the ray.
					currentPosition += deltaDirection;
					accumulatedLength += deltaDirectionLength;

					//If the length traversed is more than the ray length, or if the alpha accumulated reaches 1.0 then exit.
					if(accumulatedLength >= rayLength || accumulatedAlpha >= 1.0 )
						break;
				}

				gl_FragColor  = accumulatedColor;

			}
		</script>

		<script id="vertexShaderSecondPass" type="x-shader/x-vertex">
			varying vec3 worldSpaceCoords;
			varying vec4 projectedCoords;

			void main()
			{
				worldSpaceCoords = (modelMatrix * vec4(position + vec3(0.5, 0.5,0.5), 1.0 )).xyz;
				gl_Position = projectionMatrix *  modelViewMatrix * vec4( position, 1.0 );
				projectedCoords =  projectionMatrix * modelViewMatrix * vec4( position, 1.0 );
			}
		</script>
三维场景构建
         <script>
			if ( ! Detector.webgl ) Detector.addGetWebGLMessage();

			var container, stats;
			var camera, sceneFirstPass, sceneSecondPass, renderer;

			var clock = new THREE.Clock();
			var rtTexture, transferTexture;
			var cubeTextures = ['bonsai', 'foot', 'teapot'];
			var histogram = [];
			var guiControls;

			var materialSecondPass;

			init();
			//animate();

			function init() {

				//Parameters that can be modified.
				guiControls = new function() {
					this.model = 'bonsai';
					this.steps = 256.0;
					this.alphaCorrection = 1.0;
					this.color1 = "#00FA58";
					this.stepPos1 = 0.1;
					this.color2 = "#CC6600";
					this.stepPos2 = 0.7;
					this.color3 = "#F2F200";
					this.stepPos3 = 1.0;
				};

				container = document.getElementById( 'container' );

				camera = new THREE.PerspectiveCamera( 40, window.innerWidth / window.innerHeight, 0.01, 3000.0 );
				camera.position.z = 2.0;

				controls = new THREE.OrbitControls( camera, container );
				controls.center.set( 0.0, 0.0, 0.0 );


				//Load the 2D texture containing the Z slices.

				THREE.ImageUtils.crossOrigin = 'anonymous'; //处理纹理图加载跨域问题

				cubeTextures['bonsai'] = THREE.ImageUtils.loadTexture('./images/bonsai.raw.png');
				cubeTextures['teapot'] = THREE.ImageUtils.loadTexture('./images/teapot.raw.png');
				cubeTextures['foot'] = THREE.ImageUtils.loadTexture('./images/foot.raw.png');

				//Don't let it generate mipmaps to save memory and apply linear filtering to prevent use of LOD.
				cubeTextures['bonsai'].generateMipmaps = false;
				cubeTextures['bonsai'].minFilter = THREE.LinearFilter;
				cubeTextures['bonsai'].magFilter = THREE.LinearFilter;

				cubeTextures['teapot'].generateMipmaps = false;
				cubeTextures['teapot'].minFilter = THREE.LinearFilter;
				cubeTextures['teapot'].magFilter = THREE.LinearFilter;

				cubeTextures['foot'].generateMipmaps = false;
				cubeTextures['foot'].minFilter = THREE.LinearFilter;
				cubeTextures['foot'].magFilter = THREE.LinearFilter;


				var transferTexture = updateTransferFunction();

				var screenSize = new THREE.Vector2( window.innerWidth, window.innerHeight );
				rtTexture = new THREE.WebGLRenderTarget( screenSize.x, screenSize.y,
														{ 	minFilter: THREE.LinearFilter,
															magFilter: THREE.LinearFilter,
															wrapS:  THREE.ClampToEdgeWrapping,
															wrapT:  THREE.ClampToEdgeWrapping,
															format: THREE.RGBFormat,
															type: THREE.FloatType,
															generateMipmaps: false} );


				var materialFirstPass = new THREE.ShaderMaterial( {
					vertexShader: document.getElementById( 'vertexShaderFirstPass' ).textContent,
					fragmentShader: document.getElementById( 'fragmentShaderFirstPass' ).textContent,
					side: THREE.BackSide
				} );

				materialSecondPass = new THREE.ShaderMaterial( {
					vertexShader: document.getElementById( 'vertexShaderSecondPass' ).textContent,
					fragmentShader: document.getElementById( 'fragmentShaderSecondPass' ).textContent,
					side: THREE.FrontSide,
					uniforms: {	tex:  { type: "t", value: rtTexture },
								cubeTex:  { type: "t", value: cubeTextures['bonsai'] },
								transferTex:  { type: "t", value: transferTexture },
								steps : {type: "1f" , value: guiControls.steps },
								alphaCorrection : {type: "1f" , value: guiControls.alphaCorrection }}
				 });

				sceneFirstPass = new THREE.Scene();
				sceneSecondPass = new THREE.Scene();

				var boxGeometry = new THREE.BoxGeometry(1.0, 1.0, 1.0);
				boxGeometry.doubleSided = true;

				var meshFirstPass = new THREE.Mesh( boxGeometry, materialFirstPass );
				var meshSecondPass = new THREE.Mesh( boxGeometry, materialSecondPass );

				sceneFirstPass.add( meshFirstPass );
				sceneSecondPass.add( meshSecondPass );

				renderer = new THREE.WebGLRenderer();
				container.appendChild( renderer.domElement );

				stats = new Stats();
				stats.domElement.style.position = 'absolute';
				stats.domElement.style.top = '0px';
				container.appendChild( stats.domElement );


				var gui = new dat.GUI();
				var modelSelected = gui.add(guiControls, 'model', [ 'bonsai', 'foot', 'teapot' ] );
				gui.add(guiControls, 'steps', 0.0, 512.0);
				gui.add(guiControls, 'alphaCorrection', 0.01, 5.0).step(0.01);

				modelSelected.onChange(function(value) { materialSecondPass.uniforms.cubeTex.value =  cubeTextures[value]; } );


				//Setup transfer function steps.
				var step1Folder = gui.addFolder('Step 1');
				var controllerColor1 = step1Folder.addColor(guiControls, 'color1');
				var controllerStepPos1 = step1Folder.add(guiControls, 'stepPos1', 0.0, 1.0);
				controllerColor1.onChange(updateTextures);
				controllerStepPos1.onChange(updateTextures);

				var step2Folder = gui.addFolder('Step 2');
				var controllerColor2 = step2Folder.addColor(guiControls, 'color2');
				var controllerStepPos2 = step2Folder.add(guiControls, 'stepPos2', 0.0, 1.0);
				controllerColor2.onChange(updateTextures);
				controllerStepPos2.onChange(updateTextures);

				var step3Folder = gui.addFolder('Step 3');
				var controllerColor3 = step3Folder.addColor(guiControls, 'color3');
				var controllerStepPos3 = step3Folder.add(guiControls, 'stepPos3', 0.0, 1.0);
				controllerColor3.onChange(updateTextures);
				controllerStepPos3.onChange(updateTextures);

				step1Folder.open();
				step2Folder.open();
				step3Folder.open();


				onWindowResize();

				window.addEventListener( 'resize', onWindowResize, false );

			}

			function imageLoad(url){
				var image = document.createElement('img');
				image.crossOrigin = '';
				image.src = url;
				var loader = new THREE.TextureLoader();

				// load a resource
				const textureAssets = null
				loader.load(
					// resource URL
					image,
					// Function when resource is loaded
					function ( texture ) {
						// do something with the texture
						texture.wrapS = THREE.RepeatWrapping;
						texture.wrapT = THREE.RepeatWrapping;
						texture.offset.x = 90/(2*Math.PI);
						textureAssets = texture
					},
					// Function called when download progresses
					function ( xhr ) {
						console.log( (xhr.loaded / xhr.total * 100) + '% loaded' );
					},
					// Function called when download errors
					function ( xhr ) {
						console.log( 'An error happened' );
					}
				);

				return textureAssets; // return the texture
			}


			function updateTextures(value)
			{
				materialSecondPass.uniforms.transferTex.value = updateTransferFunction();
			}
			function updateTransferFunction()
			{
				var canvas = document.createElement('canvas');
				canvas.height = 20;
				canvas.width = 256;

				var ctx = canvas.getContext('2d');

				var grd = ctx.createLinearGradient(0, 0, canvas.width -1 , canvas.height - 1);
				grd.addColorStop(guiControls.stepPos1, guiControls.color1);
				grd.addColorStop(guiControls.stepPos2, guiControls.color2);
				grd.addColorStop(guiControls.stepPos3, guiControls.color3);

				ctx.fillStyle = grd;
				ctx.fillRect(0,0,canvas.width -1 ,canvas.height -1 );

				var img = document.getElementById("transferFunctionImg");
				img.src = canvas.toDataURL();
				img.style.width = "256 px";
				img.style.height = "128 px";

				transferTexture =  new THREE.Texture(canvas);
				transferTexture.wrapS = transferTexture.wrapT =  THREE.ClampToEdgeWrapping;
				transferTexture.needsUpdate = true;

				return transferTexture;
			}

			function onWindowResize( event ) {

				camera.aspect = window.innerWidth / window.innerHeight;
				camera.updateProjectionMatrix();

				renderer.setSize( window.innerWidth, window.innerHeight );
			}

			function animate() {

				requestAnimationFrame( animate );

				render();
				stats.update();
			}

			function render() {

				var delta = clock.getDelta();

				//Render first pass and store the world space coords of the back face fragments into the texture.
				renderer.render( sceneFirstPass, camera, rtTexture, true );

				//Render the second pass and perform the volume rendering.
				renderer.render( sceneSecondPass, camera );

				materialSecondPass.uniforms.steps.value = guiControls.steps;
				materialSecondPass.uniforms.alphaCorrection.value = guiControls.alphaCorrection;
			}

			//Leandro R Barbagallo - 2015 - lebarba at gmail.com


			const VSHADER_SOURCE = `
			attribute vec4 a_Position;
			attribute vec2 a_uv;
			varying vec2 v_uv;
			void main() {
			  gl_Position = a_Position;
			  v_uv = a_uv;
			}
			`
			const FSHADER_SOURCE = `
			precision mediump float;
			// 定义一个取样器。sampler2D 是一种数据类型,就像 vec2
			uniform sampler2D u_Sampler;
			uniform sampler2D u_Sampler2;
			varying vec2 v_uv;
			void main() {
			  // texture2D(sampler2D sampler, vec2 coord) - 着色器语言内置函数,从 sampler 指定的纹理上获取 coord 指定的纹理坐标处的像素
			  vec4 color = texture2D(u_Sampler, v_uv);
			  vec4 color2 = texture2D(u_Sampler2, v_uv);
			  gl_FragColor = color * color2;
			}
			`

			function main() {
				const canvas = document.getElementById('webgl');
				const gl = canvas.getContext("webgl");
				if (!gl) {
					console.log('Failed to get the rendering context for WebGL');
					return;
				}

				if (!initShaders(gl, VSHADER_SOURCE, FSHADER_SOURCE)) {
					console.log('Failed to intialize shaders.');
					return;
				}

				gl.clearColor(0.0, 0.5, 0.5, 1.0);

				// 几何图形的4个顶点的坐标
				const verticesOfPosition = new Float32Array([
					// 左下角是第一个点,逆时针
					-0.5, -0.5,
					0.5, -0.5,
					0.5, 0.5,
					-0.5, 0.5,
				])

				// 纹理的4个点的坐标
				const uvs = new Float32Array([
					// 左下角是第一个点,逆时针,与顶点坐标保持对应
					0.0, 0.0,
					1.0, 0.0,
					1.0, 1.0,
					0.0, 1.0
				])

				initVertexBuffers(gl, verticesOfPosition)

				initUvBuffers(gl, uvs)

				initTextures(gl)
				initMaskTextures(gl)

			}

			// 初始化纹理。之所以为复数 s 是因为可以贴多张图片。
			function initTextures(gl) {
				// 定义图片
				const img = new Image();
				// 请求 CORS 许可。解决图片跨域问题
				img.crossOrigin = "";
				// The image element contains cross-origin data, and may not be loaded.
				img.src = "./images/bonsai.raw.png";

				img.onload = () => {
					// 创建纹理
					const texture = gl.createTexture();

					// 取得取样器
					const u_Sampler = gl.getUniformLocation(gl.program, 'u_Sampler');
					if (!u_Sampler) {
						console.log('Failed to get the storage location of u_Sampler');
						return false;
					}
					// pixelStorei - 图像预处理:图片上下对称翻转坐标轴 (图片本身不变)
					gl.pixelStorei(gl.UNPACK_FLIP_Y_WEBGL, true);
					// 激活纹理单元
					gl.activeTexture(gl.TEXTURE0);
					// 绑定纹理对象
					gl.bindTexture(gl.TEXTURE_2D, texture);
					// 配置纹理参数
					gl.texParameteri(gl.TEXTURE_2D, gl.TEXTURE_MIN_FILTER, gl.LINEAR);
					gl.texParameteri(gl.TEXTURE_2D, gl.TEXTURE_MAG_FILTER, gl.LINEAR);
					gl.texParameteri(gl.TEXTURE_2D, gl.TEXTURE_WRAP_S, gl.CLAMP_TO_EDGE);
					gl.texParameteri(gl.TEXTURE_2D, gl.TEXTURE_WRAP_T, gl.MIRRORED_REPEAT);
					// 纹理图片分配给纹理对象
					gl.texImage2D(gl.TEXTURE_2D, 0, gl.RGB, gl.RGB, gl.UNSIGNED_BYTE, img);
					// 将纹理单元传给片元着色器
					gl.uniform1i(u_Sampler, 0);

					gl.clear(gl.COLOR_BUFFER_BIT);
					gl.drawArrays(gl.TRIANGLE_FAN, 0, 4);
				}
			}

			// 初始化纹理。之所以为复数 s 是因为可以贴多张图片。
			function initMaskTextures(gl) {
				const img = new Image();
				img.src = "./images/teapot.raw.png";

				img.onload = () => {
					// 创建纹理
					const texture = gl.createTexture();

					// 取得取样器
					const u_Sampler = gl.getUniformLocation(gl.program, 'u_Sampler2');
					if (!u_Sampler) {
						console.log('Failed to get the storage location of u_Sampler');
						return false;
					}
					// pixelStorei - 图像预处理:图片上下对称翻转坐标轴 (图片本身不变)
					gl.pixelStorei(gl.UNPACK_FLIP_Y_WEBGL, true);
					// 激活纹理单元
					gl.activeTexture(gl.TEXTURE1);
					// 绑定纹理对象
					gl.bindTexture(gl.TEXTURE_2D, texture);
					// 配置纹理参数
					gl.texParameteri(gl.TEXTURE_2D, gl.TEXTURE_MIN_FILTER, gl.LINEAR);
					gl.texParameteri(gl.TEXTURE_2D, gl.TEXTURE_MAG_FILTER, gl.LINEAR);
					// 纹理图片分配给纹理对象
					gl.texImage2D(gl.TEXTURE_2D, 0, gl.RGB, gl.RGB, gl.UNSIGNED_BYTE, img);
					// 将纹理单元传给片元着色器
					gl.uniform1i(u_Sampler, 1);

					gl.clear(gl.COLOR_BUFFER_BIT);
					gl.drawArrays(gl.TRIANGLE_FAN, 0, 4);
				}
			}

			function initVertexBuffers(gl, positions) {
				const vertexBuffer = gl.createBuffer();
				if (!vertexBuffer) {
					console.log('创建缓冲区对象失败');
					return -1;
				}

				gl.bindBuffer(gl.ARRAY_BUFFER, vertexBuffer);

				gl.bufferData(gl.ARRAY_BUFFER, positions, gl.STATIC_DRAW);

				const a_Position = gl.getAttribLocation(gl.program, 'a_Position');
				if (a_Position < 0) {
					console.log('Failed to get the storage location of a_Position');
					return -1;
				}

				gl.vertexAttribPointer(a_Position, 2, gl.FLOAT, false, 0, 0);

				gl.enableVertexAttribArray(a_Position);
			}

			function initUvBuffers(gl, uvs) {
				const uvsBuffer = gl.createBuffer();
				if (!uvsBuffer) {
					console.log('创建 uvs 缓冲区对象失败');
					return -1;
				}
				gl.bindBuffer(gl.ARRAY_BUFFER, uvsBuffer);
				gl.bufferData(gl.ARRAY_BUFFER, uvs, gl.STATIC_DRAW);
				const a_uv = gl.getAttribLocation(gl.program, 'a_uv');
				if (a_uv < 0) {
					console.log('Failed to get the storage location of a_uv');
					return -1;
				}

				gl.vertexAttribPointer(a_uv, 2, gl.FLOAT, false, 0, 0);

				gl.enableVertexAttribArray(a_uv);
			}

		</script>
环境设置
你只需关注着色器代码。Three.js 和其他 3D 库给你抽象了很多东西出来——如果你想要用纯 WebGL 创建这个例子,你得写很多其他的代码才能运行。要开始编写 WebGL 着色器你不需要做太多,只需如下三步:
1、确保你在使用对 WebGL 有良好支持的现代浏览器,比如最新版的 Firefox 或 Chrome.
2、创建一个目录保存你的实验。
3、拷贝一份的 压缩版的 Three.js 库 到你的目录。
参见:
LearnOpenGL - Coordinate Systems
WebGL model view projection - Web API 接口参考 | MDN


 1082
1082


 被折叠的 条评论
为什么被折叠?
被折叠的 条评论
为什么被折叠?
 到【灌水乐园】发言


