


树莓派 4b 配置 USB 网络连接
-
树莓派镜像: 2022-09-22-raspios-bullseye-arm64.img
-
电脑: windows 10
1 打开树莓派的 USB 网络
- 在
/boot/config.txt最后一行添加dtoverlay=dwc2。
例如:
# ....

[all]
dtoverlay=dwc2
- 在
/boot/cmdline.txt中rootwait后添加modules-load=dwc2,g_ether。
例如:
console=serial0,115200 console=tty1 root=PARTUUID=3d7323dc-02 rootfstype=ext4 fsck.repair=yes rootwait modules-load=dwc2,g_ether quiet splash plymouth.ignore-serial-consoles
- 重启树莓派
sudo reboot
2 在 windows 上安装 Linux USB Ethernet/RNDIS Gadget 驱动
- 将树莓派充电的 type-c 口,使用手机数据线连接到电脑上。打开设备管理器,此时 windows 系统将设备识别成 COM 口。

2.1 下载驱动
驱动下载链接:
如果没有安装 VS 或者不用自己编译驱动,建议直接跳到 2.3 小节。
2.2 自己编译驱动(需要安装VS)
- 编写
linux.inf文件,内容为
; Based on template INF file found at
;    <https://msdn.microsoft.com/en-us/library/ff570620.aspx>
; which was:
;    Copyright (c) Microsoft Corporation
; and released under the MLPL as found at:
;    <http://msdn.microsoft.com/en-us/cc300389.aspx#MLPL>.
; For use only on Windows operating systems.

[Version]
Signature           = "$Windows NT$"
Class               = Net
ClassGUID           = {4d36e972-e325-11ce-bfc1-08002be10318}
Provider            = %Linux%
DriverVer           = 10/10/2020,6.1.6000.16384
CatalogFile			= linux.cat

[Manufacturer]
%Linux%             = LinuxDevices,NTx86,NTamd64,NTia64

; Decoration for x86 architecture
[LinuxDevices.NTx86]
%LinuxDevice%       = RNDIS.NT.5.1, USB\VID_0525&PID_a4a2, USB\VID_1d6b&PID_0104&MI_00

; Decoration for x64 architecture
[LinuxDevices.NTamd64]
%LinuxDevice%       = RNDIS.NT.5.1, USB\VID_0525&PID_a4a2, USB\VID_1d6b&PID_0104&MI_00

; Decoration for ia64 architecture
[LinuxDevices.NTia64]
%LinuxDevice%       = RNDIS.NT.5.1, USB\VID_0525&PID_a4a2, USB\VID_1d6b&PID_0104&MI_00

;@@@ This is the common setting for setup
[ControlFlags]
ExcludeFromSelect=*

; DDInstall section
; References the in-build Netrndis.inf
[RNDIS.NT.5.1]
Characteristics     = 0x84   ; NCF_PHYSICAL + NCF_HAS_UI
BusType             = 15
; NEVER REMOVE THE FOLLOWING REFERENCE FOR NETRNDIS.INF
include             = netrndis.inf
needs               = Usb_Rndis.ndi
AddReg              = Rndis_AddReg_Vista

; DDInstal.Services section
[RNDIS.NT.5.1.Services]
include             = netrndis.inf
needs               = Usb_Rndis.ndi.Services

; Optional registry settings. You can modify as needed.
[RNDIS_AddReg_Vista]
HKR, NDI\params\VistaProperty, ParamDesc,  0, %Vista_Property%
HKR, NDI\params\VistaProperty, type,       0, "edit"
HKR, NDI\params\VistaProperty, LimitText,  0, "12"
HKR, NDI\params\VistaProperty, UpperCase,  0, "1"
HKR, NDI\params\VistaProperty, default,    0, " "
HKR, NDI\params\VistaProperty, optional,   0, "1"

; No sys copyfiles - the sys files are already in-build
; (part of the operating system).
; We do not support XP SP1-, 2003 SP1-, ME, 9x.

[Strings]
Linux                 = "Linux Developer Community"
LinuxDevice           = "Linux USB Ethernet/RNDIS Gadget"
Vista_Property        = "Optional Vista Property"
- 编写
DriverHelper.ps1文件,内容为
# script parameters
param(
    [ValidateSet("Sign", "UntrustCertificates")]
    [string] $Mode = "Sign",

    [string] $InfFile,
    [string] $CommonName = "linux.local",
    [switch] $Force
)

$ErrorActionPreference = "Stop"

# check if this script is run as administrator
If (-NOT ([Security.Principal.WindowsPrincipal] [Security.Principal.WindowsIdentity]::GetCurrent()).IsInRole([Security.Principal.WindowsBuiltInRole]::Administrator))
{
	Write-Error "You are not an Administrator. This script needs to be run by an Adminsitrator!"
}

# check if InfFile exists
if(-NOT (Test-Path -Path $InfFile))
{
    Write-Error "$InfFile not found!"
}

# utility functions
function Step
{
    param([string] $Desc, [System.Management.Automation.ScriptBlock] $Code)

    Write-Output "[*] $Desc";
    Invoke-Command -ScriptBlock $Code
}

function Get-CertificateThumbprint
{
    param([string] $FilePath)

    $cert = New-Object System.Security.Cryptography.X509Certificates.X509Certificate2
    $cert.Import($(Resolve-Path $FilePath))

    return $cert.Thumbprint
}


# Get Kits root
try {
    $InstalledRoots = Get-ItemProperty -Path "Registry::HKEY_LOCAL_MACHINE\SOFTWARE\Microsoft\Windows Kits\Installed Roots"
    $WinKits = $InstalledRoots.KitsRoot10
    $ToolsPrefix = "$($WinKits)\bin\10.0.18362.0\x64"
} catch {
    Write-Error "Could not locate the Windows Driver Kit. Head to https://docs.microsoft.com/en-us/windows-hardware/drivers/download-the-wdk and download the WDK"
}

function RunKit
{
    param([Parameter(Mandatory=$true)][string] $ToolName, [string[]] $Arguments)

    Write-Output "Running $($ToolsPrefix)\$($ToolName)"
    $Proc = Start-Process -FilePath "$($ToolsPrefix)\$($ToolName)" -ArgumentList $Arguments -NoNewWindow -PassThru -Wait

    if ($Proc.ExitCode -NE 0)
    {
        Write-Error "Process failed with exit code: $($Proc.ExitCode)"
    }
}

# Script vars
$CatFile = [io.path]::GetFileNameWithoutExtension($InfFile) + ".cat"
$CertFile = [io.path]::GetFileNameWithoutExtension($InfFile) + ".cer"

# Scripts
function DoSign
{
    # verify that the Inf file contains a "Catalog" entry
    if (-NOT (Select-String -Path $InfFile -Pattern "CatalogFile" -CaseSensitive -SimpleMatch -Quiet))
    {
        Write-Error "Could not find the 'CatalogFile' entry inside the INF file! Make sure it points to a certificate with the same Name."
    }

    Step -Desc "Create Catalog file" -Code {
        New-FileCatalog -Path $InfFile -CatalogFilePath $CatFile -CatalogVersion 2.0
    }

    if (-NOT (Test-Path -Path $CertFile) -OR $Force)
    {
        Step -Desc "Create a Test Certificate" -Code {
            # see https://docs.microsoft.com/en-us/windows-hardware/drivers/install/creating-test-certificates
            # This will create a self-signed certificate and store it in the Personal certificate stora on the local machine.
            RunKit -ToolName "makecert.exe" -Arguments "-r -sr LocalMachine -ss My -pe -n CN=$($CommonName) -eku 1.3.6.1.5.5.7.3.3 $CertFile"
        }

        Step -Desc "Import the Test Certificate into the Local Computer Trusted Root CAs and Trusted Publishers stores" -Code {
            Import-Certificate -FilePath $CertFile -CertStoreLocation Cert:\LocalMachine\Root
            Import-Certificate -FilePath $CertFile -CertStoreLocation Cert:\LocalMachine\TrustedPublisher
        }
    }
    else
    {
        Write-Output "Certificate already exists. Using $CertFile. If you still want to create a new one, use the -Force option"
    }

    Step -Desc "Sign the Catalog with the Test Certificate" -Code {
        # see https://docs.microsoft.com/en-us/windows-hardware/drivers/install/test-signing-a-catalog-file
        RunKit -ToolName "signtool.exe" -Arguments "sign /v /sm /s My /n $($CommonName) /t http://timestamp.digicert.com $($CatFile)"
    }

    Write-Output "Successfully singed the driver and added the certificate to the trusted store."
}

function DoUntrustCertificates
{
    Step -Desc "Remove the Test Certificate from the Local Computer Trusted Root CAs and Trusted Publishers stores" -Code {
        $thumbprint = Get-CertificateThumbprint -FilePath $CertFile

        Remove-Item -Path ("Cert:\LocalMachine\My\$($thumbprint)")
        Remove-Item -Path ("Cert:\LocalMachine\Root\$($thumbprint)")
        Remove-Item -Path ("Cert:\LocalMachine\TrustedPublisher\$($thumbprint)")
    }

    Write-Output "Sucessfully removed all certificates from the trusted certificate stores."
}

# entry
Write-Output "Selected Mode: $Mode"

Switch($Mode)
{
    "Sign" { DoSign }
    "UntrustCertificates" { DoUntrustCertificates }
}
- 以管理员的身份打开
PowerShell,切换到当前目录,运行.\DriverHelper.ps1 -Mode Sign -InfFile .\linux.inf命令,得到linux.cat和linux.cer文件。

2.3 安装驱动
- 打开设备管理器,选择中树莓派的 COM 口,选择更新驱动程序。

- 选择 游览我的电脑以查找驱动程序

- 目录调整到创建前面文件所在目录,点击下一页

- 安装完成

- 此时任务管理器驱动显示正常

3 在树莓派上安装并打开 DHCP 服务器
- 在
/etc/modules末尾添加libcomposite。
例如:
i2c-dev
libcomposite
- 在
/etc/dhcpcd.conf末尾添加denyinterfaces usb0。
例如:
#....
# fallback to static profile on eth0
#interface eth0
#fallback static_eth0
denyinterfaces usb0
- 安装 dnsmasq
sudo apt update
sudo apt install dnsmasq
- 创建
/etc/dnsmasq.d/usb文件,内容为
interface=usb0
dhcp-range=10.55.0.2,10.55.0.254,255.255.255.0,12h
dhcp-option=3
leasefile-ro
其中 dhcp-range 设置表示 DHCP 服务分配的 IP 地址范围从 10.55.0.2-10.55.0.254,子网掩码为 255.255.255.0,有效期为 12 小时。
- 创建
/etc/network/interfaces.d/usb0文件,内容为
auto usb0
allow-hotplug usb0
iface usb0 inet static
  address 10.55.0.1
  netmask 255.255.255.0
其中,address 表示 USB 接口的 IP 地址为 10.55.0.1,子网掩码为 255.255.255.0。
- 创建
/root/usb.sh,内容为
#!/bin/bash
cd /sys/kernel/config/usb_gadget/
mkdir -p pi4
cd pi4
echo 0x1d6b > idVendor # Linux Foundation
echo 0x0104 > idProduct # Multifunction Composite Gadget
echo 0x0100 > bcdDevice # v1.0.0
echo 0x0200 > bcdUSB # USB2
echo 0xEF > bDeviceClass
echo 0x02 > bDeviceSubClass
echo 0x01 > bDeviceProtocol
mkdir -p strings/0x409
echo "fedcba9876543211" > strings/0x409/serialnumber
echo "Ben Hardill" > strings/0x409/manufacturer
echo "PI4 USB Device" > strings/0x409/product
mkdir -p configs/c.1/strings/0x409
echo "Config 1: ECM network" > configs/c.1/strings/0x409/configuration
echo 250 > configs/c.1/MaxPower
# Add functions here
# see gadget configurations below
# End functions
mkdir -p functions/ecm.usb0
HOST="00:dc:c8:f7:75:14" # "HostPC"
SELF="00:dd:dc:eb:6d:a1" # "BadUSB"
echo $HOST > functions/ecm.usb0/host_addr
echo $SELF > functions/ecm.usb0/dev_addr
ln -s functions/ecm.usb0 configs/c.1/
udevadm settle -t 5 || :
ls /sys/class/udc > UDC
ifup usb0
service dnsmasq restart
- 给脚本添加可执行权限
sudo chmod +x /root/usb.sh
- 添加脚本开机启动,在
/etc/rc.local中exit 0上一行添加/root/usb.sh。
例如
_IP=$(hostname -I) || true
if [ "$_IP" ]; then
  printf "My IP address is %s\n" "$_IP"
fi

/root/usb.sh

exit 0
- 重启树莓派,在树莓派上看到 USB 接口的 IP 地址。
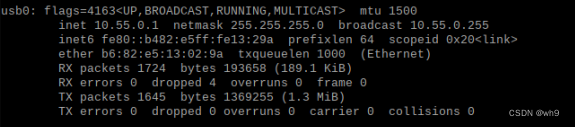
- 在 windows 电脑上查看到树莓派 type-c 接口分配的 IP 地址。

此时树莓派 IP 地址为 10.55.0.1,window 电脑的 IP 地址为 10.55.0.2。
4 测试连接
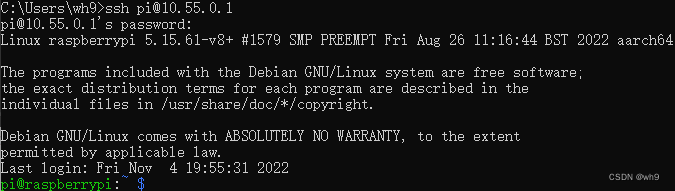
- 用 windows 电脑 ping 树莓派。

- 如果树莓派上打开了 ssh,则可以使用 ssh 连接。
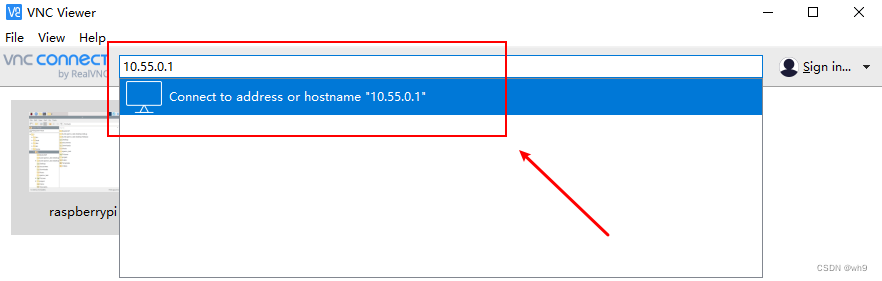
- 如果树莓派上打开了VNC,也可以用 VNC 连接
参考链接
Ethernet Gadget
Pi4 USB-C Gadget
Fix USB connection from Raspberry Pi on Windows


 8397
8397


 被折叠的 条评论
为什么被折叠?
被折叠的 条评论
为什么被折叠?
 到【灌水乐园】发言


