


使用进程并发主要依赖于Python的multiprocessing 和 mpi4py 的两个模块。
1.多进程
multiprocessing主要包括如下方法和属性:
方法介绍:
- p.start():启动进程,并调用该子进程中的p.run()
- p.run():进程启动时运行的方法,正是它去调用target指定的函数,我们自定义类的类中一定要实现该方法
- p.terminate():强制终止进程p,不会进行任何清理操作,如果p创建了子进程,该子进程就成了僵尸进程,(使用该方法需要特别小心这种情况。如果p还保存了一个锁那么也将不会被释放,进而导致死锁 )
- p.is_alive():如果p仍然运行,返回True
- p.join([timeout]):主线程等待p终止(强调:是主线程处于等的状态,而p是处于运行的状态)。
- timeout是可选的超时时间,需要强调的是,p.join只能join住start开启的进程,而不能join住run开启的进程
属性介绍:
- p.daemon:默认值为False,如果设为True,代表p为后台运行的守护进程,当p的父进程终止时,p也随之终止,并且设定为True后,p不能创建自己的新进程,必须在p.start()之前设置守护进程:跟随着父进程的代码执行结束,守护进程就结束
- p.name:进程的名称
- p.pid:进程的pid
- p.exitcode:进程在运行时为None、如果为–N,表示被信号N结束(了解即可)
- p.authkey:进程的身份验证键,默认是由os.urandom()随机生成的32字符的字符串。这个键的用途是为涉及网络连接的底层进程间通信提供安全性,这类连接只有在具有相同的身份验证键时才能成功
1.创建一个进程
Python中的multiprocessing库创建进程的步骤如下:
- 创建进程对象
- 调用
start()方法,开启进程的活动 - 调用
join()方法,在进程结束之前主进程一直等待
示例
import multiprocessing

def foo(i):
    print ('called function in process: %s' %i)
    return

if __name__ == '__main__':
    Process_jobs = []
    for i in range(5):
        p = multiprocessing.Process(target=foo, args=(i,))
        Process_jobs.append(p)
        p.start()
        p.join()
结果如下:
called function in process: 0
called function in process: 1
called function in process: 2
called function in process: 3
called function in process: 4
进程对象创建时需要分配一个函数,作为进程的执行任务。如示例中的foo(),可以使用元组的形式给函数传递一些参数
上面的代码中,主进程是指运行整个脚本的进程,也就是执行if __name__ == '__main__':之后的代码的进程。主进程负责创建和管理子进程。
2.给进程起个名字
前面创建了一个进程,分配目标函数和函数变量。给进程分配一个名字,有助于debug。
命名进程需要为进程对象提供 name 参数
进程的默认名字是Process-N这种方式
代码如下
# 命名一个进程
import multiprocessing
import time

def foo():
    name = multiprocessing.current_process().name
    print("Starting %s \n" % name)
    #time.sleep(3)
    print("Exiting %s \n" % name)

if __name__ == '__main__':
    process_with_name = multiprocessing.Process(name='foo_process', target=foo)
    process_with_name.daemon = True  # 注意原代码有这一行,但是译者发现删掉这一行才能得到正确输出
    process_with_default_name = multiprocessing.Process(target=foo)
    process_with_name.start()
    process_with_default_name.start()

》》》
开始运行...

Starting foo_process

Exiting foo_process

Starting Process-2

Exiting Process-2


运行结束。
3.后台运行进程
在处理较大任务时,可以将 进程作为后台进程,multiprocessing模块提供了后台进程选项
可以使用daemon选项设置进程后台运行。
代码如下
# 命名一个进程
import multiprocessing
import time

def foo():
    name = multiprocessing.current_process().name
    print("Starting %s \n" % name)
    time.sleep(3)
    print("Exiting %s \n" % name)

if __name__ == '__main__':
    process_with_name = multiprocessing.Process(name='foo_process', target=foo)
    process_with_name.daemon = True  # foo_process进程将会后台运行
    process_with_default_name = multiprocessing.Process(target=foo)
    process_with_name.start()
    process_with_default_name.start()
代码的输出如下:
开始运行...

Starting foo_process

Starting Process-2

Exiting Process-2


运行结束。
这段代码中if __name__ == '__main__'主进程并没有等待子进程执行完成。使用join才会等待。若要main主进程等待子进程执行完成再退出,则添加如下两行代码
    process_with_name.join()
    process_with_default_name.join()
4.杀死进程
可以使用 terminate() 方法立即杀死一个进程,可以使用 is_alive() 方法来判断一个进程是否还存活
代码如下
# 杀死一个进程
import multiprocessing
import time

def foo():
        print('Starting function')
        time.sleep(0.1)
        print('Finished function')

if __name__ == '__main__':
        p = multiprocessing.Process(target=foo)
        print('Process before execution:', p, p.is_alive())
        p.start()
        print('Process running:', p, p.is_alive())
        p.terminate()
        print('Process terminated:', p, p.is_alive())
        p.join()
        print('Process joined:', p, p.is_alive())
        print('Process exit code:', p.exitcode)
输出为
Process before execution: <Process name='Process-1' parent=11242 initial> False
Process running: <Process name='Process-1' pid=11244 parent=11242 started> True
Process terminated: <Process name='Process-1' pid=11244 parent=11242 started> True
Process joined: <Process name='Process-1' pid=11244 parent=11242 stopped exitcode=-SIGTERM> False
Process exit code: -15
上面的代码用 is_alive() 方法监控进程生命周期。然后通过调用 terminate() 方法结束进程。
通过读进程的 ExitCode 状态码(status code)验证进程已经结束, ExitCode 可能的值如下:
- == 0: 没有错误正常退出
- > 0: 进程有错误,并以此状态码退出
- < 0: 进程被
-1 *的信号杀死并以此作为 ExitCode 退出
输出的 ExitCode 是 -15 。负数表示子进程被数字为15的信号杀死。
5.子类中使用进程
实现一个自定义的进程子类,需要以下三步:
- 定义
Process的子类 - 覆盖
__init__(self [,args])方法来添加额外的参数 - 覆盖
run(self, [.args])方法来实现Process启动的时候执行的任务
创建 Porcess 子类之后,你可以创建它的实例并通过 start() 方法启动它,启动之后会运行 run() 方法。
# -*- coding: utf-8 -*-
# 自定义子类进程
import multiprocessing

class MyProcess(multiprocessing.Process):
        def run(self):
                print ('called run method in process: %s' % self.name)
                return

if __name__ == '__main__':
        for i in range(5):
                p = MyProcess()
                p.start()
                p.join()
输出为
called run method in process: MyProcess-1
called run method in process: MyProcess-2
called run method in process: MyProcess-3
called run method in process: MyProcess-4
called run method in process: MyProcess-5
由于没有指定进程名字,且是自定义了类,故进程的名字默认是MyProcess-N的方式
6.在进程间交换对象
Multiprocessing有两种方式可以交换对象:队列和管道
1.使用队列交换对象
可以通过队列数据结构来共享对象。Queue 返回一个进程共享的队列,是线程安全的,也是进程安全的。任何可序列化的对象(Python通过 pickable 模块序列化对象)都可以通过它进行交换。
使用队列来实现生产者-消费者问题。 Producer 类生产item放到队列中,然后 Consumer 类从队列中移除它们。代码如下:
import multiprocessing
import random
import time

class Producer(multiprocessing.Process):
    def __init__(self, queue):
        multiprocessing.Process.__init__(self)
        self.queue = queue

    def run(self):
        for i in range(10):
            item = random.randint(0, 256)
            self.queue.put(item)
            print("Process Producer : item %d appended to queue %s" % (item, self.name))
            time.sleep(1)
            print("The size of queue is %s" % self.queue.qsize())

class Consumer(multiprocessing.Process):
    def __init__(self, queue):
        multiprocessing.Process.__init__(self)
        self.queue = queue

    def run(self):
        while True:
            if self.queue.empty():
                print("the queue is empty")
                break
            else:
                time.sleep(2)
                item = self.queue.get()
                print('Process Consumer : item %d popped from by %s \n' % (item, self.name))
                time.sleep(1)

if __name__ == '__main__':
    queue = multiprocessing.Queue()
    process_producer = Producer(queue)
    process_consumer = Consumer(queue)
    process_producer.start()
    process_consumer.start()
    process_producer.join()
    process_consumer.join()
其中一次运行可能的输出为
the queue is empty
Process Producer : item 59 appended to queue Producer-1
The size of queue is 1
Process Producer : item 41 appended to queue Producer-1
The size of queue is 2
Process Producer : item 184 appended to queue Producer-1
The size of queue is 3
Process Producer : item 158 appended to queue Producer-1
The size of queue is 4
Process Producer : item 114 appended to queue Producer-1
The size of queue is 5
Process Producer : item 118 appended to queue Producer-1
The size of queue is 6
Process Producer : item 157 appended to queue Producer-1
The size of queue is 7
Process Producer : item 201 appended to queue Producer-1
The size of queue is 8
Process Producer : item 99 appended to queue Producer-1
The size of queue is 9
Process Producer : item 81 appended to queue Producer-1
The size of queue is 10
如果在macos系统上会出现错误, File "/usr/local/Cellar/python@3.9/3.9.5/Frameworks/Python.framework/Versions/3.9/lib/python3.9/multiprocessing/queues.py", line 126, in qsize
return self._maxsize - self._sem._semlock._get_value()
NotImplementedError
Process Consumer : item 0 popped from by Consumer-2
解决参考Queue.qsize() 可能会在未实现 sem_getvalue() 的 Unix 平台上引发 NotImplementedError 异常的解决办法
队列还有一个 JoinableQueue 子类,它有以下两个额外的方法:
task_done(): 此方法意味着之前入队的一个任务已经完成,比如,get()方法从队列取回item之后调用。所以此方法只能被队列的消费者调用。join(): 此方法将进程阻塞,直到队列中的item全部被取出并执行。
( Microndgt 注:因为使用队列进行通信是一个单向的,不确定的过程,所以你不知道什么时候队列的元素被取出来了,所以使用task_done来表示队列里的一个任务已经完成。
这个方法一般和join一起使用,当队列的所有任务都处理之后,也就是说put到队列的每个任务都调用了task_done方法后,join才会完成阻塞。)
2.使用管道交换对象
一个管道可以做以下事情:
- 返回一对被管道连接的连接对象
- 然后对象就有了 send/receive 方法可以在进程之间通信
下面是管道用法的一个简单示例。这里有一个进程管道从0到9发出数字,另一个进程接收数字并进行平方计算。
import multiprocessing

def create_items(pipe):
    output_pipe, _ = pipe
    for item in range(10):
        output_pipe.send(item)
    output_pipe.close()

def multiply_items(pipe_1, pipe_2):
    close, input_pipe = pipe_1
    close.close()
    output_pipe, _ = pipe_2
    try:
        while True:
            item = input_pipe.recv()
            output_pipe.send(item * item)
    except EOFError:
        output_pipe.close()

if __name__== '__main__':
    # 第一个进程管道发出数字
    pipe_1 = multiprocessing.Pipe(True)
    process_pipe_1 = multiprocessing.Process(target=create_items, args=(pipe_1,))
    process_pipe_1.start()
    # 第二个进程管道接收数字并计算
    pipe_2 = multiprocessing.Pipe(True)
    process_pipe_2 = multiprocessing.Process(target=multiply_items, args=(pipe_1, pipe_2,))
    process_pipe_2.start()
    pipe_1[0].close()
    pipe_2[0].close()
    try:
        while True:
            print(pipe_2[1].recv())
    except EOFError:
        print("End")
结果为
0
1
4
9
16
25
36
49
64
81
End
Pipe() 函数返回一对通过双向管道连接起来的对象。在本例中, out_pipe 包含数字0-9,通过目标函数 create_items() 产生:
在第二个进程中,我们有两个管道,输入管道和包含结果的输出管道:
7.进程同步
多个进程可以协同工作来完成一项任务。通常需要共享数据。所以在多进程之间保持数据的一致性就很重要了。需要共享数据协同的进程必须以适当的策略来读写数据。相关的同步原语和线程的库很类似。
进程的同步原语如下:
- Lock: 这个对象可以有两种状态:锁住(locked)和未锁住(unlocked)。一个Lock对象有两个方法,
acquire()和release(),来控制共享数据的读写权限。 - Event: 实现了进程间的简单通讯,一个进程发事件的信号,另一个进程等待事件的信号。
Event对象有两个方法,set()和clear(),来管理自己内部的变量。 - Condition: 此对象用来同步部分工作流程,在并行的进程中,有两个基本的方法:
wait()用来等待进程,notify_all()用来通知所有等待此条件的进程。 - Semaphore: 用来共享资源,例如,支持固定数量的共享连接。
- Rlock: 递归锁对象。其用途和方法同
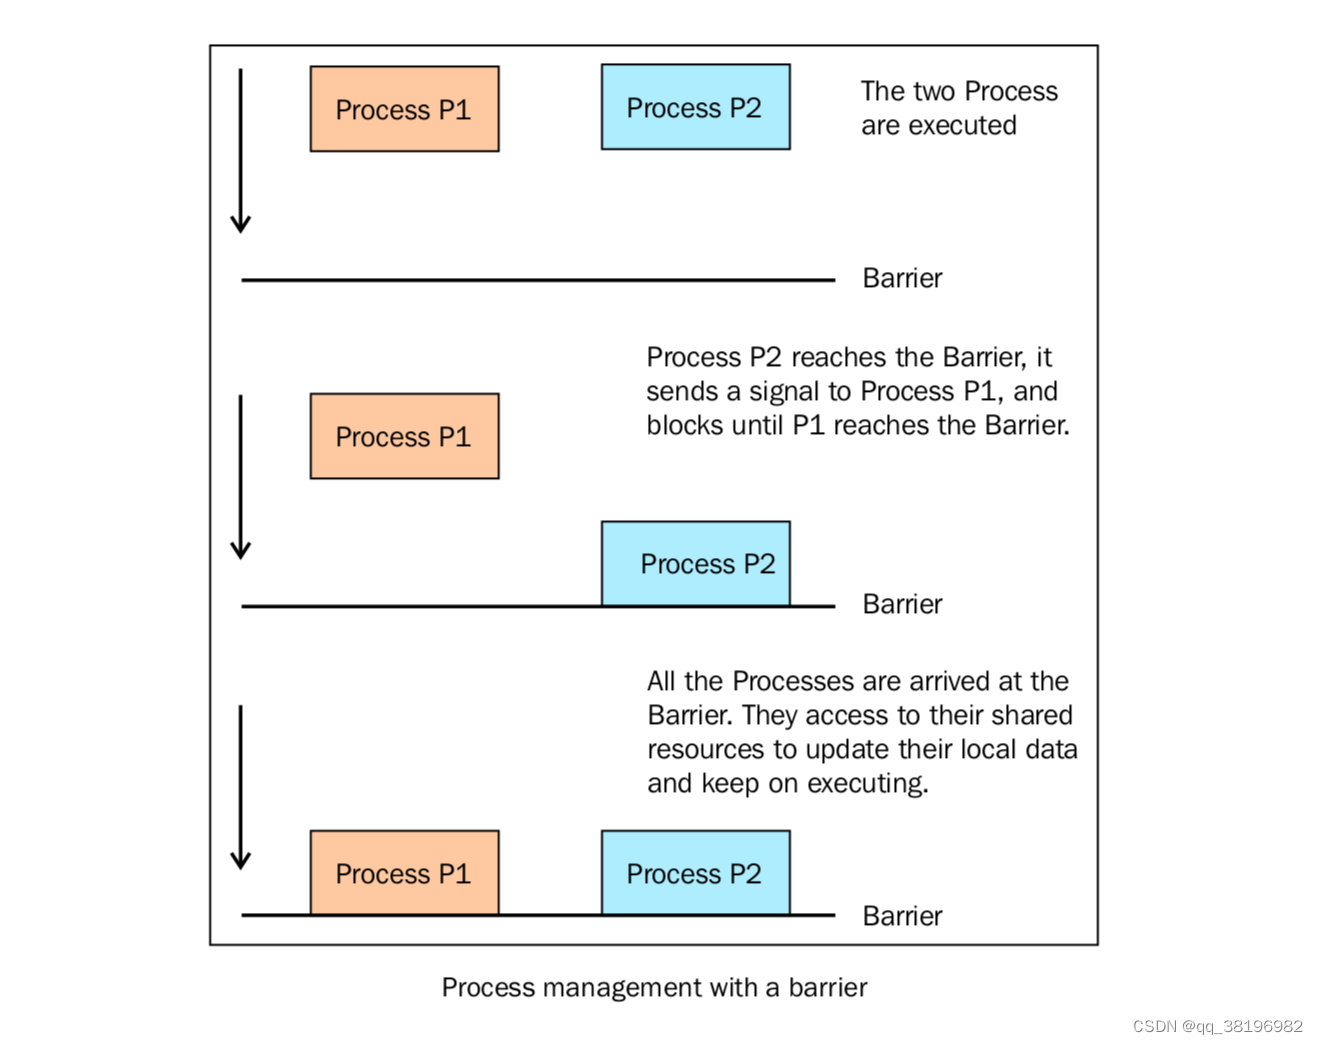
Threading模块一样。 - Barrier: 将程序分成几个阶段,适用于有些进程必须在某些特定进程之后执行。处于障碍(Barrier)之后的代码不能同处于障碍之前的代码并行。
下面的代码展示了如何使用 barrier() 函数来同步两个进程。我们有4个进程,进程1和进程2由barrier语句管理,进程3和进程4没有同步策略。
import multiprocessing
from multiprocessing import Barrier, Lock, Process
from time import time
from datetime import datetime

def test_with_barrier(synchronizer, serializer):
    name = multiprocessing.current_process().name
    synchronizer.wait()
    now = time()
    with serializer:
        print("process %s ----> %s" % (name, datetime.fromtimestamp(now)))

def test_without_barrier():
    name = multiprocessing.current_process().name
    now = time()
    print("process %s ----> %s" % (name, datetime.fromtimestamp(now)))

if __name__ == '__main__':
    synchronizer = Barrier(2)
    serializer = Lock()
    Process(name='p1 - test_with_barrier', target=test_with_barrier, args=(synchronizer,serializer)).start()
    Process(name='p2 - test_with_barrier', target=test_with_barrier, args=(synchronizer,serializer)).start()
    Process(name='p3 - test_without_barrier', target=test_without_barrier).start()
    Process(name='p4 - test_without_barrier', target=test_without_barrier).start()
在主程序中,我们创建了四个进程,然后我们需要一个锁和一个barrier来进程同步。barrier声明的第二个参数代表要管理的进程总数
test_with_barrier 函数调用了barrier的 wait() 方法
当两个进程都调用 wait() 方法的时候,它们会一起继续执行
barrier同步两个进程如下所示:
结果为
process p2 - test_with_barrier ----> 2023-09-18 16:22:20.998469
process p1 - test_with_barrier ----> 2023-09-18 16:22:20.998507
process p3 - test_without_barrier ----> 2023-09-18 16:22:20.999103
process p4 - test_without_barrier ----> 2023-09-18 16:22:20.999650
只能看到 with_barrier 的进程1和2比 without_barrier 的进程3和4时间差的小很多。偶尔进程1、2和进程3、4之间的时间是相同的
需要注意的是在macos时运行上述代码报错。
8.进程之间管理状态
Python的多进程模块提供了管理共享信息的管理者(Manager)。一个Manager对象控制着持有Python对象的服务进程,并允许其它进程操作共享对象。
Manager有以下特性:
- 它控制着管理共享对象的服务进程
- 它确保当某一进程修改了共享对象之后,所有的进程拿到额共享对象都得到了更新
代码如下
import multiprocessing

def worker(dictionary, key, item):
   dictionary[key] = item
   print("key = %d value = %d" % (key, item))

if __name__ == '__main__':
    mgr = multiprocessing.Manager()
    dictionary = mgr.dict()
    jobs = [multiprocessing.Process(target=worker, args=(dictionary, i, i*2)) for i in range(10)]
    for j in jobs:
        j.start()
    for j in jobs:
        j.join()
print('Results:', dictionary)-
首先,声明了一个manager
-
其次,创建了
dictionary类型的一个数据结构,在n个taskWorkers之间共享,每个worker更新字典的某一个index。 -
所有的worker完成之后,新的列表打印到
stdout:
结果为
key = 0 value = 0
key = 1 value = 2
key = 2 value = 4
key = 3 value = 6
key = 4 value = 8
key = 5 value = 10
key = 6 value = 12
key = 8 value = 16
key = 7 value = 14
key = 9 value = 18
Results: {0: 0, 1: 2, 2: 4, 3: 6, 4: 8, 5: 10, 6: 12, 8: 16, 7: 14, 9: 18}
9.进程池
多进程库提供了 Pool 类来实现简单的多进程任务。 Pool 类有以下方法:
apply(): 直到得到结果之前一直阻塞。apply_async(): 这是apply()方法的一个变体,返回的是一个result对象。这是一个异步的操作,在所有的子类执行之前不会锁住主进程。map(): 这是内置的map()函数的并行版本。在得到结果之前一直阻塞,此方法将可迭代的数据的每一个元素作为进程池的一个任务来执行。map_async(): 这是map()方法的一个变体,返回一个result对象。如果指定了回调函数,回调函数应该是callable的,并且只接受一个参数。当result准备好时会自动调用回调函数(除非调用失败)。回调函数应该立即完成,否则,持有result的进程将被阻塞。
下面的例子展示了如果通过进程池来执行一个并行应用。我们创建了有4个进程的进程池,然后使用 map() 方法进行一个简单的计算。
import multiprocessing

def function_square(data):
    result = data*data
    return result

if __name__ == '__main__':
    inputs = list(range(100))
    pool = multiprocessing.Pool(processes=4)
    pool_outputs = pool.map(function_square, inputs)
    pool.close()
    pool.join()
print ('Pool :', pool_outputs)multiprocessing.Pool方法在输入元素上应用function_square方法来执行简单的计算。并行的进程数量是4pool.map方法将一些独立的任务提交给进程池- 计算的结果存储在
pool_outputs中。最后的结果打印出来
结果为
Pool : [0, 1, 4, 9, 16, 25, 36, 49, 64, 81, 100, 121, 144, 169, 196, 225, 256, 289, 324, 361, 400, 441, 484, 529, 576, 625, 676, 729, 784, 841, 900, 961, 1024, 1089, 1156, 1225, 1296, 1369, 1444, 1521, 1600, 1681, 1764, 1849, 1936, 2025, 2116, 2209, 2304, 2401, 2500, 2601, 2704, 2809, 2916, 3025, 3136, 3249, 3364, 3481, 3600, 3721, 3844, 3969, 4096, 4225, 4356, 4489, 4624, 4761, 4900, 5041, 5184, 5329, 5476, 5625, 5776, 5929, 6084, 6241, 6400, 6561, 6724, 6889, 7056, 7225, 7396, 7569, 7744, 7921, 8100, 8281, 8464, 8649, 8836, 9025, 9216, 9409, 9604, 9801]需要注意的是, pool.map() 方法的结果和Python内置的 map() 结果是相同的,不同的是 pool.map() 是通过多个并行进程计算的。
在Python中,多个进程之间默认是无法直接共享变量的。每个进程都有自己独立的内存空间,变量在一个进程中的修改不会影响其他进程中的变量。
如果需要在多个进程之间共享变量,可以使用multiprocessing模块中的Value或Array来创建共享内存的变量。
进程池
import multiprocessing

def process_func(text, qq_status, index_data):
    # 处理文本段的逻辑
    # ...
    # 修改共享变量
    if qq_status.value == 0:
        try:
            # 处理文本段的逻辑
            # 如果处理失败,将qq_status赋值为-1
            # 如果处理成功,将文本段内容放入index_data中
            index_data.append(text)
            if (text == "中国最美丽的地方一定是新"):
                qq_status.value = -1
            print(text)
        except:
            qq_status.value = -1

def main():
    texts = ["中","中国","中国最","中国最美","中国最美丽","中国最美丽的","中国最美丽的地","中国最美丽的地方","中国最美丽的地方一","中国最美丽的地方一定",
            "中国最美丽的地方一定是","中国最美丽的地方一定是新","中国最美丽的地方一定是新疆","中国最美丽的地方是新疆省","中国最美丽的地方是新疆省阿"]  # 100个文本段
    manager = multiprocessing.Manager()
    qq_status = manager.Value('i', 0)
    index_data = manager.list()

    pool = multiprocessing.Pool()
    for text in texts:
        pool.apply_async(process_func, args=(text, qq_status, index_data))
    pool.close()
    pool.join()

    print(qq_status.value)
    print(index_data)

if __name__ == '__main__':
    main()


 3782
3782


 被折叠的 条评论
为什么被折叠?
被折叠的 条评论
为什么被折叠?
 到【灌水乐园】发言


