


前言
之前我写过一篇关于BeanDefinition的文章,讲述了各个属性的作用,其中有一个属性我没有提到,因为这个属性比较重要,所以这里单独开一篇文章来说明
上一篇博文链接 Spring之BeanDefinition
再探AbstractBeanDefinition源码

通过源码我们得出结论,注入类型有四种
- AUTOWIRE_NO (0)
- AUTOWIRE_BY_NAME (1)
- AUTOWIRE_BY_TYPE (2)
- AUTOWIRE_CONSTRUCTOR (3)
PS : 实际有五种,AUTOWIRE_AUTODETECT已过期,我们暂不讨论
默认情况下的注入模型
代码准备
创建配置类AppConfig
package com.test.model.config;


import org.springframework.context.annotation.ComponentScan;

@ComponentScan("com.test.model")
public class AppConfig {

}
创建一个普通bean
package com.test.model.component;

import org.springframework.stereotype.Component;

@Component
public class MixComponent {

}
创建一个BeanFactoryPostProcessor(后面简称bfpp)
package com.test.model.bfpp;

import org.springframework.beans.BeansException;
import org.springframework.beans.factory.config.AutowireCapableBeanFactory;
import org.springframework.beans.factory.config.ConfigurableListableBeanFactory;
import org.springframework.beans.factory.support.AbstractBeanDefinition;
import org.springframework.beans.factory.support.BeanDefinitionRegistry;
import org.springframework.beans.factory.support.BeanDefinitionRegistryPostProcessor;
import org.springframework.stereotype.Component;

@Component
public class AutowireBeanFactoryPostProcessor implements BeanDefinitionRegistryPostProcessor {


    @Override
    public void postProcessBeanDefinitionRegistry(BeanDefinitionRegistry registry) throws BeansException {
        AbstractBeanDefinition beanDefinition = (AbstractBeanDefinition) registry.getBeanDefinition("mixComponent");
        int autowireMode = beanDefinition.getAutowireMode();
        System.out.println(autowireMode);
    }

    @Override
    public void postProcessBeanFactory(ConfigurableListableBeanFactory beanFactory) throws BeansException {

    }
}
创建启动类
package com.test.model;

import com.test.model.config.AppConfig;
import org.springframework.context.annotation.AnnotationConfigApplicationContext;

public class Main {

    public static void main(String[] args) {

        AnnotationConfigApplicationContext context = new AnnotationConfigApplicationContext(AppConfig.class);
    }
}
运行main方法,查看运行结果 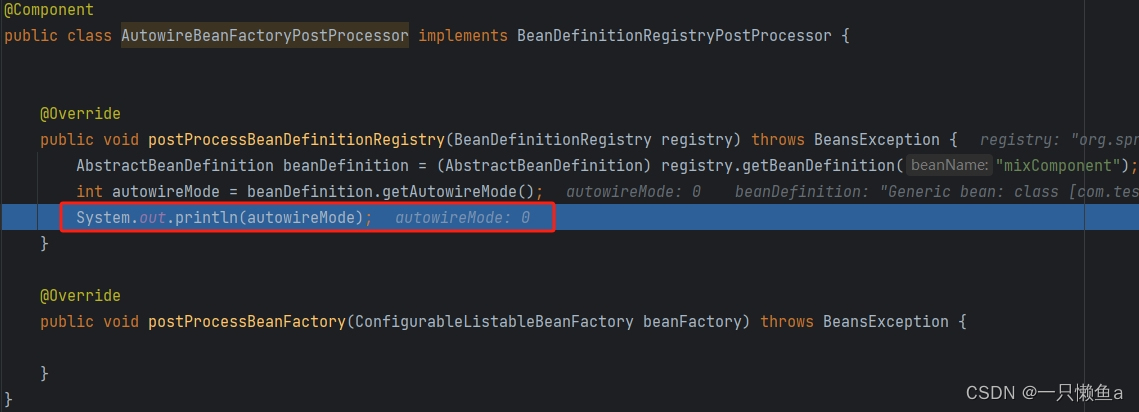
结论 : 默认的注入模型是0 (AUTOWIRE_NO)
默认情况下的依赖注入
创建三个普通bean
@Component
public class ComponentA {
}

@Component
public class ComponentB {
}

@Component
public class ComponentC {
}
依赖注入
package com.test.model.component;

import org.springframework.beans.factory.annotation.Autowired;
import org.springframework.stereotype.Component;

@Component
public class MixComponent {

    @Autowired
    private ComponentA componentA;

    private ComponentB componentB;

    private ComponentC componentC;

    @Autowired
    public void setComponentB(ComponentB componentB) {
        this.componentB = componentB;
    }

    public MixComponent() {
    }

    @Autowired
    public MixComponent(ComponentC componentC) {
        this.componentC = componentC;
    }
}
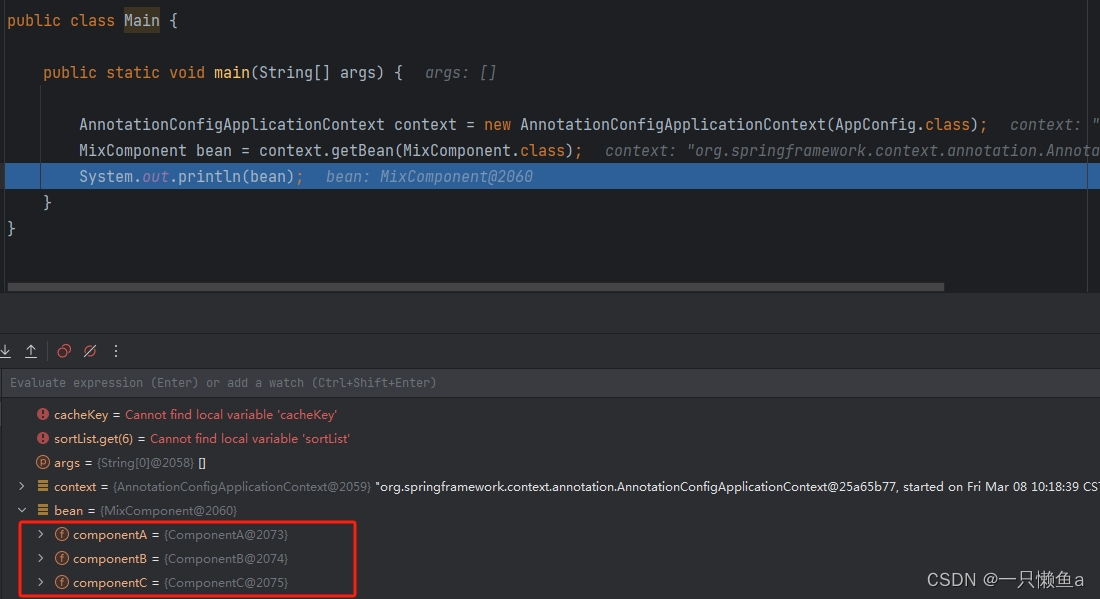
默认情况下的依赖注入的三种方式
- 属性注入
- setter注入
- 构造器注入
运行main方法,查看运行结果

byName情况下的依赖注入
通过bfpp修改注入模型
package com.test.model.bfpp;

import org.springframework.beans.BeansException;
import org.springframework.beans.factory.config.AutowireCapableBeanFactory;
import org.springframework.beans.factory.config.ConfigurableListableBeanFactory;
import org.springframework.beans.factory.support.AbstractBeanDefinition;
import org.springframework.beans.factory.support.BeanDefinitionRegistry;
import org.springframework.beans.factory.support.BeanDefinitionRegistryPostProcessor;
import org.springframework.stereotype.Component;

@Component
public class AutowireBeanFactoryPostProcessor implements BeanDefinitionRegistryPostProcessor {


    @Override
    public void postProcessBeanDefinitionRegistry(BeanDefinitionRegistry registry) throws BeansException {
        AbstractBeanDefinition beanDefinition = (AbstractBeanDefinition) registry.getBeanDefinition("mixComponent");
        // 将注入模型改为byName
        beanDefinition.setAutowireMode(AutowireCapableBeanFactory.AUTOWIRE_BY_NAME);
    }

    @Override
    public void postProcessBeanFactory(ConfigurableListableBeanFactory beanFactory) throws BeansException {

    }
}
改造MixComponent
package com.test.model.component;

import org.springframework.stereotype.Component;

@Component
public class MixComponent {

    // 没有Autowired注解
    private ComponentA componentA;

    // 没有Autowired注解
    private ComponentB componentB;

    // 没有Autowired注解
    private ComponentC componentC;

    public void setComponentA(ComponentA componentA) {
        this.componentA = componentA;
    }

    public void setComponentB(ComponentB componentB) {
        this.componentB = componentB;
    }

    public void setComponentC(ComponentC componentC) {
        this.componentC = componentC;
    }
}
运行main方法,查看运行结果
源码解析
AbstractAutowireCapableBeanFactory#populateBean
AbstractAutowireCapableBeanFactory#autowireByName
AbstractAutowireCapableBeanFactory#unsatisfiedNonSimpleProperties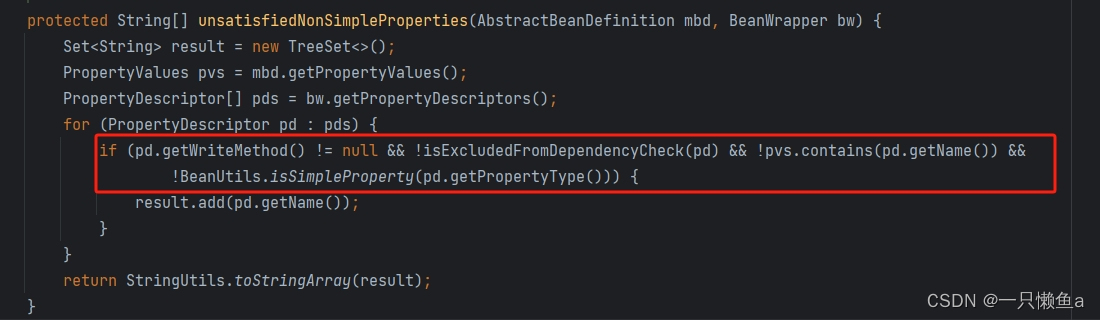
unsatisfiedNonSimpleProperties方法大概分为两个步骤
- 利用Spring的内省机制获取pds
- 判断这个pd是否符合条件
- 判断pd是否存在writeMethod
- 判断pd的propertyType是不是需要忽略的类
- pvs是否已存在相同name的值
- propertyType是不是普通类
我来解释一下pd需要满足的四个条件
条件1
package com.test.model.component;

import org.springframework.stereotype.Component;

@Component
public class Demo1 {

    public Object getAbc() {
        return null;
    }

    public void setAbc(Object abc) {

    }

    public Object getXyz() {
        return null;
    }

    public void setXyz(Object xyz) {

    }
}

不管我们是不是真实存在abc、xyz这样的属性,只要类中存在setXxx或者getXxx这样的方法,我们就认为类中存在一个名称为xxx的属性。如果存在setXxx方法,表示该属性存在writeMethod
PS : 我测试了一下,setXxx方法只能存在一个参数
条件2

比如bean实现了xxxAware接口,其相应的实现方法会被过滤掉
相关源码
AbstractApplicationContext#prepareBeanFactory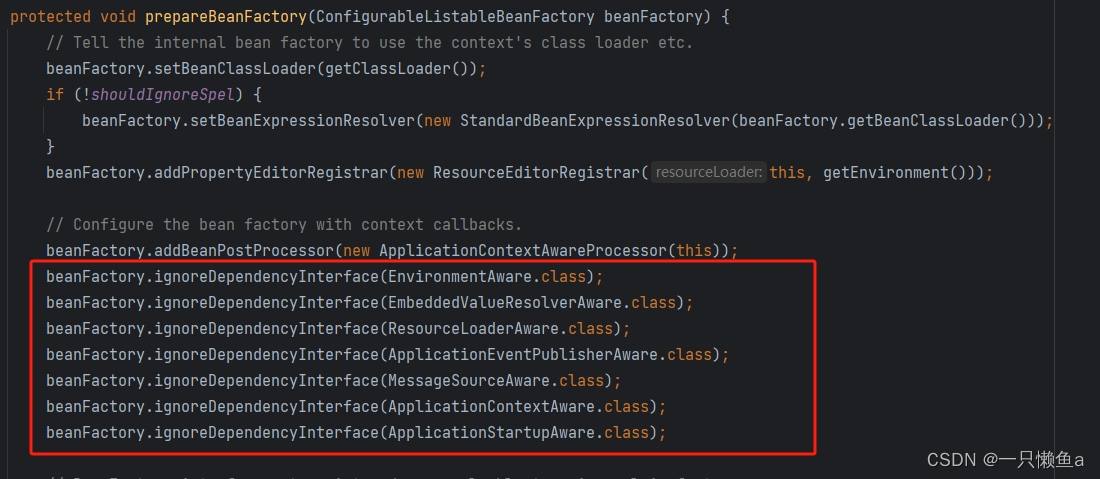
PS : 可能还有其他地方也添加了相关接口,debug的时候不止这几个
条件3
package com.test.model.bfpp;

import org.springframework.beans.BeansException;
import org.springframework.beans.factory.config.ConfigurableListableBeanFactory;
import org.springframework.beans.factory.support.AbstractBeanDefinition;
import org.springframework.beans.factory.support.BeanDefinitionRegistry;
import org.springframework.beans.factory.support.BeanDefinitionRegistryPostProcessor;
import org.springframework.stereotype.Component;

@Component
public class Demo1FactoryPostProcessor implements BeanDefinitionRegistryPostProcessor {

    @Override
    public void postProcessBeanDefinitionRegistry(BeanDefinitionRegistry registry) throws BeansException {
        AbstractBeanDefinition b2 = (AbstractBeanDefinition) registry.getBeanDefinition("demo1");

        b2.getPropertyValues().add("abc", new Object());
    }

    @Override
    public void postProcessBeanFactory(ConfigurableListableBeanFactory beanFactory) throws BeansException {

    }
}
我们可以手动给指定bean的属性设置值,那样就不会在Spring容器中查找符合条件的bean了。
条件4
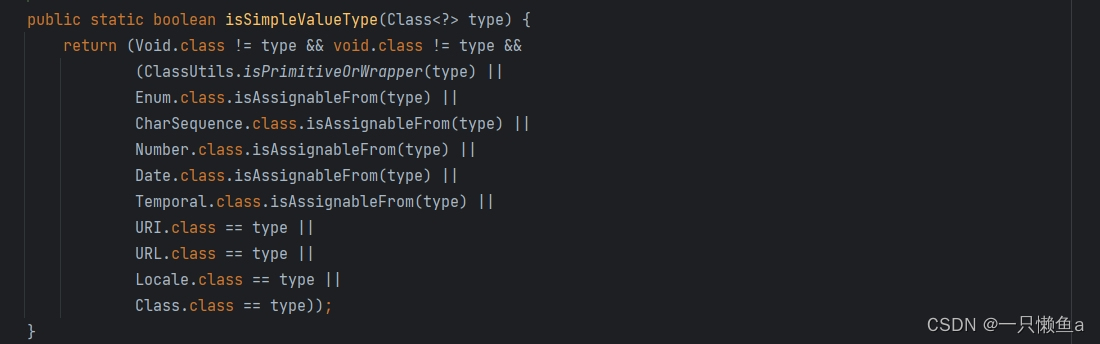
Spring定义的普通类
byType情况下的依赖注入
byType和byName类似 主要就是根据参数类型从Spring中查找符合条件的bean,主要关注unsatisfiedNonSimpleProperties方法
测试发现一个有意思的情况,下方代码在byName的情况下会错,在byType的情况下会正确注入
package com.test.model.component;

import org.springframework.stereotype.Component;

@Component
public class Demo2 {

    private ComponentC componentC;

    public void setComponentA(ComponentC componentC) {
        this.componentC = componentC;
    }
}
构造器注入
修改MixComponent代码,并将注入模型改成AUTOWIRE_CONSTRUCTOR
@Component
public class MixComponent {

    private ComponentA componentA;

    private ComponentB componentB;

    private ComponentC componentC;

    public MixComponent() {
    }

    protected MixComponent(ComponentA componentA, ComponentB componentB, ComponentC componentC) {
        this.componentA = componentA;
        this.componentB = componentB;
        this.componentC = componentC;
    }

    public MixComponent(ComponentA componentA, ComponentB componentB) {
        this.componentA = componentA;
        this.componentB = componentB;
    }
}

@Component
public class AutowireBeanFactoryPostProcessor implements BeanDefinitionRegistryPostProcessor {

    @Override
    public void postProcessBeanDefinitionRegistry(BeanDefinitionRegistry registry) throws BeansException {
        AbstractBeanDefinition beanDefinition = (AbstractBeanDefinition) registry.getBeanDefinition("mixComponent");
        // 将注入模型改为AUTOWIRE_CONSTRUCTOR
        beanDefinition.setAutowireMode(AutowireCapableBeanFactory.AUTOWIRE_CONSTRUCTOR);
    }

    @Override
    public void postProcessBeanFactory(ConfigurableListableBeanFactory beanFactory) throws BeansException {

    }
}
运行main方法,查看运行结果

最终选择了两个参数的构造方法,排序规则如下
- 修饰方法 : public > 其他
- 参数个数 : 从多到小
- 编译顺序 : 先解析 > 后解析
排序完,会计算权重,最终选择权重最小的(即优先级最高的),一般情况下排完序的第一个构造器就是选中的构造方法,详情可以看我之前的博文 : Spring之推断构造方法
除了注入模型是AUTOWIRE_CONSTRUCTOR,如果满足下列三个条件也会执行构造器注入的逻辑
- ctors != null
- mbd.hasConstructorArgumentValues()
- !ObjectUtils.isEmpty(args)
相关源码AbstractAutowireCapableBeanFactory#createBeanInstance

四个条件下的候选构造方法
- AUTOWIRE_CONSTRUCTOR : 所有构造方法
- ctors != null : 需要推断,我会在下文中,举例几种case
- mbd.hasConstructorArgumentValues() : 手动设置内容相关构造方法
- !ObjectUtils.isEmpty(args) : 手动设置内容相关构造方法
演示ctors != null能推断出构造方法的几种情况,以及两种手动设置构造函数的用法
ctors != null的几种情况
package com.test.model.component;

import org.springframework.beans.factory.annotation.Autowired;
import org.springframework.stereotype.Component;

@Component
public class Demo3 {

    /**
     * case1:有且仅有一个有参构造方法
     */
    private ComponentA componentA;

    public Demo3(ComponentA componentA) {
        this.componentA = componentA;
    }

    /**
     * case2:有且仅有一个@Autowired(required = true)标注的构造方法
     */
    private ComponentB componentB;

    private ComponentC componentC;

    @Autowired(required = true)
    public Demo3(ComponentB componentB) {
        this.componentB = componentB;
    }

    public Demo3(ComponentC componentC) {
        this.componentC = componentC;
    }

    /**
     * case3:有多个@Autowired(required = false)标注的构造方法
     */
    @Autowired(required = false)
    public Demo3(ComponentB componentB) {
        this.componentB = componentB;
    }

    @Autowired(required = false)
    public Demo3(ComponentC componentC) {
        this.componentC = componentC;
    }
}
mbd.hasConstructorArgumentValues()
package com.test.model.component;

import org.springframework.stereotype.Component;

@Component
public class Demo4 {

    private ComponentB componentB;

    private ComponentC componentC;


    public Demo4(ComponentB componentB) {
        this.componentB = componentB;
    }

    public Demo4(ComponentC componentC) {
        this.componentC = componentC;
    }
}
package com.test.model.bfpp;

import com.test.model.component.ComponentB;
import org.springframework.beans.BeansException;
import org.springframework.beans.factory.config.ConfigurableListableBeanFactory;
import org.springframework.beans.factory.support.AbstractBeanDefinition;
import org.springframework.beans.factory.support.BeanDefinitionRegistry;
import org.springframework.beans.factory.support.BeanDefinitionRegistryPostProcessor;
import org.springframework.stereotype.Component;

@Component
public class Demo4FactoryPostProcessor implements BeanDefinitionRegistryPostProcessor {

    @Override
    public void postProcessBeanDefinitionRegistry(BeanDefinitionRegistry registry) throws BeansException {
        AbstractBeanDefinition beanDefinition = (AbstractBeanDefinition) registry.getBeanDefinition("demo4");
        // 指定构造器Demo4(ComponentB componentB)
        beanDefinition.getConstructorArgumentValues().addIndexedArgumentValue(0,new ComponentB());
    }

    @Override
    public void postProcessBeanFactory(ConfigurableListableBeanFactory beanFactory) throws BeansException {

    }
}
!ObjectUtils.isEmpty(args)
package com.test.model.component;

import org.springframework.context.annotation.Lazy;
import org.springframework.stereotype.Component;

@Component
@Lazy
public class Demo5 {

    private ComponentB componentB;

    private ComponentC componentC;


    public Demo5(ComponentB componentB) {
        this.componentB = componentB;
    }

    public Demo5(ComponentC componentC) {
        this.componentC = componentC;
    }
}
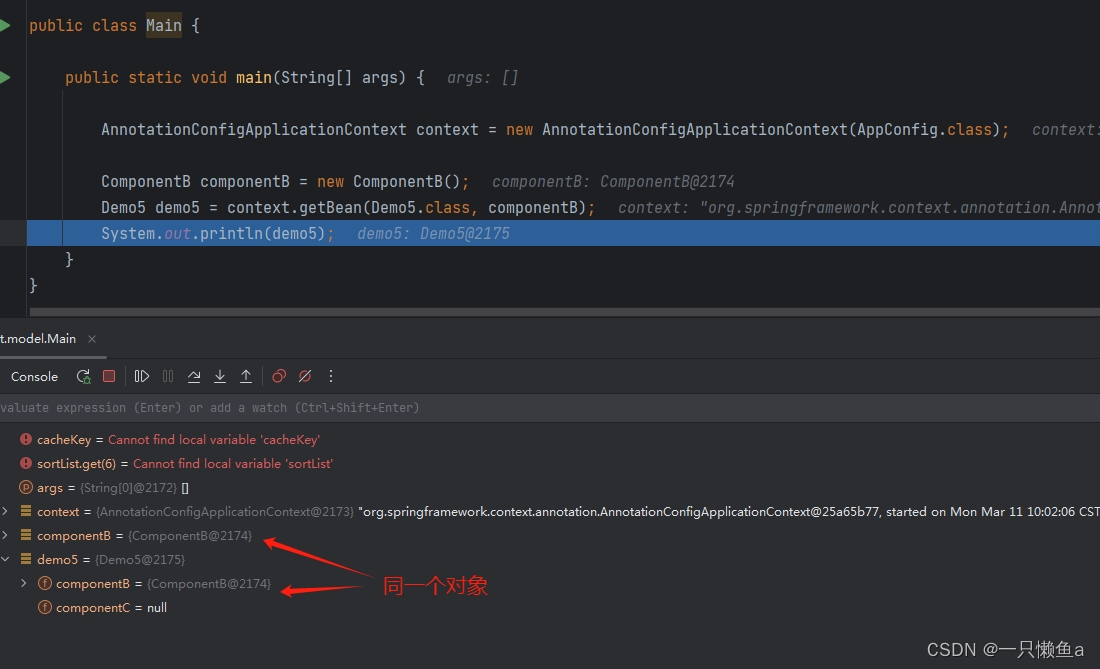
如果同时存在@Autowired注解并且注入类型是byType(byName),以byType(byName)注入的结果为准
demo演示
创建一个接口和两个实现其接口的bean
public interface Car {
}

@Component
public class RedCar implements Car {
}

@Component
public class WhiteCar implements Car {
}
创建一个类型为Person的bean,并将其注入模型改为byType
@Component
public class Person {

    @Autowired
    @Qualifier("whiteCar")
    private Car car;

    public Car getCar() {
        return car;
    }

    public void setCar(RedCar redCar) {
        this.car = redCar;
    }
}

@Component
public class PersonFactoryPostProcessor implements BeanDefinitionRegistryPostProcessor {

    @Override
    public void postProcessBeanDefinitionRegistry(BeanDefinitionRegistry registry) throws BeansException {
        AbstractBeanDefinition beanDefinition = (AbstractBeanDefinition) registry.getBeanDefinition("person");
        // 将注入模型改为AUTOWIRE_BY_TYPE
        beanDefinition.setAutowireMode(AutowireCapableBeanFactory.AUTOWIRE_BY_TYPE);
    }

    @Override
    public void postProcessBeanFactory(ConfigurableListableBeanFactory beanFactory) throws BeansException {

    }
}
运行main方法查看运行结果
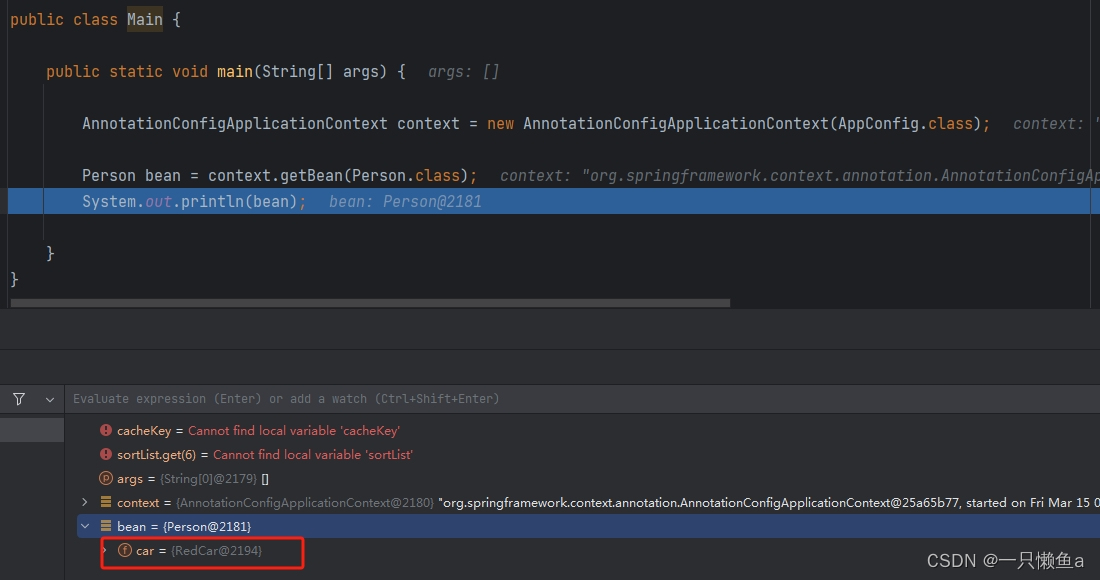
注入的是byType选中的bean
关于两种说法的自我理解
两种说法
- @Autowired是不是自动注入
- @Autowired是byType还是byName
自我理解
- @Autowired客观上存在使用者想注入一个依赖的明确目的,只是查找依赖过程是由Spring完成的,并没有达到不干预自动注入的现象,最多可以认为是半自动注入
- 从注入模型的角度上说@Autowired和三种自动注入没有任何关系,只是在查找依赖的过程中,会先通过类型查找依赖,如果找到多个符合条件的bean,再根据名称进行筛选。我们不要把根据类型查找依赖,根据名称查找依赖,与byType或者byName划上等号。它们一个是查找bean的手段,一个是自动注入枚举


 546
546


 被折叠的 条评论
为什么被折叠?
被折叠的 条评论
为什么被折叠?
 到【灌水乐园】发言


