


练习1 route-policy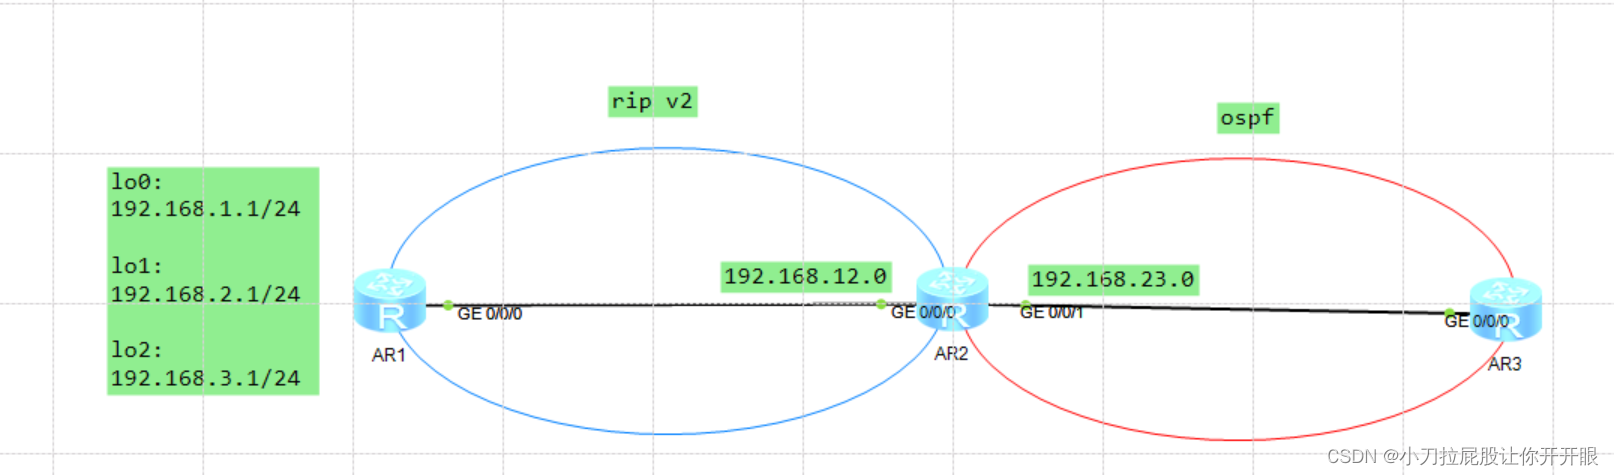
R1、R2运行ripv2,R2、R3运行ospf。R1没有在三个lo口激活ripv2
需求:
1.R1只在rip中激活g0/0/0口,而三个lo接口不能激活rip,要求R2能够通过rip学到除192.168.3.0之外的其他2条lo口路由
2.在R2上部署路由重发布,将rip注入ospf使R3能学到lo0、lo1的路由,lo0的cost是10,lo1的cost是20,路由类型均为type2
3.R3能访问lo0及lo1
基础配置如下:
R1
#
interface GigabitEthernet0/0/0
 ip address 192.168.12.1 255.255.255.0
#
interface LoopBack0
 ip address 192.168.1.1 255.255.255.0
#
interface LoopBack1
 ip address 192.168.2.1 255.255.255.0
#
interface LoopBack2
 ip address 192.168.3.1 255.255.255.0
#
rip 1
 version 2
 network 192.168.12.0
#
R2
#
interface GigabitEthernet0/0/0
 ip address 192.168.12.2 255.255.255.0
#
interface GigabitEthernet0/0/1
 ip address 192.168.23.2 255.255.255.0
#
ospf 1
 import-route rip 1 route-policy RtoO
 area 0.0.0.0
  network 192.168.23.0 0.0.0.255
#
rip 1
 version 2
 network 192.168.12.0
 import-route ospf 1
#
R3
#
interface GigabitEthernet0/0/0
 ip address 192.168.23.3 255.255.255.0
#
ospf 1
 area 0.0.0.0
  network 192.168.23.0 0.0.0.255
#
- R1引入直连路由过滤lo3
#
acl number 2000
 rule 5 deny source 192.168.3.0 0
 rule 10 permit
#
route-policy 1and2 permit node 10
 if-match acl 2000
#

[R1-rip-1]import-route direct route-policy 1and2
- R2配置rip路由引入ospf,修改cost、cost-type
#
acl number 2000
 rule 5 permit source 192.168.1.0 0
acl number 2001
 rule 5 permit source 192.168.2.0 0
#
route-policy RtoO permit node 10
 if-match acl 2000
 apply cost 10
 apply cost-type type-2
#
route-policy RtoO permit node 20
 if-match acl 2001
 apply cost 20
 apply cost-type type-2
#
route-policy RtoO permit node 30
#

[R2-ospf-1]import-route rip route-policy RtoO
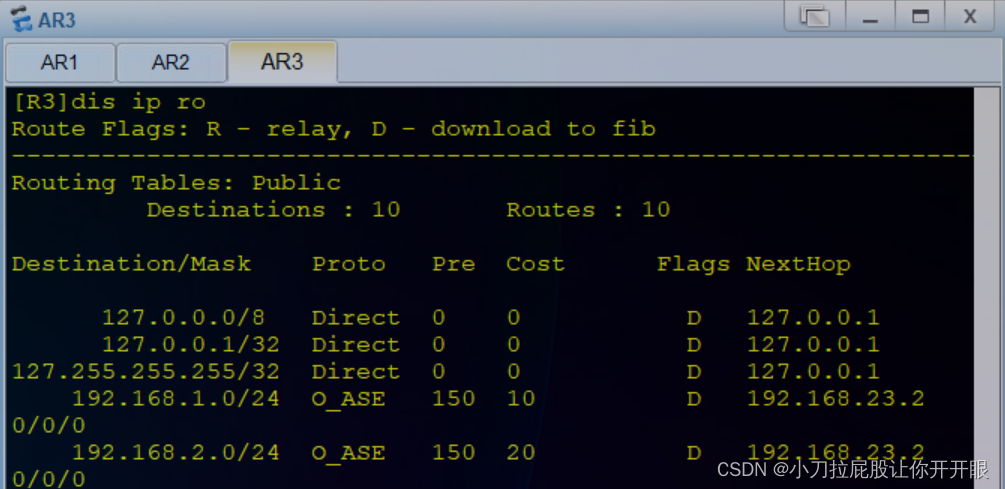
康康R3的路由表
- R2配置ospf路由引入rip
[R2-rip-1]import-route ospf 1

练习2 filter-policy路由过滤和部分引入
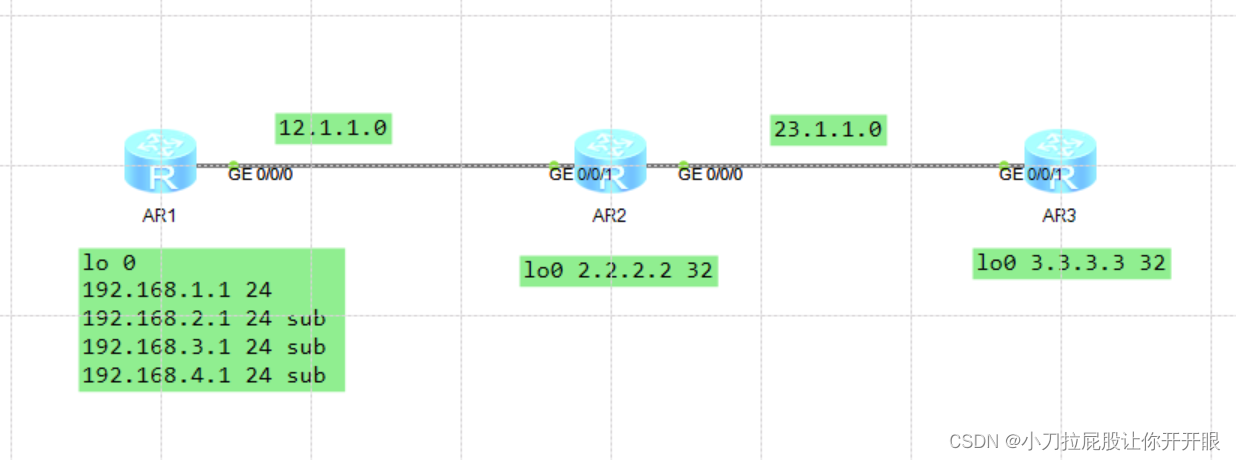
R1、R2、R3运行ospf,配置filter-policy使R2看不到192.168.1.0这条路由,R3能看到
基础配置如下:
R1
#
interface GigabitEthernet0/0/0
 ip address 12.1.1.1 255.255.255.0
#
interface LoopBack0
 ip address 192.168.1.1 255.255.255.0
 ip address 192.168.2.1 255.255.255.0 sub
 ip address 192.168.3.1 255.255.255.0 sub
 ip address 192.168.4.1 255.255.255.0 sub
 ospf network-type broadcast
 ospf enable 1 area 0.0.0.0
#
ospf 1 router-id 1.1.1.1
 area 0.0.0.0
  network 2.2.2.2 0.0.0.0
  network 12.1.1.0 0.0.0.255
#
R2
#
interface GigabitEthernet0/0/0
 ip address 23.1.1.2 255.255.255.0
#
interface GigabitEthernet0/0/1
 ip address 12.1.1.2 255.255.255.0
#
interface LoopBack0
 ip address 2.2.2.2 255.255.255.255
#
ospf 1 router-id 2.2.2.2
 area 0.0.0.0
  network 2.2.2.2 0.0.0.0
  network 12.1.1.0 0.0.0.255
  network 23.1.1.0 0.0.0.255
#
R3
#
interface GigabitEthernet0/0/1
 ip address 23.1.1.3 255.255.255.0
#
interface LoopBack0
 ip address 3.3.3.3 255.255.255.255
#
ospf 1 router-id 3.3.3.3
 area 0.0.0.0
  network 3.3.3.3 0.0.0.0
  network 23.1.1.0 0.0.0.255
#
- R2创建filter-policy 只允许2.0~4.0引入
#
ip ip-prefix ly index 10 permit 192.168.2.0 24
ip ip-prefix ly index 20 permit 192.168.3.0 24
ip ip-prefix ly index 30 permit 192.168.4.0 24
#
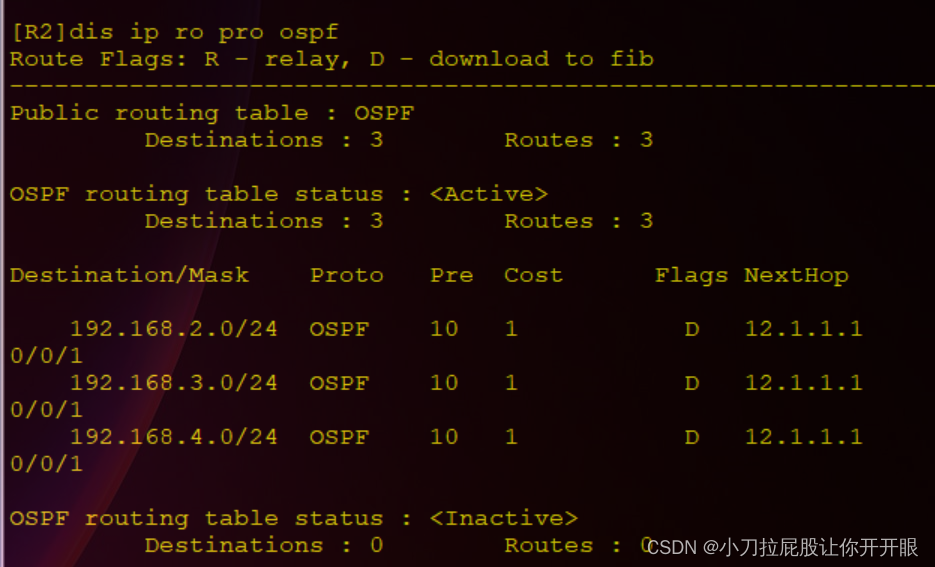
[R2-ospf-1]filter-policy ip-prefix ly import
R2的全局路由表没有192.168.1.0这条路由了
但ospf路由表还有,这玩意只能过滤路由,没法过滤lsa
在R1上取消对192.168.1.0~192.168.4.0的宣告,改为引入直连,但R2和R3只能收到192.168.1.0这条路由
- 先un掉刚才滴配置
R1
[R1-LoopBack0]un ospf enable 1 area 0.0.0.0
R2
[R2-ospf-1]un filter-policy ip-prefix ly import
- R1创建filter-policy 只允许1.0引入
#
ip ip-prefix ly index 10 permit 192.168.1.0 24
#

[R1-ospf-1]filter-policy ip-prefix ly export
[R1-ospf-1]import-route  direct
查看R2、R3的路由表 ,只有一条192.168.1.0外部引入的路由
练习3 双点双向路由重发布
R1
#
interface GigabitEthernet0/0/0
 ip address 12.1.1.1 255.255.255.0
#
interface GigabitEthernet0/0/1
 ip address 13.1.1.1 255.255.255.0
#
interface LoopBack0
 ip address 1.1.1.1 255.255.255.255
#
ospf 1 router-id 1.1.1.1
 area 0.0.0.0
  network 1.1.1.1 0.0.0.0
  network 12.1.1.0 0.0.0.255
  network 13.1.1.0 0.0.0.255
#
R2
#
interface GigabitEthernet0/0/0
 ip address 24.1.1.2 255.255.255.0
 isis enable 1
#
interface GigabitEthernet0/0/1
 ip address 12.1.1.2 255.255.255.0
#
interface LoopBack0
 ip address 2.2.2.2 255.255.255.255
#
ospf 1 router-id 2.2.2.2
 area 0.0.0.0
  network 2.2.2.2 0.0.0.0
  network 12.1.1.0 0.0.0.255
#
isis 1
 cost-style wide
 network-entity 49.0234.0000.0000.0002.00
#
R3
#
interface GigabitEthernet0/0/0
 ip address 13.1.1.3 255.255.255.0
#
interface GigabitEthernet0/0/1
 ip address 34.1.1.3 255.255.255.0
 isis enable 1
#
interface NULL0
#
interface LoopBack0
 ip address 3.3.3.3 255.255.255.255
#
ospf 1 router-id 3.3.3.3
 area 0.0.0.0
  network 3.3.3.3 0.0.0.0
  network 13.1.1.0 0.0.0.255
#
isis 1
 cost-style wide
 network-entity 49.0234.0000.0000.0003.00
#
R4
#
interface GigabitEthernet0/0/0
 ip address 34.1.1.4 255.255.255.0
 isis enable 1
#
interface GigabitEthernet0/0/1
 ip address 24.1.1.4 255.255.255.0
 isis enable 1
#
interface LoopBack0
 ip address 4.4.4.4 255.255.255.255
 isis enable 1
#
isis 1
 cost-style wide
 network-entity 49.0234.0000.0000.0004.00
#
- R1创建lo,ip为100.1.1.0/24,引入ospf
#
acl number 2000
 rule 5 permit source 100.1.1.0 0.0.0.255
#
route-policy ly permit node 10
 if-match acl 2000
#

[R1-ospf-1]import-route direct route-policy ly
- R2中ospf路由引入isis
[R2-isis-1]import-route ospf
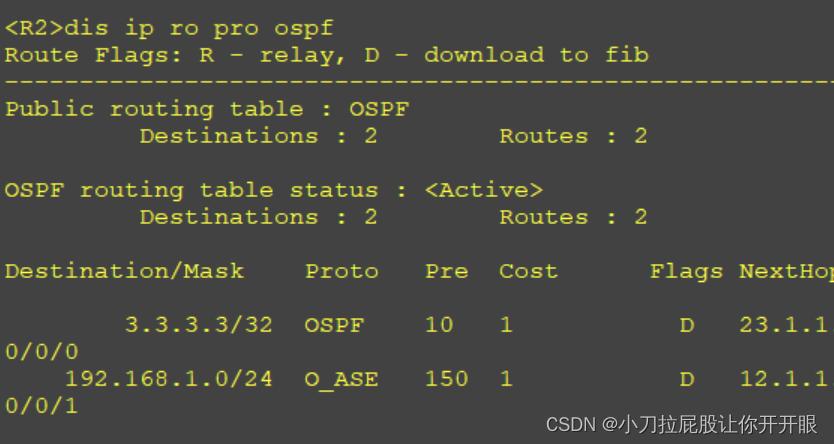
R3从R4学到了100.1.1.0的路由,成了次优路径
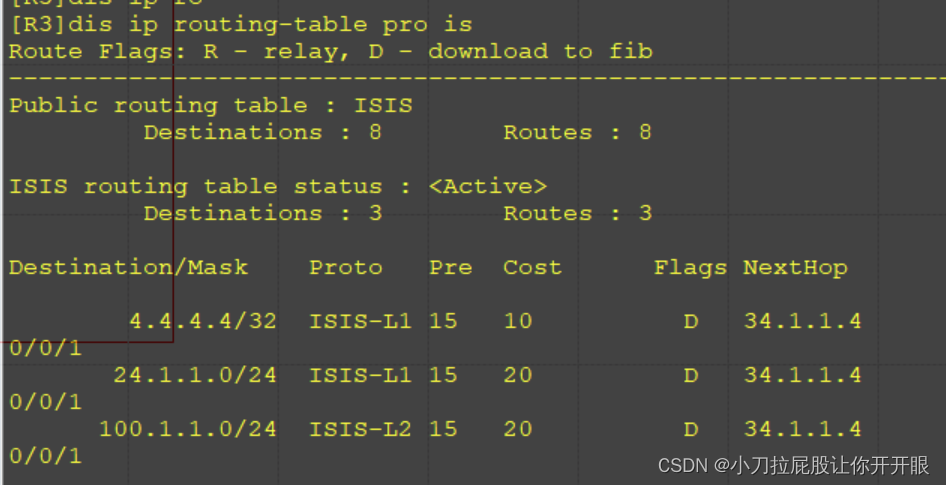
- 在R3的isis中过滤掉从R4学到的100.1.1.0
acl number 2000
 rule 5 deny source 100.1.1.0 0.0.0.255
 rule 10 permit
#

[R3-isis-1]filter-policy 2000 import
- 在R3上把ospf引入isis
[R3-isis-1]import-route ospf
但R2也会产生次优路径

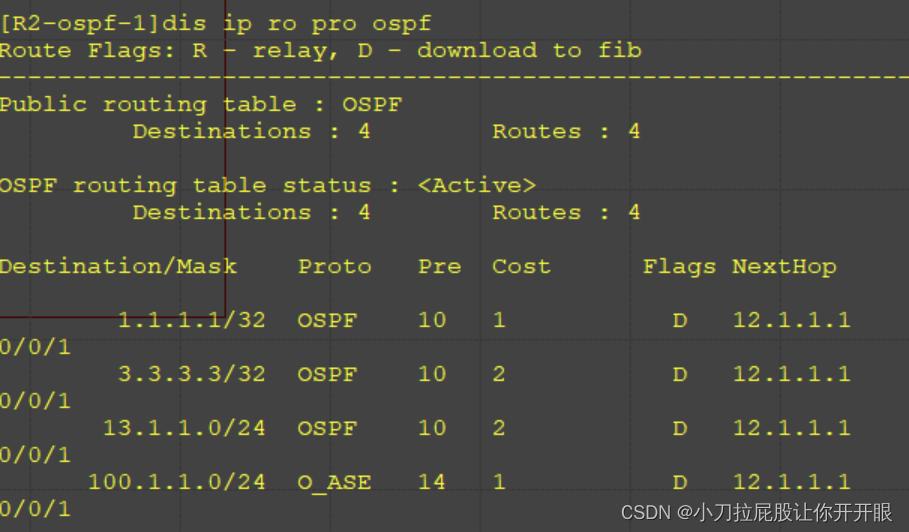
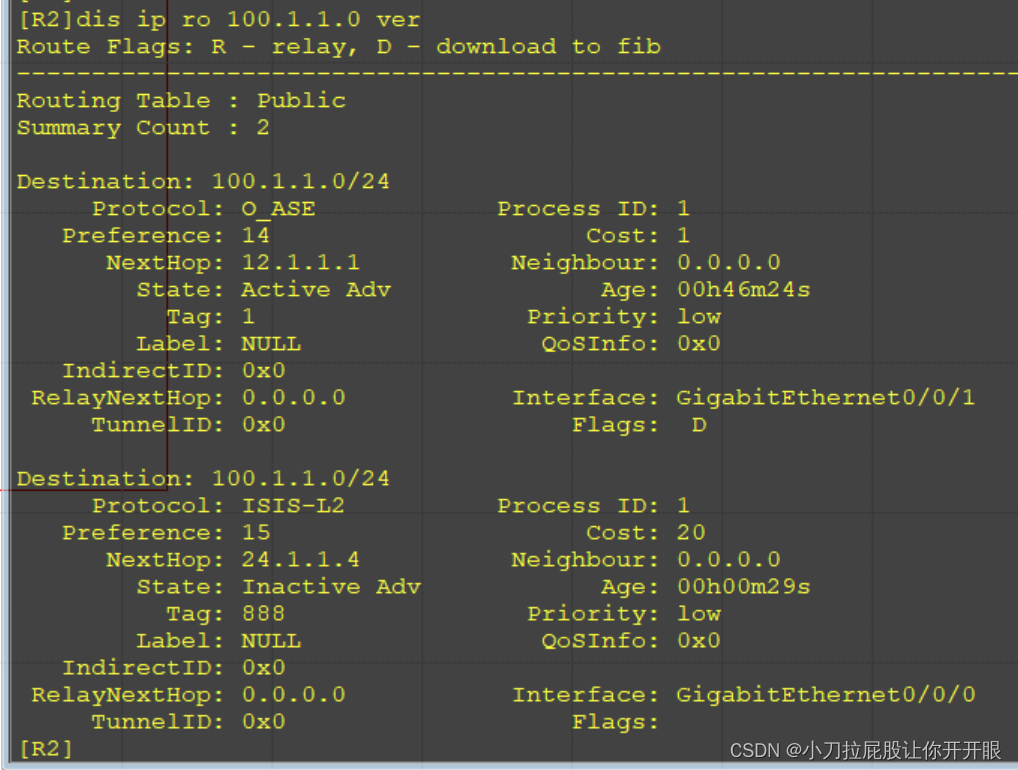
- 在R2上,在ospf把100.1.1.0优先级改为14
#
acl number 2000
 rule 5 permit source 100.1.1.0 0.0.0.255
#
route-policy pre14 permit node 10
 if-match acl 2000
 apply preference 14
#

[R2-ospf-1]preference ase route-policy pre14
好好好
R3这么配置也彳亍
- 在R2 R3上把isis的路由引入ospf
[R2-ospf-1]import-route isis
[R3-ospf-1]import-route isis
- 防环1:不样R3向ospf引入的100.1.1.0路由
#
acl number 2001
 rule 5 deny source 100.1.1.0 0.0.0.255
 rule 10 permit
#
route-policy no100 permit node 10
 if-match acl 2001
#

[R3-ospf-1]import-route isis route-policy no100
- 防环2:R3向isis引入100.1.1.0时打tag
#
acl number 2500
 rule 5 permit source 100.1.1.0 0.0.0.255
#
route-policy tag permit node 10
 if-match acl 2500
 apply tag 888
#

[R3-isis-1]import-route ospf route-policy 888
此时R2上 从R3传来的100.1.1.0 打上了888的标签
过滤掉R2中tag为888的路由
#
route-policy filter888 deny node 10
 if-match tag 888
#
route-policy filter888 permit node 20
#

[R2-ospf-1]import-route is route-policy filter888


 960
960


 被折叠的 条评论
为什么被折叠?
被折叠的 条评论
为什么被折叠?
 到【灌水乐园】发言


