


一、运行环境:
❤ 操作系统:windows 10 x64
❤ IDE:Arduino1.8.15
❤ 运行库1:TFT_eSPI
❤ 运行库2:ESP8266
❤ 开发板硬件:ESP8266-CH340 , ST7789-240*240-TFT显示屏

二、引脚接线#
| ESP8266 | ST7789 | 备注 |
|---|---|---|
| G | GND | |
| 3V | VCC | |
| D5 | SCL | |
| D7 | SDA | |
| D4 | RES | |
| D3 | DC |
三、安装TFT_eSPI运行库#
3-1 安装库#
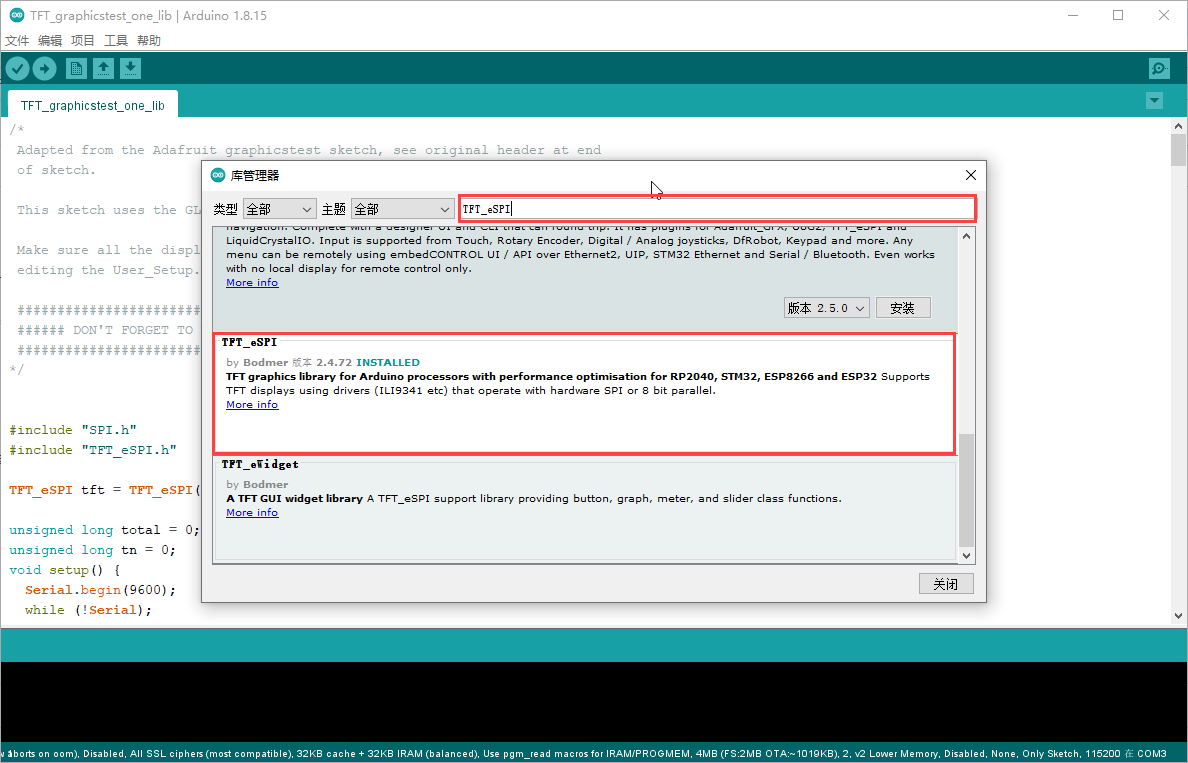
打开Arduino,进入:工具-- > 管理库...,搜索:TFT_eSPI,选择版本,点击安装
下图为已完成安装
3-2 修改头文件代码#
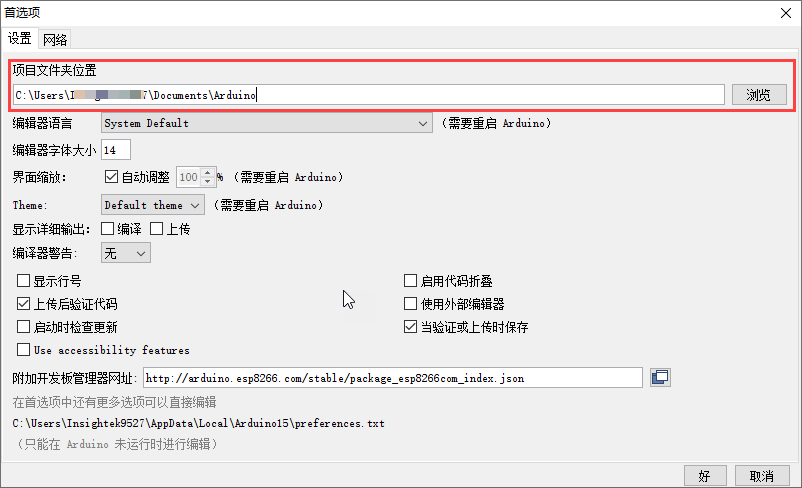
由于本次使用的ST7789TFT显示屏,需要对头文件 User_Setup.h进行修改,该文件在Arduino\libraries\TFT_eSPI目录下
那么Arduino目录在哪里呢?其实打开首选项就能看到,如下图
User_Setup.h 修改位置有三处:
❤ 第一处
保留:#define ST7789_DRIVER 即可
// Only define one driver, the other ones must be commented out
//#define ILI9341_DRIVER       // Generic driver for common displays
//#define ILI9341_2_DRIVER     // Alternative ILI9341 driver, see https://github.com/Bodmer/TFT_eSPI/issues/1172
//#define ST7735_DRIVER      // Define additional parameters below for this display
//#define ILI9163_DRIVER     // Define additional parameters below for this display
//#define S6D02A1_DRIVER
//#define RPI_ILI9486_DRIVER // 20MHz maximum SPI
//#define HX8357D_DRIVER
//#define ILI9481_DRIVER
//#define ILI9486_DRIVER
//#define ILI9488_DRIVER     // WARNING: Do not connect ILI9488 display SDO to MISO if other devices share the SPI bus (TFT SDO does NOT tristate when CS is high)
#define ST7789_DRIVER      // Full configuration option, define additional parameters below for this display
//#define ST7789_2_DRIVER    // Minimal configuration option, define additional parameters below for this display
//#define R61581_DRIVER
//#define RM68140_DRIVER
//#define ST7796_DRIVER
//#define SSD1351_DRIVER
//#define SSD1963_480_DRIVER
//#define SSD1963_800_DRIVER
//#define SSD1963_800ALT_DRIVER
//#define ILI9225_DRIVER
//#define GC9A01_DRIVER
❤ 第二处
ST7789使用屏幕尺寸为:240*240,故保留:#define TFT_WIDTH 240 和 #define TFT_HEIGHT 240 // ST7789 240 x 240
// For ST7789, ST7735, ILI9163 and GC9A01 ONLY, define the pixel width and height in portrait orientation
// #define TFT_WIDTH  80
// #define TFT_WIDTH  128
// #define TFT_WIDTH  172 // ST7789 172 x 320
#define TFT_WIDTH  240 // ST7789 240 x 240 and 240 x 320
// #define TFT_HEIGHT 160
// #define TFT_HEIGHT 128
#define TFT_HEIGHT 240 // ST7789 240 x 240
// #define TFT_HEIGHT 320 // ST7789 240 x 320
// #define TFT_HEIGHT 240 // GC9A01 240 x 240
❤ 第三处
保留:#define TFT_DC PIN_D3 和 #define TFT_RST PIN_D4
// ###### EDIT THE PIN NUMBERS IN THE LINES FOLLOWING TO SUIT YOUR ESP8266 SETUP ######

// For NodeMCU - use pin numbers in the form PIN_Dx where Dx is the NodeMCU pin designation
//#define TFT_CS   PIN_D8  // Chip select control pin D8
#define TFT_DC   PIN_D3  // Data Command control pin
#define TFT_RST  PIN_D4  // Reset pin (could connect to NodeMCU RST, see next line)
//#define TFT_RST  -1    // Set TFT_RST to -1 if the display RESET is connected to NodeMCU RST or 3.3V

//#define TFT_BL PIN_D1  // LED back-light (only for ST7789 with backlight control pin)

//#define TOUCH_CS PIN_D2     // Chip select pin (T_CS) of touch screen

//#define TFT_WR PIN_D2       // Write strobe for modified Raspberry Pi TFT only
四、编译、烧写范例到ESP8266#
4-1 编译、烧录#
在 工具-->开发板中选择:NodeMCU 1.0 (ESP 12E Module) 和 开发板与电脑连接的端口号(楼主这里是COM3,换台电脑COM口可能不一致)
打开示例:Color_Test

编译、烧录到ESP8266
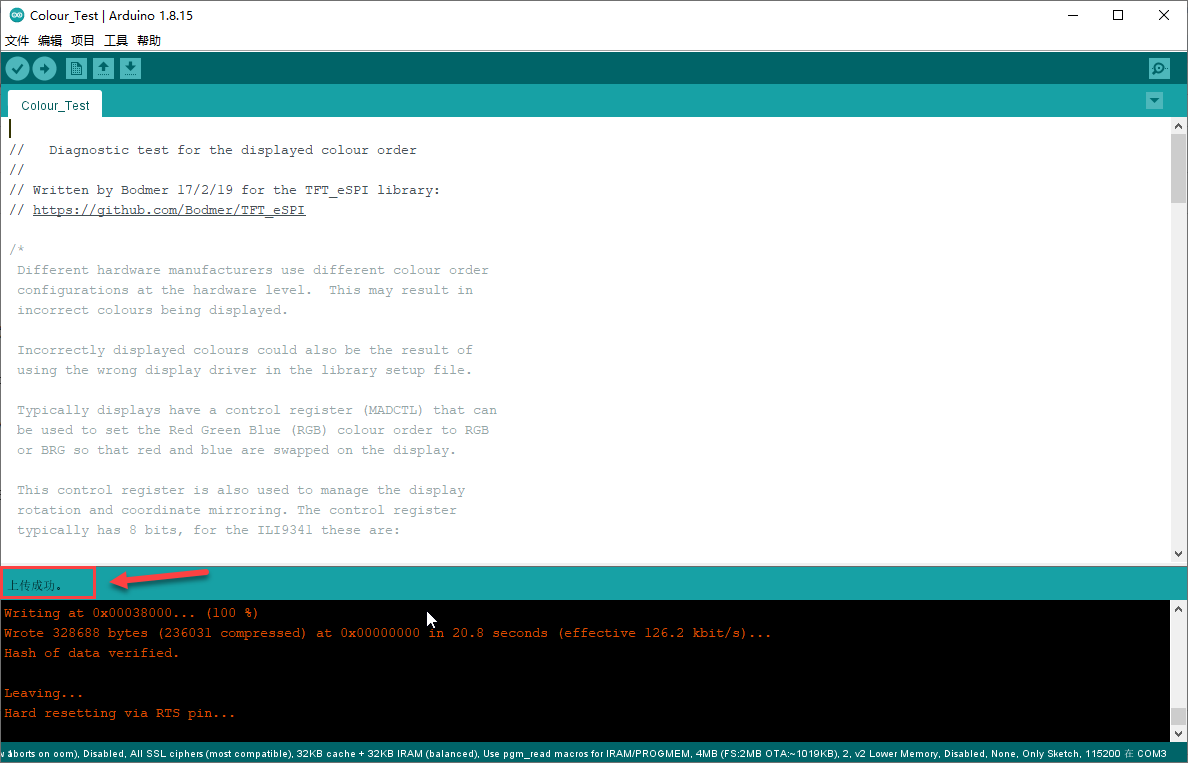
4-2 验证结果#


 4270
4270

 被折叠的 条评论
为什么被折叠?
被折叠的 条评论
为什么被折叠?
 到【灌水乐园】发言


