


文章目录
前言
本文主要讲解如何快速程序连接打Redis,进行一些常规操作
一、安装Redis
此处需要同学有一个可以ping通的设备。以下两个套餐都可以
凡人版:VMWare + Centos7 (关闭Centos的防火墙)
欧皇版:云服务器(端口要在安全组中放出来)
Redis安装流程:文件解压,编译make ,修改配置文件,启动。具体自行百度

二、使用Java连接
1.打开IDEA,创建Spring Boot项目
这里你可以创建一个maven,或者就是纯Java项目,但我为了下面方便复用就直接创建Spring Boot了

至于Spring Boot项目的创建,那基本就是一路next,然后finish。

如果同学觉得下载maven依赖比较慢,请检查是否使用的是国内的镜像源。
一般使用阿里镜像或者华为镜像。

2.在pom文件中引入依赖

3.编写测试代码

代码如下(示例):
 public static void main(String[] args) {
        // 建立连接
        Jedis jedis = new Jedis("192.168.3.10", 6379);
        // 写值并且读值
        jedis.set("jedis:name:1", "jd-zhangsan");
        System.out.println(jedis.get("jedis:name:1"));
        // 写list并获取存进去的list的长度
        jedis.lpush("jedis:list:1", "1","2","3","4");
        System.out.println(jedis.llen("jedis:list:1"));
    }
三、Spring Boot连接
1.创建Spring Boot项目
2.引入依赖
代码示例:
<dependency>
   <groupId>org.springframework.boot</groupId>
   <artifactId>spring-boot-starter-data-redis</artifactId>
</dependency>
3.编写配置Yml文件

4. 编写配置类

@Configuration
public class redisConfig {
    @Autowired
    private RedisConnectionFactory redisConnectionFactory;

    @Bean
    public RedisTemplate<String, Object> redisTemplate(){
        RedisTemplate<String, Object> redisTemplate = new RedisTemplate<>();
        redisTemplate.setKeySerializer(new StringRedisSerializer());
        redisTemplate.setValueSerializer(new StringRedisSerializer());
        redisTemplate.setHashKeySerializer(new StringRedisSerializer());
        redisTemplate.setHashValueSerializer(new StringRedisSerializer());

        redisTemplate.setConnectionFactory(redisConnectionFactory);

        return redisTemplate;
    }
}
5. 编写Controller

import org.springframework.beans.factory.annotation.Autowired;
import org.springframework.data.redis.core.RedisTemplate;
import org.springframework.web.bind.annotation.GetMapping;
import org.springframework.web.bind.annotation.RequestMapping;
import org.springframework.web.bind.annotation.RequestParam;
import org.springframework.web.bind.annotation.RestController;

import java.util.concurrent.TimeUnit;

@RestController
@RequestMapping(value = "/redis")
public class RedisController {

    @Autowired
    private RedisTemplate redisTemplate;

    @GetMapping("/put")
    public String put(@RequestParam(required = true) String key,
                      @RequestParam(required = true) String value){
        // 设置数据20秒过期
        redisTemplate.opsForValue().set(key, value, 20, TimeUnit.SECONDS);
        return "success";
    }

    @GetMapping("/get")
    public String get(@RequestParam(required = true) String key){
        // 设置数据20秒过期
        return (String) redisTemplate.opsForValue().get(key);
    }
}
6.测试
上面代码中写了set和get方法,set的时候有设置生命周期,所以在测试的时候,可以直接在浏览器中输入
http://localhost:8080/redis/put?key=name:1&value=hhhhx
将值输进去,你可以在redis客户端中查看到这个key的生命还剩多少时间
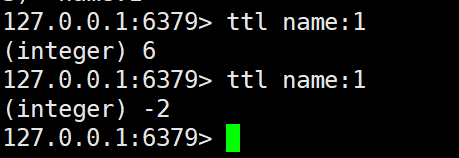
如果你在ttl > 0的时候去请求get方法,那么就会出现对应的值
http://localhost:8080/redis/get?key=name:1
一旦生命周期结束了,再请求get那就什么都请求不到了
总结
以上就是快速上手Redis的简单教程了


 2504
2504


 被折叠的 条评论
为什么被折叠?
被折叠的 条评论
为什么被折叠?
 到【灌水乐园】发言


