


本文通过配置,实现Windows通过腾讯云服务器远程连接Ubuntu系统
最近不是寒假了吗,回家后学校的服务器连接是一个麻烦事情,TeamViewer连多就会被封,所以干脆买了一个腾讯云,新用户2核1G,5M的峰值带宽,一年才38块钱,不嫖白不嫖,哈哈,配好了之后,远程桌面比Teamviewer 和向日葵都流畅
于是,配置了vpn,在家也能连接学校的服务器,不用担心回家后没有服务器跑代码了,
总结起来四大步骤:
- 云服务器端:生成 CA 证书、服务端密钥与共享密钥
- 云服务器端:openvpn配置
- 客户端:Windows openvpn的配置
- 客户端:Ubuntu18.04 openvpn的配置
目录
1.2.9 创建Diffie-Hellman文件,秘钥交换时的Diffie-Hellman算法
1.2.11 给client端证书签名(输入yes,输入密码)
2.4 添加openvpn-auth.sh 和 auth-file
4.2 将在window上面的 ca.crt client.ovpn client.pass.txt 放到目录/etc/openvpn/ 下
1.云服务器端:生成 CA 证书、服务端密钥与共享密钥
1.1配置yum源(安装epel)
yum install https://dl.fedoraproject.org/pub/epel/epel-release-latest-7.noarch.rpm
yum update
yum repolist
1.2 生成证书
1.2.1 下载证书生成工具 easy-rsa
yum -y install easy-rsa1.2.2 创建证书环境目录
mkdir -p /opt/easy-rsa
1.2.3 将 系统的 /usr/share/ 下的easy-rsa文件复制到刚刚新建的文件目录下面
cp -a /usr/share/easy-rsa/3.0.8/* /opt/easy-rsa/
cp -a /usr/share/doc/easy-rsa-3.0.8/vars.example /opt/easy-rsa/vars
1.2.4 生成秘钥前,准备vars文件
修改文件/opt/easy-rsa/vars中的如下配置(要取消注释)
vim /opt/easy-rsa/varsset_var EASYRSA_REQ_COUNTRY "CN"
set_var EASYRSA_REQ_PROVINCE "FJ"
set_var EASYRSA_REQ_CITY "FuZhou"
set_var EASYRSA_REQ_ORG "FUZ"
set_var EASYRSA_REQ_EMAIL "siki@outlook.com"
set_var EASYRSA_NS_SUPPORT "yes"1.2.5 初始化
在当前目录下创建pki目录,用于存储证书
/opt/easy-rsa/easyrsa init-pki


Note: using Easy-RSA configuration from: /opt/easy-rsa/vars

init-pki complete; you may now create a CA or requests.
Your newly created PKI dir is: /opt/easy-rsa/pki
1.2.6 创建根证书
根证书用于ca对之后生成的server和client证书签名时使用。(输入两次密码,密码要记住,然后会有Common Name设置,这个随便写一下)
/opt/easy-rsa/easyrsa build-ca
1.2.7 创建 server 端证书和私钥文件
nopass表示不加密私钥文件,生成过程中直接回车默认,然后会有Common Name设置,这个也随便写一下
/opt/easy-rsa/easyrsa gen-req server nopass
1.2.8 给server证书签名(输入yes,输入密码)
/opt/easy-rsa/easyrsa sign server server

Note: using Easy-RSA configuration from: /opt/easy-rsa/vars
Using SSL: openssl OpenSSL 1.0.2k-fips  26 Jan 2017


You are about to sign the following certificate.
Please check over the details shown below for accuracy. Note that this request
has not been cryptographically verified. Please be sure it came from a trusted
source or that you have verified the request checksum with the sender.

Request subject, to be signed as a server certificate for 825 days:

subject=
    commonName                = server


Type the word 'yes' to continue, or any other input to abort.
  Confirm request details: yes
Using configuration from /opt/easy-rsa/pki/easy-rsa-1397.ds5qpo/tmp.lX0IFN
Enter pass phrase for /opt/easy-rsa/pki/private/ca.key:
Check that the request matches the signature
Signature ok
The Subject's Distinguished Name is as follows
commonName            :ASN.1 12:'server'
Certificate is to be certified until Jun  3 14:02:46 2023 GMT (825 days)

Write out database with 1 new entries
Data Base Updated

Certificate created at: /opt/easy-rsa/pki/issued/server.crt
1.2.9 创建Diffie-Hellman文件,秘钥交换时的Diffie-Hellman算法
/opt/easy-rsa/easyrsa gen-dh1.2.10 创建client端证书和私钥文件
nopass表示不加密私钥文件,生成过程中直接回车默认, 中途会有一个Common Name的设置,这个也随便填一个,
/opt/easy-rsa/easyrsa gen-req client nopass

Note: using Easy-RSA configuration from: /opt/easy-rsa/vars
Using SSL: openssl OpenSSL 1.0.2k-fips  26 Jan 2017
Generating a 2048 bit RSA private key
..................................................................+++
...................................................................................................................+++
writing new private key to '/opt/easy-rsa/pki/easy-rsa-1761.HYs4Xv/tmp.z02JuI'
-----
You are about to be asked to enter information that will be incorporated
into your certificate request.
What you are about to enter is what is called a Distinguished Name or a DN.
There are quite a few fields but you can leave some blank
For some fields there will be a default value,
If you enter '.', the field will be left blank.
-----
Common Name (eg: your user, host, or server name) [client]:

Keypair and certificate request completed. Your files are:
req: /opt/easy-rsa/pki/reqs/client.req
key: /opt/easy-rsa/pki/private/client.key
1.2.11 给client端证书签名(输入yes,输入密码)
/opt/easy-rsa/easyrsa sign client client

Note: using Easy-RSA configuration from: /opt/easy-rsa/vars
Using SSL: openssl OpenSSL 1.0.2k-fips  26 Jan 2017


You are about to sign the following certificate.
Please check over the details shown below for accuracy. Note that this request
has not been cryptographically verified. Please be sure it came from a trusted
source or that you have verified the request checksum with the sender.

Request subject, to be signed as a client certificate for 825 days:

subject=
    commonName                = client


Type the word 'yes' to continue, or any other input to abort.
  Confirm request details: yes
Using configuration from /opt/easy-rsa/pki/easy-rsa-1828.VwQHeF/tmp.eYqBSS
Enter pass phrase for /opt/easy-rsa/pki/private/ca.key:
Check that the request matches the signature
Signature ok
The Subject's Distinguished Name is as follows
commonName            :ASN.1 12:'client'
Certificate is to be certified until Jun  3 14:09:37 2023 GMT (825 days)

Write out database with 1 new entries
Data Base Updated

Certificate created at: /opt/easy-rsa/pki/issued/client.crt
至此,云服务器端的 CA 证书、服务端密钥与共享密钥 就做好了!
2 云服务器端:openvpn配置
接下来就是云服务器的openvpn配置。
2.1 安装 openvpn 软件
yum -y install openvpn 2.2 修改配置文件
自行创建配置文件/etc/openvpn/server.conf,并加入如下配置
vim /etc/openvpn/server.conf

port 11194
proto udp
dev tap
ca ca.crt
cert server.crt
key server.key  # This file should be kept secret
dh dh.pem
topology subnet
server 10.8.0.0 255.255.255.0
ifconfig-pool-persist /etc/openvpn/ipp.txt
client-config-dir ccd
client-to-client
duplicate-cn
keepalive 10 120
cipher AES-256-CBC
max-clients 100
persist-key
persist-tun
status /etc/openvpn/openvpn-status.log
verb 3
auth-user-pass-verify /etc/openvpn/openvpn-auth.sh via-file
client-cert-not-required
username-as-common-name
script-security 3
2.3 拷贝证书到openvpn主配置文件目录下
cp -a /opt/easy-rsa/pki/ca.crt /etc/openvpn/
cp -a /opt/easy-rsa/pki/issued/server.crt /etc/openvpn/
cp -a /opt/easy-rsa/pki/private/server.key /etc/openvpn/
cp -a /opt/easy-rsa/pki/dh.pem /etc/openvpn/
2.4 添加openvpn-auth.sh 和 auth-file
在启动openvpn前,还需要增加两个文件,一般 情况下,客户端是需要ca.crt client.crt client.key三个文件才能和云服务器通信的,为减小认证的麻烦,上面在配置文件增加了 下面这一行代码
# auth-user-pass-verify /etc/openvpn/openvpn-auth.sh via-file这里用到了两个文件,分别是 openvpn-auth.sh 和 auth-file,所以要添加一下
vim auth-file

写如下(前面是用户名,后面是密码):
client1111 password
vim openvpn-auth.sh
直接复制下面的代码


#!/bin/sh
###########################################################
# checkpsw.sh (C) 2004 Mathias Sundman <mathias@openvpn.se>
#
# This script will authenticate OpenVPN users against
# a plain text file. The passfile should simply contain
# one row per user with the username first followed by
# one or more space(s) or tab(s) and then the password.

PASSFILE="/etc/openvpn/auth-file"
LOG_FILE="/var/log/openvpn-password.log"
TIME_STAMP=`date "+%Y-%m-%d %T"`
readarray -t lines < $1
username=${lines[0]}
password=${lines[1]}

###########################################################
#echo "read($1)${password}${username}" >> ${LOG_FILE}

if [ ! -r "${PASSFILE}" ]; then
  echo "${TIME_STAMP}: Could not open password file \"${PASSFILE}\" for reading." >> ${LOG_FILE}
  exit 1
fi

CORRECT_PASSWORD=`awk '!/^;/&&!/^#/&&$1=="'${username}'"{print $2;exit}' ${PASSFILE}`

if [ "${CORRECT_PASSWORD}" = "" ]; then
  echo "${TIME_STAMP}: User does not exist: username=\"${username}\", password=\"${password}\"." >> ${LOG_FILE}
  exit 1
fi

if [ "${password}" = "${CORRECT_PASSWORD}" ]; then
  echo "${TIME_STAMP}: Successful authentication: username=\"${username}\"." >> ${LOG_FILE}
  exit 0
fi

echo "${TIME_STAMP}: Incorrect password: username=\"${username}\", password=\"${password}\"." >> ${LOG_FILE}
exit 1
2.5 给openvpn-auth.sh权限
之前运行一直没成功,后来通过日志发现openvpn-auth.sh这个文件没给权限
chmod -R 777 openvpn-auth.sh2.6 启动openvpn
设置开机自启
systemctl -f enable openvpn@server.service启动openvpn
systemctl start openvpn@server.service启动后,通过i ifconfig看ip , 会多了一个tap0的,这里就设置好了。
[root@VM-4-10-centos ~]# ifconfig
eth0: flags=4163<UP,BROADCAST,RUNNING,MULTICAST>  mtu 1500
        inet 10.0.4.10  netmask 255.255.252.0  broadcast 10.0.7.255
        inet6 fe80::5054:ff:fe55:d13e  prefixlen 64  scopeid 0x20<link>
        ether 52:54:00:55:d1:3e  txqueuelen 1000  (Ethernet)
        RX packets 3942565  bytes 1774527444 (1.6 GiB)
        RX errors 0  dropped 0  overruns 0  frame 0
        TX packets 3890191  bytes 1507772382 (1.4 GiB)
        TX errors 0  dropped 0 overruns 0  carrier 0  collisions 0

lo: flags=73<UP,LOOPBACK,RUNNING>  mtu 65536
        inet 127.0.0.1  netmask 255.0.0.0
        inet6 ::1  prefixlen 128  scopeid 0x10<host>
        loop  txqueuelen 1000  (Local Loopback)
        RX packets 367  bytes 38421 (37.5 KiB)
        RX errors 0  dropped 0  overruns 0  frame 0
        TX packets 367  bytes 38421 (37.5 KiB)
        TX errors 0  dropped 0 overruns 0  carrier 0  collisions 0

tap0: flags=4163<UP,BROADCAST,RUNNING,MULTICAST>  mtu 1500
        inet 10.8.0.1  netmask 255.255.255.0  broadcast 10.8.0.255
        inet6 fe80::dc41:60ff:fe43:70b8  prefixlen 64  scopeid 0x20<link>
        ether de:41:60:43:70:b8  txqueuelen 100  (Ethernet)
        RX packets 56212  bytes 11993022 (11.4 MiB)
        RX errors 0  dropped 24  overruns 0  frame 0
        TX packets 16  bytes 1252 (1.2 KiB)
        TX errors 0  dropped 0 overruns 0  carrier 0  collisions 0
3 客户端 Windows openvpn配置
3.1 安装OpenVPN客户端软件
这里是在windows环境下部署OpenVPN的客户端的,首先需要下载安装OpenVPN客户端软件,这里用OpenVPN GUI

这里我直接附上下载链接 链接:http://链接:https://pan.baidu.com/s/1FBS4xlbYTHv7ivCY0wtnHw
提取码:yous
3.2 配置客户端
拷贝服务CA证书到OpenVPN安装目录的config目录下 ca.crt
/opt/easy-rsa/pki/ca.crt 准备两个文件,client.ovpn client.pass.txt,这两个我也放到上面的百度链接了
client.pass.txt 内容如下
client1111  (这个是之前在auth-file设置的用户名和密码 对应起来)
password
client.ovpn 内容如下
client
dev tap
proto udp
remote 云服务器公网ip 11194
resolv-retry infinite
nobind
persist-key
persist-tun
verb 3
ca ca.crt
cipher AES-256-CBC
remote-cert-tls server
auth-user-pass client.pass.txt
最后,把ca.crt client.ovpn client.pass.txt这三个文件放到 OpenVPN GUI安装目录下的config下面

3.3 最后运行 OpenVPN GUI
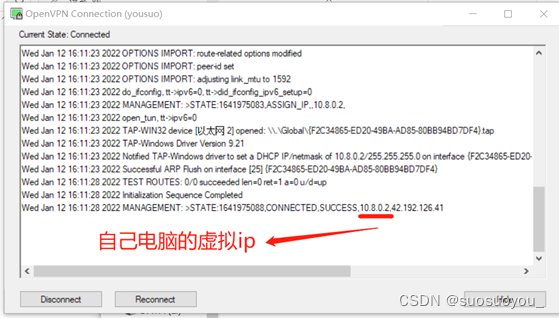
这时就可以ping通云服务器的10.8.开头的虚拟ip了
4 客户端 Ubuntu openvpn配置
4.1 安装openvpn
apt install openvpn4.2 将在window上面的 ca.crt client.ovpn client.pass.txt 放到目录/etc/openvpn/ 下
cd到 openvpn目录
cd /etc/openvpn4.3 运行openvpn:
sudo openvpn --daemon --cd /etc/openvpn --config client.ovpn到这里,Ubuntu18.04的openvpn也配置好了,通过ifconfig就可以看到新的虚拟ip了。
这里可以用window去ping通Ubuntu的主机了,如此,在家就可以远程公司或者学校的电脑了。
大家看完点个赞呀,写文章不易呀


 1593
1593

 被折叠的 条评论
为什么被折叠?
被折叠的 条评论
为什么被折叠?
 到【灌水乐园】发言


