一、Pipe 管道
- Java NIO
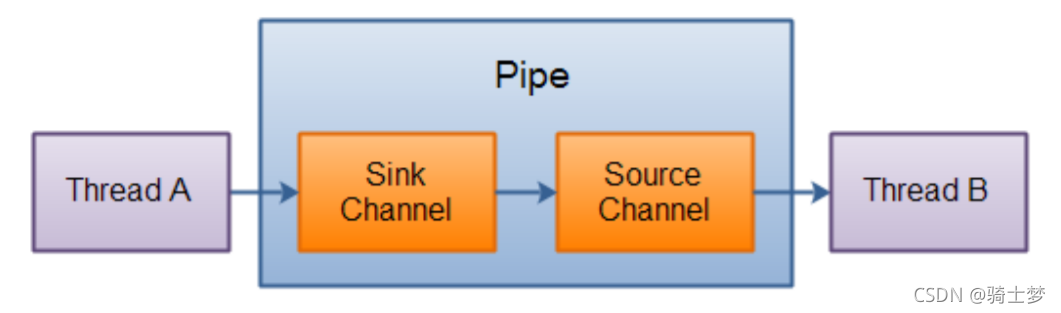
Pipe 管道,是两个线程之间的单向数据连接。
- Pipe 有一个 Source 通道和一个 Sink 通道。
- 数据会被写到 Sink 通道,从 Source 通道读取。
1. 管道示例
public class Pipe1 {
public static void main(String[] args) throws IOException {
Pipe pipe = Pipe.open();
Pipe.SinkChannel sinkChannel = pipe.sink();
ByteBuffer buffer = ByteBuffer.allocate(1024);
buffer.put("qs".getBytes());
buffer.flip();
sinkChannel.write(buffer);
buffer.flip();
Pipe.SourceChannel sourceChannel = pipe.source();
ByteBuffer buffer2 = ByteBuffer.allocate(1024);
int read = sourceChannel.read(buffer2);
System.out.println(new String(buffer2.array(), 0, read));
sourceChannel.close();
sinkChannel.close();
}
}
1. 创建管道
Pipe pipe = Pipe.open();
2. 向管道写入数据
- 要向管道写数据,需要访问 Sink 通道。
- 调用 SinkChannel 的 write() 方法,将数据写入 SinkChannel。
Pipe.SinkChannel sinkChannel = pipe.sink();
ByteBuffer buffer = ByteBuffer.allocate(1024);
buffer.put("qs".getBytes());
buffer.flip();
sinkChannel.write(buffer);
buffer.flip();
ByteBuffer buffer = ByteBuffer.allocate(84);
buffer.clear();
buffer.put("qshome".getBytes());
buffer.flip();
while (buffer.hasRemaining()) {
sinkChannel.write(buffer);
}
buffer.flip();
3. 从管道读取数据
- 从管道读取数据,需要访问 Source 通道。
- 调用 SourceChannel 的 read() 方法,来读取数据。
- read() 方法返回的 int 值,表示多少个字节被读进了缓冲区。
Pipe.SourceChannel sourceChannel = pipe.source();
ByteBuffer buffer2 = ByteBuffer.allocate(1024);
int read = sourceChannel.read(buffer2);
System.out.println(new String(buffer2.array(), 0, read));
二、FileLock 文件锁
- 如果多个程序同时访问、修改同一个文件,很容易因为文件数据不同步而出现问题。
- 给文件加一个锁,同一时间,只能有一个程序修改此文件。
- 或者程序都只能读此文件,这就解决了同步问题。
- 文件锁可以解决多个进程并发访问、修改同一个文件的问题。
- 但不能解决多线程并发访问、修改同一文件的问题。
- 使用文件锁时,同一进程内的多个线程,可以同时访问、修改此文件。
- 文件锁是当前程序所属的 JVM 实例持有的,三种方式会释放锁。
- 一旦获取到文件锁(对文件加锁),要调用
release() 释放方法。 - 或者关闭对应的 FileChannel 对象。
- 或者当前 JVM 退出。
- 一旦某个进程(比如说 JVM 实例)对某个文件加锁。
- 则在释放这个锁之前,此进程不能再对此文件加锁。
- 就是说 JVM 实例 在同一文件上的文件锁是不重叠的(进程级别不能重复在同一文件上获取锁)。
1. 文件锁分类
1.1 排它锁
- 对文件加排它锁后,该进程可以对此文件进行读和写。
- 该进程独占此文件,其他进程不能读和写此文件。
- 直到该进程释放文件锁。
1.2 共享锁
- 其他进程也可以访问此文件,但这些进程都只能读此文件,不能写。
- 线程是安全的。
- 只要还有一个进程持有共享锁,此文件就只能读,不能写。
2. 文件锁示例
2.1 排它锁
@Test
public void exclusiveLock() throws IOException, InterruptedException {
Path path = Paths.get(filePath);
FileChannel fileChannel = FileChannel.open(path, StandardOpenOption.WRITE, StandardOpenOption.APPEND);
fileChannel.position(fileChannel.size() > 0 ? fileChannel.size() - 1 : 0);
FileLock lock = fileChannel.tryLock();
System.out.printf("是否共享锁: %s", lock.isShared()).println();
writeFile(fileChannel, "排它锁");
TimeUnit.SECONDS.sleep(20);
}
2.2 共享锁
@Test
public void sharedLock() throws IOException, InterruptedException {
Path path = Paths.get(filePath);
FileChannel fileChannel = FileChannel.open(path, StandardOpenOption.WRITE, StandardOpenOption.READ);
fileChannel.position(fileChannel.size() > 0 ? fileChannel.size() - 1 : 0);
FileLock lock = fileChannel.tryLock(0, Long.MAX_VALUE, true);
System.out.printf("是否共享锁: %s", lock.isShared()).println();
readFile(filePath);
TimeUnit.SECONDS.sleep(20);
}
3. 四种获取文件锁
lock();
lock(long position, long size, booean shared);
tryLock();
tryLock(long position, long size, booean shared);
4. lock() 与 tryLock() 区别
- 如果未获取到文件锁,会一直阻塞当前线程,直到获取文件锁。
- tryLock 和 lock 的作用相同,只不过 tryLock 是非阻塞式的。
- tryLock 是尝试获取文件锁,获取成功就返回锁对象,否则返回 null,不会阻塞当前线程。
5. isShared() 和 isValid()
boolean isShared();
boolean isValid();
在某些 OS 上,对某个文件加锁后,不能对此文件使用通道映射。
三、Path 路径
- Java Path 接口,是 Java NIO 更新的一部分。
- 同 Java NIO 一起已经包括在 Java6 和 Java7 中。
- Java Path 接口,是在 Java7 中添加到 Java NIO 的。
- Path 接口位于
java.nio.file 包中,所以 Path 接口的完全限定名称为 java.nio.file.Path。
- 一个路径可以指向一个文件或一个目录。
- 路径可以是绝对路径,也可以是相对路径。
- 绝对路径:包含从文件系统的根目录到它指向的文件或目录的完整路径。
- 相对路径:包含相对于其他路径的文件或目录的路径。
java.nio.file.Path 接口,类似于 java.io.File 类。
- 有一些差别。在许多情况下,可以使用 Path 接口来替换 File 类的使用。
1. 创建绝对路径
\ 是一个转义字符,需要编写 \\,告诉 Java 编译器在字符串中写入一个 \ 字符。- 在 Linux、MacOS 等操作系统上绝对路径如下。
- 如果在 Windows 机器上使用了从
/ 开始的路径,那么路径将被解释为相对于当前驱动器。
Path path = Paths.get("E:\\TEMP\\nio\\Path.txt");
System.out.printf("path: %s", path).println();
Path path = Paths.get("/home/Path.txt");
2. 创建相对路径
Path path1 = Paths.get("E:\\TEMP\\nio\\path1", "Path1.txt");
Path path2 = Paths.get("E:\\TEMP\\nio", "path2\\Path2.txt");
System.out.printf("path1: %s", path1).println();
System.out.printf("path2: %s", path2).println();
3. Path.normalize()
- Path 接口的
normalize() 方法可以使路径标准化。
- 标准化意味着它将移除所有在路径字符串的中间的
. 和 .. 代码,并解析路径字符串所引用的路径。
Path path3 = Paths.get("E:\\TEMP\\nio\\path1\\..\\path2");
Path path4 = path3.normalize();
System.out.printf("path3: %s", path3).println();
System.out.printf("path4: %s", path4).println();
四、Files 文件
- Java NIO Files 类(java.nio.file.Files)提供了操作文件的方法。
1. Files.createDirectory() 创建目录
@Test
public void testCreateDirectory() {
Path path = Paths.get("E:\\TEMP\\nio\\files");
try {
Path directory = Files.createDirectory(path);
System.out.println(directory);
} catch (FileAlreadyExistsException e) {
System.out.printf("目录已经存在: %s", e.getMessage()).println();
} catch (IOException e) {
e.printStackTrace();
}
}
2. Files.copy() 拷贝文件
StandardCopyOption.REPLACE_EXISTING:覆盖已存在的文件。
@Test
public void testCopy() {
Path path = Paths.get("E:\\TEMP\\nio\\files\\Files.txt");
Path path2 = Paths.get("E:\\TEMP\\nio\\files\\Files-back.txt");
try {
Path copy = Files.copy(path, path2, StandardCopyOption.REPLACE_EXISTING);
System.out.println(copy);
} catch (FileAlreadyExistsException e) {
System.out.printf("目录已经存在: %s", e.getMessage()).println();
} catch (NoSuchFileException e) {
System.out.printf("文件不存在: %s", e.getMessage()).println();
} catch (IOException e) {
e.printStackTrace();
}
}
3. Files.move() 移动文件
- 移动文件与重命名相同。
- 但是移动文件既可以移动到不同的目录,也可以在相同的目录中更改它的名称。
@Test
public void testMove() throws IOException {
Path path = Paths.get("E:\\TEMP\\nio\\files\\Files-back.txt");
Path path2 = Paths.get("E:\\TEMP\\nio\\files\\Files2.txt");
Path move = Files.move(path, path2, StandardCopyOption.REPLACE_EXISTING);
System.out.println(move);
}
4. Files.delete() 删除文件
@Test
public void testDelete() {
Path path = Paths.get("E:\\TEMP\\nio\\files\\Files2.txt");
try {
Files.delete(path);
} catch (IOException e) {
System.out.printf("文件或目录不存在: %s", e.getMessage()).println();
e.printStackTrace();
}
}
5. Files.walkFileTree() 递归遍历目录树
- Files.walkFileTree() 方法包含递归遍历目录树功能。
- 将 Path 实例和 FileVisitor 作为参数。
- Path 实例指向要遍历的目录,FileVisitor 在遍历期间被调用。
- FileVisitor 是一个接口,必须自己实现 FileVisitor 接口,并将实现的实例传递给 walkFileTree() 方法。
- 在目录遍历过程中,您的 FileVisitor 实现的每个方法都将被调用。
- 如果不需要实现所有这些方法,那么可以扩展 SimpleFileVisitor 类,它包含 FileVisitor 接口中所有方法的默认实现。
- FileVisitor 接口的方法中,每个都返回一个 FileVisitResult 枚举实例,以下四个选项:
CONTINUE:继续。TERMINATE:终止。SKIP_SIBLING:跳过同级。SKIP_SUBTREE:跳过子级。
@Test
public void testWalkFileTree() {
Path rootPath = Paths.get("E:\\TEMP\\nio\\files");
final String fileToFind = File.separator + "Files.txt";
try {
Path path = Files.walkFileTree(rootPath, new SimpleFileVisitor<Path>() {
@Override
public FileVisitResult visitFile(Path file, BasicFileAttributes attrs) throws IOException {
String absolutePath = file.toAbsolutePath().toString();
if (absolutePath.endsWith(fileToFind)) {
System.out.printf("找到文件: %s", absolutePath).println();
return FileVisitResult.TERMINATE;
}
return FileVisitResult.CONTINUE;
}
});
System.out.println(path);
} catch (IOException e) {
e.printStackTrace();
}
}
五、AsynchronousFileChannel 异步文件通道
- 在 Java 7 中,Java NIO 中添加了 AsynchronousFileChannel。
- 也就是是异步地将数据写入文件。
1. 创建 AsynchronousFileChannel
Path path = Paths.get("E:\\TEMP\\nio\\AsynchronousFileChannel.txt");
AsynchronousFileChannel asynchronousFileChannel = AsynchronousFileChannel.open(path, StandardOpenOption.READ);
2. 通过 Future 读取数据
- 两种方式从 AsynchronousFileChannel 读取数据。
- 第一种方式:是调用返回 Future 的 read() 方法。
- 创建了一个 AsynchronousFileChannel。
- 创建一个 ByteBuffer,它被传递给 read() 方法作为参数,以及一个 0 的位置。
- 在调用 read() 之后,循环,直到返回的 isDone() 方法返回 true。
- 读取操作完成后,数据读取到 ByteBuffer 中,然后打印到 System.out 中。
@Test
public void readAsynchronousFileChannelByFuture() throws IOException {
Path path = Paths.get("E:\\TEMP\\nio\\AsynchronousFileChannel.txt");
AsynchronousFileChannel asynchronousFileChannel = AsynchronousFileChannel.open(path, StandardOpenOption.READ);
ByteBuffer buffer = ByteBuffer.allocate(1024);
long position = 0;
Future<Integer> future = asynchronousFileChannel.read(buffer, position);
while (!future.isDone()) ;
buffer.flip();
byte[] bytes = new byte[buffer.limit()];
buffer.get(bytes);
System.out.println(new String(bytes));
buffer.clear();
}
3. 通过 CompletionHandler 读取数据
- 第二种方式:是调用 read() 方法,该方法将一个 CompletionHandler 作为参数。
- 读取操作完成,将调用 CompletionHandler 的 completed() 方法。
- 对于 completed() 方法的第一个整数参数,表示读取了多少字节,以及传递给 read() 方法的"附件"。
- 附件是 read() 方法的第三个参数(ByteBuffer)。
- 如果读取操作失败,则将调用 CompletionHandler 的 failed() 方法。
@Test
public void readAsynchronousFileChannelByCompletionHandler() throws IOException {
Path path = Paths.get("E:\\TEMP\\nio\\AsynchronousFileChannel.txt");
AsynchronousFileChannel asynchronousFileChannel = AsynchronousFileChannel.open(path, StandardOpenOption.READ);
ByteBuffer buffer = ByteBuffer.allocate(1024);
long position = 0;
asynchronousFileChannel.read(buffer, position, buffer, new CompletionHandler<Integer, ByteBuffer>() {
@Override
public void completed(Integer result, ByteBuffer attachment) {
System.out.printf("读取字节数: %s", result).println();
attachment.flip();
byte[] bytes = new byte[attachment.limit()];
attachment.get(bytes);
System.out.println(new String(bytes));
attachment.clear();
}
@Override
public void failed(Throwable exc, ByteBuffer attachment) {
System.out.println("读取失败");
}
});
}
4. 通过 Future 写入数据
- 如果该文件不存在,那么 write() 方法将抛出一个 java.nio.file.NoSuchFileException。
- AsynchronousFileChannel 以写模式打开。
- 然后创建一个 ByteBuffer,并将一些数据写入其中。
- 然后,ByteBuffer 中的数据被写入到文件中。
- 最后,检查返回的 Future,以查看写操作完成时的情况。
@Test
public void writeAsynchronousFileChannelByFuture() throws IOException {
Path path = Paths.get("E:\\TEMP\\nio\\AsynchronousFileChannel.txt");
AsynchronousFileChannel asynchronousFileChannel = AsynchronousFileChannel.open(path, StandardOpenOption.WRITE);
ByteBuffer buffer = ByteBuffer.allocate(1024);
buffer.put("wy".getBytes());
buffer.flip();
long position = 0;
Future<Integer> future = asynchronousFileChannel.write(buffer, position);
while (!future.isDone()) ;
System.out.println("write over");
}
5. 通过 CompletionHandler 写入数据
- 当写操作完成时,将会调用 CompletionHandler 的 completed() 方法。
- 如果写失败,则会调用 failed() 方法。
@Test
public void writeAsynchronousFileChannelByCompletionHandler() throws IOException {
Path path = Paths.get("E:\\TEMP\\nio\\AsynchronousFileChannel.txt");
if (!Files.exists(path)) {
Files.createFile(path);
}
AsynchronousFileChannel asynchronousFileChannel = AsynchronousFileChannel.open(path, StandardOpenOption.WRITE);
ByteBuffer buffer = ByteBuffer.allocate(1024);
buffer.put("wyb".getBytes());
buffer.flip();
long position = 0;
asynchronousFileChannel.write(buffer, position, buffer, new CompletionHandler<Integer, ByteBuffer>() {
@Override
public void completed(Integer result, ByteBuffer attachment) {
System.out.printf("写入字节数: %s", result).println();
}
@Override
public void failed(Throwable exc, ByteBuffer attachment) {
System.out.println("写入失败");
}
});
System.out.println("write over");
}
六、Charset 字符集编码
- java 中使用 Charset 来表示字符集编码对象。
1. Charset 静态方法
| 方法 | 描述 |
|---|
static Charset forName(String charsetName) | 通过编码类型获得 Charset 对象 |
static SortedMap<String,Charset> availableCharsets() | 获得系统支持的所有编码方式 |
static Charset defaultCharset() | 获得虚拟机默认的编码方式 |
static boolean isSupported(String charsetName) | 判断是否支持该编码类型 |
@Test
public void testCharset1() {
Charset charsetGBK = Charset.forName("GBK");
System.out.printf("charsetGBK: %s", charsetGBK).println();
Map<String, Charset> map = Charset.availableCharsets();
Set<Map.Entry<String, Charset>> set = map.entrySet();
for (Map.Entry<String, Charset> entry : set) {
System.out.println(entry.getKey() + " = " + entry.getValue().toString());
}
Charset defaultCharset = Charset.defaultCharset();
System.out.printf("defaultCharset: %s", defaultCharset).println();
boolean supported = Charset.isSupported("GBK");
System.out.printf("supported: %b", supported).println();
}
2. Charset 普通方法
| 方法 | 描述 |
|---|
final String name() | 获得 Charset 对象的编码类型(String) |
abstract CharsetEncoder newEncoder() | 获得编码器对象 |
abstract CharsetDecoder newDecoder() | 获得解码器对象 |
@Test
public void testCharset2() {
String charsetName = Charset.forName("GBK").name();
System.out.printf("charsetName: %s", charsetName).println();
}
3. 编码解码
public static void main(String[] args) throws CharacterCodingException {
CharBuffer buffer = CharBuffer.allocate(1024);
buffer.put("qs你好");
buffer.flip();
Charset charset = StandardCharsets.UTF_8;
CharsetEncoder encoder = charset.newEncoder();
ByteBuffer byteBuffer = encoder.encode(buffer);
System.out.println("UTF-8编码结果: ");
for (int i = 0; i < byteBuffer.limit(); i++) {
System.out.println(byteBuffer.get());
}
byteBuffer.flip();
CharsetDecoder decoder = charset.newDecoder();
CharBuffer decode = decoder.decode(byteBuffer);
System.out.println("UTF-8解码结果: ");
System.out.println(decode.toString());
Charset charsetGBK = Charset.forName("GBK");
CharsetDecoder decoder2 = charsetGBK.newDecoder();
byteBuffer.flip();
CharBuffer decode2 = decoder2.decode(byteBuffer);
System.out.println("GBK解码结果: ");
System.out.println(decode2.toString());
}


 176
176


 被折叠的 条评论
为什么被折叠?
被折叠的 条评论
为什么被折叠?
 到【灌水乐园】发言


