文章目录
前言
据说DenseNet 是优于ResNet的网络结构,有性能优越的特点并且实现思路很简单。但是特征层的重用会导致模型需要的显存比较大,计算速度会相对比较慢。但效果确实不错。

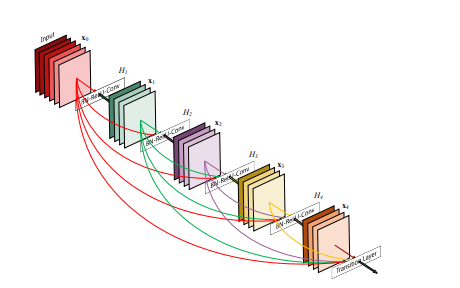
表面上好像是跨连接,实际上是concatenate 特征图。
注意:完整版代码参照官方书写,理解起来比较困难,建议大家参照简洁版,体会DenseNet 的思想和实现方式,用于修改自己的网络
一、什么是DenseNet?
先来看一张图


了解到这些之后,相信聪明的小伙伴已经意识到这个一个问题。想如此堆叠特征层必然会引来特征层通道数过多的问题,同时特征层的大小要和输入时的一致,这样势必会倒是网络的参数过多。于是作者引入了transition_block,如下图红色方框中所示:

transition_block 包含一个1x1的卷积,用来调整通道数,和一个 2x2 的池化来缩小特征层的大小。这样每个Dense Block中进行计算时 特征保持不变,直到进入下一个Dense Block。 这就是Dense Block的实现思路了。
二、keras 复现(完整版)
1.Conv Block
该部分是用于Dense Block 中进行卷积运算的块。每个参数的含义 已经写在代码的注释中。
代码如下(示例):
def conv_block(x,stage,branch,nb_filter,dropout_rate = None):
        #  参数
        #     x: input tensor  #输入张量
        #     stage: index for dense block  #第几个dense_block
        #     branch: layer index within each dense block  #dense_block 中各层的索引
        #     nb_filter: number of filters  #卷积核的个数
        #     dropout_rate: dropout rate  #dropout 参数
    eps = 1.1e-5
    bn_axis =3

    conv_name_base = 'conv' + str(stage) + '_' + str(branch)
    relu_name_base = 'relu' + str(stage) + '_' + str(branch)
    inter_channels = 4 * nb_filter
    # 1x1 的卷积用于调整输入tensor 的通道数
    x = BatchNormalization(epsilon=eps,axis=bn_axis,name=conv_name_base+'_x1_bn')(x)
    x = Activation('relu',name=relu_name_base+'_x1')(x)
    x = Conv2D(inter_channels,1,1,name=conv_name_base+'_x1',use_bias=False)(x)
    print("x in conv: ",x.shape)
    if dropout_rate:
        x = Dropout(dropout_rate)(x)

    # 3x3 的卷积
    x = BatchNormalization(epsilon=eps,axis=bn_axis,name=conv_name_base+'_x2_bn')(x)
    x = Activation('relu',name=relu_name_base+'_x2')(x)
    x = ZeroPadding2D((1, 1), name=conv_name_base+'_x2_zeropadding')(x)
    x = Conv2D(nb_filter, 3, 1, name=conv_name_base+'_x2', use_bias=False)(x)
    print("x in conv2: ",x.shape)
    if dropout_rate:
        x = Dropout(dropout_rate)(x)

    return x
2.Dense Block
通过定义好的conv_block 去声明 Dense Block。
def dense_block(x, stage, nb_layers, nb_filter, growth_rate, dropout_rate=None,grow_nb_filters=True):
    #  Build a dense_block where the output of each conv_block is fed to subsequent ones
    #     # Arguments
    #         x: input tensor
    #         stage: index for dense block
    #         nb_layers: the number of layers of conv_block to append to the model. 添加卷积块的个数
    #         nb_filter: number of filters  卷积核的个数
    #         growth_rate: growth rate  增长率
    #         dropout_rate: dropout rate  dropout
    #         grow_nb_filters: flag to decide to allow number of filters to grow 是否允许卷积核的个数变多

        concat_feat = x

        for i  in range(nb_layers):
            branch = i + 1
            x = conv_block(concat_feat,stage,branch,growth_rate,dropout_rate)
            concat_feat = layers.Concatenate(axis=3,name='concat_'+str(stage)+'_'+str(branch))([concat_feat,x])
            if grow_nb_filters:
                nb_filter += growth_rate

        return concat_feat, nb_filter
growth rate 用于判断下一个 Dense Block 中卷积 的初始个数 ,作者的设置,为的是能够控制网络深层的卷积核个数。
3.Transition Block
用于缩小特征层。


 本文介绍了DenseNet网络结构的优势及其实现原理,包括Conv Block、Dense Block和Transition Block。通过Keras分别展示了完整版和简洁版的复现代码,帮助读者理解DenseNet的思想并应用于自定义网络。
 最低0.47元/天 解锁文章


 6326
6326

 被折叠的 条评论
为什么被折叠?


