


小伙伴复制代码到开发工具之后:ctrl+alt+l ,快速对齐,然后要导包的,导入相关包即可。其中登录过程,我都省了,用提示代替。
一、Android View体系下的登录
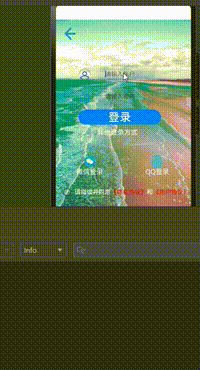
1.仿写登录运行效果:
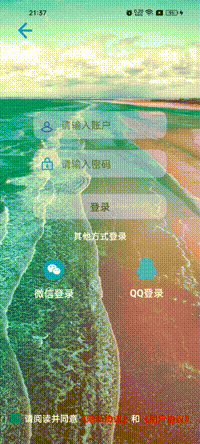
我们想要布局出这样一个效果,各位小伙伴,可以先行试试布局哦。
| <?xml version="1.0" encoding="utf-8"?> |
由于考虑尽可能使用讲解过的容器和控件,这种布局是可行的,这肯定不是最优解,小伙伴们可以自己布局哦;当然我们在实际开发中,应考虑减少层级嵌套,这样可以减少代码行数,还可以减少渲染ui时间,在体验感觉上更好。
接下来我们看看Activity里的代码。
|
|
注意观看 setOnClickListener()、myClick(),这是我写的设置点击监听封装。主要是对BaseActicity做了处理,我们去看看,都做了什么处理。
第一步:继承点击事件的接口:

第二写方法
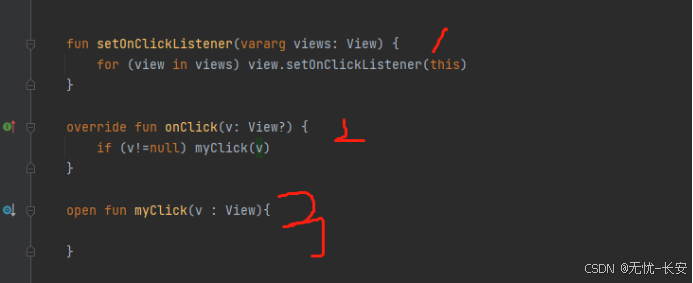
1是设置监听的点击按键的控件,为不确定数量的View,针对每一做监听。
2.是点击时候的回调
3.是可以重写的方法
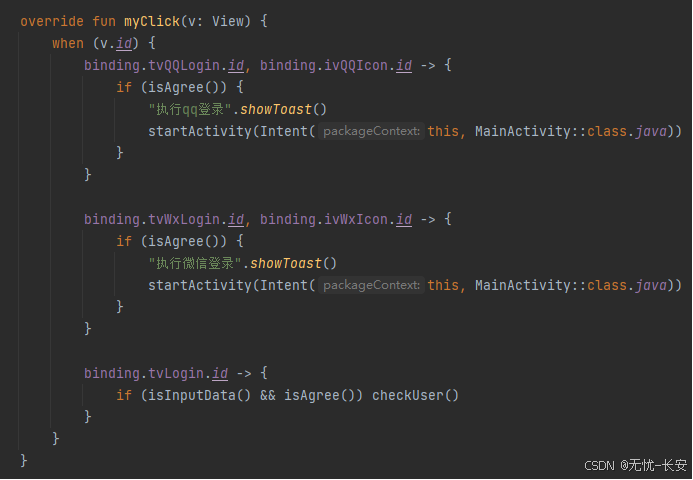
在重写方法中,更具id找到对应的点击控件,然后做不同的处理。
这里去新的界面使用 startActivity(Intent(this, MainActivity::class.java));传递一个Intent的意图,意图是传递了一个上下文和需要启动的界面class。他会帮助我们启动新的界面。我们还可以调用 finish(),关闭当前界面。
SpannableUtils,则是本人封装的一个类,直接用即可
|
|
ComplexClickTextUtils直接使用:
| class ComplexClickTextUtils( |
我们看看WebViewActivity;这个界面就是加载应用协议和隐私协议的。
布局代码:
| <?xml version="1.0" encoding="utf-8"?> |
再看看WebViewActivity界面代码
class WebViewActivity : BaseActivity<ActivityWebViewBinding>() {
private val url = "https://www.baidu.com/" //隐私和用户协议都用百度的链接
override fun initData(savedInstanceState: Bundle?) {
//设置标题
binding.tvTitle.text=intent.getStringExtra("title")
binding.ivBreak.setOnClickListener {
if (binding.wvWebView.canGoBack()){
binding.wvWebView.goBack() //先判断是否可以回退
}else{ //否则关闭当前界面
finish()
}
}
// binding.wvWebView.settings 还可以支持设置,这里就简单写一下,后续使用在讲解
binding.wvWebView.settings.javaScriptEnabled=true //开启支持java角本
binding.wvWebView.loadUrl(url)
}
override fun onDestroy() {
super.onDestroy()
binding.wvWebView.destroy() //在界面被销毁的时候,释放掉加载的资源
}
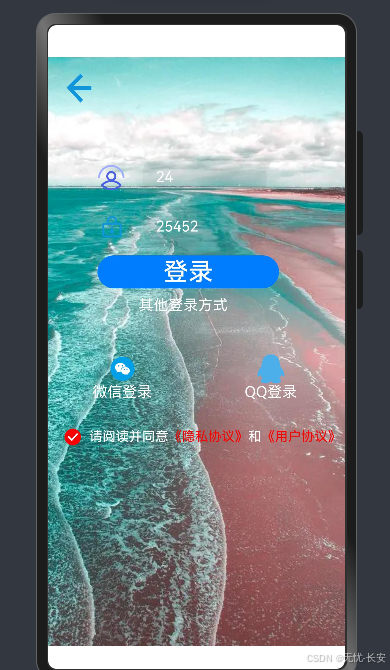
二,我们看看Compose 怎么写的。
看先看运行效果图:

我们再看看布局代码:
@OptIn(ExperimentalMaterial3Api::class)
@Composable
//根据返回的标志进行事件处理
fun LoginLayout(callBack: (isAgree : Boolean,name : String,pws : String,event :Int) -> Unit) {
var inputUserName by remember { mutableStateOf("") }
var inputUserPsw by remember { mutableStateOf("") }
var isAgree by remember { mutableStateOf(false) }
Box(
Modifier
.fillMaxSize()
.background(Color.White)) { //层叠布局
//先加载图片背景 //因为在compose中,
// 容器背景无法使用图片,解决方法使用当前布局在最底层加载图片即可
Image(
painterResource(id = R.mipmap.login),
contentDescription = null,
contentScale = ContentScale.FillHeight,
modifier = Modifier.fillMaxSize())
Image(
painterResource(id = R.mipmap.ic_break),
contentDescription = null,
modifier = Modifier
.padding(start = 30.dp, top = 40.dp)
.size(30.dp)
.clickable { callBack.invoke(isAgree,"", "", 0) }
.align(Alignment.TopStart))
Row(
Modifier
.padding(top = 200.dp)
.align(Alignment.TopCenter),
verticalAlignment = Alignment.CenterVertically,
horizontalArrangement = Arrangement.Center) {
Image(painterResource(id = R.mipmap.icon_user),
contentDescription = null,
modifier = Modifier
.padding(end = 10.dp)
.size(30.dp))
TextField(value = inputUserName, onValueChange = {
inputUserName = it
},placeholder = {
Text(text = "请输入账户", fontSize = 17.sp)
}, modifier = Modifier.height(55.dp))
}
Row(
Modifier
.padding(top = 270.dp)
.align(Alignment.TopCenter),
verticalAlignment = Alignment.CenterVertically,
horizontalArrangement = Arrangement.Center) {
Image(painterResource(id = R.mipmap.icon_psw),
contentDescription = null,
modifier = Modifier
.padding(end = 10.dp)
.size(30.dp))
TextField(value = inputUserPsw, onValueChange = {
inputUserPsw = it
}, placeholder = {
Text(text = "请输入密码", fontSize = 17.sp)
}, modifier = Modifier.height(55.dp))
}
Button(onClick = { callBack.invoke(isAgree,inputUserName,inputUserPsw,1) },
modifier = Modifier
.padding(top = 360.dp)
.align(Alignment.TopCenter)
.width(240.dp)) {
Text(text = "登录")
}
Text(text = "其他登录方式", fontSize = 16.sp,color = Color.White,
modifier = Modifier
.padding(top = 420.dp)
.align(Alignment.TopCenter))
Row(modifier = Modifier
.padding(top = 470.dp)
.fillMaxWidth()
.align(Alignment.TopCenter)) {
Column(
Modifier
.padding(start = 80.dp)
.clickable {
callBack.invoke(isAgree,inputUserName, inputUserPsw, 2)
},horizontalAlignment = Alignment.CenterHorizontally) {
Image(painter = painterResource(id = R.mipmap.icon_wx),
contentDescription = null,Modifier.size(45.dp))
Text(text = "微信登录", color = Color.White,
modifier = Modifier.padding(top = 10.dp))
}
Column(
Modifier
.padding(start = 100.dp)
.clickable {
callBack.invoke(isAgree,inputUserName, inputUserPsw, 3)
}, horizontalAlignment = Alignment.CenterHorizontally) {
Image(painter = painterResource(id = R.mipmap.icon_qq),
contentDescription = null,Modifier.size(45.dp))
Text(text = "QQ登录", color = Color.White,
modifier = Modifier.padding(top = 10.dp))
}
}
Row(modifier = Modifier.fillMaxWidth()
.align(Alignment.BottomCenter).padding(bottom = 20.dp),
horizontalArrangement = Arrangement.Center,
verticalAlignment = Alignment.CenterVertically) {
Checkbox(checked =isAgree , onCheckedChange ={
isAgree=it
})
Text(text = "请阅读并同意", color = Color.White, fontSize = 15.sp)
Text(text = "《隐私协议》", color = Color.Red, modifier = Modifier.clickable {
callBack.invoke(isAgree,"", "", 4)
}, fontSize = 15.sp)
Text(text = "和",color = Color.White, fontSize = 15.sp)
Text(text = "《用户协议》",color = Color.Red,modifier = Modifier.clickable {
callBack.invoke(isAgree,"", "", 5)
}, fontSize = 15.sp)
}
}
}
@Composable
@Preview
fun mPreview() {
LoginLayout { isAgree,user,pws ,wvent->
}
}
接下来看看你,LoginActivity代码。
| package com.example.compose.uiactivity |
看看BaseActivity,很简单的代码
| abstract class BaseActivity : ComponentActivity() { } |
我们再看看WebView的代码
|
|
三、鸿蒙开发中的布局
看看布局代码:
@Entry
  //这是装饰器的入口
@Component
  //这代表是一个Component类型的布局
  //定义一个名 LayoutLayout的组合布局
struct LoginLayout {
  @State userName: string = ""
  @State psw: string = ""
  @State isAgree: boolean = false

  build() { //构建布局 弹性布局,即使平均分配剩下的控件

    Stack() { // 层叠布局 默认居中

      Image($r('app.media.login'))
        .width('100%')
        .height('100%')
        .objectFit(ImageFit.Fill) //拉满全屏幕


      Image($r('app.media.ic_break')).width(35).height(35).onClick(() => {
        console.log("点击了退出按键")
      }).margin({ left: 20, top: 20 })


      Row() {
        Image($r('app.media.icon_user')).width(35).height(35).margin({ right: 20 })
        TextInput({ text: this.userName, placeholder: "请输入账户" })
          .fontSize(18)
          .fontColor(Color.White)
          .onChange((it: string) => {
            this.userName = it //输入账户
          })
          .width(150)
          .height(50)
      }.width('100%').margin({ left: 60, top: 120 })

      Row() {
        Image($r('app.media.icon_psw')).width(35).height(35).margin({ right: 20 })
        TextInput({ text: this.psw, placeholder: "请输入密码" })
          .fontSize(18)
          .fontColor(Color.White)
          .onChange((it: string) => {
            this.psw = it //输入密码
          })
          .width(150)
          .height(50)
      }.width('100%').margin({ left: 60, top: 180 })


      Button("登录")
        .onClick(() => {
          if (this.userName.length <= 0 || this.psw.length <= 0) {
            console.log("请输入账户或者密码");
          } else {
            if (this.isAgree) {
              console.log("登录成功");
            } else {
              console.log("请同一隐私协议和用户协议");
            }
          }
        })
        .width(220)
        .height(40)
        .fontSize(30)
        .margin({ left: 60, top: 240 })

      Text('其他登录方式').fontColor(Color.White)
        .fontSize(18).margin({ left: 110, top: 290 })

      Row() {
        Flex() {

          Column() {
            Image($r('app.media.icon_wx')).width(35).height(35)
            Text('微信登录').fontColor(Color.White)
              .fontSize(18).onClick(() => {
              if (this.isAgree) {
                console.log("微信登录");
              } else {
                console.log("请同一隐私协议和用户协议");
              }

            })
          }.width('50%')

          Column() {
            Image($r('app.media.icon_qq')).width(35).height(35)
            Text('QQ登录').fontColor(Color.White)
              .fontSize(18).onClick(() => {
              if (this.isAgree) {
                console.log("QQ登录");
              } else {
                console.log("请同一隐私协议和用户协议");
              }
            })
          }.width('50%')

        }.width('100%')

      }.width('100%').margin({ top: 360 })


      Checkbox({ name: 'checkbox1', group: 'checkboxGroup' })
        .select(this.isAgree)
        .onChange((isCheck: boolean) => {
          this.isAgree=isCheck
        })
        .unselectedColor(Color.Black)
        .selectedColor(Color.Red)
        .margin({ top: 450, left: 20 })

      Row() {
        Text("请阅读并同意").fontColor(Color.White)
        Text("《隐私协议》").fontColor(Color.Red).onClick(() => {
          console.log("点击了隐私协议");
        })
        Text("和").fontColor(Color.White)
        Text("《用户协议》").fontColor(Color.Red).onClick(() => {
          console.log("点击了用户协议");
        })
      }.margin({ top: 450, left: 50 })

    }.height('100%') //设置高度度铺满全屏
    .width('100%') //设置宽度铺满全屏
    .backgroundColor(Color.Black)
    .align(Alignment.TopStart) //此处设置开始布局位置

  }
}
最后我们看看运行效果:
我们下一章:将Android 中的RecyclerView,讲完它,我们就开始尝试做小项目,加深对控件的记忆和熟悉度,大家一起共同学习,在开发小项目时候,我不一定Android View体系和Compose 、鸿蒙开发一起发,大概率一个小项目分三次发分为上中下三篇开发对应AndroidView 体系,Android Compose 、鸿蒙。


 2万+
2万+

 被折叠的 条评论
为什么被折叠?
被折叠的 条评论
为什么被折叠?
 到【灌水乐园】发言


