


目录
a) Patch + Position Embedding(Extra learnable[class] embedding)
d) Transformer Encoder Block构建
前言
Transformer的初衷是借助多头注意力机制解决seq2seq在机器翻译中对长距离上下文翻译不准确的问题,因为seq2seq中的encoder对任意句子只能给出一个固定的size表征,而这个表征在遇到长句时会显得包含的信息量不够。
ViT的标题中的“AN IMAGE IS WORTH 16X16 WORDS”可以看出,ViT将图片分割为固定数量的patches,每个patch都视作一个token,同时引入了多头自注意力机制去提取包含了关系信息的特征信息。
阅读本文须知
为高效阅读本文,建议先掌握以下
- 不管看懂与否,完整阅读过Vision Transformer论文《AN IMAGE IS WORTH 16X16 WORDS: TRANSFORMERS FOR IMAGE RECOGNITION AT SCALE》https://arxiv.org/pdf/2010.11929.pdf
- 大致了解Transformer 详解Transformer (Attention Is All You Need) - 知乎
- 熟悉卷积神经网络 一文看懂卷积神经网络-CNN(基本原理+独特价值+实际应用)_越来越胖的GuanRunwei的博客-CSDN博客_卷积神经网络实际应用
- 熟悉PyTorch PyTorch documentation — PyTorch 1.11.0 documentation
- 了解矩阵空间乘法与向量相似度 全网最通俗易懂的 Self-Attention自注意力机制 讲解_越来越胖的GuanRunwei的博客-CSDN博客_通俗解释注意力机制
代码下载
提取码: p7lk
Vision Transformer理解与复现


1. 模型概览
从宏观的角度看,Vision Transformer和一般的CNN模型大体相同,都分为特征提取网络与分类网络。
特征提取网络部分,Vision Transformer会将图片等量切分成若干个patches,并将这些patches压平成一个并不包含空间位置信息的patch序列,输入至模型中。而后使用Transformer Encoder中的多头自注意力机制(Multi-Head Self-Attention)对输入的每个patch计算其重要程度,并保留其本身提取到的信息。
分类网络部分,Vision Transformer接收到了特征提取网络输出的特征信息,将这些特征信息通过一个普通的多层感知机(MLP)对全局特征进行分类。
2. 特征提取网络
a) Patch + Position Embedding(Extra learnable[class] embedding)
以一张224*224的图片为例,Vision Transformer默认使用kernel_size=16*16, stride=16*16, channel=768的卷积核对其进行卷积操作,那么也就意味着,经过一次卷积操作之后,输出的特征map的大小为14*14*768,也就是说,大小为14*14的每个单位元素的感受野都为原图中的16个像素。
那么,在得到14*14*768的特征map后,我们需要将其进行flatten也就是压平操作14*14*768 -> 196*768。但,这仅仅是图片本身的信息。我们仍需要一个变量表征其分类信息,因此我们添加一个1*768的张量(图上索引为0的那个),最后得到维度为197*768的特征map,里面包含了图片信息与分类信息。
但是,光包含图片信息和分类信息还不够,网络对图片进行分类就需要知道每个patch的位置信息,那么我们再次创建一个维度为197*768的可学习张量,使其在训练阶段可以学到图片的位置信息。
最终,在输入至Transformer Encoder之前,我们得到了具有图片信息、位置信息和分类信息的特征。
代码(每段代码中的关键变量都已写好维度转换提示,请放心食用)
# ----------------------------------------#
# Patch嵌入
# ----------------------------------------#
class PatchEmbed(nn.Module):
    def __init__(self, input_shape=[224, 224], patch_size=16, in_chans=3, num_features=768, norm_layer=None,
                 flatten=True):
        super(PatchEmbed, self).__init__()
        # 14 * 14
        self.num_patches = (input_shape[0] // patch_size) * (input_shape[1] // patch_size)
        self.flatten = flatten

        self.proj = nn.Conv2d(in_chans, num_features, kernel_size=patch_size, stride=patch_size)
        self.norm = norm_layer(num_features) if norm_layer else nn.Identity()

    def forward(self, x):
        # batch, 3, 224, 224 -> batch, 768, 14, 14
        x = self.proj(x)

        # batch, 768, 14, 14 -> batch, 768, 196 -> batch, 196, 768
        if self.flatten:
            x = x.flatten(2).transpose(1, 2)  # BCHW -> BNC
        x = self.norm(x)

        return x


class VisionTransformer(nn.Module):
    def __init__(
            self, input_shape=[224, 224], patch_size=16, in_chans=3, num_classes=1000, num_features=768,
            depth=12, num_heads=12, mlp_ratio=4., qkv_bias=True, drop_rate=0.1, attn_drop_rate=0.1, drop_path_rate=0.1,
            norm_layer=partial(nn.LayerNorm, eps=1e-6), act_layer=GELU
    ):
        super(VisionTransformer, self).__init__()
        # -----------------------------------------------#
        #   batch, 224, 224, 3 -> batch, 196, 768
        # -----------------------------------------------#
        self.patch_embed = PatchEmbed(input_shape=input_shape, patch_size=patch_size, in_chans=in_chans,
                                      num_features=num_features)
        num_patches = (224 // patch_size) * (224 // patch_size)
        self.num_features = num_features
        self.new_feature_shape = [int(input_shape[0] // patch_size), int(input_shape[1] // patch_size)]
        self.old_feature_shape = [int(224 // patch_size), int(224 // patch_size)]

        # --------------------------------------------------------------------------------------------------------------------#
        #   classtoken部分是transformer的分类特征。用于堆叠到序列化后的图片特征中,作为一个单位的序列特征进行特征提取。
        #
        #   在利用步长为16x16的卷积将输入图片划分成14x14的部分后,将14x14部分的特征平铺,一幅图片会存在序列长度为196的特征。
        #   此时生成一个classtoken,将classtoken堆叠到序列长度为196的特征上,获得一个序列长度为197的特征。
        #   在特征提取的过程中,classtoken会与图片特征进行特征的交互。最终分类时,我们取出classtoken的特征,利用全连接分类。
        # --------------------------------------------------------------------------------------------------------------------#
        #   1, 1, 768
        self.cls_token = nn.Parameter(torch.zeros(1, 1, num_features))
        # --------------------------------------------------------------------------------------------------------------------#
        #   为网络提取到的特征添加上位置信息。
        #   以输入图片为224, 224, 3为例,我们获得的序列化后的图片特征为196, 768。加上classtoken后就是197, 768
        #   此时生成的pos_Embedding的shape也为197, 768,代表每一个特征的位置信息。
        # --------------------------------------------------------------------------------------------------------------------#
        #   1, 197, 768
        self.pos_embed = nn.Parameter(torch.zeros(1, num_patches + 1, num_features))
        self.pos_drop = nn.Dropout(p=drop_rate)

        # -----------------------------------------------#
        #   12次 batch, 197, 768 -> batch, 197, 768
        # -----------------------------------------------#
        dpr = [x.item() for x in torch.linspace(0, drop_path_rate, depth)]
        self.blocks = nn.Sequential(
            *[
                Block(
                    dim=num_features,
                    num_heads=num_heads,
                    mlp_ratio=mlp_ratio,
                    qkv_bias=qkv_bias,
                    drop=drop_rate,
                    attn_drop=attn_drop_rate,
                    drop_path=dpr[i],
                    norm_layer=norm_layer,
                    act_layer=act_layer
                ) for i in range(depth)
            ]
        )
        # 第一个norm写在了PatchEmbed里
        self.norm = norm_layer(num_features)
        self.head = nn.Linear(num_features, num_classes) if num_classes > 0 else nn.Identity()

    def forward_features(self, x):
        # batch, 3, 224, 224 -> batch, 196, 768
        x = self.patch_embed(x)

        # 1, 1, 768 -> batch, 1, 768
        cls_token = self.cls_token.expand(x.shape[0], -1, -1)

        # batch, 1, 768 + batch, 196, 768 -> batch, 197, 768
        x = torch.cat((cls_token, x), dim=1)

        # 1, 1, 768
        cls_token_pe = self.pos_embed[:, 0:1, :]

        # 1, 196, 768
        img_token_pe = self.pos_embed[:, 1:, :]

        # 1, 196, 768 -> 1, 14, 14, 768 -> 1, 768, 14, 14
        img_token_pe = img_token_pe.view(1, *self.old_feature_shape, -1).permute(0, 3, 1, 2)

        # 1, 768, 14, 14 -> 以防输入图片大小不是224*224 做插值 -> 1, 768, 14, 14
        img_token_pe = F.interpolate(img_token_pe, size=self.new_feature_shape, mode='bicubic', align_corners=False)

        # 1, 768, 14, 14 -> 1, 14, 14, 768 -> 1, 196, 768
        img_token_pe = img_token_pe.permute(0, 2, 3, 1).flatten(1, 2)

        # 1, 1, 768 + 1, 196, 768 -> 1, 197, 768
        pos_embed = torch.cat([cls_token_pe, img_token_pe], dim=1)

        # batch, 197, 768 + 1, 197, 768 -> batch, 197, 768
        x = self.pos_drop(x + pos_embed)

        # 12次 batch, 197, 768
        x = self.blocks(x)

        # batch, 197, 768
        x = self.norm(x)

        # batch, 768
        return x[:, 0]
b) Transformer Encoder
我们将上述特征进行一个简单的norm后,输入进Transformer Encoder。Transformer Encoder包含了12个Self-Attention自注意力模块(多头注意力),用于计算输入图片特征各部分的重要程度,换句话说,图片个部分的特征,由其本身通过卷积得到的特征之外,还包含了Attention的信息,比如我判断一辆汽车侧面图片的标准主要是看他的轮胎,那么在图片的轮胎部分所在的patch,Self-Attention就会多注意一点。

大名鼎鼎的注意力机制公式:

如何感性理解这个公式,请移步我的另一篇博文:全网最通俗易懂的 Self-Attention自注意力机制 讲解_越来越胖的GuanRunwei的博客-CSDN博客_通俗解释注意力机制
这里就讲一下Attention的具体计算步骤:
1. 有三个向量 V1, V2, V3
2. 这三个向量,每个向量都对应三个矩阵Q, K, V
3. 首先,我们使用 向量V1@Q的结果 分别乘以 V1@K, V2@K, V3@K 的结果,获得V1, V2, V3这三个向量对向量V1的重要程度或者说相关程度
4. 而后乘以向量V1本身,并求和,得到带有注意力的向量V1表示:
5. 对于
而言,它的大小是Q/K的维度,用于稳定向量中的元素的方差
6. 对于计算带有注意力的向量V2和V3的表示,同上述过程1-5
注意力公式实验代码:
import numpy as np

def soft_max(z):
    t = np.exp(z)
    a = np.exp(z) / np.expand_dims(np.sum(t, axis=1), 1)
    return a

Query = np.array([
    [1,0,2],
    [2,2,2],
    [2,1,3]
])

Key = np.array([
    [0,1,1],
    [4,4,0],
    [2,3,1]
])

Value = np.array([
    [1,2,3],
    [2,8,0],
    [2,6,3]
])

scores = Query @ Key.T
print(scores)
scores = soft_max(scores)
print(scores)
out = scores @ Value
print(out)
c) 多头自注意力(MHSA)

顾名思义,用多个注意力头对图片特征信息做注意力操作。那么多个头到底注意在哪里呢?回到前文,寻找768这个数字,768表示768个通道,那么多头注意力机制也就是使用多头(ViT中默认为12个)对图片特征信息进行进一步特征提取,使其包含注意力信息。
代码:
class Attention(nn.Module):
    def __init__(self, dim, num_heads=8, qkv_bias=False, attn_drop=0., proj_drop=0.):
        super(Attention, self).__init__()
        self.num_heads = num_heads
        self.scale = (dim // num_heads) ** -0.5
        # 768 -> 768*3
        self.qkv = nn.Linear(dim, dim * 3, bias=qkv_bias)
        self.attn_drop = nn.Dropout(attn_drop)
        self.proj = nn.Linear(dim, dim)
        self.proj_drop = nn.Dropout(proj_drop)

    def forward(self, x):
        # batch, 196, 768
        B, N, C = x.shape

        # batch, 196, 768 -> batch, 196, 768*3 -> batch, 196, 3, 8, 768/8=96 -> 3, batch, 8, 196, 96
        qkv = self.qkv(x).reshape(B, N, 3, self.num_heads, C // self.num_heads).permute(2, 0, 3, 1, 4)
        # 3 * 1, batch, 8, 196, 96  -> q, k, v = batch: 16, head: 8, patch: 196, each_head_attention_channels: 96
        q, k, v = qkv[0], qkv[1], qkv[2]

        # batch, 8, 196, 96 @ batch, 8, 96, 196 -> batch, 8, 196, 196
        attn = (q @ k.transpose(-2, -1)) * self.scale
        attn = attn.softmax(dim=-1)
        attn = self.attn_drop(attn)

        # batch, 8, 196, 196 @ batch, 8, 196, 96 -> batch, 8, 196, 96 -> batch, 196, 8, 96 -> batch, 196, 768
        x = (attn @ v).transpose(1, 2).reshape(B, N, C)

        # batch, 196, 768 -> batch, 196, 768
        x = self.proj(x)

        # Dropout(batch, 196, 768)
        x = self.proj_drop(x)
        return x
d) Transformer Encoder Block构建
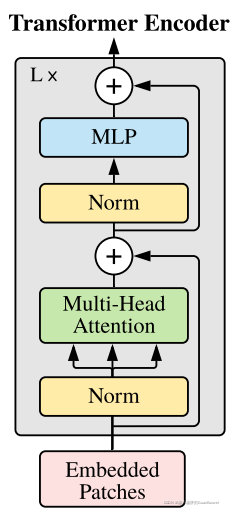
由图可知,一个Transformer Encoder Block按顺序包含了
输入:Embedded Patches
LayerNorm
Multi-Head Attention
残差操作
LayerNorm
MLP
残差操作
代码:
class MLP(nn.Module):
    """ MLP as used in Vision Transformer, MLP-Mixer and related networks
    """

    def __init__(self, in_features, hidden_features=None, out_features=None, act_layer=GELU, drop=0.):
        super(MLP, self).__init__()
        out_features = out_features or in_features
        hidden_features = hidden_features or in_features
        drop_probs = (drop, drop)

        self.fc1 = nn.Linear(in_features, hidden_features)
        self.act = act_layer()
        self.drop1 = nn.Dropout(drop_probs[0])
        self.fc2 = nn.Linear(hidden_features, out_features)
        self.drop2 = nn.Dropout(drop_probs[1])

    def forward(self, x):
        # batch, 196, 768 -> batch, 196, 768
        x = self.fc1(x)

        # batch, 196, 768 -> batch, 196, 768
        x = self.act(x)

        # batch, 196, 768 -> batch, 196, 768
        x = self.drop1(x)

        # batch, 196, 768 -> batch, 768, 1000
        x = self.fc2(x)

        # batch, 196, 768 -> batch, 768, 1000
        x = self.drop2(x)

        # batch, 196, 768 -> batch, 768, 1000
        return x


# -----------------------------------------------#
#   一个Transformer Encoder Block
# -----------------------------------------------#
class Block(nn.Module):
    def __init__(self, dim, num_heads, mlp_ratio=4., qkv_bias=False, drop=0., attn_drop=0.,
                 drop_path=0., act_layer=GELU, norm_layer=nn.LayerNorm):
        super(Block, self).__init__()
        self.norm1 = norm_layer(dim)
        self.attn = Attention(dim, num_heads=num_heads, qkv_bias=qkv_bias, attn_drop=attn_drop, proj_drop=drop)
        self.norm2 = norm_layer(dim)
        self.mlp = MLP(in_features=dim, hidden_features=int(dim * mlp_ratio), act_layer=act_layer, drop=drop)
        self.drop_path = DropPath(drop_path) if drop_path > 0. else nn.Identity()

    def forward(self, x):
        # res1 = batch, 196, 768 + Dropout(Mix_Attention(LayerNorm(batch, 196, 768))) -> batch, 196, 768
        x = x + self.drop_path(self.attn(self.norm1(x)))

        # res2 = res1 + Dropout(MLP(LayerNorm(res1))) -> batch, 196, 768
        x = x + self.drop_path(self.mlp(self.norm2(x)))
        return x
e) 特征信息分类
我们使用和图片信息一样维度的张量,将其命名为class token,拼接至图片的patch序列信息中,在提取分类信息的过程中,class token会和其他特征进行交互,以提取不同patch的特征信息。
代码:
class VisionTransformer(nn.Module):
    def __init__(
            self, input_shape=[224, 224], patch_size=16, in_chans=3, num_classes=1000, num_features=768,
            depth=12, num_heads=12, mlp_ratio=4., qkv_bias=True, drop_rate=0.1, attn_drop_rate=0.1, drop_path_rate=0.1,
            norm_layer=partial(nn.LayerNorm, eps=1e-6), act_layer=GELU
    ):
        super(VisionTransformer, self).__init__()
        # -----------------------------------------------#
        #   batch, 224, 224, 3 -> batch, 196, 768
        # -----------------------------------------------#
        self.patch_embed = PatchEmbed(input_shape=input_shape, patch_size=patch_size, in_chans=in_chans,
                                      num_features=num_features)
        num_patches = (224 // patch_size) * (224 // patch_size)
        self.num_features = num_features
        self.new_feature_shape = [int(input_shape[0] // patch_size), int(input_shape[1] // patch_size)]
        self.old_feature_shape = [int(224 // patch_size), int(224 // patch_size)]

        # --------------------------------------------------------------------------------------------------------------------#
        #   classtoken部分是transformer的分类特征。用于堆叠到序列化后的图片特征中,作为一个单位的序列特征进行特征提取。
        #
        #   在利用步长为16x16的卷积将输入图片划分成14x14的部分后,将14x14部分的特征平铺,一幅图片会存在序列长度为196的特征。
        #   此时生成一个classtoken,将classtoken堆叠到序列长度为196的特征上,获得一个序列长度为197的特征。
        #   在特征提取的过程中,classtoken会与图片特征进行特征的交互。最终分类时,我们取出classtoken的特征,利用全连接分类。
        # --------------------------------------------------------------------------------------------------------------------#
        #   1, 1, 768
        self.cls_token = nn.Parameter(torch.zeros(1, 1, num_features))
        # --------------------------------------------------------------------------------------------------------------------#
        #   为网络提取到的特征添加上位置信息。
        #   以输入图片为224, 224, 3为例,我们获得的序列化后的图片特征为196, 768。加上classtoken后就是197, 768
        #   此时生成的pos_Embedding的shape也为197, 768,代表每一个特征的位置信息。
        # --------------------------------------------------------------------------------------------------------------------#
        #   1, 197, 768
        self.pos_embed = nn.Parameter(torch.zeros(1, num_patches + 1, num_features))
        self.pos_drop = nn.Dropout(p=drop_rate)

        # -----------------------------------------------#
        #   12次 batch, 197, 768 -> batch, 197, 768
        # -----------------------------------------------#
        dpr = [x.item() for x in torch.linspace(0, drop_path_rate, depth)]
        self.blocks = nn.Sequential(
            *[
                Block(
                    dim=num_features,
                    num_heads=num_heads,
                    mlp_ratio=mlp_ratio,
                    qkv_bias=qkv_bias,
                    drop=drop_rate,
                    attn_drop=attn_drop_rate,
                    drop_path=dpr[i],
                    norm_layer=norm_layer,
                    act_layer=act_layer
                ) for i in range(depth)
            ]
        )
        # 第一个norm写在了PatchEmbed里
        self.norm = norm_layer(num_features)
        self.head = nn.Linear(num_features, num_classes) if num_classes > 0 else nn.Identity()

    def forward_features(self, x):
        # batch, 3, 224, 224 -> batch, 196, 768
        x = self.patch_embed(x)

        # 1, 1, 768 -> batch, 1, 768
        cls_token = self.cls_token.expand(x.shape[0], -1, -1)

        # batch, 1, 768 + batch, 196, 768 -> batch, 197, 768
        x = torch.cat((cls_token, x), dim=1)

        # 1, 1, 768
        cls_token_pe = self.pos_embed[:, 0:1, :]

        # 1, 196, 768
        img_token_pe = self.pos_embed[:, 1:, :]

        # 1, 196, 768 -> 1, 14, 14, 768 -> 1, 768, 14, 14
        img_token_pe = img_token_pe.view(1, *self.old_feature_shape, -1).permute(0, 3, 1, 2)

        # 1, 768, 14, 14 -> 以防输入图片大小不是224*224 做插值 -> 1, 768, 14, 14
        img_token_pe = F.interpolate(img_token_pe, size=self.new_feature_shape, mode='bicubic', align_corners=False)

        # 1, 768, 14, 14 -> 1, 14, 14, 768 -> 1, 196, 768
        img_token_pe = img_token_pe.permute(0, 2, 3, 1).flatten(1, 2)

        # batch, 1, 768 + batch, 196, 768 -> batch, 197, 768
        pos_embed = torch.cat([cls_token_pe, img_token_pe], dim=1)

        # batch, 197, 768 + batch, 197, 768 -> batch, 197, 768
        x = self.pos_drop(x + pos_embed)

        # 12次 batch, 197, 768
        x = self.blocks(x)

        # batch, 197, 768
        x = self.norm(x)

        # batch, 768
        return x[:, 0]

    def forward(self, x):
        # 整个Transformer Encoder = batch, 768
        x = self.forward_features(x)
        # 最后的MLP Header = batch, 768 -> 768 -> 1000 -> batch, 1000
        x = self.head(x)
        return x

    def freeze_backbone(self):
        backbone = [self.patch_embed, self.cls_token, self.pos_embed, self.pos_drop, self.blocks[:8]]
        for module in backbone:
            try:
                for param in module.parameters():
                    param.requires_grad = False
            except:
                module.requires_grad = False

    def Unfreeze_backbone(self):
        backbone = [self.patch_embed, self.cls_token, self.pos_embed, self.pos_drop, self.blocks[:8]]
        for module in backbone:
            try:
                for param in module.parameters():
                    param.requires_grad = True
            except:
                module.requires_grad = True
3. 分类网络
多层感知机,没啥好说的
总结
熟悉Vision Transformer其他变种的小伙伴们肯定在阅读的过程中也发现了Vision Transformer的一些缺陷,那么这些缺陷也是后面设计不同Vision Transformer变种的初衷。
关于Vision Transformer的发展现状
Vision Transformer发展现状 - 知乎 (zhihu.com)
关于Vision Transformer及其下游任务的各类论文与代码仓库:
https://github.com/GuanRunwei/Awesome-Vision-Transformer-Collection


 683
683

 被折叠的 条评论
为什么被折叠?
被折叠的 条评论
为什么被折叠?
 到【灌水乐园】发言


