


https://segmentfault.com/a/1190000004316731 配置解读
src/main/java/resources目录下
1.自定义属性
提供自定义属性的支持,这样我们就可以把一些常量配置在这里:
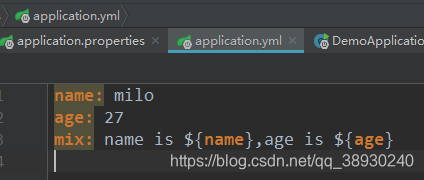
然后直接在要使用的地方通过注解@Value(value=”${config.name}”)就可以绑定到你想要的属性上面
package com.example.demo.controller;
import org.springframework.beans.factory.annotation.Value;
import org.springframework.stereotype.Controller;
import org.springframework.ui.Model;
import org.springframework.web.bind.annotation.RequestMapping;
import org.springframework.web.bind.annotation.ResponseBody;
@Controller
public class HelloController {
@Value("${name}")
private String name;
@Value("${age}")
private int age;
@Value("${mix}")
private String mix;
@RequestMapping("/hello")
public String hello(Model model){
model.addAttribute("name","thymeleaf");
return "hello" ;
}
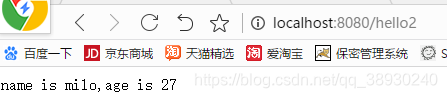
@RequestMapping("/hello2")
@ResponseBody
public String hello2(){
return mix;
}
}
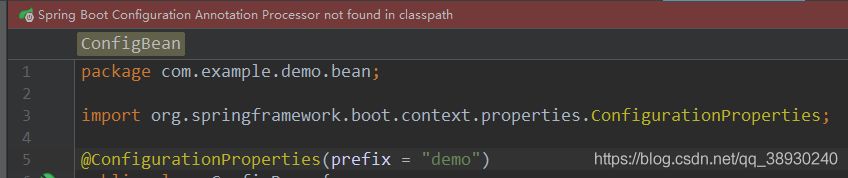
有时候属性太多了,一个个绑定到属性字段上太累,官方提倡绑定一个对象的bean,这里我们建一个ConfigBean.java类,顶部需要使用注解@ConfigurationProperties(prefix = “cxy”)来指明使用哪个
package com.example.demo.bean;

import org.springframework.boot.context.properties.ConfigurationProperties;

@ConfigurationProperties(prefix = "demo")
public class ConfigBean {
    private String name;
    private int age;

    public String getName() {
        return name;
    }

    public void setName(String name) {
        this.name = name;
    }

    public int getAge() {
        return age;
    }

    public void setAge(int age) {
        this.age = age;
    }
}
坑一:
出现spring boot Configuration Annotation Proessor not found in classpath的提示是在用了@ConfigurationProperties这个注解时,所以问题出现在ConfigurationProperties注解。
官方解决方案,Maven引入依赖
<dependency>
			<groupId> org.springframework.boot </groupId>
			<artifactId> spring-boot-configuration-processor </artifactId>
			<optional> true </optional>
		</dependency>
这里配置完还需要在spring Boot入口类加上@EnableConfigurationProperties并指明要加载哪个bean

最后在Controller中引入ConfigBean使用即可,如下:
package com.example.demo.controller;

import com.example.demo.bean.ConfigBean;
import org.springframework.beans.factory.annotation.Autowired;
import org.springframework.beans.factory.annotation.Value;
import org.springframework.stereotype.Controller;
import org.springframework.ui.Model;
import org.springframework.web.bind.annotation.RequestMapping;
import org.springframework.web.bind.annotation.ResponseBody;


@Controller
public class HelloController {

    @Autowired
    ConfigBean configBean;

    @RequestMapping("/hello2")
    @ResponseBody
    public String hello2(){
        return configBean.getMix();
    }

}
也可以用@RestController注解
其等价于@Controller+@ResponseBody的结合,使用这个注解的类里面的方法都以json格式输出。
2.使用自定义配置文件,同时用两个配置文件?
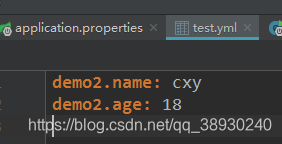
有时候我们不希望把所有配置都放在application.properties里面,这时候我们可以另外定义一个,这里我明取名为test.yml,路径跟也放在src/main/resources下面。
新建一个bean类,如下:
package com.example.demo.bean;

import org.springframework.boot.context.properties.ConfigurationProperties;
import org.springframework.context.annotation.Configuration;
import org.springframework.context.annotation.PropertySource;

@Configuration
@ConfigurationProperties(prefix = "demo2")
@PropertySource("classpath:test.yml")
public class ConfigTestBean {
    private String name;
    private int age;

    public String getName() {
        return name;
    }

    public void setName(String name) {
        this.name = name;
    }

    public int getAge() {
        return age;
    }

    public void setAge(int age) {
        this.age = age;
    }
}
添加@Configuration和@PropertySource(“classpath:test.yml”)后才可以才可以读取。
在主入口添加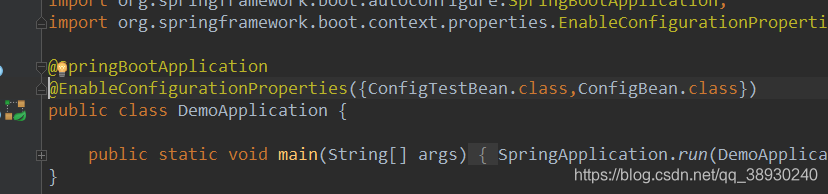
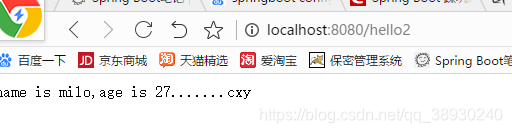
Controller就可以注入并同时使用了 。
package com.example.demo.controller;

import com.example.demo.bean.ConfigBean;
import com.example.demo.bean.ConfigTestBean;
import org.springframework.beans.factory.annotation.Autowired;
import org.springframework.beans.factory.annotation.Value;
import org.springframework.stereotype.Controller;
import org.springframework.ui.Model;
import org.springframework.web.bind.annotation.RequestMapping;
import org.springframework.web.bind.annotation.ResponseBody;


@Controller
public class HelloController {


@RequestMapping("/hello")
public String hello(Model model){

    model.addAttribute("name","thymeleaf");
    return "hello" ;
}
    @Autowired
    ConfigBean configBean;
    @Autowired
    ConfigTestBean configTestBean;

    @RequestMapping("/hello2")
    @ResponseBody
    public String hello2(){
        return configBean.getMix()+"......."+configTestBean.getName();
    }

}
3.随机值配置
配置文件中${random} 可以用来生成各种不同类型的随机值,从而简化了代码生成的麻烦,例如 生成 int 值、long 值或者 string 字符串。
4.外部配置-命令行参数配置(详情参考)
打成jar包的程序可以直接通过下面命令运行:
| |
可以以下命令修改tomcat端口号:
| |
可以看出,命令行中连续的两个减号--就是对application.properties中的属性值进行赋值的标识。
所以java -jar xx.jar --server.port=9090等价于在application.properties中添加属性server.port=9090。
如果你怕命令行有风险,可以使用SpringApplication.setAddCommandLineProperties(false)禁用它。
5.属性源
实际上,Spring Boot应用程序有多种设置途径,Spring Boot能从多重属性源获得属性,包括如下几种:
- 根目录下的开发工具全局设置属性(当开发工具激活时为
~/.spring-boot-devtools.properties)。 - 测试中的@TestPropertySource注解。
- 测试中的@SpringBootTest#properties注解特性。
- 命令行参数
SPRING_APPLICATION_JSON中的属性(环境变量或系统属性中的内联JSON嵌入)。ServletConfig初始化参数。ServletContext初始化参数。- java:comp/env里的JNDI属性
- JVM系统属性
- 操作系统环境变量
- 随机生成的带random.* 前缀的属性(在设置其他属性时,可以应用他们,比如${random.long})
- 应用程序以外的application.properties或者appliaction.yml文件
- 打包在应用程序内的application.properties或者appliaction.yml文件
- 通过@PropertySource标注的属性源
- 默认属性(通过
SpringApplication.setDefaultProperties指定).
这里列表按组优先级排序,也就是说,任何在高优先级属性源里设置的属性都会覆盖低优先级的相同属性,列如我们上面提到的命令行属性就覆盖了application.properties的属性。
6.配置文件的优先级
application.yml和appilcation.properties可以放在以下4个位置
- 外置,在相对于应用程序运行目录的/congfig子目录里。
- 外置,在应用程序运行的目录里
- 内置,在config包内
- 内置,在Classpath根目录
所以,这种情况下,src/main/resources/config下application.properties覆盖src/main/resources下application.properties中相同的属性,如图:

此外,如果你在相同优先级位置同时有application.properties和application.yml,那么application.yml里面的属性就会覆盖application.properties里的属性。这个不用深究,一般用官方推荐的yml文件。
7.Profile-多环境配置
当应用程序需要部署到不同运行环境时,一些配置细节通常会有所不同,最简单的比如日志,生产日志会将日志级别设置为WARN或更高级别,并将日志写入日志文件,而开发的时候需要日志级别为DEBUG,日志输出到控制台即可。
如果按照以前的做法,就是每次发布的时候替换掉配置文件,这样太麻烦了,Spring Boot的Profile就给我们提供了解决方案,命令带上参数就搞定。
这里我们来模拟一下,只是简单的修改端口来测试
在Spring Boot中多环境配置文件名需要满足application-{profile}.properties的格式,其中{profile}对应你的环境标识,比如:
- application-dev.properties:开发环境
- application-prod.properties:生产环境
想要使用对应的环境,只需要在application.properties中使用spring.profiles.active属性来设置,值对应上面提到的{profile},这里就是指dev、prod这2个。spring.profiles.include进行叠加也是可以的
spring.profiles.active: xx
spring.profiles.include: xx,yy参考;常用属性汇总


 4452
4452


 被折叠的 条评论
为什么被折叠?
被折叠的 条评论
为什么被折叠?
 到【灌水乐园】发言


