


文章目录
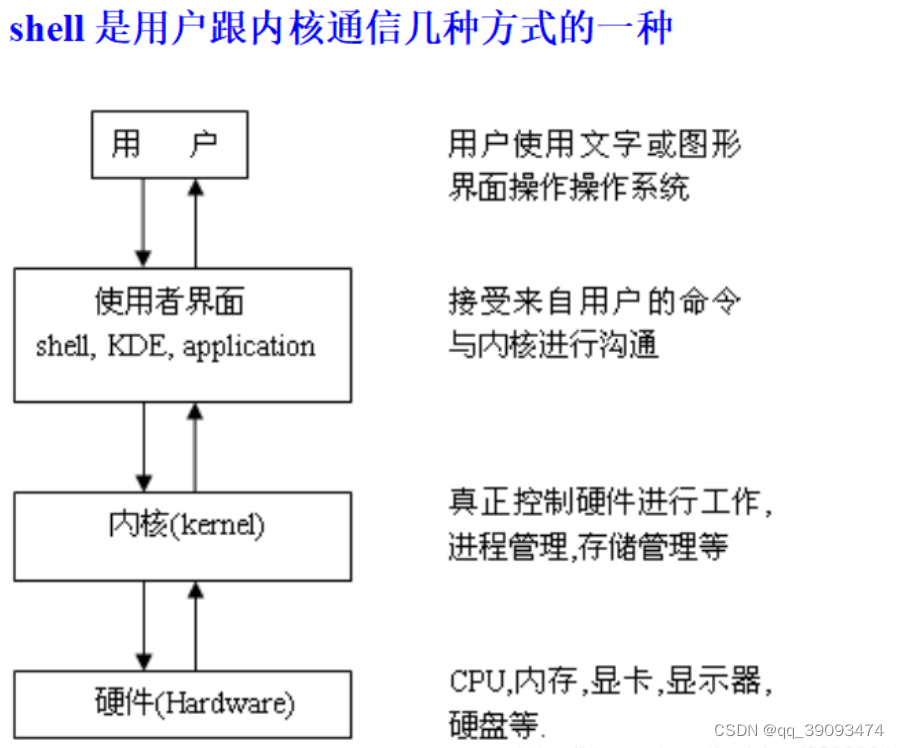
1. shell的概述
1.1 什么是shell
shell是一种脚本语言。
脚本:本质是一种文件,文件里面存放的是特定格式的指令,系统可以脚本解释器翻译或者解析指令并执行(它不需要编译)。
shell既是应用程序,又是一种脚本语言(应用程序 解析 脚本语言)。
shell命令解析器:
系统提供的shell命令解析器 :
sh ash bash
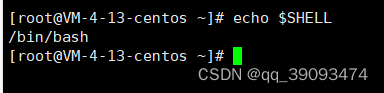
查看自己linux系统的默认解析:echo $SHELL
1.2 shell的作用
shell的作用是:
- 解释执行用户输入的命令或程序等。
- 用户输入一条命令,
shell就解释一条。 - 键盘输入命令,Linux给与响应的方式,称之为交互式。
- 在
shell脚本里定义多条Linux命令以及循环控制语句,然后将这些命令一次性执行完毕,执行脚本的方式称之为,非交互式方式
windows中存在*.bat批处理脚本。- linux中存在
*.sh脚本文件。
shell脚本是一种脚本语言,我们只需使用任意文本编辑器,按照语法编写相应程序,增加可执行权限,即可在安装shell命令解释器的环境下执行
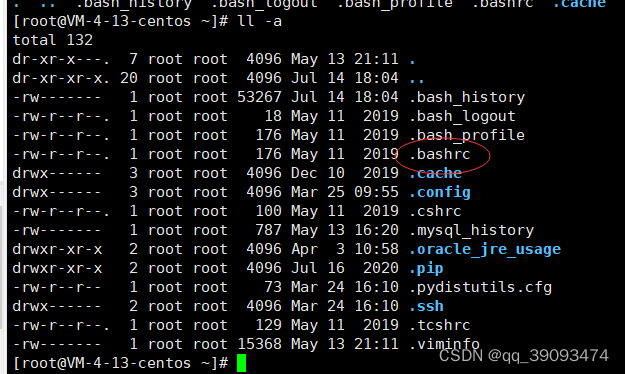
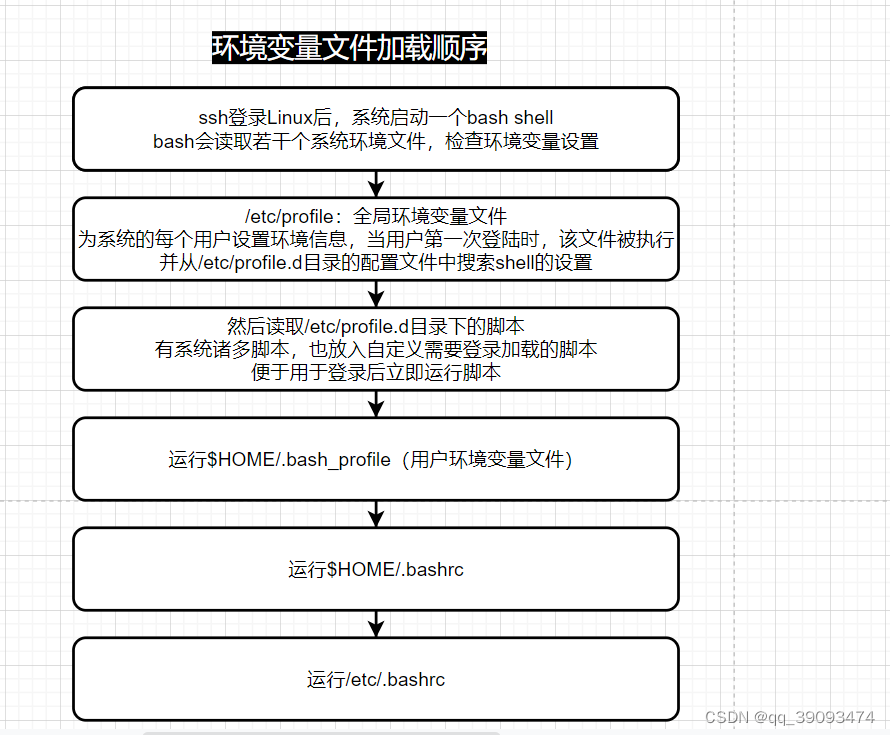
2. 脚本的调用形式
打开终端时系统自动调用:/etc/profile 或 ~/.bashrc
/etc/profile
此文件为系统的每个用户设置环境信息,当用户第一次登陆时,该文件被执行,系统的公共环境变量在这里设置。
开始自启动的程序,一般也在这里设置
~/.bashrc
用户自己添加的目录中的.bashrc。
登录时会自动调用,打开任意终端时也会自动调用。
这个文件一般设置与个人用户有关的环境变量,如交叉编译器的路径等等。
用户手动调用:用户实现的脚本。
sh 脚本名称
3. shell语法初识
3.1 Shebang
在计算机程序中,shebang指的是出现在文本文件的第一行前两个字符#!。
在Unix系统中,程序会分析shebang后面的内容,作为解释器的内容。例如
- 以
#!/bin/bash开头的文件,程序在执行的时候会调用/bin/bash,也就是bash解释器。 - 以
#!/usr/bin/python开头的文件,代表指定python解释器去执行。 - 以
#!/usr/bin/env解释器名称,是一种在不同平台上都能正确找到解释器的办法。
注意事项:
- 如果脚本未指定
shebang,脚本执行的时候,默认用当前shell去解释脚本。即$SHELL。 - 如果
shebang指定了可执行的解释器,如/bin/bash,/usr/bin/python,脚本在执行时,文件名会作为参数传递给解释器。 - 如果
#!指定的解释程序没有可执行权限,则会报错bad interpreter:Permission denied。 - 如果
#!指定的解释程序不是一个可执行文件,那么指定的解释程序会被忽略,转而交给当前的SHELL去执行这个脚本。 - 如果
#!指定的解释程序不存在,那么会报错bad interpreter:No such file or directory。 #!之后的解释程序,需要写其绝对路径(如/bin/bash),它是不会自动到$PATH中寻找解释器的。- 如果你使用
bash test.sh这样的命令来执行脚本,那么#!这一行将会被忽略掉,解释器当然是用命令行中显示指定的bash。
单个
"#"号代表注释当前行,相当于java中的//单行注释。
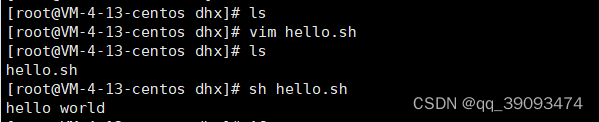
3.2 编写第一个shell脚本
3.2.1 编写脚本文件
使用vi 文件名来打开文件
vi hello.sh
编写脚本
#!/bin/bash
# 第一个shell脚本
echo "hello shell"
3.2.2 加上可执行权限
使用chmod +x xxxx.sh添加权限。
chmod +x hello.sh
3.2.3 运行

我们发现有三种执行方式 ( bash xxx.sh ./xxx.sh . xxx.sh)
三种执行方式的不同点:
- bash xxx.sh或sh xxx.sh:指明先用
bash解析器解析,如果bash不存在,才会使用默认解析器。一般用于文件本身没有权限执行,没x权限或者脚本未指定shebang。 - ./xxx.sh:先按照文件中
#!指定的解析器解析,如果#!指定指定的解析器不存在 才会使用系统默认的解析器。需要文件含有x权限。 - source . xxx.sh 或. xxx.sh:直接使用默认解析器解析(不会执行第一行的
#!指定的解析器)但是第一行还是要写的。source代表.也就是执行的含义。
三种执行情况:
打开终端就会有个解释器,我们称为当前解释器。
我们指定解析器的时候(使用 ./xxx.sh 或 bash xxx.sh)时会创建一个子shell解析 脚本
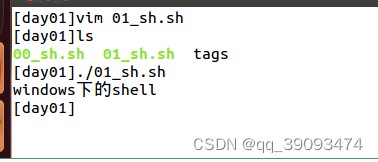
3.2.4 Windows和Linux 脚本的区别
执行结果:
那么如何解决呢?
将windows文件 转换成 unix文件
- 方法一:
dos2unix如果没有该插件 需要安装
sudo apt-get install dos2unix
dos2unix shell脚本
- 方法二:需要用
vi打开脚本,在最后一行模式下执行
:set ff=unix
4. bash是什么?
bash是一个命令处理器,运行在文本窗口中,并能执行用户直接输入的命令。bash还能从文件中读取Linux命令,称之为脚本。bash支持通配符,管道,命令替换,条件判断等逻辑控制语句。
bash有诸多方便的功能,有助于运维人员提升工作效率。
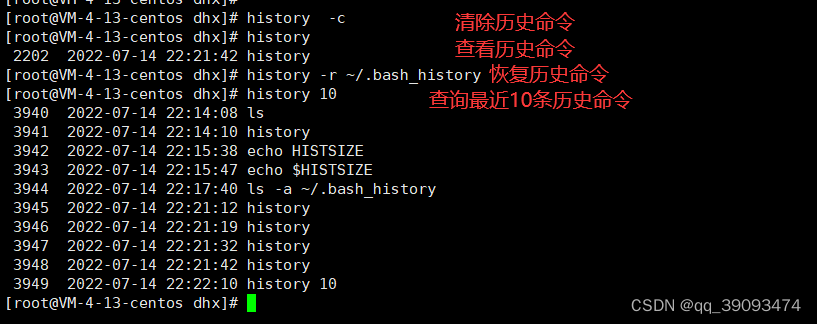
命令历史
Shell会保留其会话中用户提交执行的命令。
查看历史命令记录,注意包含文件中和内存中的历史记录。
history

shell进程可保留的命令历史的条数
echo $HISTSIZE

存放历史命令的文件
ls -a ~/.bash_history

history命令的其他用法
history  #命令以及参数
-c  #清空内存中历史命令
-r  #从文件中恢复历史命令
数字 #显示最近n条命令
5. 变量
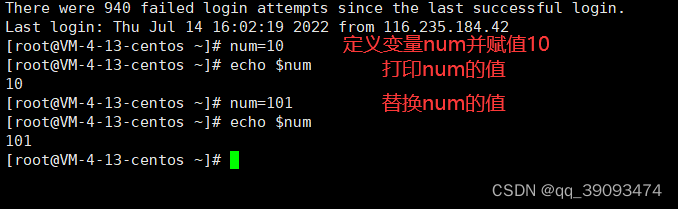
5.1 定义变量
定义变量:变量名=变量值
# 变量名为 num,值为 10
num=10
bash变量是弱类型,无需声明变量类型,是将声明和值同时进行。bash默认把所有变量都认为是字符串,
5.2 变量引用或替换
变量引用:$变量名或者${变量名}
$num #${num} 可以省略花括号
变量替换:变量名=新值
num=101
运行结果:
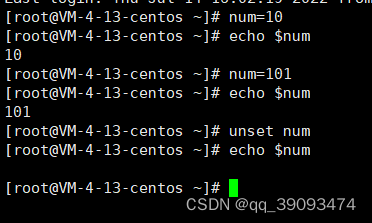
清除变量值:unset 变量名
unset num
运行结果:
5.3 变量名规则和作用域
变量名规则
- 名称定义要做的见名知意,不得引用保留关键字(help检查保留字)。
- 只能包含数字,字母,下划线。
- 不能以数字开头(
2_num=10错误num_2=20正确)。 - 不能用标点符号。
- 变量名严格区分大小写。
- 等号两边不能直接接空格符(变量与值之间不能有空格),若变量中本身就包含了空格,则整个字符串都要用双引号或单引号括起来。
双引号和单引号的区别
- 可以解析变量的值。
- 不能解析变量的值。
#! /bin/bash
num=100
echo "num=$num" #  $num当成变量的值处理
echo 'num=$num' #  $num当成字符串处理
运行结果:

如果想在PATH变量中 追加一个路径写法如下:(重要!!!!)
export PATH=$PATH:/需要添加的路径
作用域
- 本地变量:只针对当前的shell进程。

- 环境变量:也称为全局变量,针对当前
shell以及其任意子进程。环境变量也分自定义和内置两种环境变量。

- 局部变量:针对在
shell函数或者是shell脚本定义。
5.4 从键盘读取值read
read命令是内置命令,参数如下
-p:设置提示信息。-t:等待用户输入超时,timeout
5.4.1 从键盘读取一个值
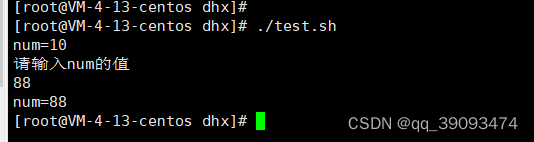
#! /bin/bash
num=10
echo "num=$num" #  $num当成变量的值处理
echo "请输入num的值"
read num
echo "num=$num"
运行结果
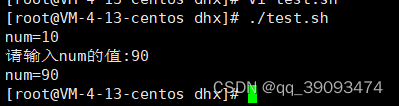
在一行上显示和添加提示 需要加上-p,来使其在同一行。
num=10
echo "num=$num"
read -p "请输入num的值:" num
echo "num=$num"
运行结果
5.4.2 从键盘读取多个值
读取多个值:read 变量1 变量2
#!/bin/bash
num=10
echo "num=$num" #  $num当成变量的值处理
read  -p  "请输入num的值:" num
echo "num=$num"

echo "请输入2个值"
read data1 data2
echo "data1=$data1"
echo "data2=$data2"

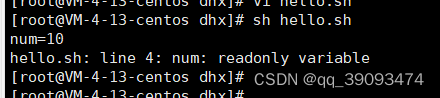
5.4 只读变量
使用readonly修饰变量,这个变量只能读不能修改
#!/bin/bash
readonly num=10 #只读变量
echo "num=$num"
num=200 #修改只读变量会报错
echo "num=$num"
5.5 查看环境变量
环境变量一般指的是用export内置命令导出的变量,用于定义shell的运行环境,保证shell命令的正常运行。
shell可以通过环境变量确定登录的用户名,PATH路径,文件系统等各种应用。
环境变量可以在命令中临时创建,但是用户退出shell终端,变量即丢失,如要永久生效,需要修改环境变量配置文件。
- 用户个人配置文件
~/.bash_profile,~/.bashrc远程登录用户特有文件。 - 全局配置文件
/etc/profile,/etc/bashrc,且系统建议最好创建在/etc/profile.d,而非直接修改主文件,修改全局配置文件,影响所有登录系统的用户
检查系统环境变量的命令:
- set:输出所有变量,包括全部变量,局部变量。
- env:只显示全局变量。
- declare:输出所有的变量,如同上面的
set。 - export:显示和设置环境变量值。
查看环境变量:env
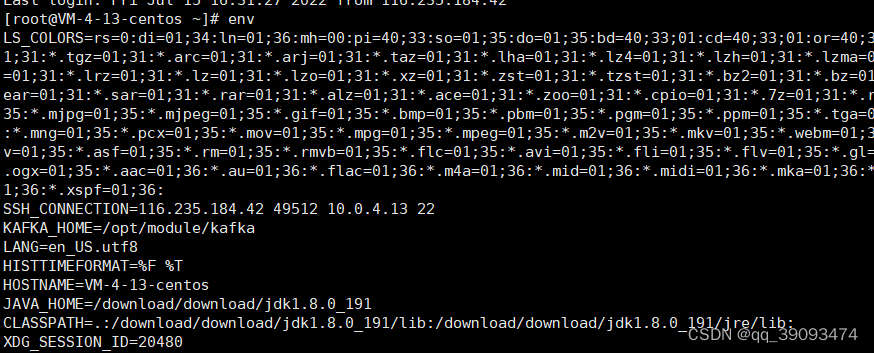
环境变量初始化和加载顺序
导出环境变量 作用:(让其他shell脚本识别该变量,设为全局变量)
source命令用法:source 脚本文件
source FileName
- 作用:在当前
bash环境下读取并执行FileName中的命令。 - 注:该命令通常用命令“
.”来替代。如:source .bash_rc与 ..bash_rc是等效的。
注意:source命令与shell scripts的区别是:
source在当前bash环境下执行命令,而scripts是启动一个子shell来执行命令。- 这样如果把设置环境变量(或
alias等等)的命令写进scripts中,就只会影响子shell,无法改变当前的BASH,所以通过文件(命令列)设置环境变量时,要用source命令。
test_env.sh
#!/bin/bash
expor DATA=250
用source 使文件生效并使用env查看环境变量
source test_env.sh
env
使用 env可以查看到环境变量中已经有 DATA
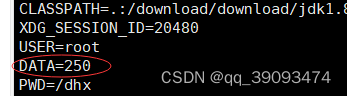
可以在终端直接中读取:
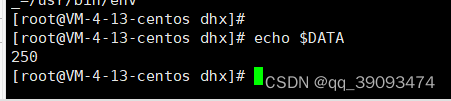
在其他shell脚本读取
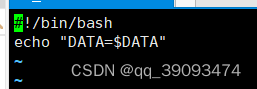
运行结果

6. 特殊变量
6.1 特殊参数变量
shell的特殊变量,用在如脚本,函数传递参数使用,有如下特殊的,位置参数变量。是shell直接提供无需定义的变量。
- $0:获取
shell脚本文件名,以及脚本路径。 - $n:获取
shell脚本的第n个参数,如$1,$2,$3,大于9则需要写$10,参数用空格隔开。 - $#:获取执行的
shell脚本后面的参数总个数。 $*:获取shell脚本所有参数,不加引号等同于$@作用,加上引号" $*"作用是:接收所有参数为单个字符串,例如"$1 $2 $3"。- $@:不加引号,效果同上,加上引号,是接收所有参数为独立字符串,如
"$1" "$2" "$3"。空格保留。
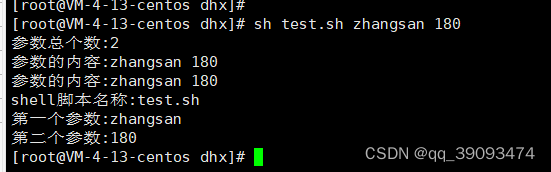
测试代码:
#!/bin/bash
echo "参数总个数:$#"
echo "参数的内容:$*"
echo "参数的内容:$@"
echo "shell脚本名称:$0"

echo "第一个参数:$1"
echo "第二个参数:$2"
运行结果:
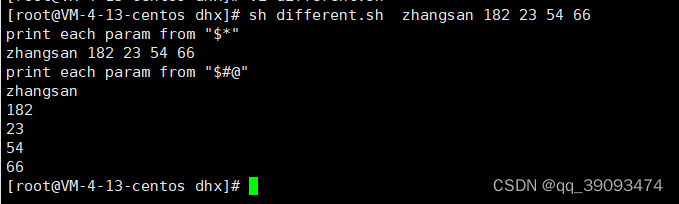
$@ 和 $*的区别:
-
$@和$*都表示传递给脚本或函数的所有参数。 -
当
$@和$*不被双引号" "包围时,它们之间没有任何区别,都是将接收到的每一个参数看作一份数据,彼此之间用空格来分隔。 -
但是当它们被双引号
" "包含时,就会有区别了$*:会将所有的参数从整体上看作一份数据,而不是把每个参数看作一份数据。$@:仍然将每个参数都看作一份数据,彼此之间是独立的。
如果使用echo输出,那么看不出什么区别,但是如果使用for循环就可以看出二者的区别。
#!/bin/bash
echo "print each param from \"\$*\""
for var  in  "$*"
do
   echo "$var"
done

echo "print each param from \"\$#@\""
for var  in "$@"
do
   echo "$var"
done
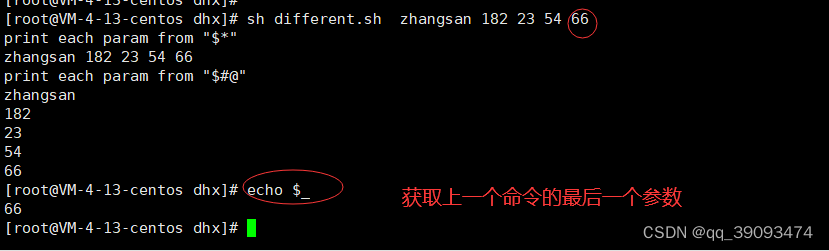
6.2 特殊状态变量
- $?:上一次命令执行状态返回值,
0正确,非0失败(用于检查上一个命令执行是否准确,在Linux中,命令退出状态为0表示该命令正常执行,任何非0值表示命令出错)。 - $$:当前
shell脚本的进程号(一般用于临时文件的名称,保证临时文件不重复)。 - $!:上一次后台进程的
PID - $_:再次之前执行的命令,最后一个参数
测试代码
#!/bin/bash
readonly num=100
num=20
echo "num=20的结果是:$?"
echo "进程号:$$"
echo "上一次后台进程PID:$!"
运行结果:

6.3 脚本标量
脚本标量的特殊用法:
- " " (双引号):包含的变量会被解释。
- ’ '(单引号):包含的变量会被当做字符串结束。
- `` (数字键
1左面的反引号):反引号中的内容作为系统命令,并执行其内容。可以替换输出为一个变量。 - \ (反斜杠):转义字符,同
c语言\n \t \r \a等,echo命令需加-e转义。 - (命令序列):由子
shell来完成,不影响当前shell中的变量。 - {命令序列}:在当前
shell中执行,会影响当前变量。
6.3.1 ``的用法
#!/bin/bash
echo "today is `date`"
ls

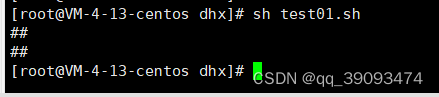
6.3.2 \ 的用法
#!/bin/bash
echo "##\n##"

加
-e转义 才起换行作用
#!/bin/bash
echo -e  "##\n##"
6.3.3 (命令序列)的用法
()由子shell完成
#!/bin/bash
num=10
( #由子shell完成 不会影响当前shell的值
        num=100
        echo "()里面num=$num"
)
echo "当前num=$num"

6.3.4 {命令序列}的用法
{}由当前的shell执行
#!/bin/bash
num=10
{ #由子shell完成 不会影响当前shell的值
	num=100
	echo "{}里面num=$num"
}
echo "当前num=$num"

6.4 内置shell命令
-
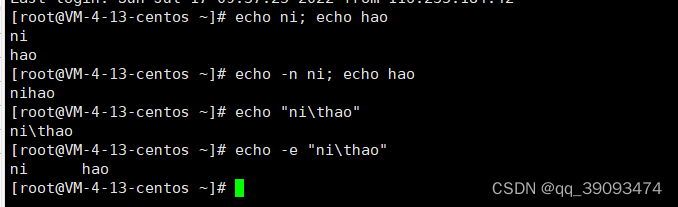
echo命令 :输出字符串(参数-n:不换行输出,-e:解析字符串中的特殊字符)。
-
eval命令:执行多个命令

-
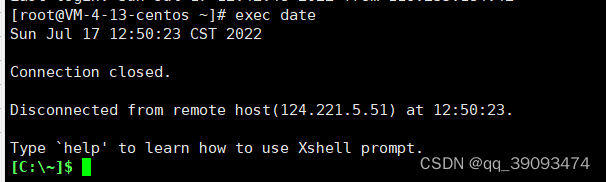
exec命令:不创建子进程,执行后续命令,且执行完毕后,自动exit。
7. 变量的扩展
7.1 判断变量是否存在
- 语法一:
${变量名:-值}
# 如果num存在,整个表达式的值为num,否则为val
${num:-val]
测试代码
#!/bin/bash
# ${num:-val} 如果num存在,那么整个表达式的值为num,否则为val
echo ${num:-100} #100
num=200
echo ${num:-100} #200
运行结果

- 语法二:
${变量名:=值}
# 如果num存在,整个表达式的值为num,否则为val,同时将num的值赋值为val
${num:=val]
测试代码:
#!/bin/bash
# ${num:=val} 如果num存在,那么整个表达式的值为num,否则为val,同时将num的值赋值为val
echo ${num:=100} #100
echo ”num=${num}“ #100
运行结果:

- 语法三:
${变量名:?值}
# 如果num存在,整个表达式的值为num,否则为val当做stderr输出
#用于变量设置为空时导致错误时,返回的错误信息
${num:?val]
测试代码:
#!/bin/bahs
num=0
echo ${num:?100}
echo ${status:?error}
运行结果:
- 语法四:
${变量名:+值}
# 如果num存在,整个表达式的值为val,否则什么都不做
${num:+val]
测试代码:
#!/bin/bahs
num=0
echo ${num:+100}
echo ${status:+success}
运行结果:

总结:
- ${变量名:-值} :判断变量如果值为空,就返回后面的字符信息。
- ${变量名:=值} :如果变量为空,后面的值赋值给接收者,以及变量本身。
- ${变量名:?值} :如果变量为空,主动的抛出错误异常信息。
- ${变量名:+值} :如果变量为空,什么也不做。否则字符返回给接收者。
7.2 字符串的操作
- ${变量名}:返回变量的值。
- ${#变量名}:返回变量长度,字符长度。
- ${变量名:start}:返回变量
start数值之后的字符,且包含start的数字。 - ${变量名:start:length}:提取
start之后的length限制的字符。 - ${变量名#word}:从变量开头删除最短匹配的word
字符串。 - ${变量名##word}:从变量开头删除最长匹配的
word字符串。 - ${变量名%word}:从变量
结尾删除最短匹配的word字符串。 - ${变量名%%word}:从变量
结尾删除最长匹配的word字符串。 - ${变量名/pattern/string}:用
string代替变量中第一个匹配的pattern。 - ${变量名//pattern/string}:用
string代替变量中所有匹配的pattern。
测试代码
#!/bin/bash
str=$1
echo "输入的str的值:$str"

#测量字符串的长度${#str}
echo "str的长度为:${#str}"

#从下标2为位置提取${str:2}
echo "str为:${str:2}"

#从下标2为位置提取长度为6个子节${str:2:6}
echo "str为:${str:2:6}"


# ${srt/old/new} 用new替换str中出现的第一个old
echo "str为:${str/:/#}"


# ${srt//old/new} 用new替换str中出现的所有的old
echo "str为:${str//:/#}"
运行结果:

指定字符内容截取:
- a*c :匹配开头为
a,中间任意个字符,结尾为c的字符串。 - a*C :匹配开头为
a,中间任意个字符,结尾为C的字符串。
[root@VM-4-13-centos dhx]# name="abcABC123ABCabc"
[root@VM-4-13-centos dhx]#
[root@VM-4-13-centos dhx]# #从头匹配最短字符删除
[root@VM-4-13-centos dhx]# echo ${name#a*c}
ABC123ABCabc
[root@VM-4-13-centos dhx]# #从头匹配字符删除最长的
[root@VM-4-13-centos dhx]# echo ${name##a*c}

[root@VM-4-13-centos dhx]#
[root@VM-4-13-centos dhx]# echo $name
abcABC123ABCabc
[root@VM-4-13-centos dhx]# #从结尾匹配最短字符删除
[root@VM-4-13-centos dhx]# echo ${name%a*c}
abcABC123ABC
[root@VM-4-13-centos dhx]# #从结尾匹配最长字符删除
[root@VM-4-13-centos dhx]# echo ${name%%a*c}

[root@VM-4-13-centos dhx]#
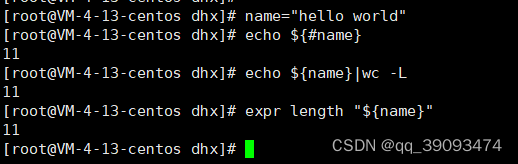
7.2.1 统计字符串长度的其他命令
[root@VM-4-13-centos dhx]# echo ${#name} #统计name的长度
11
[root@VM-4-13-centos dhx]# echo ${name}|wc -L #统计name的长度
11
[root@VM-4-13-centos dhx]# expr length "${name}" #统计name的长度
11
[root@VM-4-13-centos dhx]# echo ${name}|wc -l #统计name的行数
1
[root@VM-4-13-centos dhx]#
这么多命令,那么那个耗费的时间最短呢?
答案是${#name},接下来使用time和for命令来测试
# 结合time命令,${#name} 计算时间的12s
[root@VM-4-13-centos dhx]# time for n in {1..10000};do  char=`seq -s "dhx" 100`;echo ${#name} &>/dev/null;done

real	0m12.254s   #实际运行时间
user	0m4.374s    #用户态执行的时间
sys	0m8.102s		#内核态执行的时间

#使用 wc -L 计算时间的24s
[root@VM-4-13-centos dhx]# time for n in {1..10000};do  char=`seq -s "dhx" 100`;echo ${name}|wc -L &>/dev/null;done

real	0m24.996s
user	0m11.030s
sys	0m18.626s

#expr命令的length函数统计
[root@VM-4-13-centos dhx]# time for n in {1..10000};do  char=`seq -s "dhx" 100`;expr length  "${name}" &>/dev/null;done

real	0m22.744s
user	0m8.674s
sys	0m14.534s
综上所述,可以看出${#name}执行时间最短。
7.2.2 批量修改文件名
准备测试数据
[root@VM-4-13-centos ~]# mkdir sub_str
[root@VM-4-13-centos ~]# cd sub_str/
[root@VM-4-13-centos sub_str]# ls
[root@VM-4-13-centos sub_str]# touch test_{1..5}_finished.jpg
[root@VM-4-13-centos sub_str]# touch test_{1..5}_finished.png
[root@VM-4-13-centos sub_str]# ls -l
total 0
-rw-r--r-- 1 root root 0 Jul 17 20:47 test_1_finished.jpg
-rw-r--r-- 1 root root 0 Jul 17 20:48 test_1_finished.png
-rw-r--r-- 1 root root 0 Jul 17 20:47 test_2_finished.jpg
-rw-r--r-- 1 root root 0 Jul 17 20:48 test_2_finished.png
-rw-r--r-- 1 root root 0 Jul 17 20:47 test_3_finished.jpg
-rw-r--r-- 1 root root 0 Jul 17 20:48 test_3_finished.png
-rw-r--r-- 1 root root 0 Jul 17 20:47 test_4_finished.jpg
-rw-r--r-- 1 root root 0 Jul 17 20:48 test_4_finished.png
-rw-r--r-- 1 root root 0 Jul 17 20:47 test_5_finished.jpg
-rw-r--r-- 1 root root 0 Jul 17 20:48 test_5_finished.png
现在有一个需求:去除所有文件的
_finished字符。
解题思路:
- 第一种:使用
mv命令,然后一个个修改文件名(耗时耗力,文件少还行,几千几万个文件怎么手动修改呢。不推荐)。
[root@VM-4-13-centos sub_str]# mv test_1_finished.jpg  test_1.jpg
[root@VM-4-13-centos sub_str]# ll
total 0
-rw-r--r-- 1 root root 0 Jul 17 20:48 test_1_finished.png
-rw-r--r-- 1 root root 0 Jul 17 20:47 test_1.jpg
-rw-r--r-- 1 root root 0 Jul 17 20:47 test_2_finished.jpg
-rw-r--r-- 1 root root 0 Jul 17 20:48 test_2_finished.png
-rw-r--r-- 1 root root 0 Jul 17 20:47 test_3_finished.jpg
-rw-r--r-- 1 root root 0 Jul 17 20:48 test_3_finished.png
-rw-r--r-- 1 root root 0 Jul 17 20:47 test_4_finished.jpg
-rw-r--r-- 1 root root 0 Jul 17 20:48 test_4_finished.png
-rw-r--r-- 1 root root 0 Jul 17 20:47 test_5_finished.jpg
-rw-r--r-- 1 root root 0 Jul 17 20:48 test_5_finished.png
- 第二种:使用上面学过的变量字串功能实现,然后一个个修改文件名(这个和第一种差不多,只不过修改的文件名不需要手写,而是通过字符串截取来完成)。
[root@VM-4-13-centos sub_str]# f=test_1_finished.png
[root@VM-4-13-centos sub_str]# echo $f
test_1_finished.png
[root@VM-4-13-centos sub_str]# echo ${f//_finished/}
test_1.png
[root@VM-4-13-centos sub_str]#
- 利用反引号功能的功能修改文件名
[root@VM-4-13-centos sub_str]# mv $f `echo ${f/_finished/}`
[root@VM-4-13-centos sub_str]# ll
total 0
-rw-r--r-- 1 root root 0 Jul 17 20:47 test_1.jpg
-rw-r--r-- 1 root root 0 Jul 17 20:48 test_1.png
-rw-r--r-- 1 root root 0 Jul 17 20:47 test_2_finished.jpg
-rw-r--r-- 1 root root 0 Jul 17 20:48 test_2_finished.png
-rw-r--r-- 1 root root 0 Jul 17 20:47 test_3_finished.jpg
-rw-r--r-- 1 root root 0 Jul 17 20:48 test_3_finished.png
-rw-r--r-- 1 root root 0 Jul 17 20:47 test_4_finished.jpg
-rw-r--r-- 1 root root 0 Jul 17 20:48 test_4_finished.png
-rw-r--r-- 1 root root 0 Jul 17 20:47 test_5_finished.jpg
-rw-r--r-- 1 root root 0 Jul 17 20:48 test_5_finished.png
[root@VM-4-13-centos sub_str]#
- 第三种:使用shell脚本实现
[root@VM-4-13-centos sub_str]# for fileName in `ls *fin*jpg`;do mv $fileName `echo ${fileName/_finished/}`;done
[root@VM-4-13-centos sub_str]# ll
total 0
-rw-r--r-- 1 root root 0 Jul 18 11:14 test_1_finished.png
-rw-r--r-- 1 root root 0 Jul 18 11:13 test_1.jpg
-rw-r--r-- 1 root root 0 Jul 18 11:14 test_2_finished.png
-rw-r--r-- 1 root root 0 Jul 18 11:13 test_2.jpg
-rw-r--r-- 1 root root 0 Jul 18 11:14 test_3_finished.png
-rw-r--r-- 1 root root 0 Jul 18 11:13 test_3.jpg
-rw-r--r-- 1 root root 0 Jul 18 11:14 test_4_finished.png
-rw-r--r-- 1 root root 0 Jul 18 11:13 test_4.jpg
-rw-r--r-- 1 root root 0 Jul 18 11:14 test_5_finished.png
-rw-r--r-- 1 root root 0 Jul 18 11:13 test_5.jpg
[root@VM-4-13-centos sub_str]#
8. shell内置和外置命令
什么是内置命令,什么是外置命令呢?
- 内置命令:在系统启动时就加载入内存,常驻内存,执行效率更高,但是占用资源(
cd就是一个内置命令)。 - 外置命令:系统需要从硬盘中读取程序文件,再读入内存加载。
外置命令,也称之为,自己单独下载的文件系统命令,处于bash,shell之外的程序。一般存在与以下路径
/bin
/usr/bin
/sbin
/usr/sbin

[root@VM-4-13-centos ~]# which cd
/usr/bin/cd
[root@VM-4-13-centos ~]#
8.1 如何判断是内置命令还是外置命令
通过
linux的type命令,验证是否是内置命令,还是外置命令。
8.1.1 外置命令
外置命令的特点是:一定会开启子进程进行执行。
[root@VM-4-13-centos ~]# type cd
cd is a shell builtin
[root@VM-4-13-centos ~]# type java
java is /download/download/jdk1.8.0_191/bin/java
[root@VM-4-13-centos ~]#
[root@VM-4-13-centos ~]# ps -f --forest
UID          PID    PPID  C STIME TTY          TIME CMD
root     3810092 3810091  0 14:58 pts/1    00:00:00 -bash
root     3810742 3810092  0 1
8.1.2 内置命令
内置命令的特点:不会产生子进程去执行。
注意:内置命令和
shell是为一体的,是shell的一部分,不需要单独去读取某个文件,系统启动后,就执行在内存中。
可以使用compgen -b查看所有内置命令。
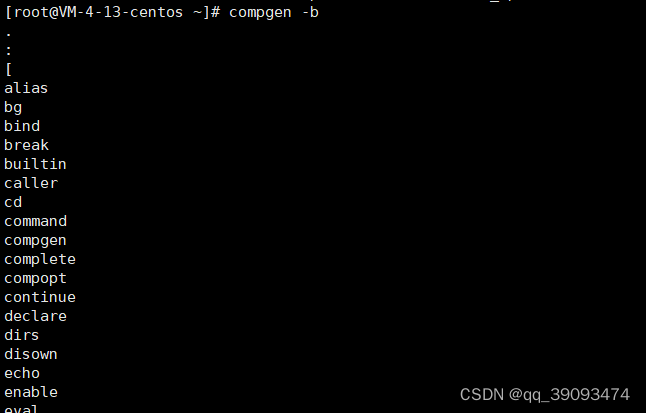
如果不放心,还可以使用type命令验证。
[root@VM-4-13-centos ~]# type wait
wait is a shell builtin
[root@VM-4-13-centos ~]# type shopt
shopt is a shell builtin
[root@VM-4-13-centos ~]#
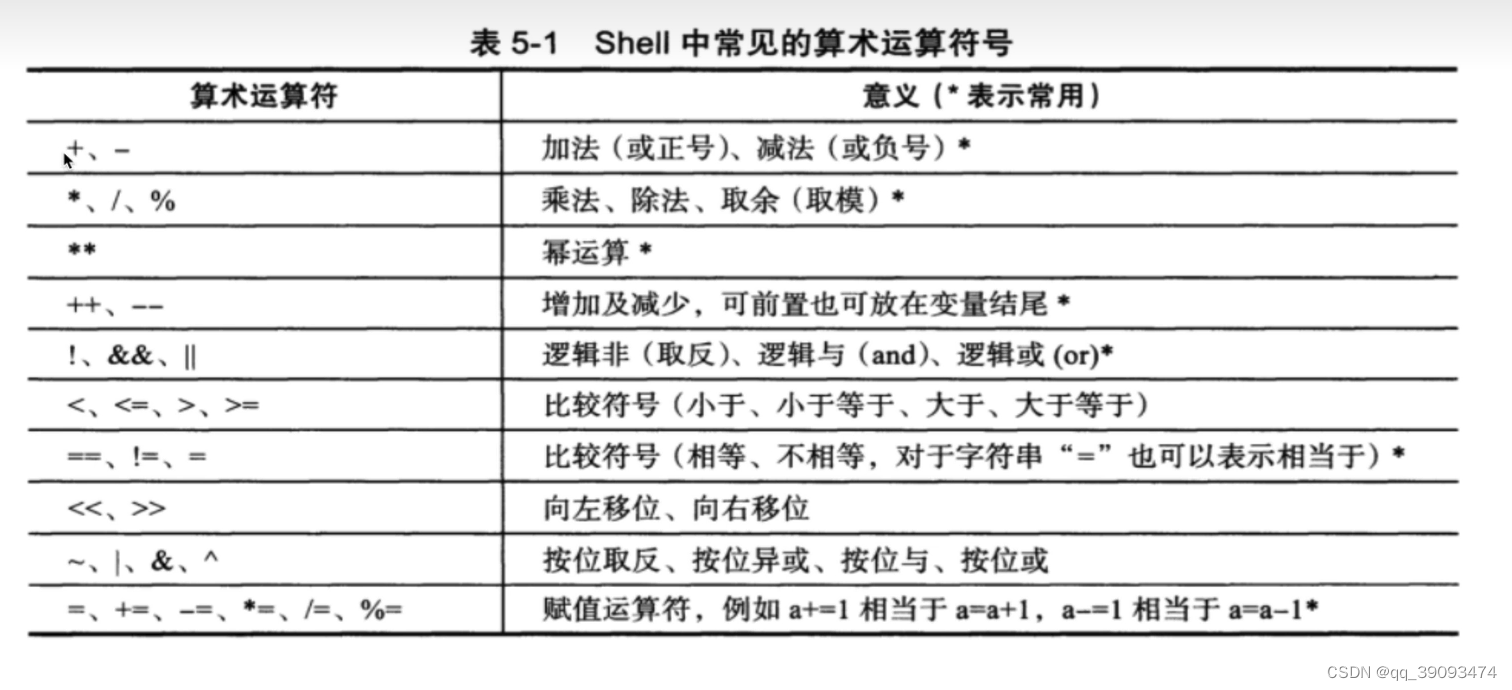
9. shell数值计算
shell中常见的算术运算符号
shell中常见的算术运算命令
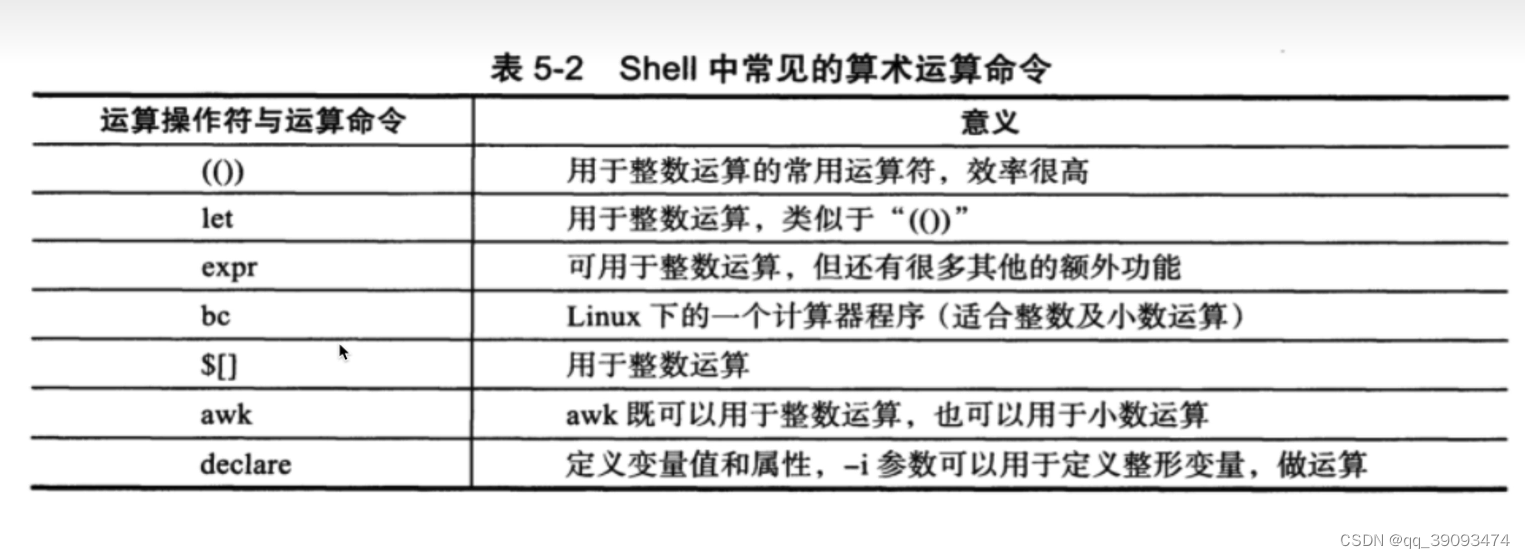
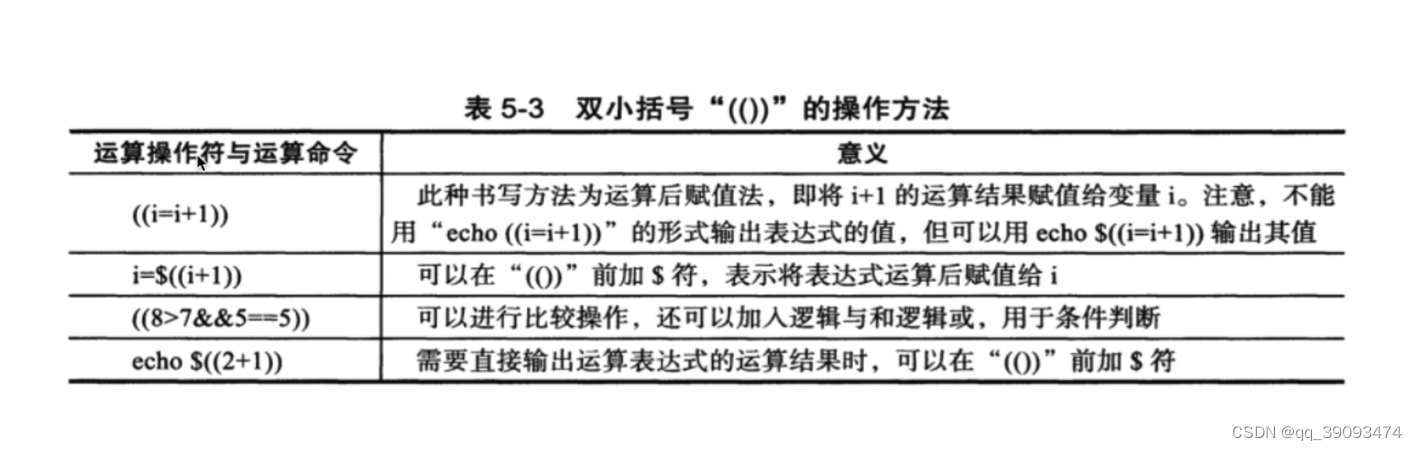
9.1 双小括号(())
&&(逻辑与)的用法
# 有关逻辑运算,真和假的区别,真为1,假为0
[root@VM-4-13-centos ~]# echo $((3>5))
0
[root@VM-4-13-centos ~]# echo $((3<5))
1

# 逻辑与 &&  符号两边都为真,结果才能为真,值才能为1,否则为0
[root@VM-4-13-centos ~]# echo $((3<5&&8>5 ))
1
[root@VM-4-13-centos ~]# echo $((3<5&&8<5 ))
0
[root@VM-4-13-centos ~]# echo $((3>5&&8>5 ))
0
(()) (双小括号)的用法
# 加减乘除
[root@VM-4-13-centos ~]# echo $((3+5))
8
[root@VM-4-13-centos ~]# echo $((3-5))
-2
[root@VM-4-13-centos ~]# echo $((3*5))
15
[root@VM-4-13-centos ~]# echo $((10/3))  #除法取商
3
[root@VM-4-13-centos ~]# echo $((2**3))  #幂运算
8
[root@VM-4-13-centos ~]# echo $((7%4))  #取模,取得余数
3
[root@VM-4-13-centos ~]#
注意点:
shell的一些基础命令,只支持整数的运算,小数的计算需要如bc这样的命令才支持。不然就会像下面一样报错。
[root@VM-4-13-centos ~]# echo $((3*5*1.5))
-bash: 3*5*1.5: syntax error: invalid arithmetic operator (error is ".5")
[root@VM-4-13-centos ~]# echo $((3*5*2))
30
[root@VM-4-13-centos ~]#
使用变量在(()) (双小括号)的用法
[root@VM-4-13-centos ~]# num=10
[root@VM-4-13-centos ~]# echo $num
10
[root@VM-4-13-centos ~]# ((num+15)) 计算值
[root@VM-4-13-centos ~]# echo $num  这里计算的值并没有赋值给num,所以num还是原来的值
10
[root@VM-4-13-centos ~]# echo ((num+15))  #如果打印值记得加$ 符号
-bash: syntax error near unexpected `('
[root@VM-4-13-centos ~]# echo $((num+15))
25
复杂运算
[root@VM-4-13-centos ~]# ((a=2+2**3-4/3))
[root@VM-4-13-centos ~]# echo $a
9
[root@VM-4-13-centos ~]# #明确(())这个shell扩展计算的语法,在括号里面支持变量的定义,赋值等操作
[root@VM-4-13-centos ~]# #且上述写法是变量,定义在括号内
[root@VM-4-13-centos ~]# #写法二,变量赋值在括号外面,必须添加美元符号,否则报错
[root@VM-4-13-centos ~]# b=$((2+2**3-4/3))
[root@VM-4-13-centos ~]# echo $b
9
9.2 特殊运算符
- ++ :进行加
1操作。 - - - :进行减
1操作。
注意:
- 当使用
a++的时候,先对变量a进行操作,然后+1。 - 当使用
++a的时候,先计算+1,然后再赋值给a。
[root@VM-4-13-centos ~]# a=5
[root@VM-4-13-centos ~]# echo $a
5
[root@VM-4-13-centos ~]# echo $((a++))  #先对a进行操作,然后加1
5
[root@VM-4-13-centos ~]# echo $a
6
[root@VM-4-13-centos ~]# echo $((++a)) 先计算`+1`,然后再赋值给`a`
7
[root@VM-4-13-centos ~]# echo $a
7
9.3 let命令运算
let命令的执行,效果等同于双小括号
但是,双小括号效率更高。
[root@VM-4-13-centos ~]# #使用let命令进行运算
[root@VM-4-13-centos ~]# num=10
[root@VM-4-13-centos ~]# echo $num
10
[root@VM-4-13-centos ~]# let num=num+3
[root@VM-4-13-centos ~]# echo $num
13
[root@VM-4-13-centos ~]# let num=num-3
[root@VM-4-13-centos ~]# echo $num
10
[root@VM-4-13-centos ~]# let num=num*3
[root@VM-4-13-centos ~]# echo $num
30
[root@VM-4-13-centos ~]#
9.4 开发网站存活检测脚本
如何去开发一个脚本,思路是什么?
- 按照需求,想好脚本的功能是什么?
- 先写伪代码和注释。
- 按照伪代码和注释使用命令去替换,完善脚本。
#!/bin/bash

checkUrl(){
	timeout=5 #超时时间
	fails=0   #失败次数
	success=0 #成功次数

	#循环的检测,循环的执行一些命令
	while true
	     do
		wget --timeout=${timeout} --tries=1 https://www.baidu.com/ -q -o /dev/null

		#echo $? 上次命令的结果
		#if的条件参数 -ne 是不等于的意思
		if [ $? -ne 0 ]; then
				let fails=fails+1  #失败次数+1
		else
				let success+=1 #成功次数+1
		fi

		#判断当成功次数大于等于1的时候,就可以得出该网站是正确访问的
		#注意if和[之间要有空格
		if [ ${success} -ge 1 ]; then
				echo "恭喜您,该网站健康的在运行"
				exit 0
		fi

		#判断当失败次数大于等于2的时候,就报警,发邮件等等
                if [ $fails -ge 2 ]; then
                                echo "网站挂了!"
                                exit 2
                fi
	     done

}

# 注意,函数定义后,一定要调用,执行
checkUrl
运行脚本,发生网站是正常运行的。

注意,如果发现以下报错
check_nginx_status.sh: line 15: syntax error near unexpected `then'
check_nginx_status.sh: line 15: `		if[ $? -ne 0 ]; then'
那么就需要注意
if和[的之间空格。
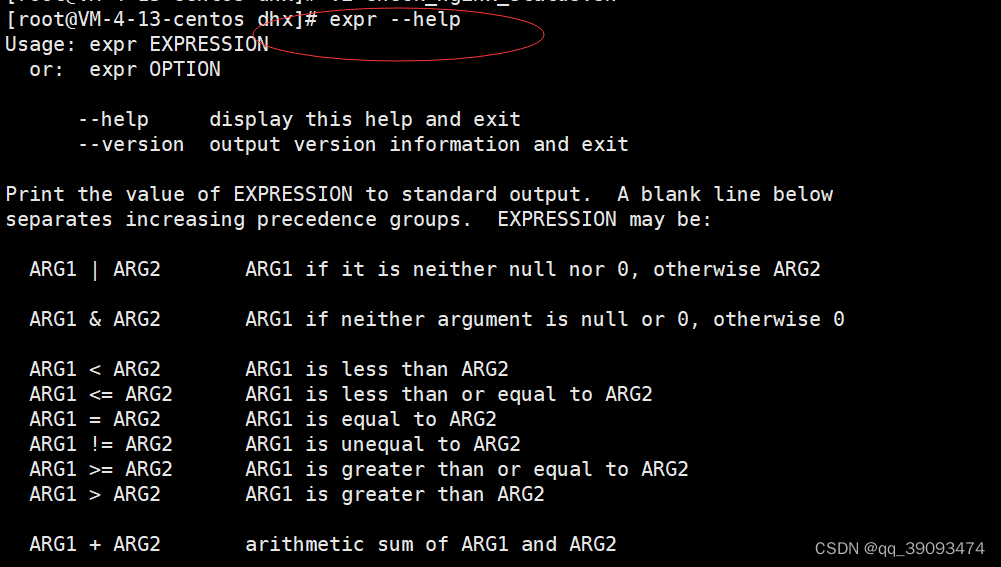
9.5 expr命令
简单的计算器执行命令,可以使用以下命令,查看其功能
#expr命令并不是很好用,基于空格传入参数,但是在shell里一些元字符都是有特殊含义的
[root@VM-4-13-centos dhx]# expr 3 + 5
8
[root@VM-4-13-centos dhx]# expr 3 * 5
expr: syntax error: unexpected argument ‘check_nginx_status.sh’
[root@VM-4-13-centos dhx]# expr 3 \* 5
15
[root@VM-4-13-centos dhx]# expr length 123567
6
[root@VM-4-13-centos dhx]# expr 5 \> 6 #逻辑运算
0
9.5.1 expr模式匹配
expr模式匹配:有两个特殊字符
:(冒号):计算字符串的字符数量(hello 5个字符)。.*:任意的字符串重复0次或者多次。
[root@VM-4-13-centos dhx]# #统计文件的字符个数
[root@VM-4-13-centos dhx]# expr test.png ":" ".*"
8
[root@VM-4-13-centos dhx]# #最后的模式可以自定义
[root@VM-4-13-centos dhx]# expr test.png ":" ".*j"
0
[root@VM-4-13-centos dhx]# #判断jpg文件的字符个数
[root@VM-4-13-centos dhx]# expr test.png ":" ".*\.jpg"
0
[root@VM-4-13-centos dhx]# expr test.jpg ":" ".*\.jpg"
8
[root@VM-4-13-centos dhx]# expr test.jpgggggggggg ":" ".*\.jpg"
8
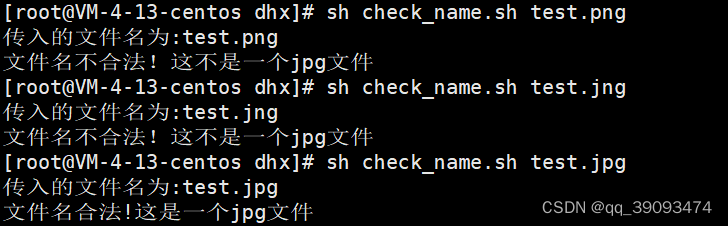
9.5.2 expr命令判断文件后缀名是否合法
需求:执行脚本,传入一个文件名,然后判断该文件,是否是
jpg图片文件。
脚本代码
#!/bin/bash
echo "传入的文件名为:$1"
if expr "$1"  ":" ".*\.jpg" &>/dev/null
  then
	echo "文件名合法!这是一个jpg文件"
else
	echo "文件名不合法!这不是一个jpg文件"
fi
运行结果
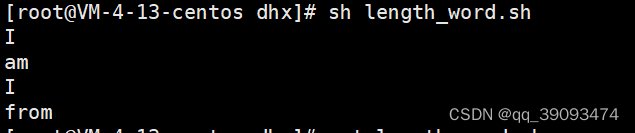
9.5.2 expr命令找出长度小于5的字符串
脚本代码
#!/bin/bash
for str in I am zhangsan, I from china, hello
  do
	if [ `expr length $str` -lt  5  ]
  	then
		echo $str
	fi
  done
运行结果
9.6 bc命令
bc命令当做计算器来用的,命令行的计算器,支持小数。
[root@VM-4-13-centos dhx]# bc
bc 1.07.1
Copyright 1991-1994, 1997, 1998, 2000, 2004, 2006, 2008, 2012-2017 Free Software Foundation, Inc.
This is free software with ABSOLUTELY NO WARRANTY.
For details type `warranty'.
3+4
7
2*5
10
1.222+4.3
5.522
9.6.1 bc命令结合管道符来计算数学
[root@VM-4-13-centos dhx]# echo "4*4"
4*4
[root@VM-4-13-centos dhx]# echo "4*4" |bc
16
[root@VM-4-13-centos dhx]# echo "4*2.3" |bc
9.2
[root@VM-4-13-centos dhx]# num=6
[root@VM-4-13-centos dhx]# result=`echo $num*3|bc`
[root@VM-4-13-centos dhx]# echo $result
18
[root@VM-4-13-centos dhx]#
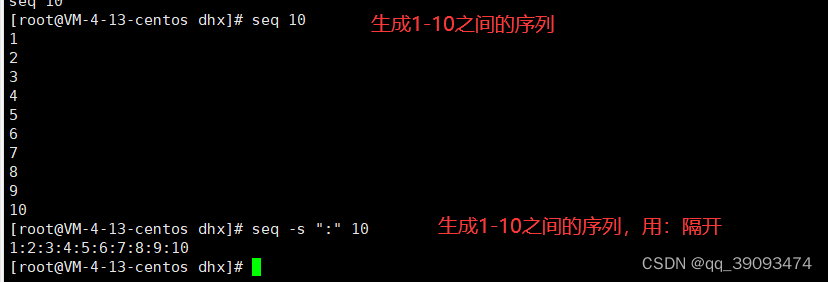
9.6.2 计算1~10的总和
如果不使用脚本就是计算
1+2+3+...+10的和。
脚本开发
方案一:
[root@VM-4-13-centos dhx]# echo {1..10}
1 2 3 4 5 6 7 8 9 10
[root@VM-4-13-centos dhx]# #使用tr命令替换
[root@VM-4-13-centos dhx]# echo {1..10} | tr " " "+"
1+2+3+4+5+6+7+8+9+10
[root@VM-4-13-centos dhx]# echo {1..10} | tr " " "+" |bc
55
方案二:
[root@VM-4-13-centos dhx]# seq  10
1
2
3
4
5
6
7
8
9
10
[root@VM-4-13-centos dhx]# seq -s "+" 10
1+2+3+4+5+6+7+8+9+10
[root@VM-4-13-centos dhx]# seq -s "+" 10 |bc
55
方案三:
[root@VM-4-13-centos dhx]# echo $((`seq -s "+" 10`))
55
9.7 awk命令
awk也支持小数计算
[root@VM-4-13-centos dhx]# echo "3.2 2.5" | awk '{print $1+$2}'
5.7
[root@VM-4-13-centos dhx]# echo "3.2 2.5" | awk '{print $1*$2}'
8
[root@VM-4-13-centos dhx]# echo "3.2 2.5" | awk '{print $1+4*$2}'
13.2
[root@VM-4-13-centos dhx]#
9.8 中括号计算
语法:$[表达式]
[root@VM-4-13-centos dhx]# num=5
[root@VM-4-13-centos dhx]# result=$[num+3]
[root@VM-4-13-centos dhx]# echo $result
8
[root@VM-4-13-centos dhx]# result=$[num*3]
[root@VM-4-13-centos dhx]# echo $result
15
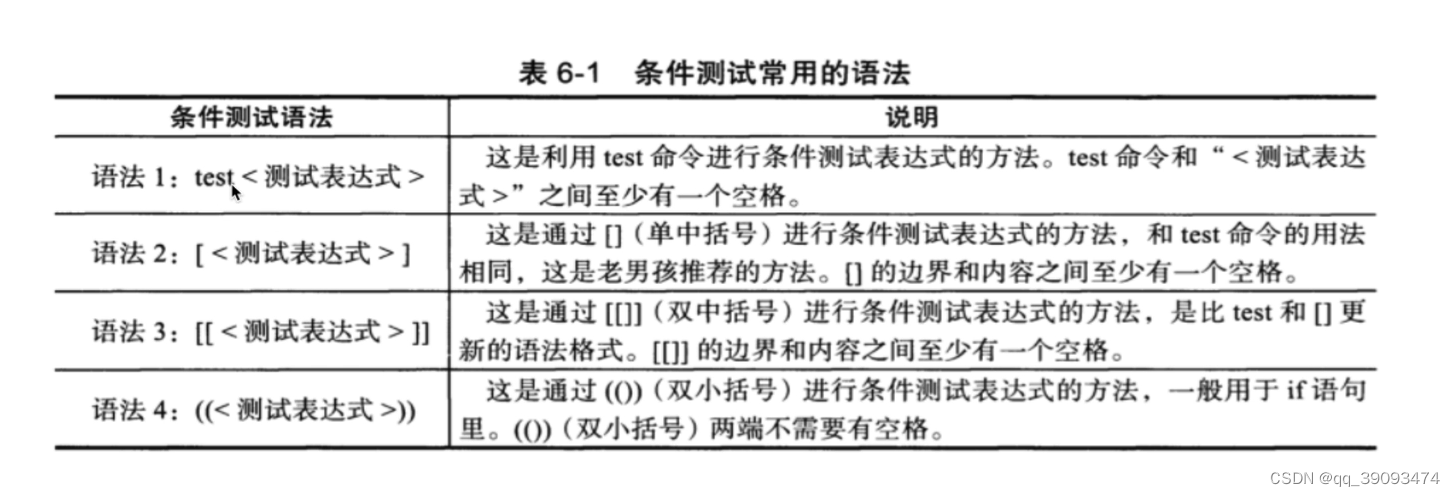
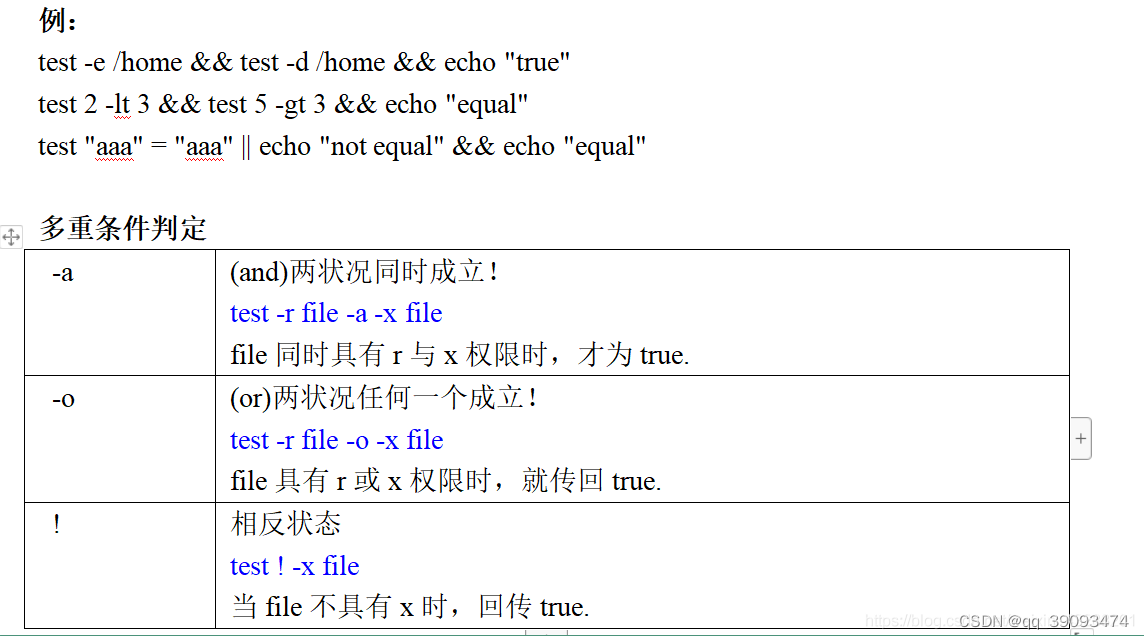
10. 条件测试
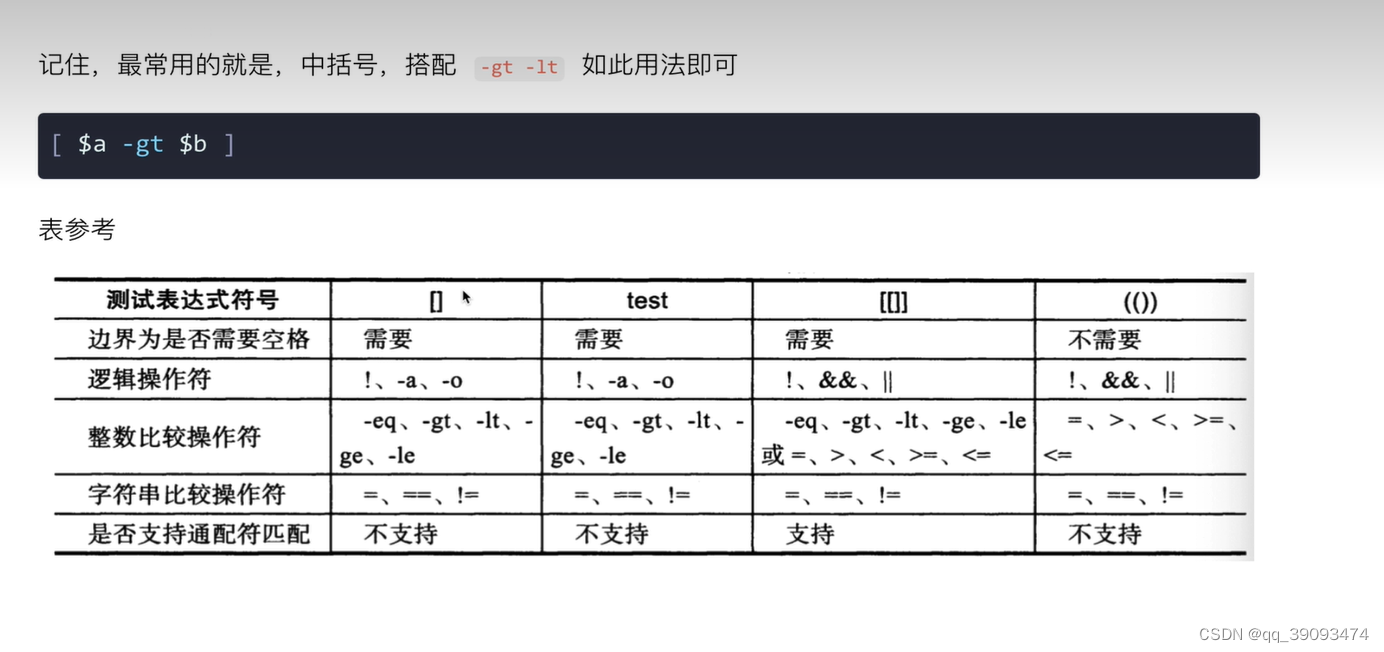
test命令:用于测试字符串,文件状态和数字。如果条件为真,那么命令执行状态码结果就为0,否则就是不为0。通过$?取值。
test命令有两种语法格式:
- 第一种:
test condition。 - 第二种:
[ condition ]。
使用方括号时,要注意在条件两边加上空格。在条件测试中使用变量,必须添加双引号。
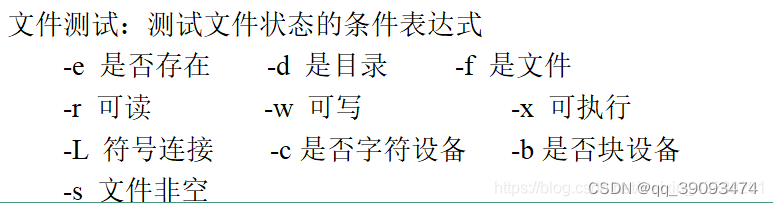
10.1 文件测试
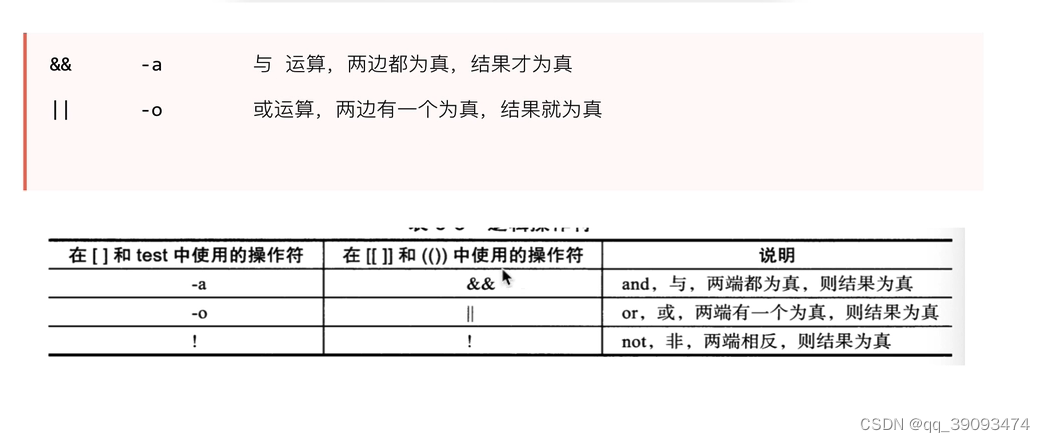
shell中对于真假判断的逻辑,提供&&(与运算,并且的,并且的两端是递进关系)和||(或运算,任意一个条件)。
A 条件 && B 条件  #当A条件成立,并且执行B条件
A 条件 || B 条件  #当A条件不成立的时候,才会执行B条件
10.1.1 文件类型侦测
语法:关于某个文件名的类型侦测(存在与否)如test -e filename
- e:判断该文件名是否存在,(普通文件和目录),存在为真,否则为假,(常用)。
[root@VM-4-13-centos dhx]# ls
check_name.sh          different.sh  index.html    index.html.2    test01.sh  test03.sh    test.sh
check_nginx_status.sh  hello.sh      index.html.1  length_word.sh  test02.sh  test_env.sh
[root@VM-4-13-centos dhx]# test -e hello.sh
[root@VM-4-13-centos dhx]# echo $?
0
[root@VM-4-13-centos dhx]# [ -e hello22.sh ]
[root@VM-4-13-centos dhx]# echo $?
1
- f:该文件名是文件(file),(常用)。
[root@VM-4-13-centos dhx]# test -f index.html && echo ok || echo no
ok
[root@VM-4-13-centos dhx]# test -f index && echo ok || echo no
no
- d:该文件名是否为目录(directory),(常用)。- b:该文件名是否为一个block device装置。- c:该文件名是否为一个character device装置。- S:该文件名是否为一个Socket文件。- P:该文件名是否为一个FiFO(pipe)文件。- L:该文件名是否为一个连接档。
10.1.2 文件权限侦测
语法:关于文件的权限侦测,如test -r filename
- r:侦测该文件名是否具有可读的属性?- w:侦测该文件名是否具有可写的属性?- x:侦测该文件名是否具有可执行的属性?- u:侦测该文件名是否具有SUID的属性?- g:侦测该文件名是否具有SGID的属性?- k:侦测该文件名是否具有Sticky bit的属性?- s:侦测该文件名是否为非空白文件。
10.1.3 两个文件之间的比较
语法:两个文件之间的比较 ,如test file1 -nt file2。
-nt(newer then):判断file1是否比file2新。-ot(older then):判断file1是否比file2旧。-ef:判断file1与file2是否为同一文件,可用在判断hard link的判定上,主要意义在判定,两个文件是否均指向同一个inode。
10.2 字符串测试
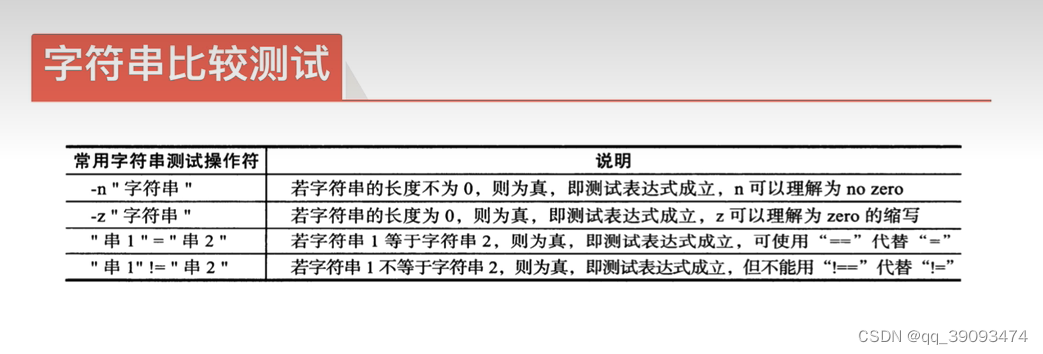
=:两个字符串相等,就为真,否则为假。!=:两个字符串不相等,就为真,否则为假。-z:希望字符串为空,就为真,否则为假。-n:希望字符串是有内容的,就为真,否则为假。!:取结果的反义(结果为真,返回假)。
注意
- 对于字符串变量的比较。
- 一定要记住给变量添加双引号。
- 使用等于号的值判断,左右两边也必须有空格
10.2.1 测试两个字符串相等
=:两个字符串相等,就为真,否则为假。
[root@VM-4-13-centos dhx]# [ "zhangsan" = "lisi" ] && echo "ok" || echo "no"
no
[root@VM-4-13-centos dhx]# [ "zhangsan" = "zhangsan" ] && echo "ok" || echo "no"
ok
10.2.2 测试两个字符串不相等
!=:两个字符串不相等,就为真,否则为假。
[root@VM-4-13-centos dhx]# [ "zhangsan" != "lisi" ] && echo "ok" || echo "no"
ok
[root@VM-4-13-centos dhx]# [ "zhangsan" != "zhangsan" ] && echo "ok" || echo "no"
no
10.2.3 测试字符串为空
-z:希望字符串为空,就为真,否则为假。
[root@VM-4-13-centos dhx]# [  -z "lisi"  ] && echo "ok" || echo "no"
no
[root@VM-4-13-centos dhx]# [  -z ""  ] && echo "ok" || echo "no"
ok
10.2.4 测试字符串不为空
-n:希望字符串是有内容的,就为真,否则为假。
[root@VM-4-13-centos dhx]# [  -n ""  ] && echo "ok" || echo "no"
no
[root@VM-4-13-centos dhx]# [  -n "shangf"  ] && echo "ok" || echo "no"
ok
10.2.5 测试!
!:取结果的反义(结果为真,返回假)。
下面就拿前面的测试字符串不为空的列子举例
[root@VM-4-13-centos dhx]# [ ! -n ""  ] && echo "ok" || echo "no"  # [ -n ""  ] 的结果是不成立的,但是取反之后条件就是成立的,所以返回ok

ok
[root@VM-4-13-centos dhx]# [ ! -n "shangf"  ] && echo "ok" || echo "no"
no
10.3 数值测试
语法:
test num1 operator num2
其中operator 在各个环境下的用法。
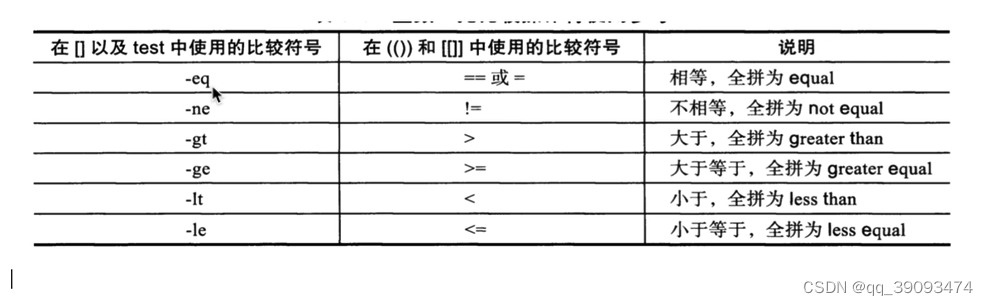
注意,如果在中括号中使用数学比较符号,请添加转义符号
\。例如 [ 2\>1]。
10.3.1 使用test命令测试数值
[root@VM-4-13-centos dhx]# test 2 -ne 3 &&echo "ok"  || echo "no"
ok
[root@VM-4-13-centos dhx]# test 2 -ge 3 &&echo "ok"  || echo "no"
no
[root@VM-4-13-centos dhx]# test 2 -le 3 &&echo "ok"  || echo "no"
ok
[root@VM-4-13-centos dhx]# test 2 -eq 3 &&echo "ok"  || echo "no"
no
注意,如果在
test中使用数学比较符号,请添加转义符号\。例如 [ 2\>1]。
[root@VM-4-13-centos dhx]# test 2 > 3 &&echo "ok"  || echo "no"
ok
[root@VM-4-13-centos dhx]# test 2 < 3 &&echo "ok"  || echo "no"
ok
[root@VM-4-13-centos dhx]# test 2 \> 3 &&echo "ok"  || echo "no"
no
[root@VM-4-13-centos dhx]# test 2 \< 3 &&echo "ok"  || echo "no"
ok
[root@VM-4-13-centos dhx]#
10.3.2 使用[] (中括号)命令测试数值
[root@VM-4-13-centos dhx]# [ 3 -eq 3 ]&&echo "ok"  || echo "no"
ok
[root@VM-4-13-centos dhx]# [ 3 -ne 3 ]&&echo "ok"  || echo "no"
no
[root@VM-4-13-centos dhx]# [ 3 -ge 3 ]&&echo "ok"  || echo "no"
ok
[root@VM-4-13-centos dhx]# [ 3 -le 6 ]&&echo "ok"  || echo "no"
ok
注意,如果在中括号中使用数学比较符号,请添加转义符号
\。例如 [ 2\>1]。
[root@VM-4-13-centos dhx]# [ 3 \< 6 ]&& echo "ok"  || echo "no"
ok
[root@VM-4-13-centos dhx]# [ 3 \> 6 ]&& echo "ok"  || echo "no"
no
10.3.3 使用[[ ]] (双中括号)命令测试数值
对单中括号的补充,双中括号还支持正则处理。
在双括号中就不需要转义符号了。
[root@VM-4-13-centos dhx]# [[ 3 -ge 3 ]]&&echo "ok"  || echo "no"
ok
[root@VM-4-13-centos dhx]# [[ 3 -ge 5 ]]&&echo "ok"  || echo "no"
no
[root@VM-4-13-centos dhx]# [[ 3 >=5 ]]&&echo "ok"  || echo "no"
no
[root@VM-4-13-centos dhx]# [[ 3 >=5 ]]&&echo "ok"  || echo "no"
no
[root@VM-4-13-centos dhx]# [[ 3 <=5 ]]&&echo "ok"  || echo "no"
ok
[root@VM-4-13-centos dhx]# [[ 3 <=5 ]]&&echo "ok"  || echo "no"
[root@VM-4-13-centos dhx]# [[ 3 != 5 ]]&&echo "ok"  || echo "no"
ok
10.4 逻辑运算符号
命令执行控制:
&&(与运算):如果存在这样一个命令command1 && command2。只要左边命令(command1)执行成功(即返回0),shell才执行&&右边的命令(command2)。||(或运算):如果存在这样一个命令command1 || command2。只要左边命令(command1)未执行成功(即返回非0),shell才执行&&右边的命令(command2)。
10.4.1 使用test逻辑运算比较
[root@VM-4-13-centos dhx]# #对文件是否存在测试,进行逻辑判断
[root@VM-4-13-centos dhx]# filename1=hello.sh  #文件存在
[root@VM-4-13-centos dhx]# filename2=hello6666.sh  #文件不存在
[root@VM-4-13-centos dhx]#
[root@VM-4-13-centos dhx]# test -e "$filename1" -a -e "$filename2" && echo "ok" || echo "no"  #两个文件同时存在才行
no
[root@VM-4-13-centos dhx]# test -e "$filename1" -o -e "$filename2" && echo "ok" || echo "no"  #任意一个文件存在就行
ok
[root@VM-4-13-centos dhx]#
不能使用&&和 || 命令。
[root@VM-4-13-centos dhx]# test -e "$filename1" && -e "$filename2" && echo "ok" || echo "no"
-bash: -e: command not found
no
[root@VM-4-13-centos dhx]# test -e "$filename1" || -e "$filename2" && echo "ok" || echo "no"
ok
[root@VM-4-13-centos dhx]# test -e "$filename2" || -e "$filename1" && echo "ok" || echo "no"
-bash: -e: command not found
no
[root@VM-4-13-centos dhx]#
10.4.2 中括号逻辑运算比较
[root@VM-4-13-centos dhx]# [ -e "$filename1" -o -e "$filename2" ] && echo "ok" || echo "no"
ok
[root@VM-4-13-centos dhx]# [ -e "$filename1" -a -e "$filename2" ] && echo "ok" || echo "no"
no
[root@VM-4-13-centos dhx]# [ -e "$filename1" || -e "$filename2" ] && echo "ok" || echo "no"
-bash: [: missing `]'
-bash: -e: command not found
no
[root@VM-4-13-centos dhx]# [ -e "$filename1" && -e "$filename2" ] && echo "ok" || echo "no"
-bash: [: missing `]'
no
[root@VM-4-13-centos dhx]#
10.4.3 双中括号逻辑运算比较
[root@VM-4-13-centos dhx]# a=""
[root@VM-4-13-centos dhx]# b="lisi"
[root@VM-4-13-centos dhx]#
[root@VM-4-13-centos dhx]# test -n "$a" && echo "ok" || echo "no" #空字符串,条件不成立
no
[root@VM-4-13-centos dhx]# test -n "$b" && echo "ok" || echo "no" #是字符串,条件成立
ok
[root@VM-4-13-centos dhx]#
[root@VM-4-13-centos dhx]#
[root@VM-4-13-centos dhx]# [[ -n "$a" && "$a" = "$b" ]] && echo "ok" || echo "no"
no
[root@VM-4-13-centos dhx]# [[ -n "$a" && ! "$a" = "$b" ]] && echo "ok" || echo "no"
no
[root@VM-4-13-centos dhx]# [[ -n "$a" &&  "$a" != "$b" ]] && echo "ok" || echo "no"
no
[root@VM-4-13-centos dhx]# a="cc"
[root@VM-4-13-centos dhx]# [[ -n "$a" && ! "$a" = "$b" ]] && echo "ok" || echo "no"
ok
[root@VM-4-13-centos dhx]# [[ -n "$a" &&  "$a" != "$b" ]] && echo "ok" || echo "no"
ok
[root@VM-4-13-centos dhx]#
10.4.4 逻辑运算的实战脚本开发
需求:接受用户输入,判断安装
lnmp脚本,还是安装lamp脚本。
- 模拟创建出两个安装的脚本:
lnmp.sh和lamp.sh。
[root@VM-4-13-centos test_scripts]# echo "echo "lnmp is intall"" > lnmp.sh
[root@VM-4-13-centos test_scripts]# echo "echo "lamp is intall"" > lamp.sh
[root@VM-4-13-centos test_scripts]# ls
lamp.sh  lnmp.sh
[root@VM-4-13-centos test_scripts]# chmod +x lnmp.sh
[root@VM-4-13-centos test_scripts]# chmod +x lamp.sh
[root@VM-4-13-centos test_scripts]# ./lnmp.sh
lnmp is intall
[root@VM-4-13-centos test_scripts]# ./lamp.sh
lamp is intall
- 脚本开发
#!/bin/bash

# 判断脚本目录是否存在
path=/dhx/test_scripts/

#条件判断

#开发脚本,真和假两个情况,优先处理错误的情况,因为错误的情况最容易处理

[ ! -d "$path" ] && mkdir $path -p

cat <<END
        1.[install lnmp]
        2.[install lamp]
        3.exit
END

read -p "plese input the num you wangt: " num

# 限制用户必须输入的是1,2,3
#[[]]支持正则表达式,[[ $num =~ [1-3] ]] 表示用户输入的值在1-3之间
[[ ! "$num" =~ [1-3] ]] &&{
        echo "the num you input  must be {1|2|3}"
        exit 1
}

[ "$num" -eq "1" ] &&{
        echo "start installing ...lnmp..."
        sleep 2
        [ -x "$path/lnmp.sh" ] || {
                echo "the file is error..."
                exit 2
        }

        $path/lnmp.sh
        exit $?
}
[ "$num" -eq "2" ] &&{
        echo "start installing ...lamp..."
        sleep 2
        [ -x "$path/lamp.sh" ] || {
                echo "the file is error..."
                exit 3
        }

        $path/lamp.sh
        exit $?
}

[ "$num" -eq "3" ] &&{
        echo "bye bye"

        exit 4
}
- 测试结果
[root@VM-4-13-centos test_scripts]# sh lamp_or_lnmp.sh
	1.[install lnmp]
	2.[install lamp]
	3.exit
plese input the num you wangt: 4
the num you input  must be {1|2|3}
[root@VM-4-13-centos test_scripts]# sh lamp_or_lnmp.sh
	1.[install lnmp]
	2.[install lamp]
	3.exit
plese input the num you wangt: 3
bye bye
[root@VM-4-13-centos test_scripts]# sh lamp_or_lnmp.sh
	1.[install lnmp]
	2.[install lamp]
	3.exit
plese input the num you wangt: 2
start installing ...lamp...
lamp is intall
[root@VM-4-13-centos test_scripts]# sh lamp_or_lnmp.sh
	1.[install lnmp]
	2.[install lamp]
	3.exit
plese input the num you wangt: 1
start installing ...lnmp...
lnmp is intall
[root@VM-4-13-centos test_scripts]#
10.4.5 总结
11. 控制语句
11.1 if 控制语句
11.1.1 单分支if语句
语法:
if <条件表达式>
	then
	# 条件成立执行的代码
fi
#还有一种简化写法
if <条件表达式>;then
	# 条件成立执行的代码
fi
测试代码:
[root@VM-4-13-centos test_scripts]# if [ 5 -ge 3 ];then echo "5大于等于3条件成立";fi #条件成立 ,执行输出命令
5大于等于3条件成立
[root@VM-4-13-centos test_scripts]# if [ 5 -le 3 ];then echo "5大于等于3条件成立";fi  #条件不成立 ,不执行输出命令
[root@VM-4-13-centos test_scripts]#
11.1.2 if-else语句
语法:
if < 条件表达式 >;then
	#条件成立,执行该命令
else
	#条件不成立,执行该命令
fi
测试代码:
[root@VM-4-13-centos test_scripts]# if [ 5 -le 3 ];then echo "5大于等于3条件成立";else echo "5是不小于等于3的";fi
5是不小于等于3的
11.1.3 多分支if处理
语法:
if < 条件1>;then
	# 条件1成立,执行该命令
elif < 条件2>;then
	# 条件2成立,执行该命令
else
	#上面两个条件都不成立,执行该命令
fi
11.1.4 开发系统监控脚本
需求:开发一个shell脚本,满足以下条件
- 检测
Linux剩余可用内存,当可用内存小于100M时,就发邮件给运维。 - 并且该脚本加入
crontab,每三分钟检查一次内存。
思路:
- 获取当前内存情况
- 配置邮件告警,用
linux发送邮件(mail服务的配置),邮件内容是内存剩余情况。 - 开发脚本,判断剩余内存是否小于
100M,if判断。 - 脚本加入
crontab,写规则。
#使用free -m获取内存
[root@VM-4-13-centos ~]# free -m
              total        used        free      shared  buff/cache   available
Mem:           3736         519         853           1        2364        2952
Swap:             0           0           0
# 获取available的数据,它是现实系统可以提供给应用程序可以的内存大小
[root@VM-4-13-centos ~]# free -m |awk 'NR==2 {print $NF}'  # NR==2 第二行  $NF 最后一个
2952
脚本代码
#!/bin/bash

freeMem=`free -m |awk 'NR==2{print $NF}'`
CHARS="Current memory is $freeMem"

if [ $freeMem -lt "3000" ];then
	echo $CHARS|tee /tmp/messages.txt
	# mail -s "主题" 收件人
	#mail -s "`date +%F-%T`$CHARS" test@163.com < /tmp/messages.txt
	echo "内存不足,抓紧维护服务器"
fi
测试代码:
[root@VM-4-13-centos test_scripts]# sh check_free.sh
Current memory is 2950
内存不足,抓紧维护服务器
[root@VM-4-13-centos test_scripts]#
加入到crontab中
[root@VM-4-13-centos test_scripts]# crontab -l #查看定时任务列表
*/5 * * * * flock -xn /tmp/stargate.lock -c '/usr/local/qcloud/stargate/admin/start.sh > /dev/null 2>&1 &'
[root@VM-4-13-centos test_scripts]#
[root@VM-4-13-centos test_scripts]# crontab -e #添加定时任务
crontab: installing new crontab
[root@VM-4-13-centos test_scripts]# crontab -l
*/5 * * * * flock -xn /tmp/stargate.lock -c '/usr/local/qcloud/stargate/admin/start.sh > /dev/null 2>&1 &'
*/3 * * * * /bin/bash /dhx/test_scripts/check_free.sh &>/dev/null
11.2 开发mysql监控脚本
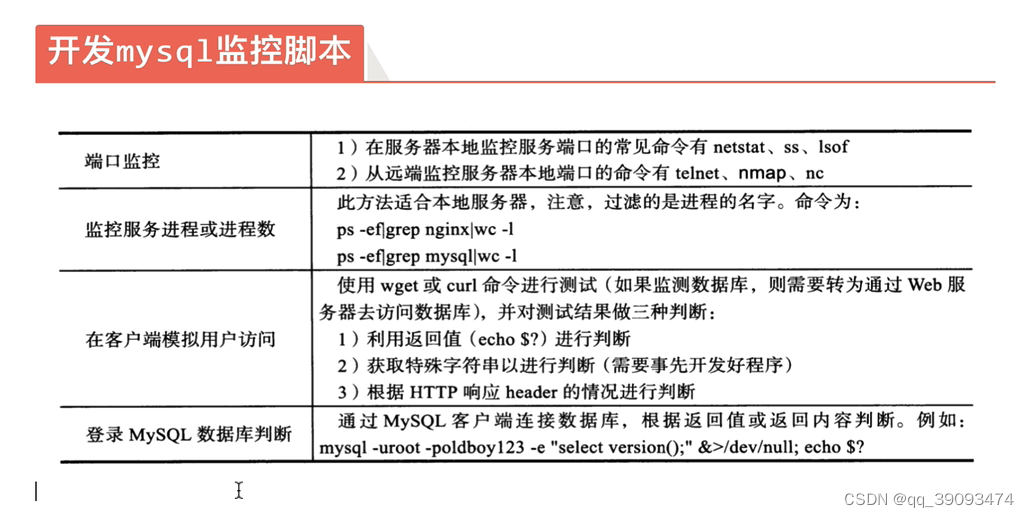
11.2.1 使用端口监控
在服务器本地监控服务端口,可以使用以下三个命令监控:
netstat命令
[root@VM-4-13-centos ~]# netstat  -tunlp  #查看开放的tcp和udp端口
Active Internet connections (only servers)
Proto Recv-Q Send-Q Local Address           Foreign Address         State       PID/Program name
tcp        0      0 0.0.0.0:22              0.0.0.0:*               LISTEN      1542/sshd
tcp6       0      0 :::3306                 :::*                    LISTEN      1758/mysqld
tcp6       0      0 :::22                   :::*                    LISTEN      1542/sshd
udp        0      0 127.0.0.1:323           0.0.0.0:*                           777/chronyd
udp6       0      0 ::1:323                 :::*                                777/chronyd
[root@VM-4-13-centos ~]# netstat  -tunlp|grep 3306 #查看3306端口
tcp6       0      0 :::3306                 :::*                    LISTEN      1758/mysqld
[root@VM-4-13-centos ~]# netstat  -tunlp|grep 3306 |wc -l #查看3306端口,如果有数据显示1
1
[root@VM-4-13-centos ~]# netstat  -tunlp|grep 3309 |wc -l #查看3309端口,如果没有数据显示0
0
[root@VM-4-13-centos ~]#
ss命令:
[root@VM-4-13-centos ~]# ss -tunlp
Netid     State      Recv-Q      Send-Q           Local Address:Port           Peer Address:Port     Process
udp       UNCONN     0           0                    127.0.0.1:323                 0.0.0.0:*         users:(("chronyd",pid=777,fd=6))
udp       UNCONN     0           0                        [::1]:323                    [::]:*         users:(("chronyd",pid=777,fd=7))
tcp       LISTEN     0           128                    0.0.0.0:22                  0.0.0.0:*         users:(("sshd",pid=1542,fd=5))
tcp       LISTEN     0           80                           *:3306                      *:*         users:(("mysqld",pid=1758,fd=23))
tcp       LISTEN     0           128                       [::]:22                     [::]:*         users:(("sshd",pid=1542,fd=6))
[root@VM-4-13-centos ~]# ss  -tunlp|grep 3309 |wc -l
0
[root@VM-4-13-centos ~]# ss  -tunlp|grep 3306 |wc -l
1
[root@VM-4-13-centos ~]#
lsof命令
[root@VM-4-13-centos ~]# lsof -i tcp:3306 |wc -l
2
[root@VM-4-13-centos ~]# lsof -i udp:3306 |wc -l
0
[root@VM-4-13-centos ~]# lsof -i tcp:33060 |wc -l
0
[root@VM-4-13-centos ~]#
从远端监控服务器本地端口,可以使用以下三个命令监控:
- 如果没有安装的话,要先使用命令安装
yum install telnet nmap nc -y
nmap命令:端口扫描
[root@VM-4-13-centos ~]# nmap  127.0.0.1 -p 3306
Starting Nmap 7.70 ( https://nmap.org ) at 2022-07-20 10:28 CST
Nmap scan report for VM-4-13-centos (127.0.0.1)
Host is up (0.000041s latency).

PORT     STATE SERVICE
3306/tcp open  mysql

Nmap done: 1 IP address (1 host up) scanned in 0.33 seconds
[root@VM-4-13-centos ~]# nmap  127.0.0.1 -p 33060
Starting Nmap 7.70 ( https://nmap.org ) at 2022-07-20 10:28 CST
Nmap scan report for VM-4-13-centos (127.0.0.1)
Host is up (0.000030s latency).

PORT      STATE  SERVICE
33060/tcp closed mysqlx

Nmap done: 1 IP address (1 host up) scanned in 0.25 seconds
[root@VM-4-13-centos ~]# nmap  127.0.0.1 -p 3306 |grep open |wc -l
1
telnet命令:
[root@VM-4-13-centos ~]# echo -e "\n" |telnet 127.0.0.1 3306
Trying 127.0.0.1...
Connected to 127.0.0.1.
Escape character is '^]'.
Connection closed by foreign host.
[root@VM-4-13-centos ~]# echo -e "\n" |telnet 127.0.0.1 33060
Trying 127.0.0.1...
telnet: connect to address 127.0.0.1: Connection refused
[root@VM-4-13-centos ~]# echo -e "\n" |telnet 127.0.0.1 3306 2>/dev/null  |grep Connected |wc -l
1
[root@VM-4-13-centos ~]# echo -e "\n" |telnet 127.0.0.1 33060 2>/dev/null  |grep Connected |wc -l
0
11.2.2 使用进程监控
此方法适合本地服务器,注意,过滤的是进程的名字
[root@VM-4-13-centos ~]# ps -ef |grep mysql
mysql       1758       1  0 Jun10 ?        00:19:18 /usr/sbin/mysqld --daemonize --pid-file=/var/run/mysqld/mysqld.pid
root       20137 4190882  0 10:50 pts/0    00:00:00 grep --color=auto mysql
[root@VM-4-13-centos ~]# ps -ef |grep mysql|grep -v grep
mysql       1758       1  0 Jun10 ?        00:19:18 /usr/sbin/mysqld --daemonize --pid-file=/var/run/mysqld/mysqld.pid
[root@VM-4-13-centos ~]# ps -ef |grep mysql|grep -v grep |wc -l
1
[root@VM-4-13-centos ~]#
11.2.3 使用编程语言连接MySQL
通过访问应用程序接口,读取数据库,查看是否能拿到数据,从而得知
mysql是否运行。前提条件,要准备好Linux的数据库环境
使用PHP连接MySQL:
- 准备好
php的环境依赖
[root@VM-4-13-centos ~]# yum remove php-mysql
[root@VM-4-13-centos ~]# yum install php-mysqlnd php
- 开放php连接mysql的代码
[root@VM-4-13-centos test_scripts]# vi test_mysql.php

<?php
$mysql_id=mysqli_connect("localhost","root","秘密") or mysql_error();

if($mysql_id){
  echo "mysql connection sunccessful";
}else{
  echo mysql_error();
}

function mysql_error(){
   echo "fils";
}
- 测试结果
[root@VM-4-13-centos test_scripts]# php test_mysql.php
mysql connection sunccessful
[root@VM-4-13-centos test_scripts]# vi test_mysql.php
使用Python连接MySQL:
- 安装python的环境依赖
[root@VM-4-13-centos test_scripts]# yum install python3 python3-devel python3-pip
- 通过python的包管理工具,安装连接mysql的模块
[root@VM-4-13-centos test_scripts]# pip3 install pymysql
- 开发python连接mysql的代码,注意python的代码,空格数量是严格把控的。
[root@VM-4-13-centos test_scripts]# cat test_python_mysql.py
import pymysql

db = pymysql.connect(
	host="localhost",
	user="root",
	#password='',
	db='mysql',
	charset='utf8'
)

# 操纵数据库
cursor=db.cursor()
cursor.execute('select version()')

data=cursor.fetchone()

print("数据库连接正确,该数据库版本是:%s"%data)
db.close()
- 测试结果
[root@VM-4-13-centos test_scripts]# python3 test_python_mysql.py
数据库连接正确,该数据库版本是:5.7.16
11.2.4 使用shell脚本监测MySQL状态
脚本代码:
[root@VM-4-13-centos test_scripts]# cat test_mysql.sh
#!/bin/bash

echo "方法一:使用netsta监测端口"

if [ `netstat -tunlp|grep mysql |wc -l` -eq "1" ];then
	echo "MySQL is running..."
else
	echo "MySQL is stopped..."
fi

echo "方法二:使用ss监测端口"

if [ `ss -tunlp|grep mysql |wc -l` -eq "1" ];then
        echo "MySQL is running..."
else
        echo "MySQL is stopped..."
fi

echo "方法三:使用lsof监测端口"

#调用lsof方法,判断该返回值大于0即可
if [ `lsof -i tcp:3306 |wc -l` -gt "0" ];then
        echo "MySQL is running..."
else
        echo "MySQL is stopped..."
fi


echo "方法四:使用php脚本监测"

#开发php脚本的执行
#先执行该php读取mysql的脚本
#根据该命令的返回值,判断该mysql是否存活

php /dhx/test_scripts/test_mysql.php

if [ "$?" -eq "0" ];then
        echo "MySQL is running..."
else
        echo "MySQL is stopped..."
fi

echo "方法五:使用python脚本监测"

python3  /dhx/test_scripts/test_python_mysql.py

if [ "$?" -eq "0" ];then
        echo "MySQL is running..."
else
        echo "MySQL is stopped..."
fi
测试结果:
[root@VM-4-13-centos test_scripts]# sh test_mysql.sh
方法一:使用netsta监测端口
MySQL is running...
方法二:使用ss监测端口
MySQL is running...
方法三:使用lsof监测端口
MySQL is running...
方法四:使用php脚本监测

mysql connection sunccessfulMySQL is running...
方法五:使用python脚本监测
数据库连接正确,该数据库版本是:5.7.16
MySQL is running...
11.3 case语句
语法:
case $变量名称 in
	"第一个变量内容")
	   命令1
	   ;;  #相当于break ,直接跳出循环
	"第二个变量内容")
	   命令2
	   ;;  #相当于break ,直接跳出循环
	 *)
	   其他命令
		exit 1
esac
代码开发:
case $choice in
	yes |y* |Y*)
	echo "input is yes"
	;; #break
	no |n* |N*)
	echo "input is no"
        ;;
	*) #default
	echo "input is not yes and no"
	;;
esac
测试结果
[root@VM-4-13-centos test_scripts]# sh test_case.sh
pless input yes or no:yes
input is yes
[root@VM-4-13-centos test_scripts]# sh test_case.sh
pless input yes or no:no
input is no
[root@VM-4-13-centos test_scripts]# sh test_case.sh
pless input yes or no:4564564
input is not yes and no
[root@VM-4-13-centos test_scripts]# sh test_case.sh
pless input yes or no:yfsdfdsfsf
input is yes
11.4 for循环语句
语法一:
for(( 初始值;限制值;执行步阶))
	do
		程序段
	done
- 初始值:变量在循环中的初始值。
- 限制值:当变量值在这个限制范围内时,就继续进行循环。
- 执行步阶:每作一次循环时,变量的变化量
declare是bash的一个内置命令,可以用来声明shell变量,设置变量的属性,declare也可以写作typeset。declare -i s:代表强制把s变量当做int类型参数运算。
代码演示:
[root@VM-4-13-centos test_scripts]# cat test_for_1.sh
#!/bin/bash
#显示使用declare执行为int类型
declare -i sum=0
declare -i i=0

for (( i=0;i<=100;i++ ))
  do
	sum=$sum+$i
  done

echo "sum的值为:$sum"
测试结果:
[root@VM-4-13-centos test_scripts]# sh test_for_1.sh
sum的值为:5050
语法二:
for var in con1 con2 con3 ...
	do
		程序端
	done
- 第一次循环时,
$var的内容是con1。 - 第二次循环时,
$var的内容是con2。 - 第三次循环时,
$var的内容是con3。 - 依次类推。
代码演示:
[root@VM-4-13-centos test_scripts]# cat test_for_1.sh
#!/bin/bash
#显示使用declare执行为int类型
declare -i sum=0
declare -i i=0

#for i in 1 2 3 4 5 6 7 8 9 10
for i in {1..10}  #这样的写法也可以
  do
	sum=$sum+$i
  done

echo "sum的值为:$sum"
测试结果:
[root@VM-4-13-centos test_scripts]# sh test_for_1.sh
sum的值为:55
11.4.1 使用for循环扫描当前文件
代码演示:
[root@VM-4-13-centos dhx]# cat test_for_file.sh
#!/bin/bash
for fileName in `ls`
  do
	if [ -f "$fileName" ];then
		echo "$fileName is file"
	elif [ -d "$fileName" ];then
                echo "$fileName is diectory"
	else
		echo "不知道是啥"
	fi
  done
测试结果:
[root@VM-4-13-centos dhx]# sh test_for_file.sh
check_name.sh is file
check_nginx_status.sh is file
different.sh is file
hello.sh is file
index.html is file
index.html.1 is file
index.html.2 is file
length_word.sh is file
test01.sh is file
test02.sh is file
test03.sh is file
test_env.sh is file
test_for_file.sh is file
test_scripts is diectory
test.sh is file
11.5 while语句
语法:
#当condition成立的时候进入while循环,直到condition不成立的时候退出循环。
while [condition]
	do
		程序端
	done
测试代码:
[root@VM-4-13-centos test_scripts]# cat test_for_1.sh
#!/bin/bash
#显示使用declare执行为int类型
declare -i sum=0
declare -i i

while [ "$i" != "101" ]
  do
	i=$i+1;
	sum=$i+$sum;
  done

echo "i的值为:$i"
测试结果:
[root@VM-4-13-centos test_scripts]# sh test_for_1.sh
i的值为:101
11.6 until语句
语法:
#这种方式与while恰恰相反,当condition条件成立的时候退出循环,否则继续循环
until [condition]
	do
		程序端
	done
测试代码:
[root@VM-4-13-centos test_scripts]# cat test_for_1.sh
#!/bin/bash
#显示使用declare执行为int类型
declare -i sum=0
declare -i i

until[ "$i" = "101" ]
  do
	i=$i+1;
	sum=$i+$sum;
  done

echo "i的值为:$i"
测试结果:
[root@VM-4-13-centos test_scripts]# sh test_for_1.sh
i的值为:101
11.7 break continue
- break :
break命令允许跳出循环,通常用在进行一些处理后退出循环或case语句。 - continue:
continue命令类似于break命令,只有一点重要差别,它不会跳出循环,只是跳过这个循环步骤。
12. 函数
12.1 Linux的别名功能
比如,我们输入这样一个命令
[root@VM-4-13-centos ~]# cat /etc/sysconfig/network-scripts/ifcfg-eth0
# Created by cloud-init on instance boot automatically, do not edit.
#
BOOTPROTO=dhcp
DEVICE=eth0
DHCPV6C=yes
HWADDR=52:54:00:0d:7b:2f
IPV6INIT=yes
ONBOOT=yes
PERSISTENT_DHCLIENT=yes
TYPE=Ethernet
USERCTL=no
下次如果我们还想输入同样的语句的话,要么使用Linux提供的上下箭头去搜索语句,要么就重新写一遍。不过还有另外一种方法,那就是使用别名功能。
[root@VM-4-13-centos ~]# alias catnetwork='cat /etc/sysconfig/network-scripts/ifcfg-eth0'
[root@VM-4-13-centos ~]# catnetwork
# Created by cloud-init on instance boot automatically, do not edit.
#
BOOTPROTO=dhcp
DEVICE=eth0
DHCPV6C=yes
HWADDR=52:54:00:0d:7b:2f
IPV6INIT=yes
ONBOOT=yes
PERSISTENT_DHCLIENT=yes
TYPE=Ethernet
USERCTL=no
[root@VM-4-13-centos ~]#
12.2 函数
函数的特点,和上面的Linux别名有点类似,能够简化Linux命令的操作,让整个命令更易读,更易用。
- 函数:就是将你需要执行的
shell命令,组合起来,组合成一个函数体。 - 还得给这个函数体,起一个名字,这个名字就称之为函数名。
- 函数=函数名+函数体。
- 使用函数名就可以执行这个函数。
shell命令自上而下执行,函数定义在前面,调用在后面。
12.1.1 函数的语法
语法一:
function 函数名(){
	命令
	return 返回值  #可以使用$?获取值
	# return 从函数中返回,用最后状态命令决定返回值
	# return 0  无错误返回
	# return 1  有错误返回
}
语法二:
 函数名(){
	命令
	return 返回值
}
所有函数在使用前必须定义,必须将函数放在脚本开始部分,直至
shell解释器首次发现它时,才可以使用
调用函数的语法:
函数名 param1 param2

使用参数同在一般脚本中使用特殊变量
$1 ,$2 ...$9 一样
12.1.2 执行函数的基础概念
有关函数执行的基础概念:
-
执行
shell函数,直接写函数名字即可,无需添加其他内容。 -
函数必须先定义,再执行。
shell脚本自上而下加载。 -
函数体内定义的变量,称之为局部变量。
-
函数体内需要添加
return语句,作用是退出函数,且赋予返回值给调用该函数的程序,也就是shell脚本(在shell脚本中,定义,使用函数,shell函数执行完毕后,通过$?获取其return的返回值)。 -
return语句和exit语句的不同return是结束函数的执行,返回一个(退出值,返回值)。exit是结束shell环境,返回一个(退出值,返回值)给当前的shell。
-
函数如果单独写入一个文件里,需要用
source读取(函数的另一种写法,写入文件中,用于加载)。 -
函数内,使用
local关键字,定义局部变量。
12.1.3 求最大值(同一个文件内)
在同一个文件里定义函数并使用
代码演示:
[root@VM-4-13-centos dhx]# cat test_max.sh
#!/bin/bash

#函数定义 求两个数最大值
function my_max(){
	if [ $1 -gt $2 ];then
	    return $1
	else
	    return $2
	fi
}

read -p "请输入数值1:" data1
read -p "请输入数值2:" data2

my_max $data1 $data2

echo "$data1和$data2的最大值为:$?"
测试结果:
[root@VM-4-13-centos dhx]# sh test_max.sh
请输入数值1:40
请输入数值2:20
40和20的最大值为:40
12.1.4 求最大值(不在同一个文件内)
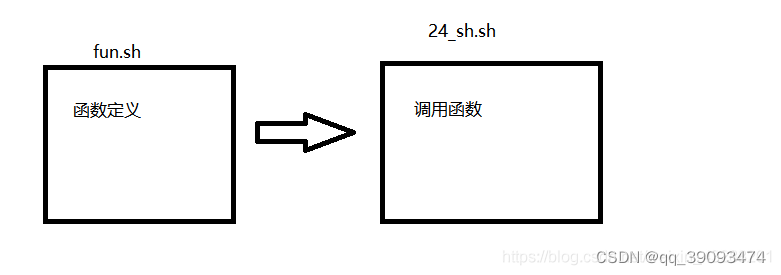
fun.sh
#!/bin/bash

#函数定义 求两个数最大值
function my_max(){
	if [ $1 -gt $2 ];then
	    return $1
	else
	    return $2
	fi
}
24_sh.sh
[root@VM-4-13-centos dhx]# cat 24_sh.sh
#!/bin/bash

#导入函数
source ./fun.sh

read -p "请输入数值1:" data1
read -p "请输入数值2:" data2

#调用函数
my_max $data1 $data2

echo "$data1和$data2的最大值为:$?"
[root@VM-4-13-centos dhx]#
测试结果:
[root@VM-4-13-centos dhx]# sh  24_sh.sh
请输入数值1:60
请输入数值2:30
60和30的最大值为:60
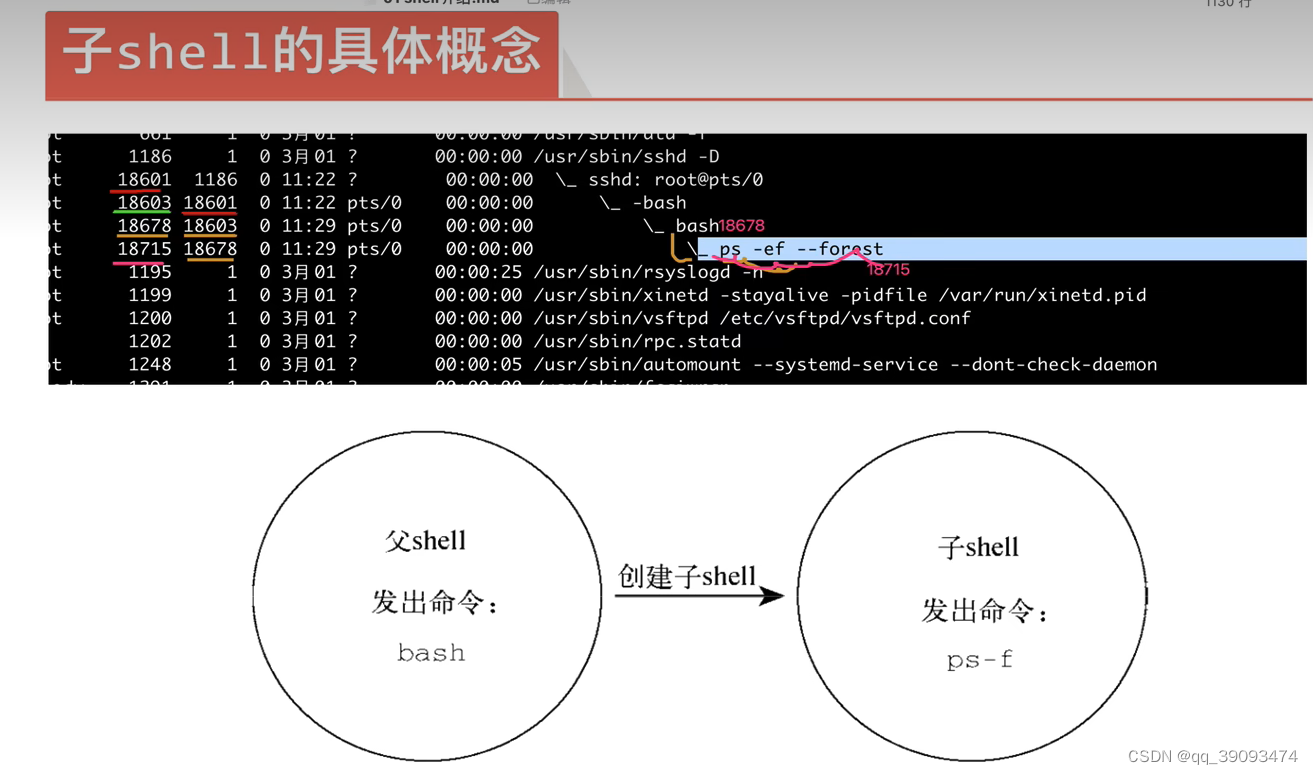
8. 为什么需要父子shell
8.1 父子shell

8.2 父shell的概念

8.3 子shell的概念


 2997
2997


 被折叠的 条评论
为什么被折叠?
被折叠的 条评论
为什么被折叠?
 到【灌水乐园】发言


