


 本文介绍Java中多线程的基本概念与实现方法,包括线程创建、线程生命周期及线程同步等内容,并通过实例演示如何使用继承Thread类与实现Runnable接口的方式进行多线程编程。
文章目录
本章内容 - 多线程处理
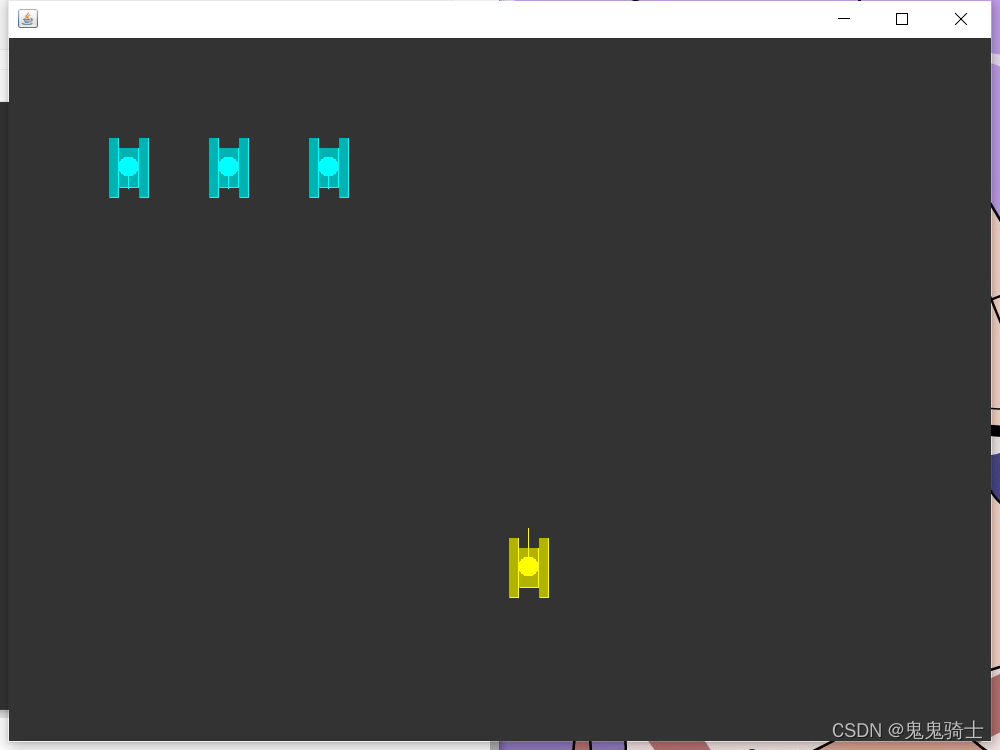
绘制敌方坦克
- 因为敌人的坦克,是在MyPanel上,所以我们的代码在MyPanel
- 因为敌人的坦克,后面有自己的特殊的属性和方法,可以单开一个EnemyTank
- 敌人坦克数量多,可以放入到集合Vector(多线程安全性)
- 新建EnemyTank类继承Tank类,构造方法传入x,y
public class EnemyTank extends Tank {
    public EnemyTank(int x, int y){
        super(x,y);
    }

}
- 创建集合,遍历并初始化坦克位置
    //定义我的坦克
    Hero hero = null;
    //定义敌人坦克,放入到Vector集合
    Vector<EnemyTank> enemyTanks = new Vector();
    int enemyTanksSize = 3;
    public MyPanel(){

        hero = new Hero(500,500);   //初始化自己的坦克
        hero.setSpeed(50);               //初始化坦克速度

        //初始化敌人坦克
        for (int i = 0; i < enemyTanksSize; i++) {
            enemyTanks.add(new EnemyTank(100 + i * 100,100));
        }
    }
- paint方法中,for循环画出敌方坦克
    public void paint(Graphics g){
        super.paint(g);
        g.fillRect(0,0,1000,750);    //填充矩形,默认黑色
        //画出坦克 - 封装方法
        //自己的坦克
        drawTank(hero.getX(),hero.getY(),g,hero.getDirect(),1);        //type坦克类型
        //敌人的坦克
        for (int i = 0; i < enemyTanks.size(); i++) {
            //取出坦克
            EnemyTank enemyTank = enemyTanks.get(i);
            drawTank(enemyTank.getX(),enemyTank.getY(),g,enemyTank.getDirect(),0);
        }
    }
- 地方坦克炮筒向下
        for (int i = 0; i < enemyTanks.size(); i++) {
            //取出坦克
            EnemyTank enemyTank = enemyTanks.get(i);
            enemyTank.setDirect(2); //默认向下
            drawTank(enemyTank.getX(),enemyTank.getY(),g,enemyTank.getDirect(),0);
        }
线程基础
线程相关概念
程序(program)
是为完成特定任务、用某种语言编写的一组指令的集合。
简单的说:就是我们写的代码
进程
- 进程是指运行中的程序,比如我们使用QQ,就启动了一个进程,操作系统就会为该进程分配内存空间。当我们使用迅雷,又启动了一个进程,操作系统将为迅雷分配新的内存空间。
- 进程是程序的一次执行过程,或是正在运行的一个程序。是动态过程:有它自身的产生,存在和消亡的过程
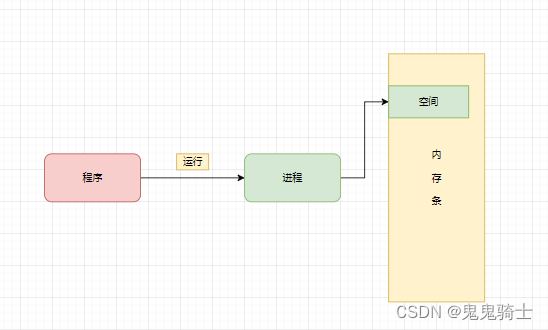
什么是线程
- 线程由进程创建的,是进程的一个实体
- 一个进程可以拥有多个线程,如下图(emm,大概就是这个意思叭~~)
其他相关概念
单线程
同一时刻,只允许执行一个线程
多线程
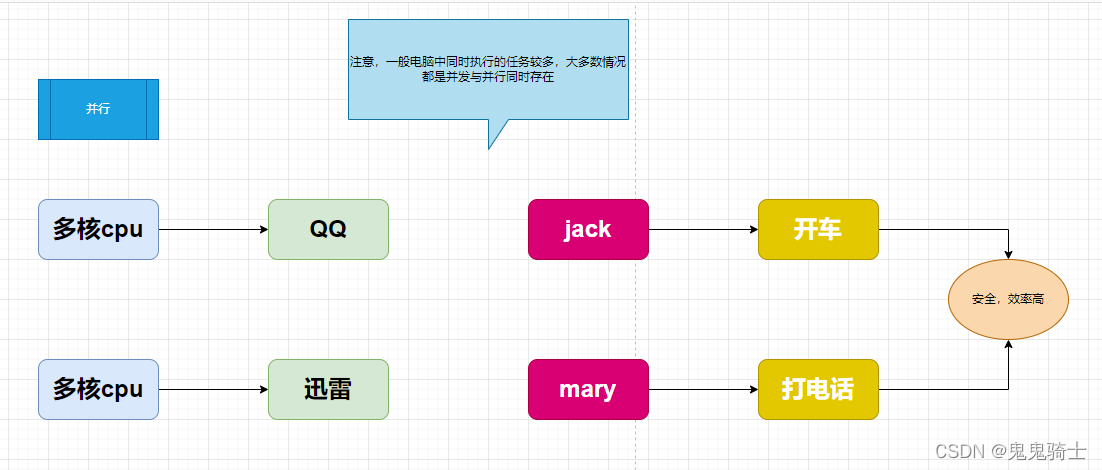
同一时刻,可以执行多个线程,比如:一个qq进程,可以同时打开多个聊天窗口,一个迅雷进程,可以同时下载多个文件

并发
同一个时刻,多个任务交替执行,造成一种“貌似同时”的错觉,简单的说,单核cpu实现的多任务就是并发
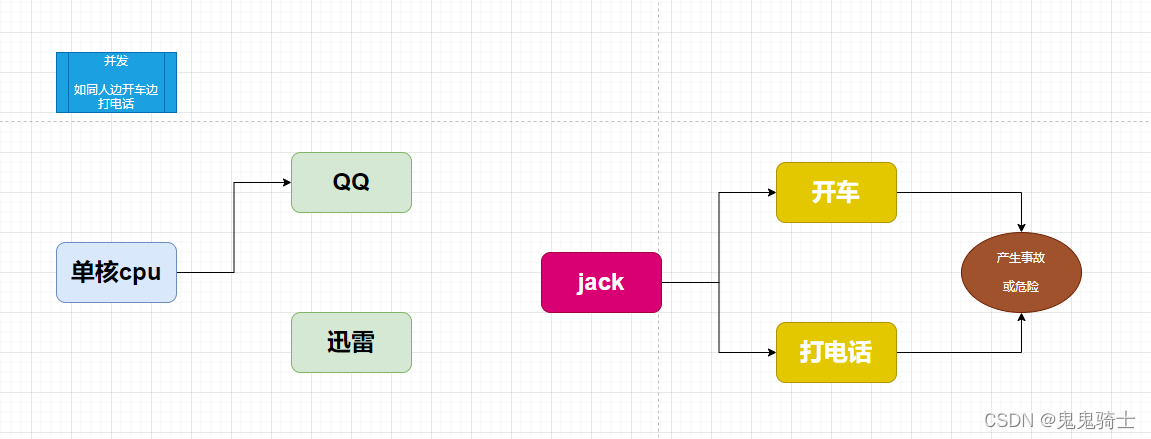
并行
同一个时刻,多个任务同时执行。多核cpu可以实现并行。
获取当前电脑处理器(cpu)个数
Runtime类
/**
 * Create By 刘鸿涛
 * 2022/1/14 2:51
 */
public class CupNum {
    public static void main(String[] args) {
        Runtime runtime = Runtime.getRuntime();
        //Processors :处理器
        int cupNums = runtime.availableProcessors();
        System.out.println("我的电脑的cpu个数为:" + cupNums);
    }
}
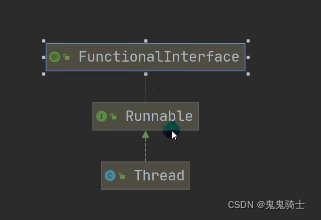
Java中创建线程的两种方式
- 继承Thread类,重写run方法
- 实现Runnable接口,重写run方法
线程基本使用(重要)
案例1
- 编写程序,开启一个线程,该线程每隔1秒,在控制台输出“喵喵,我是小喵咪”
- 对上题改进:当输出80次“喵喵,我是小喵咪”,结束该线程
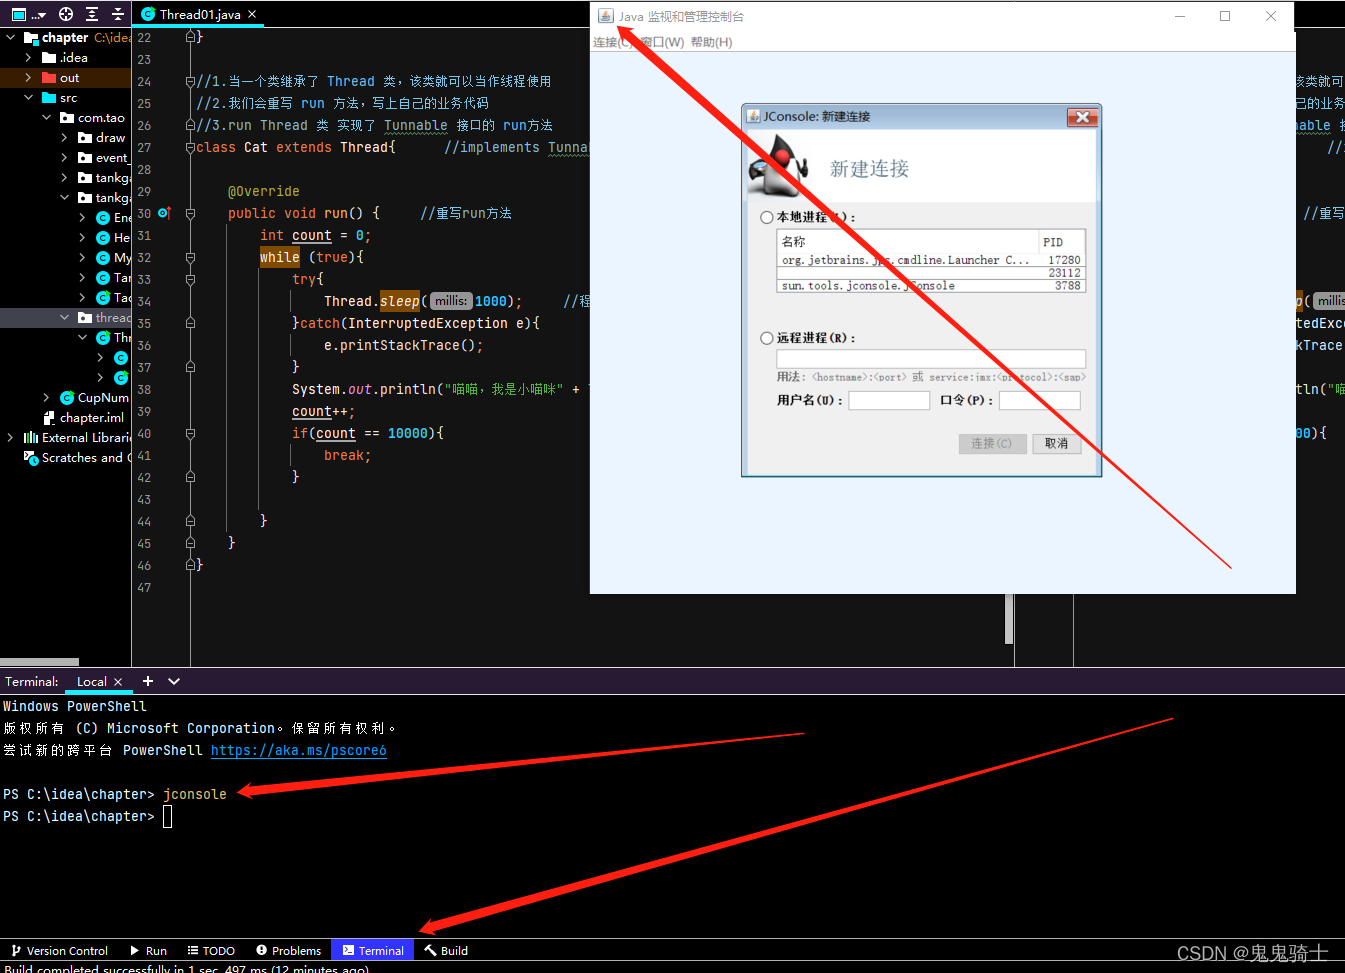
- 使用JConsole监控线程执行情况,并画出程序示意图
package com.tao.threaduse;
/**
* Create By 刘鸿涛
* 2022/1/14 3:07
*/
public class Thread01 {
public static void main(String[] args) throws InterruptedException {
Cat cat = new Cat();
//启动线程
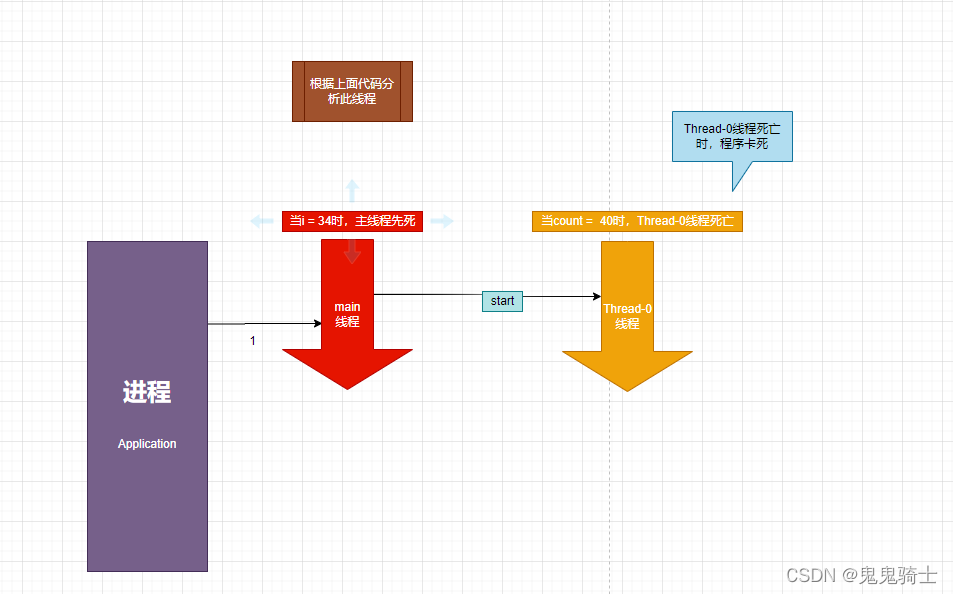
cat.start(); //Thread类方法,实现Tunnable则无次方法
//说明:当main线程启动一个子线程Thread-0,主线程不会阻塞,会继续执行
System.out.println("主线程继续执行" + Thread.currentThread().getName()); //main线程
for (int i = 0; i < 35; i++) {
System.out.println("主线程" + i);
if(i == 34){
System.out.println("主线程已死");
}
//让主线程休眠
Thread.sleep(1000);
}
}
}
//1.当一个类继承了 Thread 类,该类就可以当作线程使用
//2.我们会重写 run 方法,写上自己的业务代码
//3.run Thread 类 实现了 Tunnable 接口的 run方法
class Cat extends Thread{ //implements Tunnable
@Override
public void run() { //重写run方法
int count = 0;
while (true){
try{
Thread.sleep(1000); //程序休眠1000毫秒
}catch(InterruptedException e){
e.printStackTrace();
}
System.out.println("喵喵,我是小喵咪" + Thread.currentThread().getName()); //打印线程名字
count++;
if(count == 40){
break;
}
}
}
}
- 理论上可以更复杂些,比如下面这样
使用JConsole监控器
- 注意,需要程序运行时使用查找线程功能
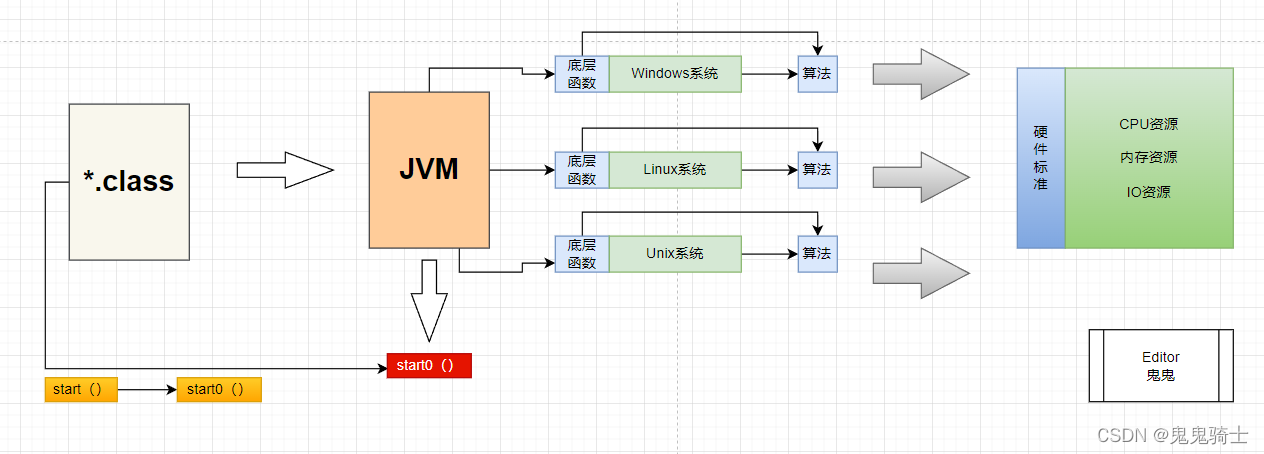
为什么使用start()方法(重点)
-
因为你在main方法中调用run()方法后,你的线程名,依然是main,依然是单线程
-
start()方法调用start0()方法后,该线程并不一定会立马执行,只是将线程变成了可运行状态,具体什么时候执行,取决于CPU,由CPU统一调度
案例2
实现Runnable接口
- java是单继承的,在某些情况下一个类可能已经继承了某个父类,这时在用继承Thread类方法来创建线程显然不可能了
- java设计者们提供了另外一个方式创建线程,就是通过实现Runnable接口来创建线程
 package com.tao.threaduse;

/**
 * Create By 刘鸿涛
 * 2022/1/15 1:37
 */
public class Thread02 {
    public static void main(String[] args) {
        Dog dog = new Dog();
        //Runnable接口没有start()方法
//        dog.start();

        //实现思路
        //创建Thread对象,把 dog对象(实现Runnable),放入Thread类
        //这里用了设计模式中- 《代理模式》
        Thread thread = new Thread(dog);
        thread.start();
    }
}
class Dog implements Runnable{

    @Override
    public void run() {
        int count = 0;
        while(true){

            System.out.println("小狗汪汪第" + (++count) + "次叫" + Thread.currentThread().getName());
            try{
                Thread.sleep(1000);
            }catch(InterruptedException e){
                e.printStackTrace();
            }

            if (count > 5){
                break;
            }
        }
    }
}
设计模式(代理模式)
- 我这个类没有这个方法,但是我可以请代理类帮我完成这个方法,但实际上工作的还是原来的类方法
package com.tao.threaduse;

/**
 * Create By 刘鸿涛
 * 2022/1/15 1:53
 */
public class Thread03 {
    public static void main(String[] args) {
        Tiger tiger = new Tiger();  //实现了Runnable接口
        Proxy proxy = new Proxy(tiger);//因为Tiger、Proxy都实现了Runnable接口
        proxy.start();
    }
}
class Animal{}
class Tiger extends Animal implements Runnable{

    @Override
    public void run() {
        System.out.println("老虎嗷嗷叫..." + Thread.currentThread().getName());  //main线程
    }
}
//Proxy:代理
//线程代理类,模拟了一个极简的Thread类
class Proxy implements Runnable{    //你可以把Proxy类当作 Thread,
    private Runnable target = null; //属性,类型是 Runnable

    @Override
    public void run() {
        if (target != null){
            target.run();           //动态绑定(运行类型Tiger)
        }
    }

    public Proxy(Runnable target){  //target = tiger
        this.target = target;
    }

    public void start(){
        start0();   //这个方法真正实现多线程
    }

    public void start0(){
        run();
    }
}
线程作业练习
package com.tao.threaduse;

/**
 * Create By 刘鸿涛
 * 2022/1/15 2:22
 */
public class Homework01 {
    public static void main(String[] args) {
        Thread01_ thread01_ = new Thread01_();
        Thread thread =  new Thread(thread01_);
        thread.start(); //线程1 - Thread-0

        Thread02_ thread02_ = new Thread02_();
        thread02_.start();
    }
}
class Thread01_ implements Runnable{

    @Override
    public void run() {
        int count = 0;
        while(true){
            System.out.println("第" + ++count + "helloword" + Thread.currentThread().getName());
            try{
                Thread.sleep(1000);
            }catch(InterruptedException e){

            }
            if (count == 10){
                break;
            }
        }
    }
}
class Thread02_ extends Thread{
    @Override
    public void run(){
        int count = 0;
        while(true){
            System.out.println("第" + ++count + "hi" + Thread.currentThread().getName());
            try{
                Thread.sleep(1000);
            }catch(InterruptedException e){
                e.printStackTrace();
            }
            if (count == 5){
                break;
            }
        }
    }
}
继承Thread 和 实现Runnable的区别
- 从java的设计来看,通过继承Thread或者实现Runnable接口来创建线程本质上没有区别,从jdk帮助文档我们可以看到Thread类本身就实现了Runnable接口
- 实现Runnable接口方式更加适合多个线程共享一个资源的情况,并且避免了单继承的限制
- 建议使用Runnable接口
案例演示
- [售票系统],编程模拟三个售票窗口售票100,分别使用 继承 Thread 和实现Runnable方式,并分析有什么问题?
package com.tao.threaduse;

/**
 * Create By 刘鸿涛
 * 2022/1/15 4:45
 */
public class Homework02 {
    public static void main(String[] args) {
        //继承Thread
//        SellTicket01 sellTicket01 = new SellTicket01();
//        SellTicket01 sellTicket02 = new SellTicket01();
//        SellTicket01 sellTicket03 = new SellTicket01();
//        sellTicket01.start();   //启动售票线程
//        sellTicket02.start();   //启动售票线程
//        sellTicket03.start();   //启动售票线程

        //实现Runnable接口
//        SellTicket02 sellTicket02 = new SellTicket02();
//        SellTicket02 sellTicket021 = new SellTicket02();
//        SellTicket02 sellTicket022 = new SellTicket02();
//        Thread thread = new Thread(sellTicket02);
//        Thread thread1 = new Thread(sellTicket021);
//        Thread thread2 = new Thread(sellTicket022);
//        thread.start();
//        thread1.start();
//        thread2.start();
        SellTicket02 sellTicket02 = new SellTicket02();
        new Thread(sellTicket02).start();
        new Thread(sellTicket02).start();
        new Thread(sellTicket02).start();

    }
}
class SellTicket01 extends Thread{
    private static int ticketNum = 100; //

    @Override
    public void run(){
        while(true){
            if(ticketNum <= 0){
                System.out.println("售票结束");
                break;
            }
            try{
                Thread.sleep(50);
            }catch(InterruptedException e){
                e.printStackTrace();
            }
            System.out.println("窗口 " + Thread.currentThread().getName() +"卖出了一张票" + "\n剩余票数:" + (--ticketNum));
        }
    }
}
class SellTicket02 implements Runnable{
    private static int ticketNum = 100; //

    @Override
    public void run(){
        while(true){
            if(ticketNum <= 0){
                System.out.println("售票结束");
                break;
            }
            try{
                Thread.sleep(50);
            }catch(InterruptedException e){
                e.printStackTrace();
            }
            System.out.println("窗口 " + Thread.currentThread().getName() +"卖出了一张票" + "\n剩余票数:" + (--ticketNum));
        }
    }
}

- 不管是继承Thread还是实现Runnable接口,都会出现超卖现象
注意
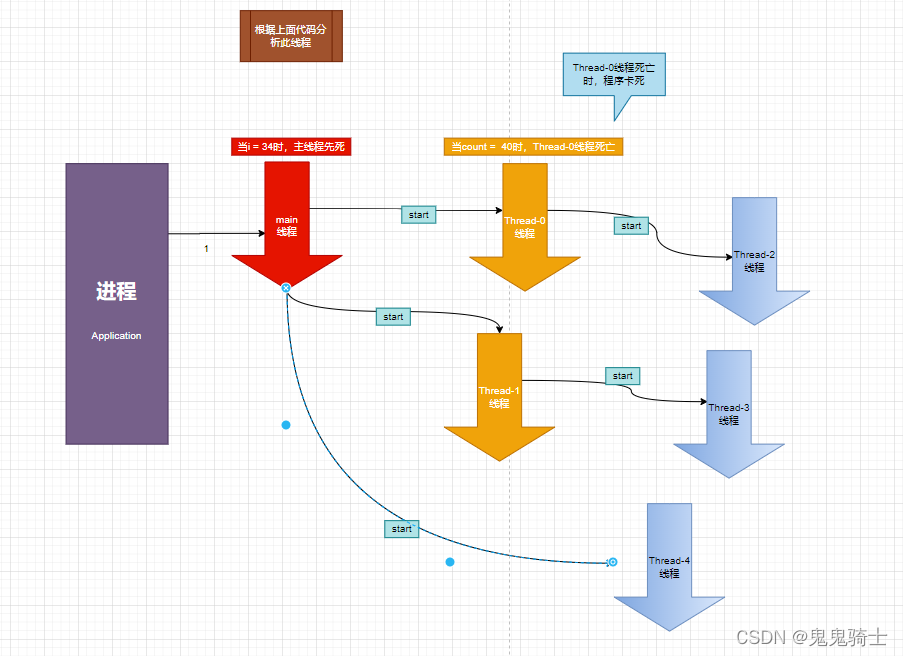
- main线程可以比其他线程先死!


 3003
3003

 被折叠的 条评论
为什么被折叠?
被折叠的 条评论
为什么被折叠?
 到【灌水乐园】发言


