


0.前半段和后半段
Tauri的安装、启动、打包和很多用例(第一部分)
Tauri的用例(第二部分)
8.create-tauri-app vanilla
注意:.\tauri-app\src-tauri\tauri.conf.json中的 withGlobalTauri 设置项,在文档中的默认值是false,在create-tauri-app(crates渠道/npm渠道)中被设置为true
yarn create tauri-app快速地创建一个新 Tauri 项目。
Project name?直接回车跳过
Choose your package manager?yarn
Choose your UI template?vanilla
依次输入以下命令
cd tauri-app
yarn
yarn tauri dev
等待大约5分钟,窗口出现。

关闭窗口
21.两个窗口发消息,全局事件
按步骤8创建tauri-js-message项目
1、修改.\tauri-js-message\src-tauri\tauri.conf.json
{
    ...
    "tauri": {
        ...
        "windows": [
            {
                "label": "w1",
                "fullscreen": false,
                "height": 600,
                "resizable": true,
                "title": "tauri-config-staticwindow",
                "width": 800
            },
            {
                "label": "w2",
                "url": "index2.html"
            }
        ]
    }
}
2、新建文件.\tauri-js-message\src\index2.html,输入以下内容
<meta http-equiv="Content-Type" content="text/html; charset=utf-8" />
<p>接收消息</p>
<p id="greet-msg"></p>
<script>
    const { listen } = window.__TAURI__.event;

    window.addEventListener("DOMContentLoaded", () => {
        greetMsgEl = document.querySelector("#greet-msg");
        const unlisten = async () => {
            await listen("msg1", (event) => {
                greetMsgEl.textContent = event.payload.abcdMessage;
            });
        };
        unlisten();
    });
</script>
3、修改.\tauri-js-message\src\main.js的greet函数
async function greet() {
    const { emit } = window.__TAURI__.event;
    emit("msg1", { abcdMessage: greetInputEl.value });
}
4、运行yarn tauri dev,输入文字后点击Greet按钮,成功收到消息

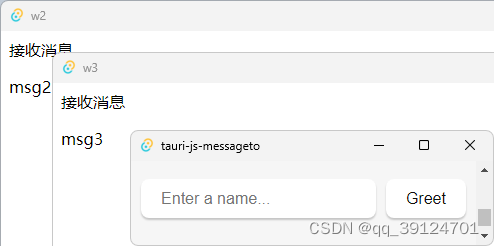
22.两个窗口发消息,私信事件
参步八创tauri-js-messageto
1、修改.\tauri-js-messageto\src-tauri\tauri.conf.json
{
    ...
    "tauri": {
        ...
        "windows": [
            {
                "label": "w1",
                "fullscreen": false,
                "height": 600,
                "resizable": true,
                "title": "tauri-config-staticwindow",
                "width": 800
            },
            { "label": "w2", "title": "w2", "url": "index2.html" },
            { "label": "w3", "title": "w3", "url": "index3.html" }
        ]
    }
}
2、修改.\tauri-js-messageto\src\main.js的greet函数
async function greet() {
    const { WebviewWindow } = window.__TAURI__.window;
    const w2 = WebviewWindow.getByLabel("w2");
    const w3 = WebviewWindow.getByLabel("w3");
    w2.emit("msg1", { msg11: "msg2" });
    w3.emit("msg1", { msg11: "msg3" });
}
3、在.\tauri-js-message\src路径下新建index2.html和index3.html,两个文件都输入以下内容
<meta http-equiv="Content-Type" content="text/html; charset=utf-8" />
<p>接收消息</p>
<p id="greet-msg"></p>
<script>
    const { listen } = window.__TAURI__.event;
    window.addEventListener("DOMContentLoaded", () => {
        greetMsgEl = document.querySelector("#greet-msg");
        const unlisten = async () => {
            await listen("msg1", (event) => {
                greetMsgEl.textContent = event.payload.msg11;
            });
        };
        unlisten();
    });
</script>
4、yarn tauri dev,点击Greet按钮,各自收到消息
23.rust发消息,全局事件
参步八创tauri-rust-message
1、cmd /c "cd src-tauri && cargo add rand"添加板条箱rand
2、修改main.rs的main函数
fn main() {
    use rand::Rng;
    use tauri::Manager;

    #[derive(Clone, serde::Serialize)]
    struct Payload { message: String, }

    tauri::Builder::default()
        .setup(|app| {
            let handle = app.handle();
            tauri::async_runtime::spawn(async move {
                loop {
                    std::thread::sleep(std::time::Duration::from_millis(2000));
                    let mut rng = rand::prelude::thread_rng();
                    let mut rand_text = String::from("");
                    for _ in 0..10 {
                        let rand_char = rng.gen_range('A'..='Z');
                        rand_text += &rand_char.to_string();
                    }

                    handle.emit_all("msg1", Payload { message: rand_text.to_string(), },).unwrap();
                }
            });
            Ok(())
        })
        .invoke_handler(tauri::generate_handler![greet])
        .run(tauri::generate_context!())
        .expect("运行失败");
}
3、在.\tauri-rust-message\src路径下新建index2.html和index3.html,两个文件都输入以下内容
<meta http-equiv="Content-Type" content="text/html; charset=utf-8" /><p>接收消息</p><p id="greet-msg"></p>
<script>
    const { listen } = window.__TAURI__.event;
    window.addEventListener("DOMContentLoaded", () => {
        greetMsgEl = document.querySelector("#greet-msg");
        const unlisten = async () => {
            await listen("msg1", (event) => { greetMsgEl.textContent = event.payload.message; });
        };
        unlisten();
    });
</script>
4、修改tauri.conf.json的tauri.windows
"windows": [
	{ "label": "w1", "title": "w1", "url": "index1.html" },
	{ "label": "w2", "title": "w2", "url": "index2.html" },
	{ "label": "w3", "title": "w3", "url": "index3.html" }
]
5、yarn tauri dev,每过2秒,w2和w3就会收到新的全局消息

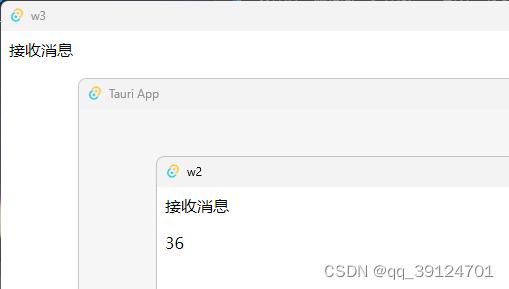
24.rust发消息,私信事件
参步八创tauri-rust-messageto
1、修改main.rs的main函数
fn main() {
    use tauri::Manager;
    #[derive(Clone, serde::Serialize)]
    struct Payload { msg: String, }
    tauri::Builder::default()
        .setup(|app| {
            let handle = app.handle();
            tauri::async_runtime::spawn(async move {
                for i in 0..100 {
                    std::thread::sleep(std::time::Duration::from_millis(2000));
                    handle.emit_to("w2", "msg1", Payload { msg: i.to_string() }).unwrap();
                }
            });
            Ok(())
        })
        .invoke_handler(tauri::generate_handler![greet])
        .run(tauri::generate_context!())
        .expect("运行失败");
}
2、修改tauri.conf.json的tauri.windows
"windows": [
	{ "label": "w1", },
	{ "label": "w2", "title": "w2", "url": "index2.html" },
	{ "label": "w3", "title": "w3", "url": "index3.html" }
]
3、在.\src路径下新建index2.html和index3.html,两个文件都输入以下内容
<meta http-equiv="Content-Type" content="text/html; charset=utf-8" /><p>接收消息</p><p id="greet-msg"></p><script>const { listen } = window.__TAURI__.event;window.addEventListener("DOMContentLoaded", () => {greetMsgEl = document.querySelector("#greet-msg");const unlisten = async () => {await listen("msg1", (event) => {greetMsgEl.textContent = event.payload.message;});};unlisten();});</script>
4、yarn tauri dev,只有w2可以收到消息
25.javascript给后端发私信
方法1、#[tauri::command]调用指令
方法2、广播消息假装私信消息
26.读取剪贴板的文本内容
注意只能读取和写入文本内容,不支持位图,更高级的功能需要借助板条箱,例如clipboard-win
参步八创tjs-clipboard
1、向tauri.conf.json添加项tauri.allowlist.clipboard.all,设置为true
{
    ...
    "tauri": {
        "allowlist": {
            ...
            "clipboard": { "all": true }
        },
        ...
    }
}
2、修改main.js中的greet函数
async function greet() {
    const { readText, writeText } = window.__TAURI__.clipboard;
    greetMsgEl.textContent = await readText();
    await writeText("这是由Tauri写入的剪贴板文本。");
}
3、yarn tauri dev,复制文本后,点击Greet按钮,可以获取到文本内容并将准备好的内容写入剪贴板。

27.添加启动界面
tjs-splashscreen
1、在main.js的开头加上2000毫秒的死循环let a=Date.now();while(1){ if(Date.now() - a > 2000){break;} }
2、将main.js的监听代码改为
window.addEventListener("DOMContentLoaded", () => {
    const { WebviewWindow } = window.__TAURI__.window;
    const w1 = WebviewWindow.getByLabel("w1");
    const w2 = WebviewWindow.getByLabel("w2");
    w1.show();
    w2.close();
});
3、tauri.conf.json的tauri.windows改为
"windows": [
    { "label": "w1", "visible": false, "center": true },
    {
        "label": "w2",
        "url": "sp.html",
        "decorations": false,
        "transparent": true,
        "center": true,
        "width": 206,
        "height": 206,
        "resizable": false,
        "skipTaskbar": true
    }
]
4、在tauri.conf.json中添加tauri.allowlist.window
"window":{ "show": true, "close": true }
5、在src路径新建sp.html,内容为:
<html style="width: 206px; height: 206px">
    <body>
        <img
            src="/assets/tauri.svg"
            style="max-height: 100px; position: relative; top: 53px; left: 58px"
        />
        <script>
            window.oncontextmenu =
                window.onkeydown =
                window.onkeyup =
                window.onkeypress =
                    (e) => {
                        window.event.returnValue = false;
                        e.preventDefault();
                    };
        </script>
    </body>
</html>
6、yarn tauri dev,显示了2秒的图标之后,显示了主程序窗口
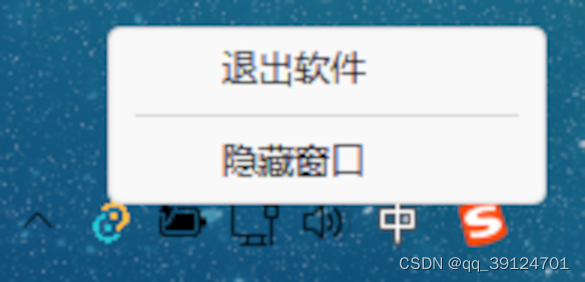
28.系统托盘
trust-systemtray
1、在tauri.conf.json中添加tauri.systemTray.iconPath
{
    ...
    "tauri": {
        ...
        "windows": [
            {
                "fullscreen": false,
                "height": 600,
                "resizable": true,
                "title": "trust-systemtray",
                "width": 800
            }
        ],
        "systemTray": {
            "iconPath": "icons/icon.png"
        }
    }
}
2、修改main.rs的main函数
fn main() {
    use tauri::Manager;
    use tauri::{CustomMenuItem, SystemTray, SystemTrayEvent, SystemTrayMenu, SystemTrayMenuItem};

    fn hide_text(i: i8) -> String {
        if i == 0 {
            return "隐藏窗口".to_string();
        } else {
            return "显示窗口".to_string();
        }
    }

    let hide = CustomMenuItem::new("hide".to_string(), hide_text(0));
    let quit = CustomMenuItem::new("quit".to_string(), "退出软件");

    let tray_menu = SystemTrayMenu::new()
        .add_item(quit)
        .add_native_item(SystemTrayMenuItem::Separator)
        .add_item(hide);
    let system_tray = SystemTray::new().with_menu(tray_menu);

    tauri::Builder::default()
        .system_tray(system_tray)
        .on_system_tray_event(|app, event| match event {
            SystemTrayEvent::LeftClick {
                position: _,
                size: _,
                ..
            } => {
                println!("系统托盘左击事件");
            }
            SystemTrayEvent::RightClick {
                position: _,
                size: _,
                ..
            } => {
                println!("系统托盘右击事件");
            }
            SystemTrayEvent::DoubleClick {
                position: _,
                size: _,
                ..
            } => {
                println!("系统托盘双击事件");
            }
            SystemTrayEvent::MenuItemClick { id, .. } => {
                let item_handle = app.tray_handle().get_item(&id);
                match id.as_str() {
                    "quit" => {
                        std::process::exit(0);
                    }
                    "hide" => {
                        let window = app.get_window("main").unwrap();
                        if window.is_visible().unwrap() {
                            window.hide().unwrap();
                            item_handle.set_title(hide_text(1)).unwrap();
                        } else {
                            window.show().unwrap();
                            item_handle.set_title(hide_text(0)).unwrap();
                        }
                    }
                    _ => {}
                }
            }
            _ => {}
        })
        .invoke_handler(tauri::generate_handler![greet])
        .run(tauri::generate_context!())
        .expect("运行Tauri应用出错");
}
3、yarn tauri dev,显示了系统托盘和右键菜单并且有相应功能
29.制作自己的CLI(命令行接口)
29-1.yarn命令(开发用途)
编辑package.json的script项
{
    ...
    "scripts": {
        "tauri": "tauri",
        "cargo": "cmd /c \"cd src-tauri && cargo\""
    },
    ...
}
运行yarn cargo add rand就可以添加板条箱rand,运行yarn cargo -V显示cargo的版本
29-2.tauri命令(rust代码)(用户接口)
t-cli
1、在tauri.conf.json中添加tauri.cli
{
    ...
    "tauri": {
        ...
        "cli": {
            "args": [
                {
                    "short": "m",
                    "name": "maximized",
                    "description": "最大化窗口",
                    "conflictsWith": "minimized"
                },
                {
                    "short": "n",
                    "name": "minimized",
                    "description": "最小化窗口",
                    "conflictsWith": "maximized"
                },
                {
                    "short": "l",
                    "name": "lang",
                    "description": "语言",
                    "takesValue": true,
                    "numberOfValues": 1,
                    "possibleValues": ["zh-CN", "en-US"]
                }
            ]
        }
    }
}
2、修改main.rs中main函数
fn main() {
    use tauri::Manager;
    tauri::Builder::default()
        .setup(|app| {
            let matches = app.get_cli_matches()?;
            match matches.args["maximized"].value {
                serde_json::Value::Bool(b) => {
                    if b {
                        app.get_window("main").unwrap().maximize().unwrap();
                    }
                }
                _ => {}
            };
            match matches.args["minimized"].value {
                serde_json::Value::Bool(b) => {
                    if b {
                        app.get_window("main").unwrap().minimize().unwrap();
                    }
                }
                _ => {}
            };
            match &matches.args["lang"].value {
                serde_json::Value::String(str) => {
                    if str == "zh-CN" {
                        app.get_window("main")
                            .unwrap()
                            .set_title("中文标题")
                            .unwrap();
                    } else if str == "en-US" {
                        app.get_window("main")
                            .unwrap()
                            .set_title("english title")
                            .unwrap();
                    }
                }
                _ => {}
            };
            Ok(())
        })
        .invoke_handler(tauri::generate_handler![greet])
        .run(tauri::generate_context!())
        .expect("运行出错");
}
3、运行yarn tauri dev成功后退出(想看页面也可以不退出,下面的命令另开一个shell就行了)(相关github议题)
①运行.\src-tauri\target\debug\t-cli.exe --maximized或者.\src-tauri\target\debug\t-cli.exe -m
已读取命令--maximized,自动创建了最大化的窗口
②运行.\src-tauri\target\debug\t-cli.exe --minimized或者.\src-tauri\target\debug\t-cli.exe -n
已读取命令--minimized,最小化窗口(就是反应慢了一点,可以预先隐藏1秒2秒的,就看不见了)
③运行.\src-tauri\target\debug\t-cli.exe --lang=zh-CN或者.\src-tauri\target\debug\t-cli.exe -l zh-CN
已读取命令--lang=zh-CN,窗口标题变为"中文标题"
29-2.tauri命令(javascript代码)(用户接口)
t-cli-js
1、在tauri.conf.json中添加tauri.cli
{
    ...
    "tauri": {
        ...
        "cli": {
            "args": [
                { "name": "carmode", "description": "开小车模式" },
                { "name": "eatmode", "description": "中午吃什么" }
            ]
        }
    }
}
2、将main.js文件改为以下内容
const { getMatches } = window.__TAURI__.cli;
getMatches().then((matches) => {
    if (matches.args.carmode.value) {
        location.replace("https://bruno-simon.com/");
    }
    if (matches.args.eatmode.value) {
        location.replace("https://chishenme.xyz/");
    }
});
3、运行yarn tauri dev成功后最小化页面
另开一个shell窗口运行.\src-tauri\target\debug\t-cli-js.exe --eatmode
成功启用--eatmode配置

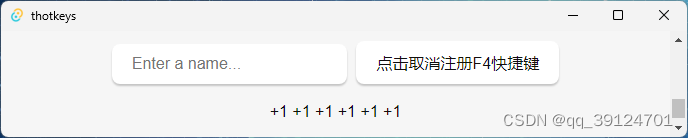
30.全局快捷键
虽然需要快捷键功能但是要求不高的话,可以使用hotkeys-js、mousetrap
系统全局快捷键经常出现冲突占用等问题,确保注册和取消注册结对出现。
thotkeys
1、向tauri.conf.json添加tauri.allowlist.globalShortcut(globalShortcut仅有一个all选项)
{
    ...
    "tauri": {
        "allowlist": {
            ...
            "globalShortcut": { "all": true }
        },
    }
}
2、运行一遍yarn tauri dev,运行完毕后退出(如果不运行,rust-analyzer可能会提示失败)
3、修改main.js的监听部分
window.addEventListener("DOMContentLoaded", () => {
    const btn = document.querySelector("#greet-button");
    const msg = document.querySelector("#greet-msg");
    btn.textContent = "点击注册F4快捷键";

    btn.addEventListener("click", async () => {
        const { isRegistered, register, unregister } = window.__TAURI__.globalShortcut;
        const isRegistered_f4 = await isRegistered("F4");

        if (isRegistered_f4) {
            await unregister("f4");
            btn.textContent = "点击注册F4快捷键";
        } else {
            await register("f4", () => { msg.textContent += " +1"; });
            btn.textContent = "点击取消注册F4快捷键";
        }
    });
});
4、运行yarn tauri dev,点击注册后,按WIN + D,F4,再按WIN + D,Tauri响应了快捷键
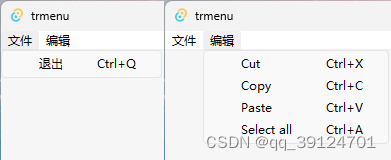
31.窗口菜单
trmenu
1、修改main.rs的main函数
fn main() {
    // accelerator()函数的参数判断标准:https://github.com/tauri-apps/tao/blob/dev/src/keyboard.rs
    // accelerator()文档:https://docs.rs/tao/latest/tao/accelerator/
    let quit = CustomMenuItem::new("quit".to_string(), "退出").accelerator("ctrl+q");
    let file = Submenu::new("文件", Menu::new().add_item(quit));

    let edit = Submenu::new(
        "编辑",
        Menu::new()
            // https://docs.rs/tauri/1.2.4/tauri/enum.MenuItem.html#variants
            .add_native_item(MenuItem::Undo)
            .add_native_item(MenuItem::Redo)
            .add_native_item(MenuItem::Cut)
            .add_native_item(MenuItem::Copy)
            .add_native_item(MenuItem::Paste)
            .add_native_item(MenuItem::SelectAll),
    );

    let menu = Menu::new().add_submenu(file).add_submenu(edit);

    tauri::Builder::default()
        .menu(menu)
        .on_menu_event(|event| match event.menu_item_id() {
            "quit" => {
                std::process::exit(0);
            }
            _ => {}
        })
        .invoke_handler(tauri::generate_handler![greet])
        .run(tauri::generate_context!())
        .expect("e");
}
2、运行yarn tauri dev,显示了窗口菜单,但是添加的快捷键是个摆设,按了不好使,还给我返回禁止的系统警告音,可能与6263议题有关,也许1.3版本会解决
3、下载hotkeys.min.js放到src目录下,添加hotkeys引用
<title>Tauri App</title>
<script src="/hotkeys.min.js"></script>
4、在main.js最开始部分添加以下代码
hotkeys.filter = () => { return true; };
hotkeys("ctrl+q", async (e) => {
    const { invoke } = window.__TAURI__.tauri;
    await invoke("quit_command");
});
5、向main.rs添加一个新函数
#[tauri::command]
fn quit_command() {std::process::exit(0);}
6、再次运行yarn tauri dev,网页内可以响应ctrl+q快捷键了,tauri窗口外框当然还是不能正确响应
32.选择文件窗口、保存文件窗口
topenfile
tauri.conf.json
{
    "tauri": {
        "allowlist": {
            "dialog": {"open": true,"save": true},
            "path": {"all": true},
            "fs":{"readFile": true,"writeFile": true,"scope": ["$DESKTOP/*"]}
        }
    }
}
main.js的greet函数
let selected = null;
async function greet() {
    const { open, save } = window.__TAURI__.dialog;
    const { readTextFile, writeTextFile, BaseDirectory } = window.__TAURI__.fs;
    const { desktopDir } = window.__TAURI__.path;

    if (selected === null) {
        selected = await open({
            defaultPath: await desktopDir(),
            filters: [
                {
                    name: "文本文件",
                    extensions: ["txt"],
                },
            ],
            title: "选择文件",
        });
        if (selected) {
            greetInputEl.value = await readTextFile(selected, {
                dir: BaseDirectory.Desktop,
            });
        }
    } else {
        const filePath = await save({
            defaultPath: await desktopDir(),
            filters: [
                {
                    name: "文本文件",
                    extensions: ["txt"],
                },
            ],
            title: "另存文件",
        });

        if (filePath) {
            selected = null;
            await writeTextFile(filePath, greetInputEl.value, {
                dir: BaseDirectory.Desktop,
            });
        }
    }
}
运行yarn tauri dev,点击Greet选择文件打开,在输入框编辑文件,再点击Greet另存文件
33.系统通知
tnotification
tauri.conf.json
{
    "tauri": {
        "allowlist": {
            "notification": {"all": true}
        }
    }
}
main.js的greet函数
async function greet() {
    const { isPermissionGranted, requestPermission, sendNotification } =
        window.__TAURI__.notification;

    let permissionGranted = await isPermissionGranted();
    greetMsgEl.textContent = permissionGranted;

    if (!permissionGranted) {
        const permission = await requestPermission();
        permissionGranted = permission === "granted";
    } else {
        sendNotification("哒哒哒哒滴哒哒!");
        sendNotification({ title: "啥!", body: "咋啦?" });
    }
}
运行yarn tauri dev,点击Greet向系统发送了通知
34.shell
tshell
tauri.conf.json,本次操作必须启用execute,sidecar。open用不上,所以all是false
{
    "tauri": {
        "allowlist": {
            "shell": {
                "all": false,
                "open": false,
                "execute": true,
                "sidecar": true,
                "scope": [
                    {
                        "name": "inprivateEdge",
                        "cmd": "cmd",
                        "args": ["/c","start", "msedge", "--inprivate"]
                    }
                ]
            }
        }
    }
}
main.js的greet函数
async function greet() {
 const { Command } = window.__TAURI__.shell;
    let inprivate_edge = new Command("inprivateEdge", [
        "/c",
        "start",
        "msedge",
        "--inprivate",
    ]);
    await inprivate_edge.execute();
}
运行yarn tauri dev,点击Greet后打开了InPrivate模式的Edge浏览器
35.将文件路径转换为URL供webview加载
t-convert-file-src
向tauri.conf.json添加tauri.allowlist.protocol、tauri.allowlist.path、tauri.security.csp
{
    "tauri": {
        "allowlist": {
            "protocol": {
                "asset": true,
                "assetScope": ["$VIDEO/延时摄影/*"]
            },
            "path": {
                "all": true
            }
        },
        "security": {
            "csp": "default-src 'self'; img-src 'self' asset: https://asset.localhost"
        }
    }
}
main.js的greet函数
async function greet() {
    const { videoDir, join } = window.__TAURI__.path;
    const { convertFileSrc } = window.__TAURI__.tauri;
    const videoDirPath = await videoDir();
    // 正反斜杠随意,Tauri会统一为正斜杠后再联系windows系统索要文件
    const filePath = await join(videoDirPath, "延时摄影/车流.mp4");
    const assetUrl = convertFileSrc(filePath);

    const video = document.createElement("video");
    video.setAttribute("style", "height: 170px;");
    video.setAttribute("autoplay", "");
    video.setAttribute("controls", "");
    video.setAttribute("loop", "");
    const source = document.createElement("source");
    source.type = "video/mp4";
    source.src = assetUrl;
    video.appendChild(source);
    document.body.appendChild(video);

    video.load();
}
运行yarn tauri dev,点击Greet后加载了位于%USERPROFILE%\Videos\延时摄影\车流.mp4视频文件
36.http请求
在搜索引擎上先搜到一个壁纸API(例如每日壁纸免费API),,设置为软件的背景图
tauri.conf.json,添加tauri.allowlist.http中的request和scope
{
    "tauri": {
        "allowlist": {
            "http": {
                "request": true,
                "scope": ["https://v.api.aa1.cn/*"]
            }
        }
    }
}
main.js替换为以下内容
let imgs = [];

async function greet() {
    var img = imgs[Math.floor(Math.random() * imgs.length)];
    document.body.style.setProperty("background-image", "url(" + img + ")");
}

window.addEventListener("DOMContentLoaded", async () => {
    document.documentElement.style = "height: 100%; min-height: 390px;";
    document.body.style = "height: 100%; margin: 0px; padding: 0px;background-size: cover;";
    document.querySelector("h1").style =
        document.querySelector(".row").style =
        document.querySelector("p").style =
        document.querySelector("#greet-msg").style =
            "background-image: linear-gradient(to right, #0000, #fff, #f000);";

    document
        .querySelector("#greet-button")
        .addEventListener("click", () => greet());
    // tauri的fetch
    const { fetch } = window.__TAURI__.http;
    const response = await fetch(
        "https://v.api.aa1.cn/api/api-meiribizhi/api.php",
        {
            method: "GET",
            timeout: 30,
        }
    );
    imgs = response.data.data.map((v) => v.url);
    document.body.style.setProperty("background-image", "url(" + imgs[0] + ")");
});
运行yarn tauri dev,多次点击Greet切换背景图
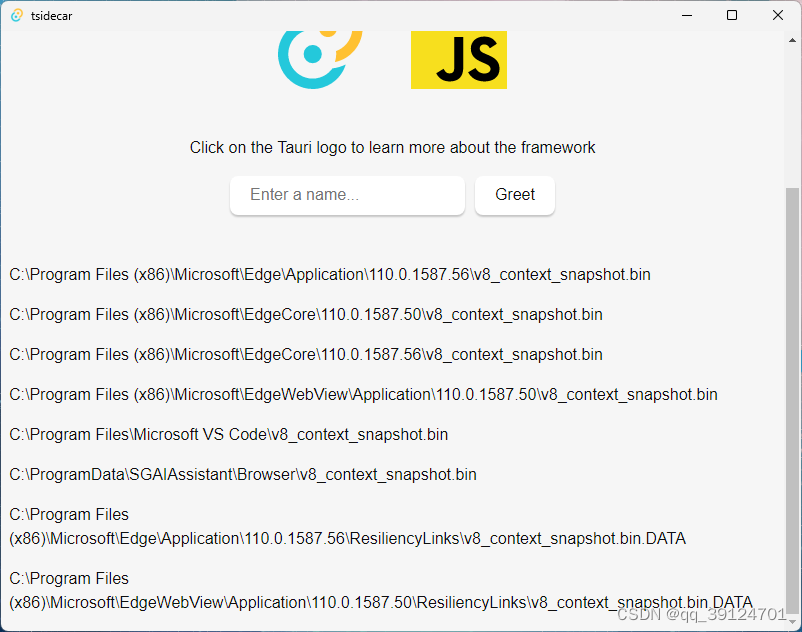
37.sidecar
tsidecar
市面上很多依赖Everything的软件却不将其内置,这次用tauri的sidecar调用everything,将Everything内置
1、访问Everything官网下载便携版 64 位和 Everything 命令行接口
最终文件路径如下
.\tsidecar\src-tauri\es.exe
.\tsidecar\src-tauri\Everything.exe
.\tsidecar\src-tauri\Everything.lng(顺带就加上了,其实没啥用,就是个语言包)
2、修改tauri.conf.json tauri.allowlist.shell的scope和sidecar
{
    "tauri": {
        "allowlist": {
            "shell": {
                "scope": [
                    { "name": "es", "sidecar": true, "args": true },
                    { "name": "Everything", "sidecar": true, "args": true }
                ],
                "sidecar": true
            }
        }
    }
}
3、修改tauri.conf.json tauri.bundle的externalBin和resources
{
    "tauri": {
        "bundle": {
            "externalBin": ["Everything", "es"],
            "resources": ["Everything.lng"]
        }
    }
}
4、修改tauri.conf.json tauri.allowlist.window的close(用来监听窗口关闭事件)
{
    "tauri": {
        "allowlist": {
            "window": {
                "close": true
            }
        }
    }
}
5、运行yarn tauri dev触发编译错误,获取报错提示的全文件名,系统不同文件名不同,以报错为准

本次报错为path matching Everything/Everything-x86_64-pc-windows-msvc.exe not found.
既然找不到文件,那就改文件名就行了
修改文件名后,最终文件路径如下
.\tsidecar\src-tauri\es-x86_64-pc-windows-msvc.exe
.\tsidecar\src-tauri\Everything-x86_64-pc-windows-msvc.exe
.\tsidecar\src-tauri\Everything.lng(资源文件不用改名)
4、重新运行yarn tauri dev,成功运行
并且.\tsidecar\src-tauri\target\debug目录多了es.exe、Everything.exe和Everything.lng三个文件
5、将mian.js替换为以下内容
const { Command } = window.__TAURI__.shell;

function greet() {
    document.querySelector("#greet-msg").textContent = "正在连接Everything";
    startEverything().then(() => {
        setTimeout(() => {
            document.querySelector("#greet-msg").textContent = "";
            searchV8().then(() => {
                setTimeout(() => {
                    document.documentElement.scrollTo(0, 330);
                }, 500);
            });
        }, 500);
    });
}

window.addEventListener("DOMContentLoaded", () => {
    const { TauriEvent } = window.__TAURI__.event;
    const currentwindow = window.__TAURI__.window.getCurrent();
    currentwindow.listen(TauriEvent.WINDOW_CLOSE_REQUESTED, (event) => {
        stopEverything().then(() =>
            window.__TAURI__.window.getCurrent().close()
        );
    });
    document
        .querySelector("#greet-button")
        .addEventListener("click", () => greet());
});

const echoG = (str) => {
    console.log(`%c${str}`, "color: green");
};
const echoB = (str) => {
    console.log(`%c${str}`, "color: blue");
};

async function searchV8() {
    const es = Command.sidecar("es", ["v8_context_snapshot.bin"]);
    es.on("close", (data) => {
        if (data.code == 0) {
            echoG("es 无已知错误,搜索成功。");
        }
    });
    es.on("error", (error) => console.error(`es command error: "${error}"`));
    es.stdout.on("data", (line) => {
        let p = document.createElement("p");
        p.textContent = `${line}`;
        document.body.appendChild(p);
    });
    es.stderr.on("data", (line) => echoG(`es command stderr: "${line}"`));
    const eschild = await es.spawn();
    echoG(`es pid:${eschild.pid}`);
}

async function startEverything() {
    const et = Command.sidecar("Everything", ["-admin", "-startup"]);
    const etchild = await et.spawn();
    echoB(`Everything pid:${etchild.pid}`);
}

async function stopEverything() {
    const etquit = Command.sidecar("Everything", ["-quit"]);
    await etquit.execute();
}
6、运行yarn tauri dev,点击Greet按钮之后,窗口列出了电脑中的所有v8_context_snapshot.bin文件的位置
(默认Everything软件的索引已创建完毕。第一次用必须按完按钮等会再重启使用,给Everything留时间建索引)


 1万+
1万+

 被折叠的 条评论
为什么被折叠?
被折叠的 条评论
为什么被折叠?
 到【灌水乐园】发言


