


0、配置PowerShell执行策略
以管理员身份运行PowerShell,运行Set-ExecutionPolicy RemoteSigned,并输入Y,回车确认
1、安装nvm
访问下载地址下载安装nvm:
- 百度云分享
- 官网直装链接
- nvm的github发行界面下载
nvm-setup.exe
2、配置nvm
nvm install 18.15.0安装Node.js18.15.0LTS版
nvm use 18.15.0启用这个版本
运行cmd /c "nvm -v && node -v && npm -v",正常输出版本号说明安装完成
npm config set registry https://registry.npmmirror.com 设置镜像
3、安装浏览器
Gluon基于已安装的浏览器,和Electron、Tauri的运行原理都不同
Win11自带Edge浏览器,Ubuntu自带火狐浏览器,实在没有也可以安装Chrome浏览器
Chrome官网、Firefox官网、Edge官网
基于Chromium和Firefox一众浏览器
不支持Safari
4、安装VSCode
5、Gluon项目构成
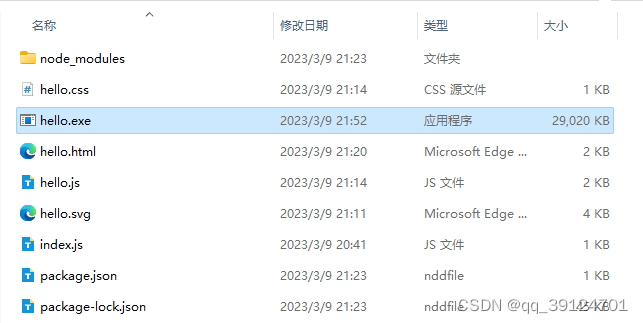
gluon_data这不是项目本身,不用关注,这是自动生成的。node_modules模块文件夹。里面有很多模块,例如@gluon-framework/gluonindex.js程序入口文件。package.json中的main属性指定了index.js作为入口文件package-lock.json锁定安装时的包的版本号及包的依赖的版本号。这是自动生成的。package.json项目描述文件。用于放置脚本,指定入口文件,指定依赖包。
8、新建项目hellogluon
-
md hellogluon;cd hellogluon;npm init -y;npm install @gluon-framework/gluon --save;code .
创建、初始化gluon、安装、使用VSCode打开 -
修改
package.json,添加type属性{ "type": "module" }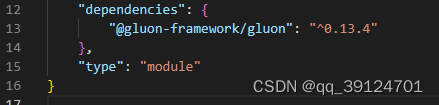
-
新建文件
.\hellogluon\index.js// 导入gluon import * as Gluon from "@gluon-framework/gluon"; //一个直接执行的匿名函数 (async () => { // 获取启动参数 const browsers = process.argv.slice(2).filter((x) => !x.startsWith("-")); // 检查是否有启动参数 if (browsers.length > 0) { // 将启动参数传递给新窗口,打开一个新窗口 for (const forceBrowser of browsers) { await Gluon.open("./hello.html", { windowSize: [800, 500], forceBrowser, }); } // 结束匿名函数的运行 return; } // 打开一个新窗口 await Gluon.open("./hello.html", { windowSize: [800, 500], }); })(); -
新建文件
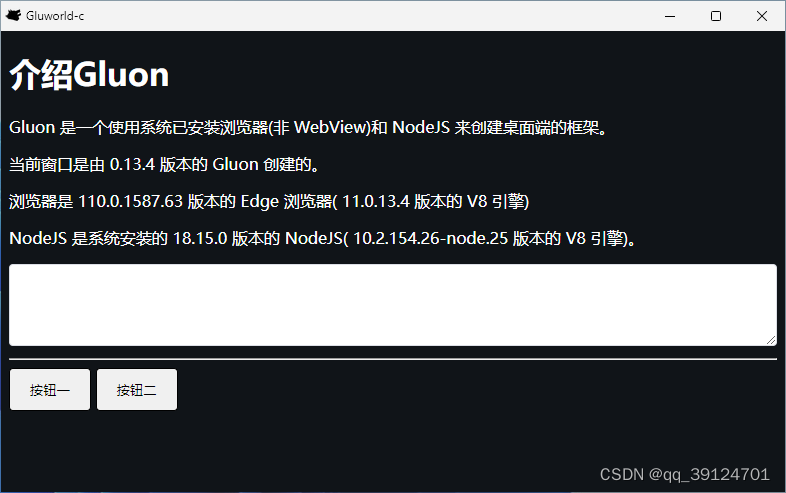
.\hellogluon\hello.html<!DOCTYPE html> <html lang="zh-CN"> <head> <meta charset="UTF-8" /> <!-- Gluon只会读网络图片和本地svg图片,极低概率读取本地favicon.ico,读取什么格式都是损坏的 --> <link rel="icon" href="./hello.svg" /> <title>Gluworld-c</title> <link rel="stylesheet" href="hello.css" /> <script src="hello.js"></script> </head> <body> <h1>介绍Gluon</h1> <p> Gluon 是一个使用系统已安装浏览器(非 WebView)和 NodeJS 来创建桌面端的框架。 </p> <p> 当前窗口是由 <span id="GluonVersion">0.13.4</span> 版本的 Gluon 创建的。 </p> <p> 浏览器是 <span id="BrowserVersion">110.0.1587.63</span> 版本的 <span id="Browser">Edge</span> 浏览器( <span id="JSEngineVersioin">11.0.13.4</span> 版本的 <span id="JSEngine">V8</span> 引擎) </p> <p> NodeJS 是<span id="NodeState">系统安装</span>的 <span id="NodeVersion">18.15.0</span> 版本的 NodeJS( <span id="NodeV8Version">10.2.154.26-node.25</span> 版本的 V8 引擎)。 </p> <textarea title="---" id="text"></textarea> <hr /> <button id="btn1" type="button">按钮一</button> <button id="btn2" type="button">按钮二</button> </body> </html> -
网上随便找个svg图片放在这个路径:
.\hellogluon\hello.svg -
新建文件
.\hellogluon\hello.csshtml, body { background: #101418; color: #fff; } textarea { border-radius: 4px; border: 1px solid #dcdfe6; box-sizing: border-box; line-height: 40px; outline: none; padding: 0 15px; width: 100%; } button { cursor: pointer; padding: 12px 20px; border-radius: 4px; border: 1px solid black; } button:active { transform: translate(2px, 2px); } button:hover { border: 1px solid white; } -
新建文件
.\hellogluon\hello.js(async () => { await new Promise((resolve) => { function check() { if (!window.Gluon) { return setTimeout(check, 50); } else { return resolve(); } } check(); }); // 获取gluon版本号 document.querySelector("#GluonVersion").textContent = Gluon.versions.gluon; //获取浏览器版本号 document.querySelector("#BrowserVersion").textContent = Gluon.versions.browser; //获取当前嵌入的浏览器 document.querySelector("#Browser").textContent = Gluon.versions.product; //获取JS引擎的版本号 document.querySelector("#JSEngineVersioin").textContent = Gluon.versions.js.browser; //获取JS引擎名称 document.querySelector("#JSEngine").textContent = Gluon.versions.browserType === "firefox" ? "SpiderMonkey" : "V8"; //获取Node的运行位置 document.querySelector("#NodeState").textContent = Gluon.versions.embedded .node ? "内部嵌入" : "系统安装"; //获取Node版本号 document.querySelector("#NodeVersion").textContent = Gluon.versions.node; //获取Node使用的V8引擎的版本号 document.querySelector("#NodeV8Version").textContent = Gluon.versions.js.node; })(); -
项目根目录
.\hellogluon运行node .
9、caxa打包
- 安装caxa
npm install caxa --save-dev - 运行打包命令
就这么简单,soeasy。Remove-Item -Recurse -Force .\gluon_data\;npx caxa --input . --output hello.exe -- "{{caxa}}/node_modules/.bin/node" "{{caxa}}/index.js"
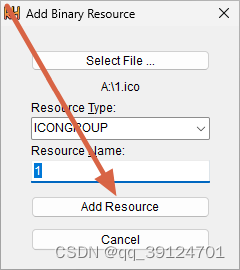
- Resource Hacker官网下载软件用来添加图标,在线ICO转换网站用来转换图标,将
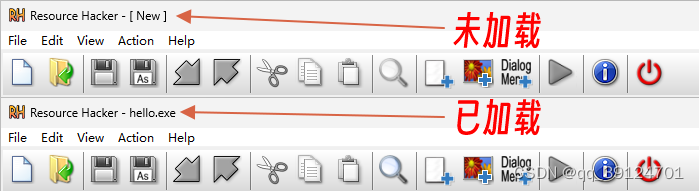
.\hellogluon\hello.svg转换为1.ico(必须叫这个名字,就叫1.ico) - 将hello.exe拖拽进ResourceHacker软件,标题栏变化说明加载成功
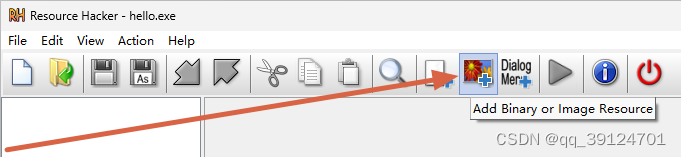
- 点击选项
Add Binary or Image Resource(菜单选项Action中也有该项,快捷键Ctrl+M)
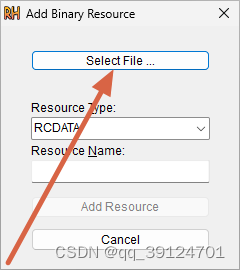
- 点击按钮
Select File …,打开1.ico,点击按钮Add Resource,点击保存按钮
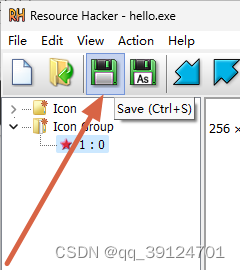
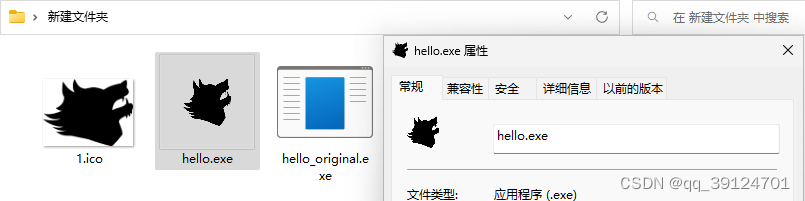
7.修改完成(确认方法:将hello.exe放进随机数文件夹里,躲避Windows图标缓存)
10、pkg打包?
如何构建可执行文件? - Github议题
Gluon目前并没有打包方案,使用pkg?
ES modules not supported - pkg - github议题
pkg打了半天打不上,打个屁😂。
直接下载Node压缩包node-v18.15.0-win-x64.zip,官网下载、镜像下载
解压Node,将项目和Node放一起,目录如下
".\hello\gluworld-c
.\hello\node-v18.15.0-win-x64
.\hello\start.bat
.\hello\start.bat的内容为:
node-v18.15.0-win-x64\node.exe gluworld-c\index.js


 1220
1220


 被折叠的 条评论
为什么被折叠?
被折叠的 条评论
为什么被折叠?
 到【灌水乐园】发言


