


EGE专栏:EGE专栏
目录
一、分形
可以看看知乎这篇关于分形的文章
二、康托尔集(Cantor Set)
1. Koch雪花曲线

Koch雪花曲线是由最开始的一个三角形,经过对边不断进行弯折吼形成的一个形似雪花的一个图形。
如下图,从单独的一条边来看,将一条边三等分,中间的一段拱起,变成原来的两倍长度,尖角为60°,这样就将一条边变形为4条小边。再对每条小边进行同样的处理,经过多次之后,就形成了最终的形态。
可以通过控制迭代次数来控制图形精度。三角形三条边进行同样的操作,就形成了雪花。

#include <graphics.h>
#include <math.h>

//分别对应60度的倍数
double cosx[6], sinx[6];

//koch雪花曲线
//将一条由p1到p2的线()
void koch(ege_point p1, ege_point p2, int dir, int n) {
	if (n <= 0) {
		ege_line(p1.x, p1.y, p2.x, p2.y);
	}
	else {
		ege_point mid1 = { p1.x + (p2.x-p1.x) / 3, p1.y + (p2.y - p1.y) / 3};
		ege_point mid3 = { p2.x + (p1.x - p2.x) / 3,  p2.y + (p1.y - p2.y) / 3 };

		float len = sqrt((p2.x - p1.x) * (p2.x - p1.x) + (p2.y - p1.y)* (p2.y - p1.y)) / 3;
		ege_point mid2 = { mid1.x + len * cosx[(dir + 1) % 6], mid1.y + len * sinx[(dir + 1) % 6] };

		//递归绘制四条边
		koch(p1, mid1, dir, n - 1);
		koch(mid1, mid2, (dir + 1) % 6, n - 1);
		koch(mid2, mid3, (dir + 5) % 6, n - 1);
		koch(mid3, p2, dir, n - 1);
	}
}

int main()
{
	initgraph(600, 600, INIT_RENDERMANUAL);

	setbkcolor(WHITE);					//设置背景颜色
	setcolor(EGEACOLOR(0xFF, BLUE));	//设置线条颜色
	ege_enable_aa(true);				//开启抗锯齿

	//计算60°倍角的cos和sin值
	for (int i = 0; i < 6; i++) {
		cosx[i] = cos(i * PI / 3);
		sinx[i] = sin(i * PI / 3);
	}

	//计算正三角形的三个顶点
	ege_point triangle[3] = {
		{300 + 200 * cos(PI / 6), 300 + 200 * sin(PI / 6)},
		{300 + 200 * cos(- PI / 2), 300 + 200 * sin(- PI / 2)},
		{300 + 200 * cos(5 * PI / 6), 300 + 200 * sin(5 * PI / 6)},
	};

	for (int i = 0; i <= 6;delay_ms(800),i++) {
		cleardevice();

		//三角形三条边
		koch(triangle[0], triangle[1], 4, i);
		koch(triangle[1], triangle[2], 2, i);
		koch(triangle[2], triangle[0], 0, i);
	}

	getch();

	closegraph();

	return 0;
}

三、曼德布罗特集(Mandelbrot)
也称 “上帝的指纹”。
描述如下:

就是将窗口上的像素点映射到一个复数
c
\ c
c, 初始
z
=
0
\ z=0
z=0, 再由公式
z
=
z
2
+
c
z = z^2+c
z=z2+c 对
z
z
z进行多次迭代,如果最终
z
z
z收敛,那么该点就属于集合。
对于判别是否收敛,可以在多次迭代后,判断
z
z
z的模是否大于某个值,若大于则为发散,这里可以取2值,则模的平方为4,判别4即可,避免开方操作。
关于窗口上的像素点坐标映射成的复数
c
\ c
c,可以通过标准坐标系的图形来观察(即中心为(0,0),坐标轴为小数),然后选取部分区域,将窗口内的像素坐标映射到这个区域即可。通过改变窗口映射的区域,可以实现放大缩小。
假设窗口大小为 (width, height),对应的区域为 (fromx, tox), (fromy, toy),那么坐标
(
x
,
y
)
\ (x, y)
(x,y)对应的复数
c
\ c
c 公式为:
实部
r
e
a
l
=
f
r
o
m
x
+
(
t
o
x
−
f
r
o
m
x
)
x
w
i
d
t
h
实部real\,\,=\,\,fromx\,\,+\,\,\left( tox-fromx \right) \frac{x}{width}
实部real=fromx+(tox−fromx)widthx
虚部
i
m
a
g
=
f
r
o
m
y
+
(
t
o
y
−
f
r
o
m
y
)
y
h
e
i
g
h
t
虚部imag\,\,=\,\,fromy\,\,+\,\,\left( toy-fromy \right) \frac{y}{height}
虚部imag=fromy+(toy−fromy)heighty 下面的程序则是将窗口区域映射到标准坐标系中 x范围(-2, 1), y轴范围(-1.2, 1.2) 的矩形区域。
颜色则是根据超出阈值时的迭代次数转成HSL颜色,因为迭代次数很靠近,会形成颜色变化过慢,所以进行放大,如果颜色不同,还可以通过增加值来改变色相。
这里取
HSVtoRGB((float)(((i+10) << 4) % 360), 1.0, 1.0)
如果你想后期可以改变颜色,那么只需要存储每个像素超出阈值时的迭代次数即可。
#include <graphics.h>

//复数
struct Complex
{
	double re, im;

	Complex() :re(0.0), im(0.0) {}
	Complex(double real, double imag) : re(real), im(imag) {}

	//重载乘法运算符和加法运算符
	Complex operator * (Complex c) { return Complex(re * c.re - im * c.im, im * c.re + re * c.im);}
	Complex operator + (Complex c) { return Complex(re + c.re, im + c.im); }
};

int main()
{
	const int SCR_WIDTH = 640, SCR_HEIGHT = 480;
	initgraph(SCR_WIDTH, SCR_HEIGHT, INIT_RENDERMANUAL);	//初始化图形窗口

	//映射的区域范围
	float fromX = -2, toX = 1;
	float fromY = -1.2, toY = 1.2;

	Complex c;
	for (int x = 0; x < 640; x++)
	{
		c.re = fromX + (toX - fromX) * ((float)x / SCR_WIDTH);
		for (int y = 0; y < 480; y++)
		{
			c.im = fromY + (toY - fromY) * ((float)y / SCR_HEIGHT);
			Complex z;
			const int ITOR_NUM = 180;
			int i;

			for (i = 0; i < ITOR_NUM; i++)
			{
				if (z.re * z.re + z.im * z.im > 4)
					break;
				z = z * z + c;
			}

			//设置颜色,这里使用HSV颜色模型,这样可以根据迭代层数,颜色渐变
			color_t color = (i == ITOR_NUM) ? BLACK : HSVtoRGB((float)(((i+10) << 4) % 360), 1.0, 1.0);
			putpixel(x, y, color);
		}
	}

	getch();

	closegraph();

	return 0;
}
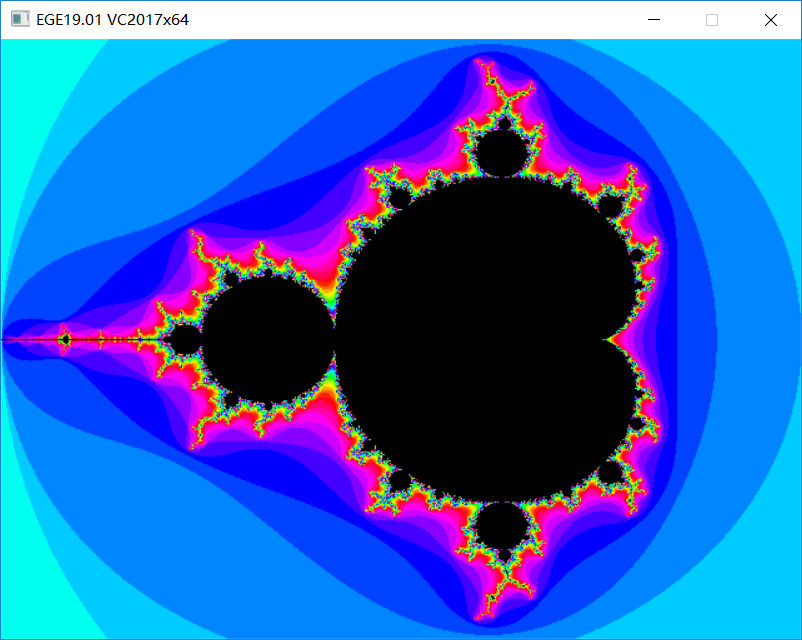
下图映射区域: x∈(-2, 1), y∈(-1.2, 1.2)
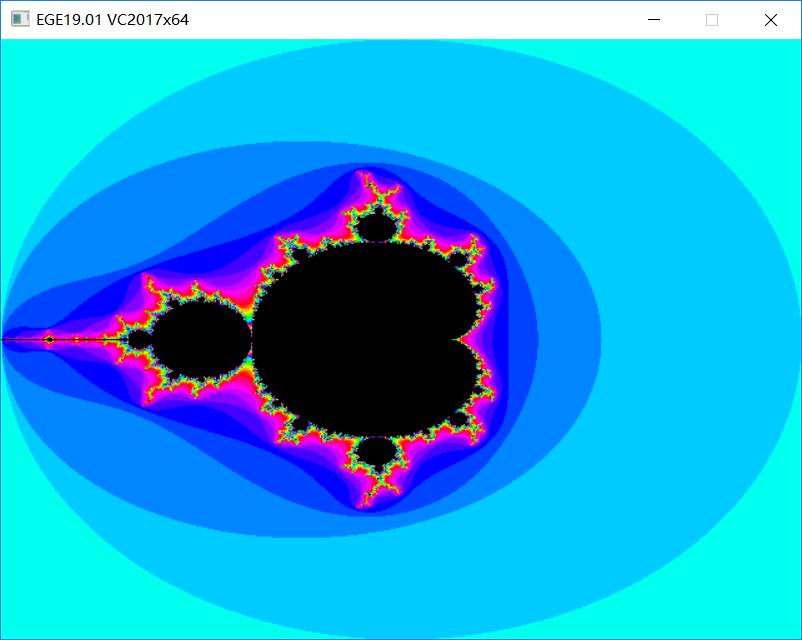
下图映射区域: x∈(-2, 2), y∈(-2, 2)
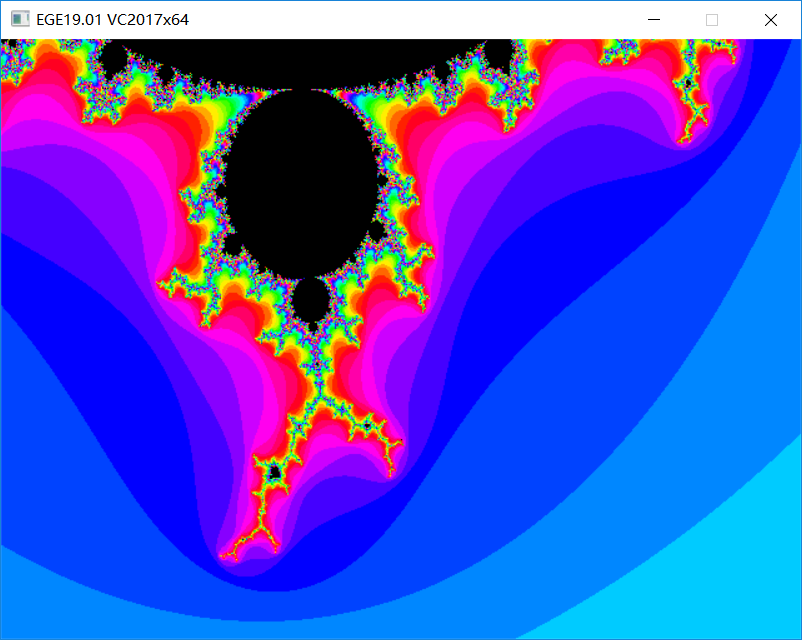
如果你对应到很小的地方,那么会看到细节部分,当然,迭代次数需要更大,这样才能更精细。
x范围(-0.5, 0.5), y轴范围(0.6, 1.2)
对应区域即上图中最下面的一个枝条(y轴向下为正)
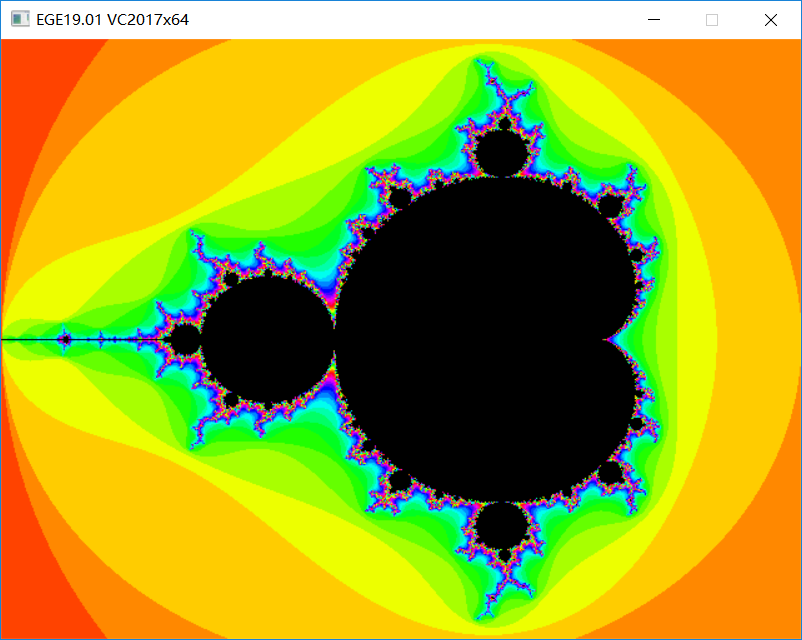
通过修改生成颜色公式,可以得到不同的颜色,如
HSVtoRGB((float)((i << 4) % 360), 1.0, 1.0);
可局部放大的曼德布洛特集
(修改自easyx官网分形学示例)
(鼠标左键框选区域放大显示)
由鼠标选取区域重新确定映射区域,然后重新进行计算绘制。


#include <graphics.h>

const int NUM_ITER = 1000;		// 迭代次数

#ifndef  SWAP
#define SWAP(a, b, t) {t = a; a = b; b = t;}
#endif // ! SWAP


struct Complex
{
	double re, im;

	Complex() :re(0.0), im(0.0) {}
	Complex(double real, double imag) : re(real), im(imag) {}

	//重载乘法运算符和加法运算符
	Complex operator * (Complex c) { return Complex(re * c.re - im * c.im, im * c.re + re * c.im); }
	Complex operator + (Complex c) { return Complex(re + c.re, im + c.im); }
};


#define MAX_COLOR_NUM 64	// 颜色数
int Color[MAX_COLOR_NUM];

// 初始化颜色
void initColdeTable()
{
	for (int i = 0; i < MAX_COLOR_NUM / 2; i++)
	{
		Color[i] = HSLtoRGB(240, 1.0, i * 2.0 / MAX_COLOR_NUM);
		Color[MAX_COLOR_NUM - 1 - i] = HSLtoRGB(30, 1.0, i * 2.0 / MAX_COLOR_NUM);
	}
}

// 绘制曼德布洛特集 (Mandelbrot Set)
void draw(double fromx, double fromy, double tox, double toy)
{
	Complex c;
	for (int x = 0; x < 640; x++)
	{
		c.re = fromx + (tox - fromx) * (x / 640.0);
		for (int y = 0; y < 480; y++)
		{
			c.im = fromy + (toy - fromy) * (y / 480.0);
			Complex z;
			int i = 0;
			for ( ; i < NUM_ITER; i++)
			{
				if (z.re * z.re + z.im * z.im > 4.0)	break;
				z = z * z + c;
			}
			putpixel(x, y, (i == NUM_ITER) ? 0 : Color[i % MAX_COLOR_NUM]);
		}
	}
}

int main()
{
	initgraph(640, 480, INIT_RENDERMANUAL);

	//初始化颜色表
	initColdeTable();

	// 初始化 Mandelbrot Set(曼德布洛特集)坐标系范围
	const double INIT_FROM_X = -2, INIT_TO_X = 1;
	const double INIT_FROM_Y = -1.2, INIT_TO_Y = 1.2;

	double fromx = INIT_FROM_X, tox = INIT_TO_X;
	double fromy = INIT_FROM_Y, toy = INIT_TO_Y;

	draw(fromx, fromy, tox, toy);

	bool isPress = false;	//鼠标左键按下标志位
	bool redraw = true;

	int areaLeft = 0, areaTop = 0, areaRight = 0, areaBottom = 0;	// 定义选区

	while (1) {
		mouse_msg msg = getmouse();

		// 鼠标中键按下时重置图形
		if (msg.is_mid() && msg.is_down()) {
			fromx = INIT_FROM_X;
			tox = INIT_TO_X;
			fromy = INIT_FROM_Y;
			toy = INIT_TO_Y;

			redraw = true;
		}
		//鼠标左键点击,选取范围
		else if (msg.is_left()) {
			if (msg.is_down()) {
				isPress = true;
				setcolor(WHITE);
				setwritemode(R2_XORPEN);
				areaLeft = areaRight = msg.x;
				areaTop = areaBottom = msg.y;
			}
			else {	// 鼠标左键松开时确定选区
				isPress = false;
				redraw = true;

				//消除选框
				rectangle(areaLeft, areaTop, areaRight, areaBottom);
				setwritemode(R2_COPYPEN);

				areaRight = msg.x;
				areaBottom = msg.y;

				if (areaLeft != areaRight && areaTop != areaBottom) {
					// 修正选区为 4:3
					int temp;
					if (areaLeft > areaRight)
						SWAP(areaLeft, areaRight, temp);
					if (areaTop > areaBottom)
						SWAP(areaTop, areaBottom, temp);

					if ((areaRight - areaLeft) * 0.75 < (areaBottom - areaTop))
					{
						areaBottom += (3 - (areaBottom - areaTop) % 3);
						areaLeft -= (areaBottom - areaTop) / 3 * 4 / 2 - (areaRight - areaLeft) / 2;
						areaRight = areaLeft + (areaBottom - areaTop) / 3 * 4;
					}
					else
					{
						areaRight += (4 - (areaRight - areaLeft) % 4);
						areaTop -= (areaRight - areaLeft) * 3 / 4 / 2 - (areaBottom - areaTop) / 2;
						areaBottom = areaTop + (areaRight - areaLeft) * 3 / 4;
					}

					// 更新坐标系
					double from = fromx, to = tox;
					fromx = from + (to - from) * areaLeft / 640;
					tox = from + (tox - from) * areaRight / 640;
					from = fromy;
					to = toy;
					fromy = from + (to - from) * areaTop / 480;
					toy = from + (to - from) * areaBottom / 480;
				}
			}
		}
		else if (msg.is_move() && isPress) {
			//消除选框
			rectangle(areaLeft, areaTop, areaRight, areaBottom);
			areaRight = msg.x;
			areaBottom = msg.y;
			//绘制选框
			rectangle(areaLeft, areaTop, areaRight, areaBottom);
		}

		//重绘
		if (redraw) {
			redraw = false;
			draw(fromx, fromy, tox, toy);
		}
	}

	getch();
	closegraph();

	return 0;
}
四、谢尔宾斯基三角形(Sierpinski triangle)
1. 迭代法
方法是先取一个实心三角形,将三条边的三个中点相连,分成四个小三角形,将中间的三角形去掉,形成镂空状(即只绘制其它三个三角形)。然后对剩余的三个三角形重复进行操作。
递归层数太多会很耗时,并且因为镂空得太多,三角形会变得很淡,由于屏幕分辨率限制,也无法太细,所以7以内即可。
可以控制图形精细程度,比较美观,并且可以用抗锯齿函数绘制。
一种是先绘制实心三角形,递归时绘制背景色中心三角形将其镂空,另一种是先不绘制,递归到一定层数时再绘制各个实心小三角形。这里取第二种。
#include <graphics.h>
#include <math.h>

void sierpinskiTriangle(ege_point points[3], int n) {
	if (n == 0) {
		ege_fillpoly(3, points);
		return;
	}

	ege_point midPoint[3] = {
		{(points[0].x + points[1].x) / 2, (points[0].y + points[1].y) / 2},
		{(points[1].x + points[2].x) / 2, (points[1].y + points[2].y) / 2},
		{(points[0].x + points[2].x) / 2, (points[0].y + points[2].y) / 2}
	};
	ege_point  tri1[3] = { points[0], midPoint[0], midPoint[2] };
	ege_point  tri2[3] = { midPoint[0], points[1], midPoint[1] };
	ege_point  tri3[3] = { midPoint[2], midPoint[1], points[2] };

	sierpinskiTriangle(tri1, n - 1);
	sierpinskiTriangle(tri2, n - 1);
	sierpinskiTriangle(tri3, n - 1);
}

int main()
{
	initgraph(600, 600, INIT_RENDERMANUAL);
	setbkcolor(WHITE);
	delay_ms(0);
	setfillcolor(EGEARGB(0xFF, 0x50, 0x80, 0xFF));
	ege_enable_aa(true);

	ege_point triangle[3] = { {300, 50}, {50, 500}, {550, 500} };	//三角形三个顶点

	for (int i = 0; i <= 7; delay_ms(1000),i++) {
		cleardevice();
		sierpinskiTriangle(triangle, i);
	}
	getch();

	closegraph();

	return 0;
}
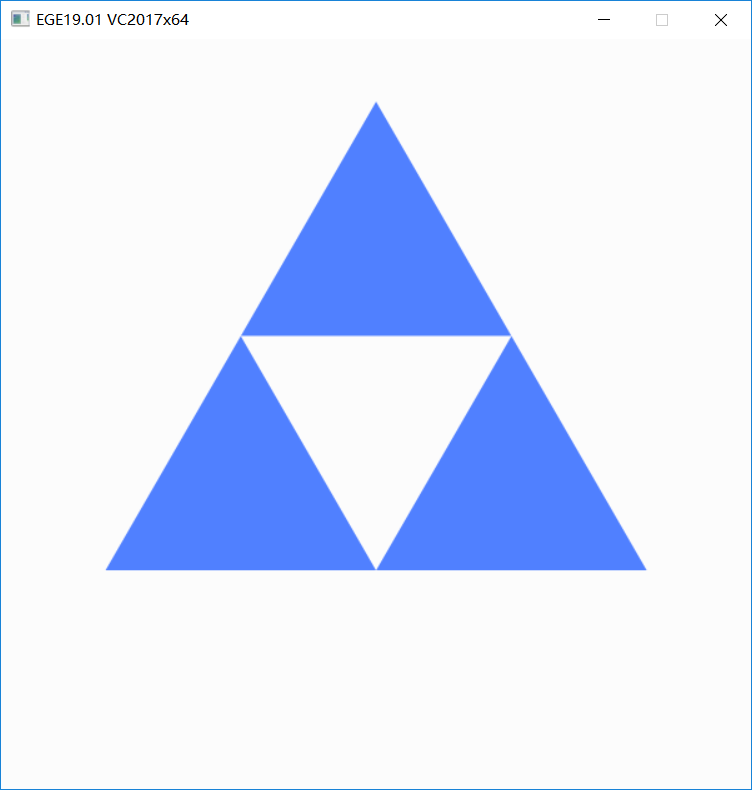
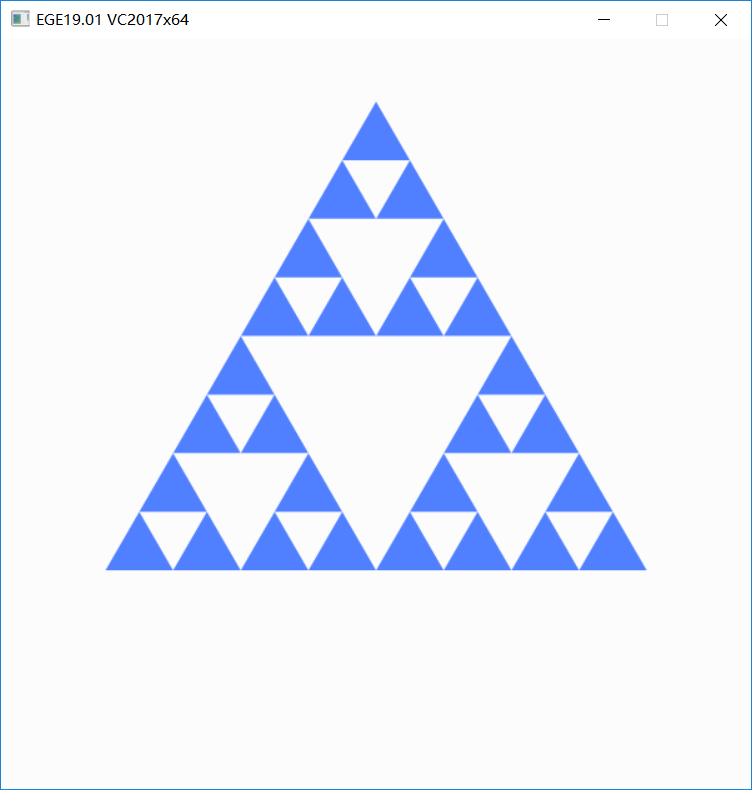
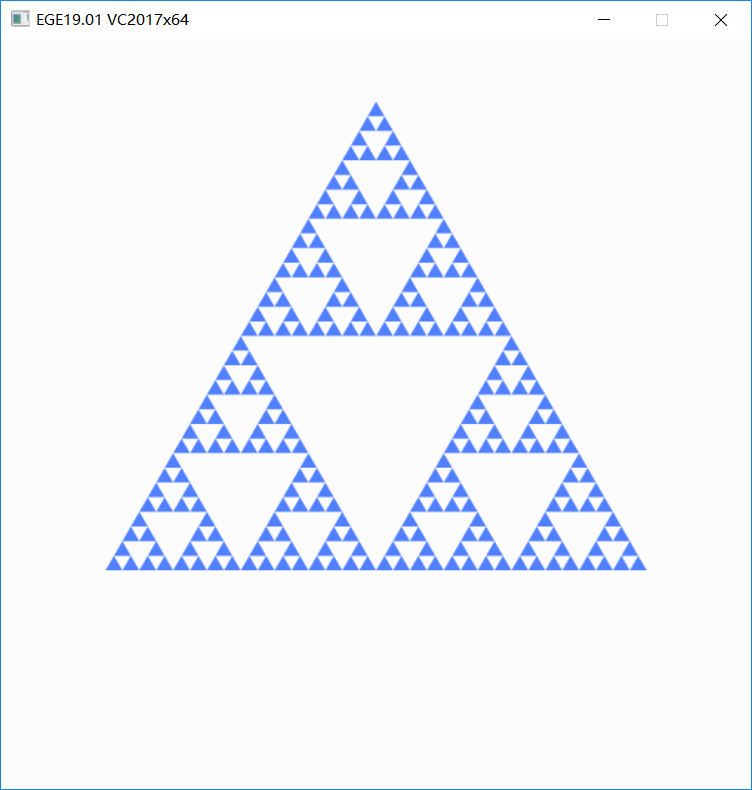
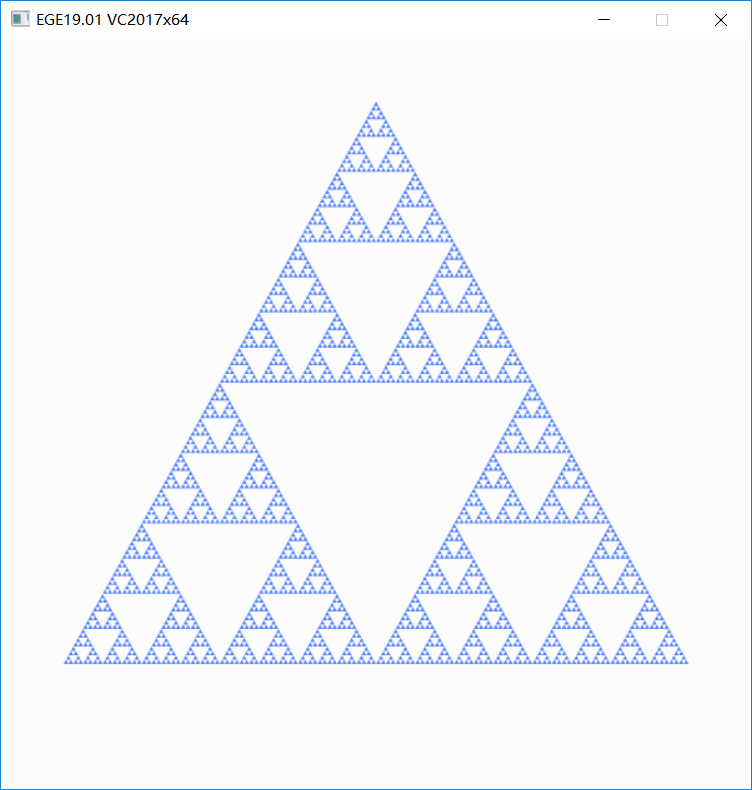
递归1层,递归3层,递归5层和递归7层
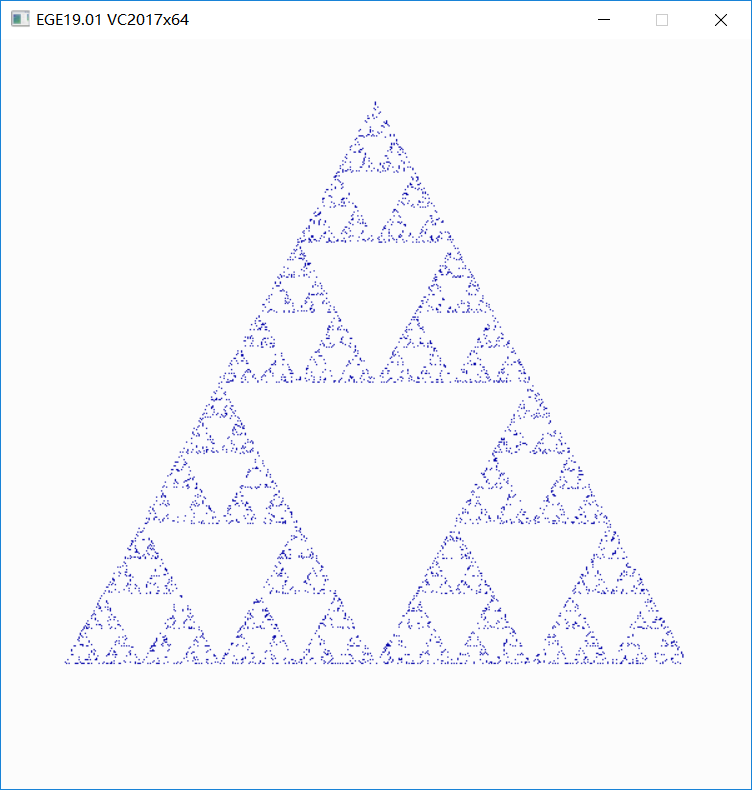
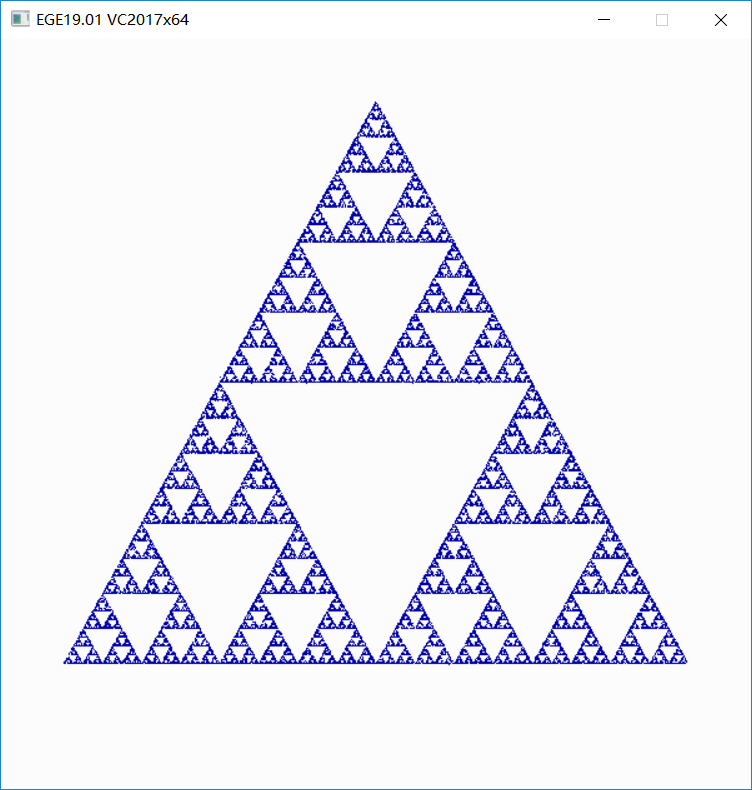
2. 随机法
取平面上三点A,B,C,组成一三角形
任意取三角形ABC内的一点P(因为最后都会形成图形,位置不重要)
重复下面步骤:
- 计算出点P与三角形随机一个顶点的中点,并画出该点
- 点P变为该中点
程序比较简单,但是需要大量的随机点,否则图形会看到很多噪点,并且无法控制图形的精细程度。因为是随机生成的,比较粗糙。
初始点不在三角形内部的话,可能会在外部产生几个点,但最后点会进入三角形内部。
下面是代码。
#include <graphics.h>
#include <stdlib.h>
#include <time.h>

int main()
{
	ege_point triangle[3] = { {300, 50}, {50, 500}, {550, 500} };	//三角形三个顶点
	ege_point p = { 300, rand() % 300 };	//三角形内部任意点

	initgraph(600, 600, INIT_RENDERMANUAL);
	setbkcolor(WHITE);

	srand((unsigned)time(0));
	for (int i = 0; i <= 60000; i++) {
		int r = rand() % 3;
		p.x = (p.x + triangle[r].x) / 2;
		p.y = (p.y + triangle[r].y) / 2;
		putpixel(p.x, p.y, BLUE);
	}

	// 按任意键退出
	getch();

	closegraph();

	return 0;
}
左边为迭代5000次, 右边为迭代50000次。
EGE专栏:EGE专栏


 1392
1392


 被折叠的 条评论
为什么被折叠?
被折叠的 条评论
为什么被折叠?
 到【灌水乐园】发言


