


 本文详细介绍了如何在VSCode中配置launch.json文件,以调试涉及CUDA和torch.distributed.launch的Python命令。两种方法分别通过attach模式和直接启动脚本实现,确保在多GPU环境下顺利进行深度学习模型的训练。
简单命令
- 例如想要执行的命令为
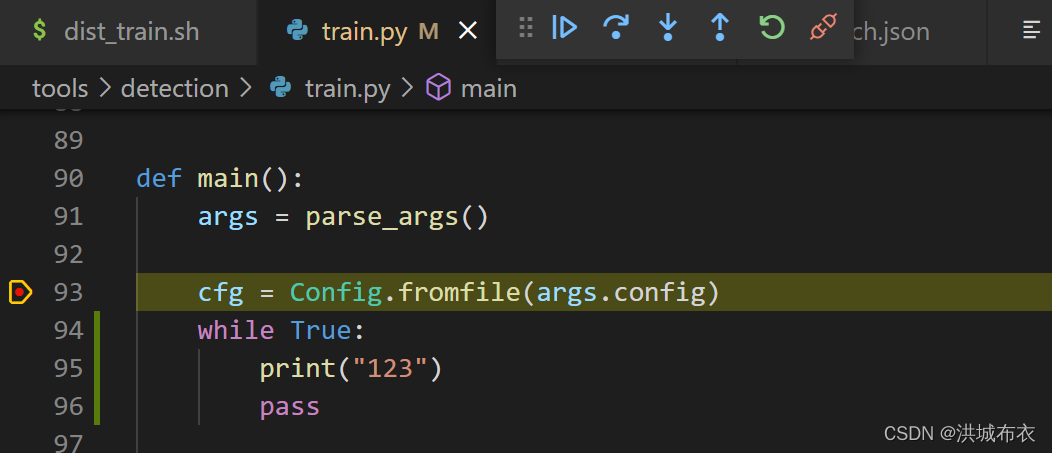
CUDA_VISIBLE_DEVICES="0,1,2,3" python train.py --batch_size 8 --imgsize 680 - 在launch.json中添加如下,再打开train.py这个文件,设置断点,点击上方的运行->调试即可
{
    // 使用 IntelliSense 了解相关属性。
    // 悬停以查看现有属性的描述。
    // 欲了解更多信息,请访问: https://go.microsoft.com/fwlink/?linkid=830387
    "version": "0.2.0",
    "configurations": [
        {
            "name": "Python: 当前文件",
            "type": "python",
            "request": "launch",
            "program": "${file}",
            "console": "integratedTerminal",
            "env": {"CUDA_VISIBLE_DEVICES":"0,1,2,3"},
            "args": ["--batch_size", "8", "--imgsize", "680"]
            ]
        }
    ]
}
复杂命令
想执行的命令形如 python -m,就不能只是指定启动参数了
python -m torch.distributed.launch --nproc_per_node=4 train.py --batch_size 8 --imgsize 680
有两种方式实现,推荐方式二
方式一
-
那么执行
python3 -m pip install debugpy安装debugpy
再在launch.json中填入{ // 使用 IntelliSense 了解相关属性。 // 悬停以查看现有属性的描述。 // 欲了解更多信息,请访问: https://go.microsoft.com/fwlink/?linkid=830387 "version": "0.2.0", "configurations": [ { "name": "Python: Attach", "type": "python", "request": "attach", "connect": { "host": "localhost", "port": 5678 } } ] } -
然后命令行执行
python -m debugpy --listen 5678 -m torch.distributed.launch --nproc_per_node=4 train.py --batch_size 8 --imgsize 680 -
再点运行->调试,稍等片刻即可连接上你的调试,使用这种方式的调试,工具栏的最右边由停止符号变成了一个双插头连接符号
方式二
// 想要执行python -m torch.distributed.launch --nproc_per_node=4 train.py --batch_size 8 --imgsize 680
// 定位到当前解释器中torch.distributed.launch包的位置并设置program项,可以通过import torch.distributed.launch as launch 然后打印 launch.__file__即可获得
{
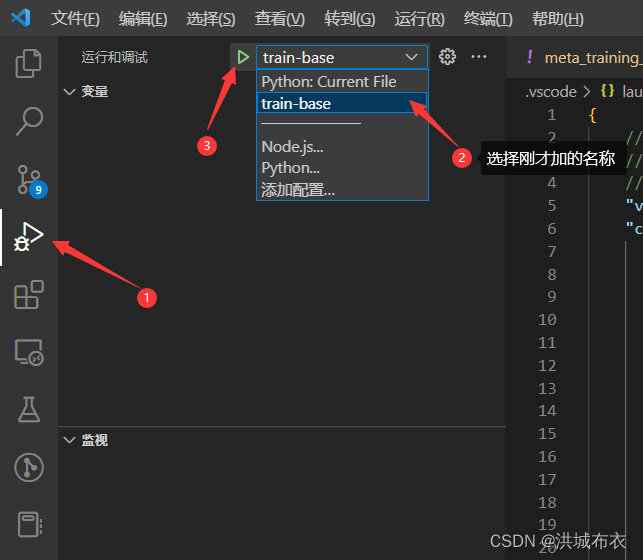
"name": "train-base",
"type": "python",
"request": "launch",
"program": "/usr/local/anaconda3/envs/openmmlab/lib/python3.7/site-packages/torch/distributed/launch.py",
"console": "integratedTerminal",
"env": {"CUDA_VISIBLE_DEVICES":"0,1,2,3"},
"args": ["--node_rank=4", "train.py",
"batch_size", "8", "--imgsize", "680"]
}


 474
474

 被折叠的 条评论
为什么被折叠?
被折叠的 条评论
为什么被折叠?
 到【灌水乐园】发言


