


文章目录
- 一、isinstance和issubclass
- 二、反射
- 三 、__ setattr__,__ delattr__,__ getattr__
- 四、__ getattribute__
- 五、描述符(__ get__,__ set__,__ delete__)
- 六、再看property
- 七、__ setitem__,__ getitem__,__ delitem__
- 八、__ str__,__ repr__,__ format__
- 九、__next__和__iter__实现迭代器协议
- 十、__ doc__
- 十一、__ module__和__class__
- 十二、__ del__
- 十三、__ call__
- 十四、__ enter__和__ exit__
- 十五、__ len__
- 十六、__ hash__
- 十七、__ eq__
- 十八、__ new__和元类metaclass
一、isinstance和issubclass
isinstance(obj,cls)检查是否obj是否是类 cls 的对象
class Foo(object):
     pass

obj = Foo()

isinstance(obj, Foo)
issubclass(sub, super)检查sub类是否是 super 类的派生类
class Foo(object):
    pass

class Bar(Foo):
    pass

issubclass(Bar, Foo)
二、反射
1 什么是反射
反射的概念是由Smith在1982年首次提出的,主要是指程序可以访问、检测和修改它本身状态或行为的一种能力(自省)。这一概念的提出很快引发了计算机科学领域关于应用反射性的研究。它首先被程序语言的设计领域所采用,并在Lisp和面向对象方面取得了成绩。
2 python面向对象中的反射
通过字符串的形式操作对象相关的属性。python中的一切事物都是对象(都可以使用反射)
四个可以实现自省的函数
下列方法适用于类和对象(一切皆对象,类本身也是一个对象)
- hasattr(obj, name):判断object中有没有一个name字符串对应的方法或属性
- getattr(obj, name, default=None):从对象获取命名属性;getattr(x,‘y’)等价于x.y。当一个默认参数被给定时,当属性没有被指定时,它被返回存在;没有它,在这种情况下会引发异常。
- setattr(x, y, v):将给定对象上的命名属性设置为指定值。setattr(x,‘y’,v)等价于“x.y=v”
- delattr(x, y):从给定对象中删除命名属性。delattr(x,‘y’)等价于“del x.y”
四个方法的使用演示:
class BlackMedium:
    feature='Ugly'
    def __init__(self,name,addr):
        self.name=name
        self.addr=addr

    def sell_house(self):
        print('%s 黑中介卖房子啦,傻逼才买呢,但是谁能证明自己不傻逼' %self.name)
    def rent_house(self):
        print('%s 黑中介租房子啦,傻逼才租呢' %self.name)

b1=BlackMedium('万成置地','回龙观天露园')

#检测是否含有某属性
print(hasattr(b1,'name'))
print(hasattr(b1,'sell_house'))

#获取属性
n=getattr(b1,'name')
print(n)
func=getattr(b1,'rent_house')
func()

# getattr(b1,'aaaaaaaa') #报错
print(getattr(b1,'aaaaaaaa','不存在啊'))

#设置属性
setattr(b1,'sb',True)
setattr(b1,'show_name',lambda self:self.name+'sb')
print(b1.__dict__)
print(b1.show_name(b1))

#删除属性
delattr(b1,'addr')
delattr(b1,'show_name')
delattr(b1,'show_name111')#不存在,则报错

print(b1.__dict__)

'''
AttributeError: show_name111
True
True
万成置地
万成置地 黑中介租房子啦,傻逼才租呢
不存在啊
{'name': '万成置地', 'addr': '回龙观天露园', 'sb': True, 'show_name': <function <lambda> at 0x000001CA326CC430>}
万成置地sb
'''
类也是对象:
class Foo(object):
    staticField = "old boy"

    def __init__(self):
        self.name = 'wupeiqi'

    def func(self):
        return 'func'

    @staticmethod
    def bar():
        return 'bar'


print(getattr(Foo, 'staticField'))
print(getattr(Foo, 'func'))
print(getattr(Foo, 'bar'))

'''
old boy
<function Foo.func at 0x000001A6B27AC5E0>
<function Foo.bar at 0x000001A6B27ACB80>
'''
反射当前模块成员:
import sys


def s1():
    print('s1')


def s2():
    print('s2')


this_module = sys.modules[__name__]

print(hasattr(this_module, 's1'))
print(getattr(this_module, 's2'))

'''
True
<function s2 at 0x000001F90DF9C670>
'''
导入其他模块,利用反射查找该模块是否存在某个方法
def test():
    print('from the test')
"""
程序目录:
    module_test.py
    index.py

当前文件:
    index.py
"""

import module_test as obj

#obj.test()

print(hasattr(obj,'test'))

getattr(obj,'test')()
获取当前模块:
current_module=__import__(__name__)
x=111
print(hasattr(current_module,"x"))
print(getattr(current_module,"x"))
3 反射的好处
好处一:可以事先定义好接口,接口只有在被完成后才会真正执行,这实现了即插即用,这其实是一种‘后期绑定’,什么意思?即你可以事先把主要的逻辑写好(只定义接口),然后后期再去实现接口的功能
例如还未实现全部功能的代码:
class FtpClient:
    'ftp客户端,但是还么有实现具体的功能'
    def __init__(self,addr):
        print('正在连接服务器[%s]' %addr)
        self.addr=addr
但不影响其他人的代码编写:
#from module import FtpClient
f1=FtpClient('192.168.1.1')
if hasattr(f1,'get'):
    func_get=getattr(f1,'get')
    func_get()
else:
    print('---->不存在此方法')
    print('处理其他的逻辑')
好处二:动态导入模块(基于反射当前模块成员)

三 、__ setattr__,__ delattr__,__ getattr__
class Foo:
    x=1
    def __init__(self,y):
        self.y=y

    def __getattr__(self, item):
        print('----> from getattr:你找的属性不存在')


    def __setattr__(self, key, value):
        print('----> from setattr')
        # self.key=value #这就无限递归了,你好好想想
        # self.__dict__[key]=value #应该使用它

    def __delattr__(self, item):
        print('----> from delattr')
        # del self.item #无限递归了
        self.__dict__.pop(item)

#__setattr__添加/修改属性会触发它的执行
f1=Foo(10)
print(f1.__dict__) # 因为你重写了__setattr__,凡是赋值操作都会触发它的运行,你啥都没写,就是根本没赋值,除非你直接操作属性字典,否则永远无法赋值
f1.z=3
print(f1.__dict__)

#__delattr__删除属性的时候会触发
f1.__dict__['a']=3#我们可以直接修改属性字典,来完成添加/修改属性的操作
del f1.a
print(f1.__dict__)

#__getattr__只有在使用点调用属性且属性不存在的时候才会触发
f1.xxxxxx

'''
----> from setattr
{}
----> from setattr
{}
----> from delattr
{}
----> from getattr:你找的属性不存在
'''
四、__ getattribute__
回顾__getattr__:
class Foo:
    def __init__(self,x):
        self.x=x

    def __getattr__(self, item):
        print('执行的是我')
        # return self.__dict__[item]

f1=Foo(10)
print(f1.x)
f1.xxxxxx #不存在的属性访问,触发__getattr__

'''
10
执行的是我
'''
__ getattribute__的用法:
class Foo:
    def __init__(self,x):
        self.x=x

    def __getattribute__(self, item):
        print('不管是否存在,我都会执行')

f1=Foo(10)
f1.x
f1.xxxxxx

'''
不管是否存在,我都会执行
不管是否存在,我都会执行
'''
当__getattribute__与__getattr__同时存在,只会执行__getattrbute__,除非__getattribute__在执行过程中抛出异常AttributeError
class Foo:
    def __init__(self,x):
        self.x=x

    def __getattr__(self, item):
        print('执行的是我')
        # return self.__dict__[item]
    def __getattribute__(self, item):
        print('不管是否存在,我都会执行')
        raise AttributeError('哈哈')

f1=Foo(10)
f1.x
f1.xxxxxx

'''
不管是否存在,我都会执行
执行的是我
不管是否存在,我都会执行
执行的是我
'''
五、描述符(__ get__,__ set__,__ delete__)
1 什么是描述符
描述符本质就是一个新式类,在这个新式类中,至少实现了__get__(),__ set__(),__ delete__()中的一个,这也被称为描述符协议。
- __ get__():调用一个属性时,触发
- __ set__():为一个属性赋值时,触发
- __ delete__():采用del删除属性时,触发
定义一个描述符:
class Foo: #在python3中Foo是新式类,它实现了三种方法,这个类就被称作一个描述符
    def __get__(self, instance, owner):
        pass
    def __set__(self, instance, value):
        pass
    def __delete__(self, instance):
        pass
2 描述符的作用
描述符的作用是用来代理另外一个类的属性的(必须把描述符定义成这个类的类属性,不能定义到构造函数中)
何时何地会触发描述符的三个方法的执行?
#描述符Str
class Str:
    def __get__(self, instance, owner):
        print('Str调用')
    def __set__(self, instance, value):
        print('Str设置...')
    def __delete__(self, instance):
        print('Str删除...')

#描述符Int
class Int:
    def __get__(self, instance, owner):
        print('Int调用')
    def __set__(self, instance, value):
        print('Int设置...')
    def __delete__(self, instance):
        print('Int删除...')

class People:
    name=Str()
    age=Int()
    def __init__(self,name,age): #name被Str类代理,age被Int类代理,
        self.name=name
        self.age=age

#何地?:定义成另外一个类的类属性

#何时?:且看下列演示

p1=People('alex',18)

#描述符Str的使用
p1.name
p1.name='egon'
del p1.name

#描述符Int的使用
p1.age
p1.age=18
del p1.age

#我们来瞅瞅到底发生了什么
print(p1.__dict__)
print(People.__dict__)

#补充
print(type(p1) == People) #type(obj)其实是查看obj是由哪个类实例化来的
print(type(p1).__dict__ == People.__dict__)

'''
Str设置...
Int设置...
Str调用
Str设置...
Str删除...
Int调用
Int设置...
Int删除...
{}
{'__module__': '__main__', 'name': <__main__.Str object at 0x000001FF6D153FD0>, 'age': <__main__.Int object at 0x000001FF6D153FA0>, '__init__': <function People.__init__ at 0x000001FF6D151700>, '__dict__': <attribute '__dict__' of 'People' objects>, '__weakref__': <attribute '__weakref__' of 'People' objects>, '__doc__': None}
True
True
'''
3 描述符种类
分为两种:
一 数据描述符:至少实现了__get__()和__set__()
class Foo:
    def __set__(self, instance, value):
        print('set')
    def __get__(self, instance, owner):
        print('get')
二 非数据描述符:没有实现__set__()
class Foo:
    def __get__(self, instance, owner):
        print('get')
4 注意事项
- 一、描述符本身应该定义成新式类,被代理的类也应该是新式类
- 二、必须把描述符定义成这个类的类属性,不能为定义到构造函数中
- 三、要严格遵循该优先级,优先级由高到底分别是:类属性 > 数据描述符 > 实例属性 > 非数据描述符 > 找不到的属性触发__getattr__()
5 描述符的使用
如果我们的类有很多属性,你仍然采用在定义一堆类属性的方式去实现,low
类的装饰器(无参):
def decorate(cls):
    print('类的装饰器开始运行啦------>')
    return cls

@decorate #无参:People=decorate(People)
class People:
    def __init__(self,name,age,salary):
        self.name=name
        self.age=age
        self.salary=salary

p1=People('egon',18,3333.3)

'''
类的装饰器开始运行啦------>
'''
类的装饰器(有参):
def typeassert(**kwargs):
    def decorate(cls):
        print('类的装饰器开始运行啦------>',kwargs)
        return cls
    return decorate
@typeassert(name=str,age=int,salary=float)
#有参:
# 1.运行typeassert(...)返回结果是decorate,此时参数都传给kwargs
# 2.People=decorate(People)
class People:
    def __init__(self,name,age,salary):
        self.name=name
        self.age=age
        self.salary=salary

p1=People('egon',18,3333.3)

'''
类的装饰器开始运行啦------> {'name': <class 'str'>, 'age': <class 'int'>, 'salary': <class 'float'>}
'''
描述符的使用:
class Typed:
    def __init__(self,name,expected_type):
        self.name=name
        self.expected_type=expected_type
    def __get__(self, instance, owner):
        print('get--->',instance,owner)
        if instance is None:
            return self
        return instance.__dict__[self.name]

    def __set__(self, instance, value):
        print('set--->',instance,value)
        if not isinstance(value,self.expected_type):
            raise TypeError('Expected %s' %str(self.expected_type))
        instance.__dict__[self.name]=value
    def __delete__(self, instance):
        print('delete--->',instance)
        instance.__dict__.pop(self.name)

def typeassert(**kwargs):
    def decorate(cls):
        print('类的装饰器开始运行啦------>',kwargs)
        for name,expected_type in kwargs.items():
            setattr(cls,name,Typed(name,expected_type))
        return cls
    return decorate
@typeassert(name=str,age=int,salary=float) #有参:1.运行typeassert(...)返回结果是decorate,此时参数都传给kwargs 2.People=decorate(People)
class People:
    def __init__(self,name,age,salary):
        self.name=name
        self.age=age
        self.salary=salary

print(People.__dict__)
p1=People('egon',18,3333.3)

'''
类的装饰器开始运行啦------> {'name': <class 'str'>, 'age': <class 'int'>, 'salary': <class 'float'>}
{'__module__': '__main__', '__init__': <function People.__init__ at 0x00000243FCFB1790>, '__dict__': <attribute '__dict__' of 'People' objects>, '__weakref__': <attribute '__weakref__' of 'People' objects>, '__doc__': None, 'name': <__main__.Typed object at 0x00000243FCFB53D0>, 'age': <__main__.Typed object at 0x00000243FCFB5310>, 'salary': <__main__.Typed object at 0x00000243FCFB52B0>}
set---> <__main__.People object at 0x00000243FCFB5FD0> egon
set---> <__main__.People object at 0x00000243FCFB5FD0> 18
set---> <__main__.People object at 0x00000243FCFB5FD0> 3333.3
'''
6 描述符总结
描述符是可以实现大部分python类特性中的底层魔法,包括@classmethod,@staticmethd,@property甚至是__slots__属性
描述父是很多高级库和框架的重要工具之一,描述符通常是使用到装饰器或者元类的大型框架中的一个组件.
六、再看property
一个静态属性property本质就是实现了get,set,delete三种方法
用法一:
class Foo:
    @property
    def AAA(self):
        print('get的时候运行我啊')

    @AAA.setter
    def AAA(self,value):
        print('set的时候运行我啊')

    @AAA.deleter
    def AAA(self):
        print('delete的时候运行我啊')

#只有在属性AAA定义property后才能定义AAA.setter,AAA.deleter
f1=Foo()
f1.AAA
f1.AAA='aaa'
del f1.AAA

'''
get的时候运行我啊
set的时候运行我啊
delete的时候运行我啊
'''
用法二:
class Foo:
    def get_AAA(self):
        print('get的时候运行我啊')

    def set_AAA(self,value):
        print('set的时候运行我啊')

    def delete_AAA(self):
        print('delete的时候运行我啊')
    AAA=property(get_AAA,set_AAA,delete_AAA) #内置property三个参数与get,set,delete一一对应

f1=Foo()
f1.AAA
f1.AAA='aaa'
del f1.AAA

'''
get的时候运行我啊
set的时候运行我啊
delete的时候运行我啊
'''
实例:
class Goods:

    def __init__(self):
        # 原价
        self.original_price = 100
        # 折扣
        self.discount = 0.8

    @property
    def price(self):
        # 实际价格 = 原价 * 折扣
        new_price = self.original_price * self.discount
        return new_price

    @price.setter
    def price(self, value):
        self.original_price = value

    @price.deleter
    def price(self):
        del self.original_price


obj = Goods()
obj.price         # 获取商品价格
obj.price = 200   # 修改商品原价
print(obj.price)
del obj.price     # 删除商品原价
七、__ setitem__,__ getitem__,__ delitem__
用于索引操作,如字典等,分别实现设置、获取、删除等功能
class Foo:
    def __init__(self,name):
        self.name=name

    def __getitem__(self, item):
        print(self.__dict__[item])

    def __setitem__(self, key, value):
        self.__dict__[key]=value
    def __delitem__(self, key):
        print('del obj[key]时,我执行')
        self.__dict__.pop(key)
    def __delattr__(self, item):
        print('del obj.key时,我执行')
        self.__dict__.pop(item)

f1=Foo('sb')
f1['age']=18 # 自动触发执行__setitem__方法
f1['age1']=19
del f1.age1 # 自动触发执行__delattr__方法
del f1['age'] # 自动触发执行__delitem__方法
f1['name']='alex'
print(f1.__dict__)

'''
del obj.key时,我执行
del obj[key]时,我执行
{'name': 'alex'}
'''
八、__ str__,__ repr__,__ format__
改变对象的字符串显示__str__,__repr __,如果一个类中定义了__str __方法,那么在打印对象时默认输出该方法的返回值
自定制格式化字符串__format__
#_*_coding:utf-8_*_

format_dict={
    'nat':'{obj.name}-{obj.addr}-{obj.type}',#学校名-学校地址-学校类型
    'tna':'{obj.type}:{obj.name}:{obj.addr}',#学校类型:学校名:学校地址
    'tan':'{obj.type}/{obj.addr}/{obj.name}',#学校类型/学校地址/学校名
}
class School:
    def __init__(self,name,addr,type):
        self.name=name
        self.addr=addr
        self.type=type

    def __repr__(self):
        return 'School(%s,%s)' %(self.name,self.addr)
    def __str__(self):
        return '(%s,%s)' %(self.name,self.addr)

    def __format__(self, format_spec):
        # if format_spec
        if not format_spec or format_spec not in format_dict:
            format_spec='nat'
        fmt=format_dict[format_spec]
        return fmt.format(obj=self)

s1=School('oldboy1','北京','私立')
print('from repr: ',repr(s1))
print('from str: ',str(s1))
print(s1)

'''
str函数或者print函数--->obj.__str__()
repr或者交互式解释器--->obj.__repr__()
如果__str__没有被定义,那么就会使用__repr__来代替输出
注意:这俩方法的返回值必须是字符串,否则抛出异常
'''
print(format(s1,'nat'))
print(format(s1,'tna'))
print(format(s1,'tan'))
print(format(s1,'asfdasdffd'))

'''
from repr:  School(oldboy1,北京)
from str:  (oldboy1,北京)
(oldboy1,北京)
oldboy1-北京-私立
私立:oldboy1:北京
私立/北京/oldboy1
oldboy1-北京-私立
'''
%s和%r:
class B:

     def __str__(self):
         return 'str : class B'

     def __repr__(self):
         return 'repr : class B'


b=B()
print('%s'%b)
print('%r'%b)

'''
str : class B
repr : class B
'''
九、__next__和__iter__实现迭代器协议
如果类中有__iter__方法,则该类是一个可迭代对象
其中 对象.__iter__的返回值是迭代器
示例:
class Foo:
    def __init__(self,x):
        self.x=x

    def __iter__(self):
        return self

    def __next__(self):
        n=self.x
        self.x+=1
        return self.x

f=Foo(3)
for i in f:
    print(i)
十、__ doc__
表示类的描述信息,且该属性无法被继承
class Foo:
    '我是描述信息'
    pass

print(Foo.__doc__)

'''
我是描述信息
'''
十一、__ module__和__class__
__ module__ 表示当前操作的对象在那个模块
__ class__ 表示当前操作的对象的类是什么
示例文件lib/aa.py:
class C:

    def __init__(self):
        self.name = ‘SB'
index.py:
from lib.aa import C

obj = C()
print obj.__module__  # 输出 lib.aa,即:输出模块
print obj.__class__      # 输出 lib.aa.C,即:输出类
十二、__ del__
析构方法,当对象在内存中被释放时,自动触发执行。
注:此方法一般无须定义,因为Python是一门高级语言,程序员在使用时无需关心内存的分配和释放,因为此工作都是交给Python解释器来执行,所以,析构函数的调用是由解释器在进行垃圾回收时自动触发执行的。因此什么时候执行并不知道
示例:
class Foo:

    def __del__(self):
        print('执行我啦')

f1=Foo()
del f1
print('------->')

#输出结果
执行我啦
------->
十三、__ call__
对象后面加括号,触发执行。
注:
- 构造方法__init__的执行是由创建对象触发的,即:对象 = 类名() ;
- 而对于 __ call__ 方法的执行是由对象后加括号触发的,即:对象() 或者 类()()
class Foo:

    def __init__(self):
        pass

    def __call__(self, *args, **kwargs):

        print('__call__')


obj = Foo() # 执行 __init__
obj()       # 执行 __call__

'''
__call__
'''
十四、__ enter__和__ exit__
我们知道在操作文件对象的时候可以这么写:
with open('a.txt') as f:
   '代码块'
上述叫做上下文管理协议,即with语句,为了让一个对象兼容with语句,必须在这个对象的类中声明__enter__和__exit__方法
class Open:
    def __init__(self,name):
        self.name=name

    def __enter__(self):
        print('出现with语句,对象的__enter__被触发,有返回值则赋值给as声明的变量')
        # return self
    def __exit__(self, exc_type, exc_val, exc_tb):
        print('with中代码块执行完毕时执行我啊')


with Open('a.txt') as f:
    print('=====>执行代码块')
    # print(f,f.name)

'''
出现with语句,对象的__enter__被触发,有返回值则赋值给as声明的变量
=====>执行代码块
with中代码块执行完毕时执行我啊
'''
__ exit__()中的三个参数分别代表异常类型,异常值和追溯信息,with语句中代码块出现异常,则with后的代码都无法执行
class Open:
    def __init__(self,name):
        self.name=name

    def __enter__(self):
        print('出现with语句,对象的__enter__被触发,有返回值则赋值给as声明的变量')

    def __exit__(self, exc_type, exc_val, exc_tb):
        print('with中代码块执行完毕时执行我啊')
        print(exc_type)
        print(exc_val)
        print(exc_tb)


with Open('a.txt') as f:
    print('=====>执行代码块')
    raise AttributeError('***着火啦,救火啊***')
print('0'*100) #------------------------------->不会执行

'''
出现with语句,对象的__enter__被触发,有返回值则赋值给as声明的变量
=====>执行代码块
with中代码块执行完毕时执行我啊
<class 'AttributeError'>
***着火啦,救火啊***
<traceback object at 0x00000261F6ABDB80>
Traceback (most recent call last):
  File "D:\pystudy\fullstack\作业练习\脚本.py", line 18, in <module>
    raise AttributeError('***着火啦,救火啊***')
AttributeError: ***着火啦,救火啊***
'''
如果__exit()返回值为True,那么异常会被清空,就好像啥都没发生一样,with后的语句正常执行
class Open:
    def __init__(self,name):
        self.name=name

    def __enter__(self):
        print('出现with语句,对象的__enter__被触发,有返回值则赋值给as声明的变量')

    def __exit__(self, exc_type, exc_val, exc_tb):
        print('with中代码块执行完毕时执行我啊')
        print(exc_type)
        print(exc_val)
        print(exc_tb)
        return True


with Open('a.txt') as f:
    print('=====>执行代码块')
    raise AttributeError('***着火啦,救火啊***')
print('0'*100) #------------------------------->会执行
'''
出现with语句,对象的__enter__被触发,有返回值则赋值给as声明的变量
=====>执行代码块
with中代码块执行完毕时执行我啊
<class 'AttributeError'>
***着火啦,救火啊***
<traceback object at 0x00000240B7E8DC00>
0000000000000000000000000000000000000000000000000000000000000000000000000000000000000000000000000000
'''
__ enter__和__ exit__的用途:
-
使用with语句的目的就是把代码块放入with中执行,with结束后,自动完成清理工作,无须手动干预
-
在需要管理一些资源比如文件,网络连接和锁的编程环境中,可以在__exit__中定制自动释放资源的机制,你无须再去关系这个问题,这将大有用处
十五、__ len__
class A:
    def __init__(self):
        self.a = 1
        self.b = 2

    def __len__(self):
        return len(self.__dict__)
a = A()
print(len(a))

'''
2
'''
十六、__ hash__
class A:
    def __init__(self):
        self.a = 1
        self.b = 2

    def __hash__(self):
        return hash(str(self.a)+str(self.b))
a = A()
print(hash(a))

'''
-9051584000431974590
'''
十七、__ eq__
class A:
    def __init__(self):
        self.a = 1
        self.b = 2

    def __eq__(self,obj):
        if  self.a == obj.a and self.b == obj.b:
            return True
a = A()
b = A()
print(a == b)

'''
True
'''
一道面试题:
class Person:
    def __init__(self,name,age,sex):
        self.name = name
        self.age = age
        self.sex = sex

    def __hash__(self):
        return hash(self.name+self.sex)

    def __eq__(self, other):
        if self.name == other.name and self.sex == other.sex:return True


p_lst = []
for i in range(84):
    p_lst.append(Person('egon',i,'male'))

print(p_lst)
print(set(p_lst))
'''
[<__main__.Person object at 0x0000016F4A143FD0>, <__main__.Person object at 0x0000016F4A143F70>, <__main__.Person object at 0x0000016F4A143E80>, <__main__.Person object at 0x0000016F4A143DC0>, <__main__.Person object at 0x0000016F4A143D60>, <__main__.Person object at 0x0000016F4A143790>, <__main__.Person object at 0x0000016F4A143730>, <__main__.Person object at 0x0000016F4A1436D0>, <__main__.Person object at 0x0000016F4A143670>, <__main__.Person object at 0x0000016F4A143610>, <__main__.Person object at 0x0000016F4A1435B0>, <__main__.Person object at 0x0000016F4A143550>, <__main__.Person object at 0x0000016F4A1434F0>, <__main__.Person object at 0x0000016F4A143490>, <__main__.Person object at 0x0000016F4A143430>, <__main__.Person object at 0x0000016F4A1433D0>, <__main__.Person object at 0x0000016F4A143370>, <__main__.Person object at 0x0000016F4A143310>, <__main__.Person object at 0x0000016F4A1432B0>, <__main__.Person object at 0x0000016F4A143250>, <__main__.Person object at 0x0000016F4A1431F0>, <__main__.Person object at 0x0000016F4A143190>, <__main__.Person object at 0x0000016F4A143130>, <__main__.Person object at 0x0000016F4A1430D0>, <__main__.Person object at 0x0000016F4A143070>, <__main__.Person object at 0x0000016F4A142FD0>, <__main__.Person object at 0x0000016F4A142F70>, <__main__.Person object at 0x0000016F4A142F10>, <__main__.Person object at 0x0000016F4A142EB0>, <__main__.Person object at 0x0000016F4A142E50>, <__main__.Person object at 0x0000016F4A142DF0>, <__main__.Person object at 0x0000016F4A142D90>, <__main__.Person object at 0x0000016F4A142D30>, <__main__.Person object at 0x0000016F4A142CD0>, <__main__.Person object at 0x0000016F4A142C70>, <__main__.Person object at 0x0000016F4A142C10>, <__main__.Person object at 0x0000016F4A142BB0>, <__main__.Person object at 0x0000016F4A142880>, <__main__.Person object at 0x0000016F4A142820>, <__main__.Person object at 0x0000016F4A1427C0>, <__main__.Person object at 0x0000016F4A142760>, <__main__.Person object at 0x0000016F4A142700>, <__main__.Person object at 0x0000016F4A1426A0>, <__main__.Person object at 0x0000016F4A142640>, <__main__.Person object at 0x0000016F4A1425E0>, <__main__.Person object at 0x0000016F4A142580>, <__main__.Person object at 0x0000016F4A142520>, <__main__.Person object at 0x0000016F4A1424C0>, <__main__.Person object at 0x0000016F4A142460>, <__main__.Person object at 0x0000016F4A142400>, <__main__.Person object at 0x0000016F4A1423A0>, <__main__.Person object at 0x0000016F4A142340>, <__main__.Person object at 0x0000016F4A1422E0>, <__main__.Person object at 0x0000016F4A142130>, <__main__.Person object at 0x0000016F4A1420D0>, <__main__.Person object at 0x0000016F4A142070>, <__main__.Person object at 0x0000016F4A127AC0>, <__main__.Person object at 0x0000016F4A127B50>, <__main__.Person object at 0x0000016F4A127BB0>, <__main__.Person object at 0x0000016F4A127C10>, <__main__.Person object at 0x0000016F4A127D00>, <__main__.Person object at 0x0000016F49F2B0A0>, <__main__.Person object at 0x0000016F49F2B070>, <__main__.Person object at 0x0000016F49F2BC10>, <__main__.Person object at 0x0000016F4A0C0A90>, <__main__.Person object at 0x0000016F49F25130>, <__main__.Person object at 0x0000016F49EFBBB0>, <__main__.Person object at 0x0000016F49EFBB50>, <__main__.Person object at 0x0000016F49A8B0D0>, <__main__.Person object at 0x0000016F4A145580>, <__main__.Person object at 0x0000016F4A145520>, <__main__.Person object at 0x0000016F4A1454C0>, <__main__.Person object at 0x0000016F4A145460>, <__main__.Person object at 0x0000016F4A145400>, <__main__.Person object at 0x0000016F4A1453A0>, <__main__.Person object at 0x0000016F4A145340>, <__main__.Person object at 0x0000016F4A1452E0>, <__main__.Person object at 0x0000016F4A145280>, <__main__.Person object at 0x0000016F4A145220>, <__main__.Person object at 0x0000016F4A1451C0>, <__main__.Person object at 0x0000016F4A145160>, <__main__.Person object at 0x0000016F4A145100>, <__main__.Person object at 0x0000016F4A1450A0>, <__main__.Person object at 0x0000016F4A145040>]
{<__main__.Person object at 0x0000016F4A143FD0>}

'''
十八、__ new__和元类metaclass
1 什么是元类
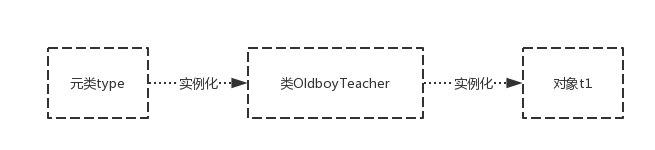
python中一切皆为对象。让我们先定义一个类:
class OldboyTeacher(object):
    school='oldboy'

    def __init__(self,name,age):
        self.name=name
        self.age=age

    def say(self):
        print('%s says welcome to the oldboy to learn Python' %self.name)
所有的对象都是实例化或者说调用类而得到的(调用类的过程称为类的实例化),比如对象t1是调用类OldboyTeacher得到的
t1=OldboyTeacher('egon',18)
print(type(t1)) #查看对象t1的类是<class '__main__.OldboyTeacher'>
如果一切皆为对象,那么类OldboyTeacher本质也是一个对象,既然所有的对象都是调用类得到的,那么OldboyTeacher必然也是调用了一个类得到的,这个类称为元类
于是我们可以推导出===>产生OldboyTeacher的过程一定发生了:OldboyTeacher=元类(…)
print(type(OldboyTeacher)) # 结果为<class 'type'>,证明是调用了type这个元类而产生的OldboyTeacher,即默认的元类为type
2 class关键字创建类的流程分析
上文我们基于python中一切皆为对象的概念分析出:我们用class关键字定义的类本身也是一个对象,负责产生该对象的类称之为元类(元类可以简称为类的类),内置的元类为type
class关键字在帮我们创建类时,必然帮我们调用了元类OldboyTeacher=type(…),那调用type时传入的参数是什么呢?必然是类的关键组成部分,一个类有三大组成部分,分别是:
- 类名class_name=‘OldboyTeacher’
- 基类们class_bases=(object,)
- 类的名称空间class_dic,类的名称空间是执行类体代码而得到的
调用type时会依次传入以上三个参数
综上,class关键字帮我们创建一个类应该细分为以下四个过程

补充:exec的用法:
三个参数:
- 参数一:包含一系列python代码的字符串
- 参数二:全局作用域(字典形式),如果不指定,默认为globals()
- 参数三:局部作用域(字典形式),如果不指定,默认为locals()
可以把exec命令的执行当成是一个函数的执行,会将执行期间产生的名字存放于局部名称空间中
g={
    'x':1,
    'y':2
}
l={}

exec('''
global x,z
x=100
z=200

m=300
''',g,l)

print(g) #{'x': 100, 'y': 2,'z':200,......}
print(l) #{'m': 300}
3 自定义元类控制类的创建
一个类没有声明自己的元类,默认他的元类就是type,除了使用内置元类type,我们也可以通过继承type来自定义元类,然后使用metaclass关键字参数为一个类指定元类:
class Mymeta(type): #只有继承了type类才能称之为一个元类,否则就是一个普通的自定义类
    pass

class OldboyTeacher(object,metaclass=Mymeta): # OldboyTeacher=Mymeta('OldboyTeacher',(object),{...})
    school='oldboy'

    def __init__(self,name,age):
        self.name=name
        self.age=age

    def say(self):
        print('%s says welcome to the oldboy to learn Python' %self.name)
自定义元类可以控制类的产生过程,类的产生过程其实就是元类的调用过程,即OldboyTeacher=Mymeta(‘OldboyTeacher’,(object),{…}),调用Mymeta会先产生一个空对象OldoyTeacher,然后连同调用Mymeta括号内的参数一同传给Mymeta下的__init__方法,完成初始化,于是我们可以:
class Mymeta(type): #只有继承了type类才能称之为一个元类,否则就是一个普通的自定义类
    def __init__(self,class_name,class_bases,class_dic):
        # print(self) #<class '__main__.OldboyTeacher'>
        # print(class_bases) #(<class 'object'>,)
        # print(class_dic) #{'__module__': '__main__', '__qualname__': 'OldboyTeacher', 'school': 'oldboy', '__init__': <function OldboyTeacher.__init__ at 0x102b95ae8>, 'say': <function OldboyTeacher.say at 0x10621c6a8>}
        super(Mymeta, self).__init__(class_name, class_bases, class_dic)  # 重用父类的功能

        if class_name.islower():
            raise TypeError('类名%s请修改为驼峰体' %class_name)

        if '__doc__' not in class_dic or len(class_dic['__doc__'].strip(' \n')) == 0:
            raise TypeError('类中必须有文档注释,并且文档注释不能为空')

class OldboyTeacher(object,metaclass=Mymeta): # OldboyTeacher=Mymeta('OldboyTeacher',(object),{...})
    """
    类OldboyTeacher的文档注释
    """
    school='oldboy'

    def __init__(self,name,age):
        self.name=name
        self.age=age

    def say(self):
        print('%s says welcome to the oldboy to learn Python' %self.name)
4 自定义元类控制类的调用
调用一个对象,就是触发对象所在类中的__call__方法的执行,如果把OldboyTeacher也当做一个对象,那么在OldboyTeacher这个对象的类中也必然存在一个__call__方法
class Mymeta(type): #只有继承了type类才能称之为一个元类,否则就是一个普通的自定义类
    def __call__(self, *args, **kwargs):
        print(self) #<class '__main__.OldboyTeacher'>
        print(args) #('egon', 18)
        print(kwargs) #{}
        return 123

class OldboyTeacher(object,metaclass=Mymeta):
    school='oldboy'

    def __init__(self,name,age):
        self.name=name
        self.age=age

    def say(self):
        print('%s says welcome to the oldboy to learn Python' %self.name)


# 调用OldboyTeacher就是在调用OldboyTeacher类中的__call__方法
# 然后将OldboyTeacher传给self,溢出的位置参数传给*,溢出的关键字参数传给**
# 调用OldboyTeacher的返回值就是调用__call__的返回值
t1=OldboyTeacher('egon',18)
print(t1)

'''
<class '__main__.OldboyTeacher'>
('egon', 18)
{}
123
'''
默认地,调用t1=OldboyTeacher(‘egon’,18)会做三件事:
- 产生一个空对象obj
- 调用__init__方法初始化对象obj
- 返回初始化好的obj
对应着,OldboyTeacher类中的__call__方法也应该做这三件事
class Mymeta(type): #只有继承了type类才能称之为一个元类,否则就是一个普通的自定义类
    def __call__(self, *args, **kwargs): #self=<class '__main__.OldboyTeacher'>
        #1、调用__new__产生一个空对象obj
        obj=self.__new__(self) # 此处的self是类OldoyTeacher,必须传参,代表创建一个OldboyTeacher的对象obj

        #2、调用__init__初始化空对象obj
        self.__init__(obj,*args,**kwargs)

        #3、返回初始化好的对象obj
        return obj

class OldboyTeacher(object,metaclass=Mymeta):
    school='oldboy'

    def __init__(self,name,age):
        self.name=name
        self.age=age

    def say(self):
        print('%s says welcome to the oldboy to learn Python' %self.name)

t1=OldboyTeacher('egon',18)
print(t1.__dict__)

'''
{'name': 'egon', 'age': 18}
'''
上例的__call__相当于一个模板,我们可以在该基础上改写__call__的逻辑从而控制调用OldboyTeacher的过程,比如将OldboyTeacher的对象的所有属性都变成私有的
class Mymeta(type): #只有继承了type类才能称之为一个元类,否则就是一个普通的自定义类
    def __call__(self, *args, **kwargs): #self=<class '__main__.OldboyTeacher'>
        #1、调用__new__产生一个空对象obj
        obj=self.__new__(self) # 此处的self是类OldoyTeacher,必须传参,代表创建一个OldboyTeacher的对象obj

        #2、调用__init__初始化空对象obj
        self.__init__(obj,*args,**kwargs)

        # 在初始化之后,obj.__dict__里就有值了
        obj.__dict__={'_%s__%s' %(self.__name__,k):v for k,v in obj.__dict__.items()}
        #3、返回初始化好的对象obj
        return obj

class OldboyTeacher(object,metaclass=Mymeta):
    school='oldboy'

    def __init__(self,name,age):
        self.name=name
        self.age=age

    def say(self):
        print('%s says welcome to the oldboy to learn Python' %self.name)

t1=OldboyTeacher('egon',18)
print(t1.__dict__)

'''
{'_OldboyTeacher__name': 'egon', '_OldboyTeacher__age': 18}
'''
上例中涉及到查找属性的问题,比如self.new,请看下一小节
5 属性查找
结合python继承的实现原理+元类重新看属性的查找应该是什么样子呢???
在学习完元类后,其实我们用class自定义的类也全都是对象(包括object类本身也是元类type的 一个实例,可以用type(object)查看),我们学习过继承的实现原理,如果把类当成对象去看,将下述继承应该说成是:对象OldboyTeacher继承对象Foo,对象Foo继承对象Bar,对象Bar继承对象object
class Mymeta(type): #只有继承了type类才能称之为一个元类,否则就是一个普通的自定义类
    n=444

    def __call__(self, *args, **kwargs): #self=<class '__main__.OldboyTeacher'>
        obj=self.__new__(self)
        self.__init__(obj,*args,**kwargs)
        return obj

class Bar(object):
    n=333

class Foo(Bar):
    n=222

class OldboyTeacher(Foo,metaclass=Mymeta):
    n=111

    school='oldboy'

    def __init__(self,name,age):
        self.name=name
        self.age=age

    def say(self):
        print('%s says welcome to the oldboy to learn Python' %self.name)


print(OldboyTeacher.n) #自下而上依次注释各个类中的n=xxx,然后重新运行程序,发现n的查找顺序为OldboyTeacher->Foo->Bar->object->Mymeta->type
于是属性查找应该分成两层,一层是对象层(基于c3算法的MRO)的查找,另外一个层则是类层(即元类层)的查找

查找顺序:
1、先对象层:OldoyTeacher->Foo->Bar->object
2、然后元类层:Mymeta->type
依据上述总结,我们来分析下元类Mymeta中__call__里的self.__new__的查找
class Mymeta(type):
    n=444

    def __call__(self, *args, **kwargs): #self=<class '__main__.OldboyTeacher'>
        obj=self.__new__(self)
        print(self.__new__ is object.__new__) #True


class Bar(object):
    n=333

    # def __new__(cls, *args, **kwargs):
    #     print('Bar.__new__')

class Foo(Bar):
    n=222

    # def __new__(cls, *args, **kwargs):
    #     print('Foo.__new__')

class OldboyTeacher(Foo,metaclass=Mymeta):
    n=111

    school='oldboy'

    def __init__(self,name,age):
        self.name=name
        self.age=age

    def say(self):
        print('%s says welcome to the oldboy to learn Python' %self.name)


    # def __new__(cls, *args, **kwargs):
    #     print('OldboyTeacher.__new__')


OldboyTeacher('egon',18) #触发OldboyTeacher的类中的__call__方法的执行,进而执行self.__new__开始查找
总结,Mymeta下的__call__里的self.new__在OldboyTeacher、Foo、Bar里都没有找到__new__的情况下,会去找object里的__new,而object下默认就有一个__new__,所以即便是之前的类均未实现__new__,也一定会在object中找到一个,根本不会、也根本没必要再去找元类Mymeta->type中查找__new__
我们在元类的__call__中也可以用object.new(self)去造对象

但我们还是推荐在__call__中使用self.new(self)去创造空对象,因为这种方式会检索三个类OldboyTeacher->Foo->Bar,而object.__new__则是直接跨过了他们三个
最后说明一点
class Mymeta(type): #只有继承了type类才能称之为一个元类,否则就是一个普通的自定义类
    n=444

    def __new__(cls, *args, **kwargs):
        obj=type.__new__(cls,*args,**kwargs) # 必须按照这种传值方式
        print(obj.__dict__)
        # return obj # 只有在返回值是type的对象时,才会触发下面的__init__
        return 123

    def __init__(self,class_name,class_bases,class_dic):
        print('run。。。')


class OldboyTeacher(object,metaclass=Mymeta): #OldboyTeacher=Mymeta('OldboyTeacher',(object),{...})
    n=111

    school='oldboy'

    def __init__(self,name,age):
        self.name=name
        self.age=age

    def say(self):
        print('%s says welcome to the oldboy to learn Python' %self.name)


print(type(Mymeta)) #<class 'type'>
# 产生类OldboyTeacher的过程就是在调用Mymeta,而Mymeta也是type类的一个对象,那么Mymeta之所以可以调用,一定是在元类type中有一个__call__方法
# 该方法中同样需要做至少三件事:
# class type:
#     def __call__(self, *args, **kwargs): #self=<class '__main__.Mymeta'>
#         obj=self.__new__(self,*args,**kwargs) # 产生Mymeta的一个对象
#         self.__init__(obj,*args,**kwargs)
#         return obj


 223
223


 被折叠的 条评论
为什么被折叠?
被折叠的 条评论
为什么被折叠?
 到【灌水乐园】发言


