


Typora及相关插件的安装
文章目录
Typora安装一直点下一步就好了
1. 文件导出插件安装 Pandoc
-
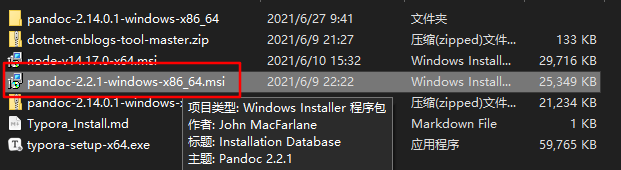
点击Pandoc.msi,然后一直点下一步
-
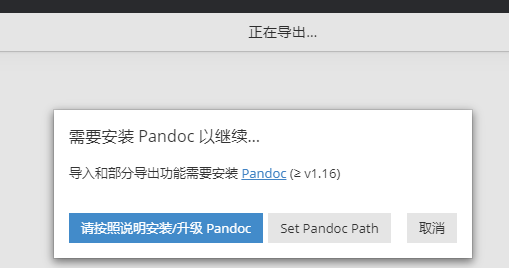
将Typora连接到Pandoc
-
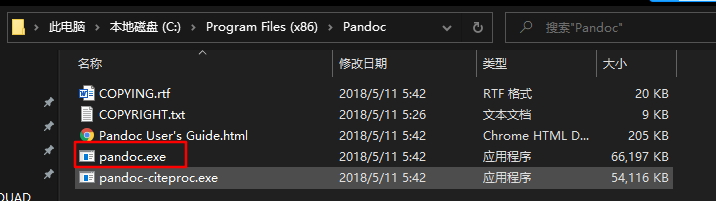
点击设置set Pandoc Path
-
选择该文件
-
重启Typora
2. 利用PicGo-Core 将图片上传到Gitee(文件自动重命名功能)
-
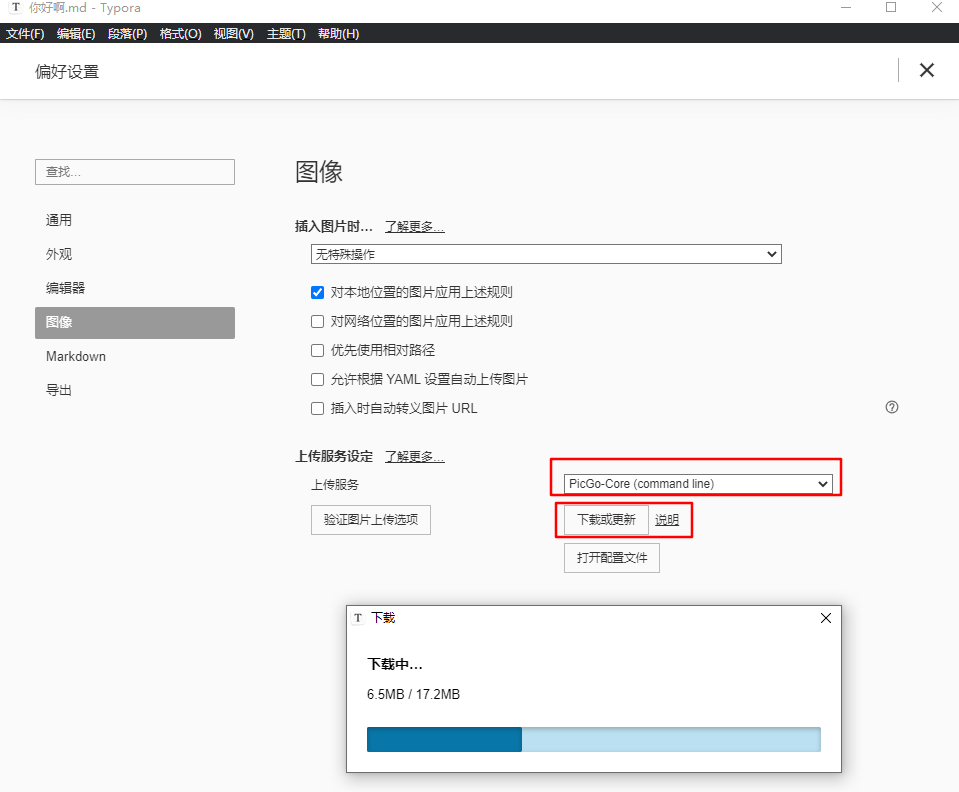
安装PicGo-Core
-
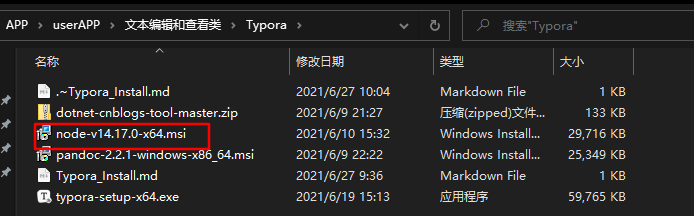
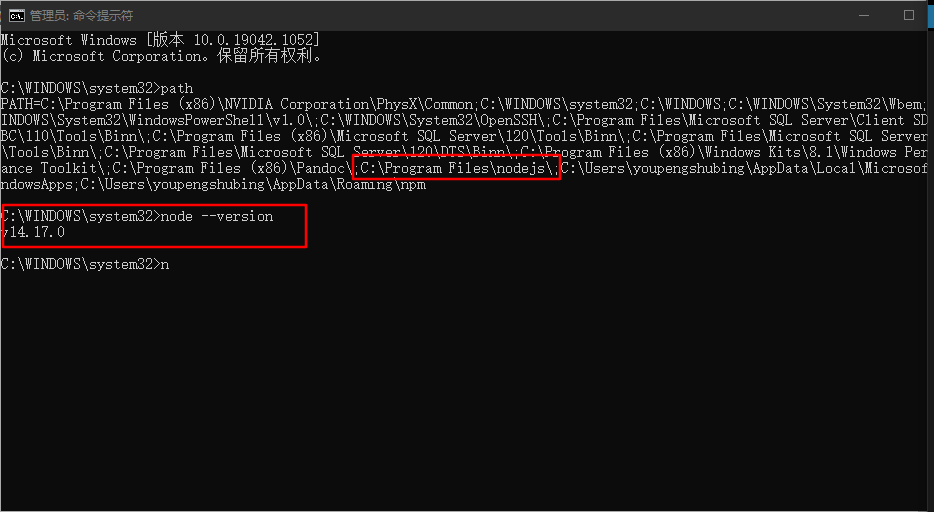
安装Node
查看是否安装成功
-
利用node安装Gitee-uploader
-
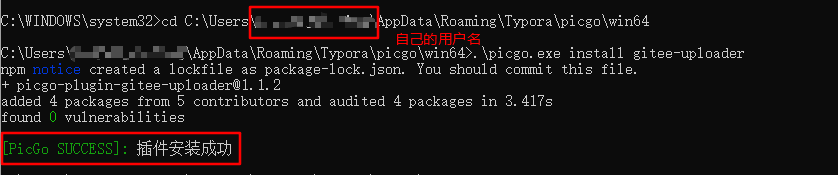
在Cmd中输入命令
-
cd C:\Users\自己的用户名\AppData\Roaming\Typora\picgo\win64 定位到picgo
-
.\picgo.exe install gitee-uploader 安装gitee-uploader
-
-
-
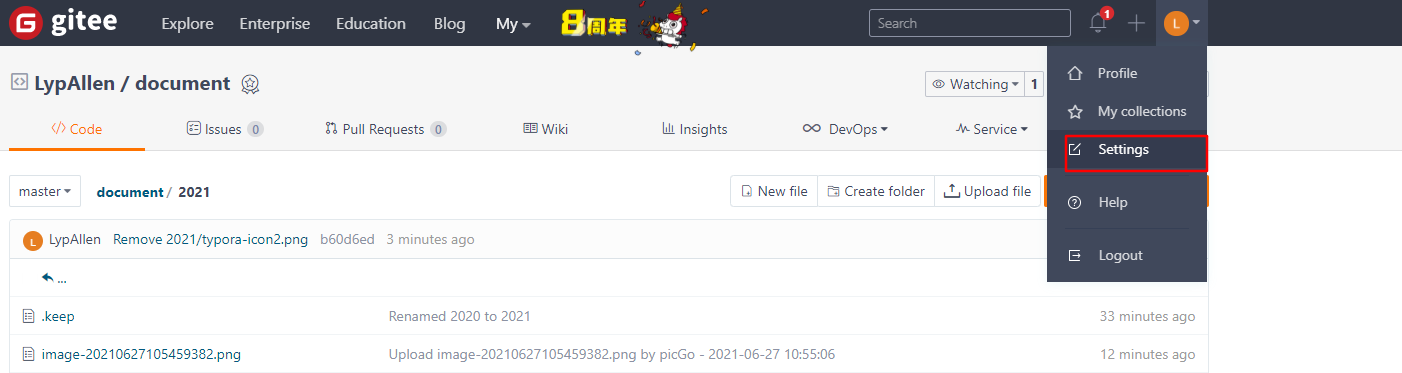
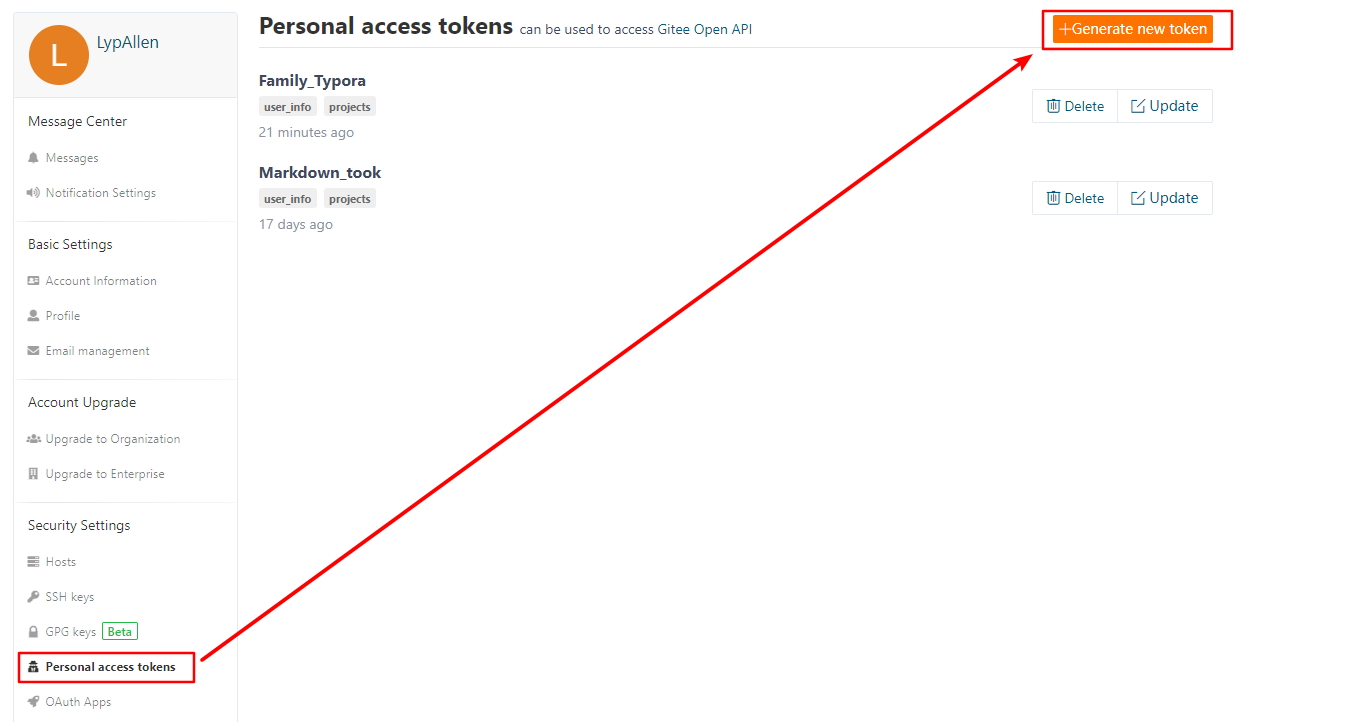
在Gitee中创建一个仓库(必须是公开的)
-
生成Token
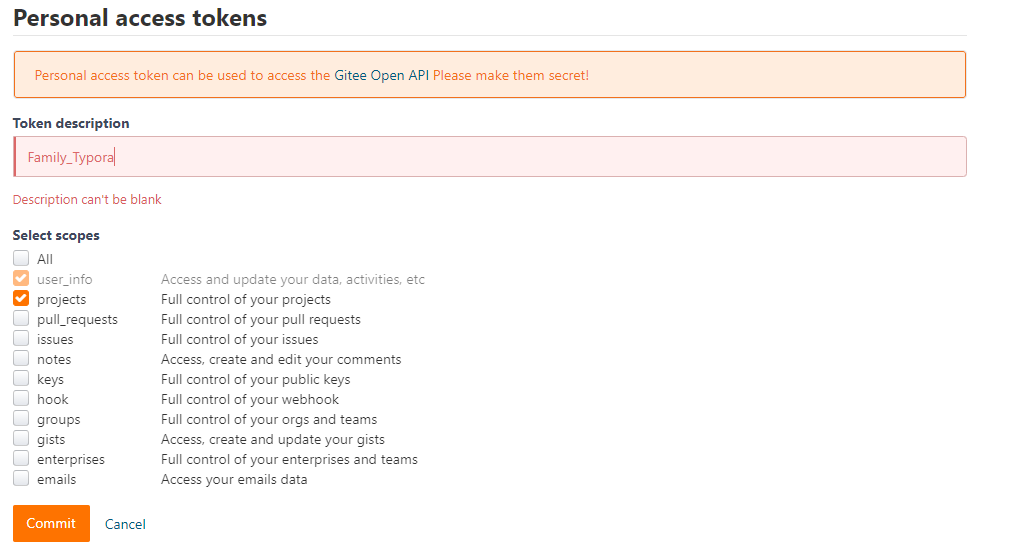
点击Commit,然后输入密码,记住Token
-
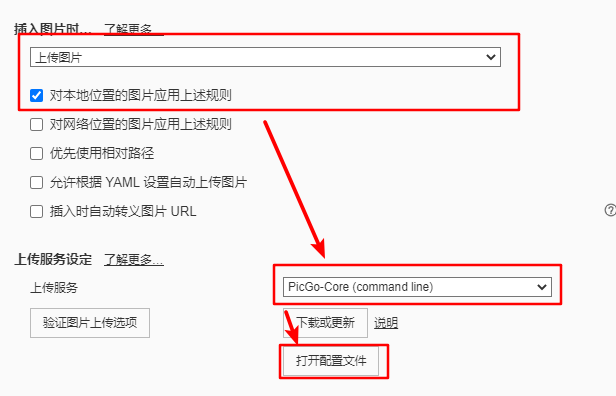
设置Typora并配置文件
{ "picBed": { "current": "gitee", "uploader": "gitee", "gitee": { "repo": "lypallengit/document",//这里写自己的仓库名 看注意 "branch": "master", "token": "",//这里填自己的token 第五步生成的 "path": "2021/",//这里填仓库中的文件夹名字 "customPath": "default", "customUrl": "" }, "transformer": "path" }, "picgoPlugins": { "picgo-plugin-gitee-uploader": true, "picgo-plugin-super-prefix": true }, "picgo-plugin-super-prefix": { "fileFormat": "YYYYMMDDHHmmss" }, //super-prefix插件配置 "picgo-plugin-gitee-uploader": { "lastSync": "2021-06-27 11:10:16" } }注意:仓库名最好是填写Clone中的,这样可以防止出错

-
验证图库是否正常工作
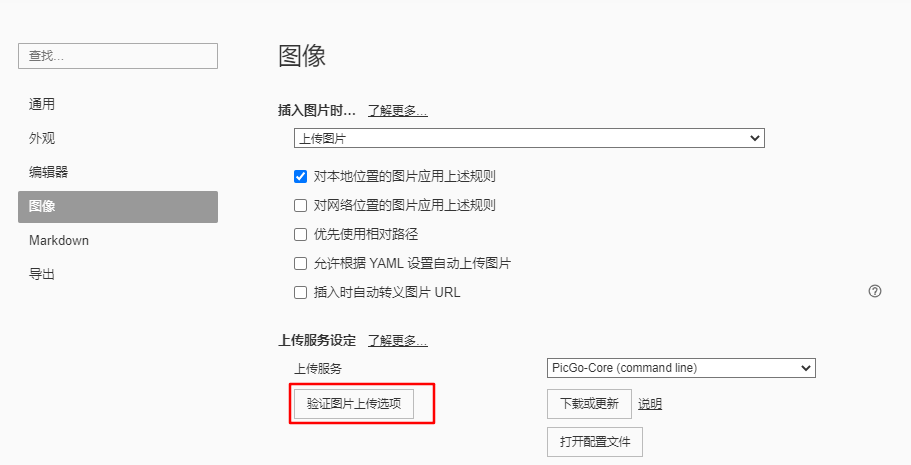
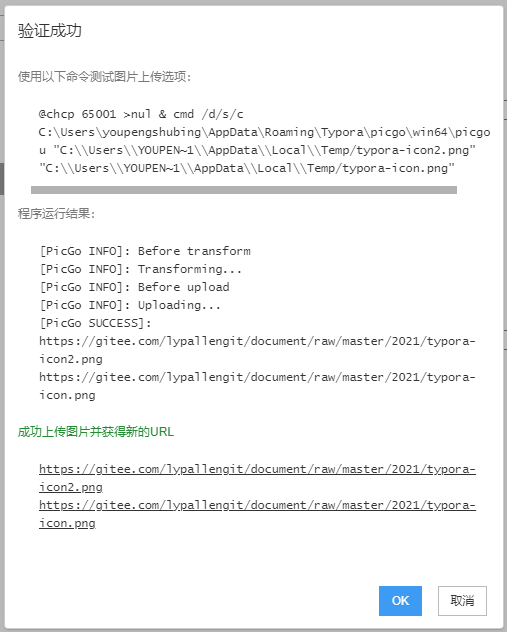
出现以下情况说明某次已经验证成功了

注意 这里不能上传同名图片
-
安装super-prefix,实现图片自动重命名注意重启Typora
.\picgo.exe install super-prefix 命令
注意:在第六步配置文件中要添加该代码

3. 标题自动编号(带目录)
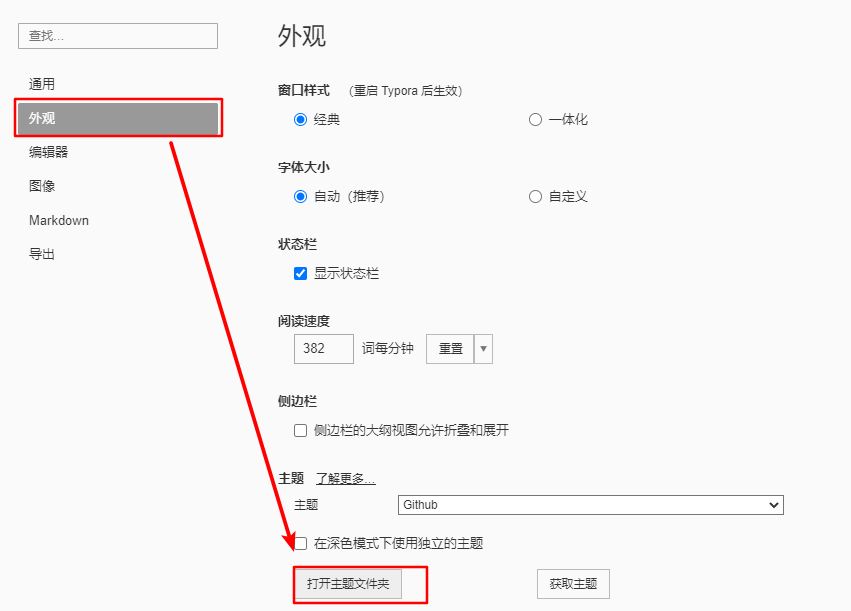
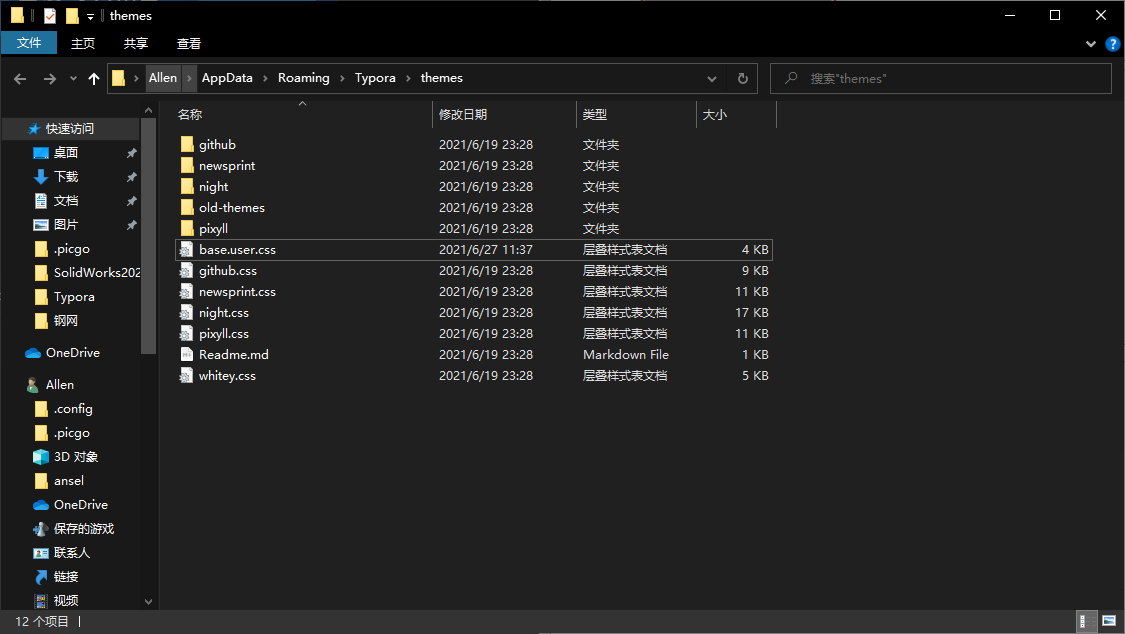
新建base.user.css文件
将参考文件1中的代码粘贴到该文件,为了方便复制下面代码就可以了
/**************************************
 * Header Counters in TOC
 **************************************/

/* No link underlines in TOC */
.md-toc-inner {
    text-decoration: none;
}

.md-toc-content {
    counter-reset: h1toc
}

.md-toc-h1 {
    margin-left: 0;
    font-size: 1.5rem;
    counter-reset: h2toc
}

.md-toc-h2 {
    font-size: 1.1rem;
    margin-left: 2rem;
    counter-reset: h3toc
}

.md-toc-h3 {
    margin-left: 3rem;
    font-size: .9rem;
    counter-reset: h4toc
}

.md-toc-h4 {
    margin-left: 4rem;
    font-size: .85rem;
    counter-reset: h5toc
}

.md-toc-h5 {
    margin-left: 5rem;
    font-size: .8rem;
    counter-reset: h6toc
}

.md-toc-h6 {
    margin-left: 6rem;
    font-size: .75rem;
}

.md-toc-h1:before {
    color: black;
    counter-increment: h1toc;
    content: counter(h1toc) ". "
}

.md-toc-h1 .md-toc-inner {
    margin-left: 0;
}

.md-toc-h2:before {
    color: black;
    counter-increment: h2toc;
    content: counter(h1toc) ". " counter(h2toc) ". "
}

.md-toc-h2 .md-toc-inner {
    margin-left: 0;
}

.md-toc-h3:before {
    color: black;
    counter-increment: h3toc;
    content: counter(h1toc) ". " counter(h2toc) ". " counter(h3toc) ". "
}

.md-toc-h3 .md-toc-inner {
    margin-left: 0;
}

.md-toc-h4:before {
    color: black;
    counter-increment: h4toc;
    content: counter(h1toc) ". " counter(h2toc) ". " counter(h3toc) ". " counter(h4toc) ". "
}

.md-toc-h4 .md-toc-inner {
    margin-left: 0;
}

.md-toc-h5:before {
    color: black;
    counter-increment: h5toc;
    content: counter(h1toc) ". " counter(h2toc) ". " counter(h3toc) ". " counter(h4toc) ". " counter(h5toc) ". "
}

.md-toc-h5 .md-toc-inner {
    margin-left: 0;
}

.md-toc-h6:before {
    color: black;
    counter-increment: h6toc;
    content: counter(h1toc) ". " counter(h2toc) ". " counter(h3toc) ". " counter(h4toc) ". " counter(h5toc) ". " counter(h6toc) ". "
}

.md-toc-h6 .md-toc-inner {
    margin-left: 0;
}

/**************************************
 * Header Counters in Content
 **************************************/

/** initialize css counter */
#write {
    counter-reset: h1
}

h1 {
    counter-reset: h2
}

h2 {
    counter-reset: h3
}

h3 {
    counter-reset: h4
}

h4 {
    counter-reset: h5
}

h5 {
    counter-reset: h6
}

/** put counter result into headings */
#write h1:before {
    counter-increment: h1;
    content: counter(h1) ". "
}

#write h2:before {
    counter-increment: h2;
    content: counter(h1) "." counter(h2) ". "
}

#write h3:before, h3.md-focus.md-heading:before { /*override the default style for focused headings */
    counter-increment: h3;
    content: counter(h1) "." counter(h2) "." counter(h3) ". "
}

#write h4:before, h4.md-focus.md-heading:before {
    counter-increment: h4;
    content: counter(h1) "." counter(h2) "." counter(h3) "." counter(h4) ". "
}

#write h5:before, h5.md-focus.md-heading:before {
    counter-increment: h5;
    content: counter(h1) "." counter(h2) "." counter(h3) "." counter(h4) "." counter(h5) ". "
}

#write h6:before, h6.md-focus.md-heading:before {
    counter-increment: h6;
    content: counter(h1) "." counter(h2) "." counter(h3) "." counter(h4) "." counter(h5) "." counter(h6) ". "
}

/** override the default style for focused headings */
#write>h3.md-focus:before, #write>h4.md-focus:before, #write>h5.md-focus:before, #write>h6.md-focus:before, h3.md-focus:before, h4.md-focus:before, h5.md-focus:before, h6.md-focus:before {
    color: inherit;
    border: inherit;
    border-radius: inherit;
    position: inherit;
    left: initial;
    float: none;
    top: initial;
    font-size: inherit;
    padding-left: inherit;
    padding-right: inherit;
    vertical-align: inherit;
    font-weight: inherit;
    line-height: inherit;
}
参考文献
[1] 带目录功能的标题自动重命名
[2] 使用PicGo上传图片到Gitee
相关软件百度网盘链接
链接:https://pan.baidu.com/s/1UOCj9coZo-ZhKKfNC10DHA
提取码:mjmj


 1096
1096


 被折叠的 条评论
为什么被折叠?
被折叠的 条评论
为什么被折叠?
 到【灌水乐园】发言


