


一 什么是Active MQ
Active MQ是消息队列技术的具体实现之一,支持点对点(Queue)与订阅/发布(Topic)两种信息传递模式。其常用于建立服务之间的连接机制,与Feign相比,更适用于异步操作,像数据同步这种与业务无强关联又耗时的操作,就很适合使用。
Active MQ基于JMS消息代理实现(JMS是Java的消息服务规范,类似于JDBC,是一种实现功能的标准)。与之相应的还有另一种规范AMQP,较JMS而言更加先进,同时兼容JMS,其最著名的具体实现是Rabbit MQ,这会在另一篇博文中具体讲述。
二 Active MQ的两种角色
在Active MQ中有两种角色。
发布者(publisher):用于发布消息。
消费者(consumer):用于消费(接收)消息。
三 Active MQ的两种信息传递模式
(1)点对点(Queue)模式
点对点模式:一个消息只能有一个消费者(情场菜鸟,一套说辞撩一个妹纸)。

(2)订阅/发布(Topic)模式
订阅/发布模式:一个消息可以有多个消费者(情场老手,一套说辞撩多个妹纸)。
附:参考文件1:springboot整合使用activemq
四 Spring Boot工程整合Active MQ的准备工作
(1)依赖(pom.xml)
        <!--  Spring Boot工程Active MQ起步依赖  -->
        <dependency>
            <groupId>org.springframework.boot</groupId>
            <artifactId>spring-boot-starter-activemq</artifactId>
        </dependency>
        <!--  Apache组织Active MQ池依赖  -->
        <dependency>
            <groupId>org.apache.activemq</groupId>
            <artifactId>activemq-pool</artifactId>
        </dependency>
(2)配置文件(application.yml)
spring:
  activemq:
    // 注意,默认的端口号是61616。
    broker-url: tcp://127.0.0.1:61616
    user: admin
    password: admin
    pool:
      enabled: true
      max-connections: 10
  jms:
    // 是否开启发布/订阅模式(false:Queue模式,true:Topic模式,默认false)。
    pub-sub-domain: true
五 Spring Boot工程整合Active MQ(Queue)
注:Queue模式必须将配置文件中的spring.jms.pub-sub-domain参数设置为false。
(1)发布者
@Autowired
private JmsTemplate jmsTemplate;
/**
* 1:下发Queue消息
*
* @return
*/
@PostMapping(value = "send/queue", produces = MediaType.APPLICATION_JSON_UTF8_VALUE)
public void sendQueue() {
// 设置点对点模式队列名。
String name = "active.queue";
// 实例化点对点模式队列实例。
Queue queue = new ActiveMQQueue(name);
// 循环发送消息。
String message;
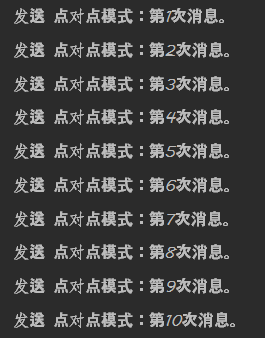
for (int i = 1; i <= 10; i++) {
message = "点对点模式:第" + i + "次消息。";
System.out.println("发送 " + message);
// 下发消息,参数1表示消息所在的队列,消息二表示消息。
jmsTemplate.convertAndSend(queue, message);
}
}
执行。
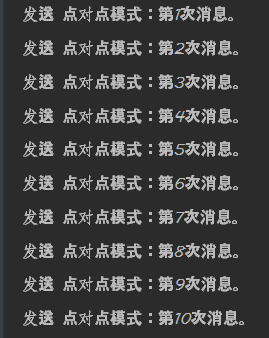
发布者一共发布了10条消息。
(2)消费者
设置消息队列监听器,一个监听器代表一个消费者,注解@JmsListener的destination属性用于填写队列名。被@JmsListener注解的方法为监听器。
注:监听器所在的类必须配置为Bean。
/**
 * @author 白
 */
@Service
public class ActiveListener {

    /**
     * 1:处理
     *
     * @param message
     */
    @JmsListener(destination = "active.queue")
    public void handlerOne(String message) {
        System.out.println("消费者1接收 " + message);
    }

    /**
     * 2:处理
     *
     * @param message
     */
    @JmsListener(destination = "active.queue")
    public void handlerTwo(String message) {
        System.out.println("消费者2接收 " + message);
    }

}
为了比较与Topic模式的区别,我建立了两个消费者监听同一个队列,结果如下:
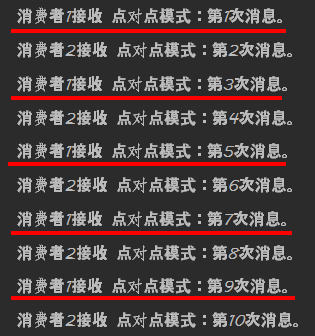
两个消费者各消费了5条消息,消息被消费者1消费的情况下就无法被消费者2消费。
六 Spring Boot工程整合Active MQ(Topic)
注:Topic模式必须将配置文件中的spring.jms.pub-sub-domain参数设置为true。
(1)发布者
    @Autowired
    private JmsTemplate jmsTemplate;

    /**
     * 2:下发Topic消息
     *
     * @return
     */
    @PostMapping(value = "send/topic", produces = MediaType.APPLICATION_JSON_UTF8_VALUE)
    public void sendTopic() {
        // 设置发布/订阅模式队列名。
        String name = "active.topic";
        // 实例化发布/订阅模式队列实例。
        Topic topic = new ActiveMQTopic(name);
        // 循环发送消息。
        String message;
        for (int i = 1; i <= 10; i++) {
            message = "发布/订阅模式:第" + i + "次消息。";
            System.out.println("发送 " + message);
            jmsTemplate.convertAndSend(topic, message);
        }
    }
执行。
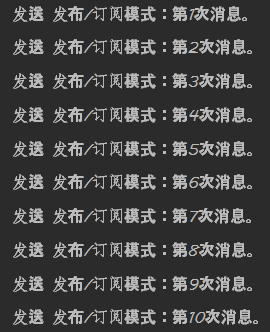
发布者一共发布了10条消息。
(2)消费者
修改监听器监听的队列。
/**
 * @author 白
 */
@Service
public class ActiveListener {

    /**
     * 1:处理
     *
     * @param message
     */
    @JmsListener(destination = "active.topic")
    public void handlerOne(String message) {
        System.out.println("消费者1接收 " + message);
    }

    /**
     * 2:处理
     *
     * @param message
     */
    @JmsListener(destination = "active.topic")
    public void handlerTwo(String message) {
        System.out.println("消费者2接收 " + message);
    }

}
结果如下:
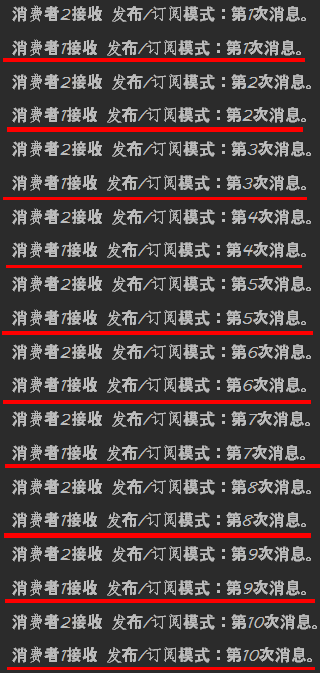
发布者一共发布了10条消息,但是每个消费者都消费了10条。这就是点对点(Queue)模式与发布/订阅(Topic)模式的区别,一条消息允许被多个消费者消费。
七 Topic/Queue模式下发布Queue/Topic消息的情况
在上述的讲述中,我们都是在特定模式下发送特定类型的消息,那么如果发送其它模式的消息会怎么样呢?
我们以在Topic模式下发布Queue消息的情况为例。
保持Topic模式(spring.jms.pub-sub-domain:true)不变,执行第五部分:Spring Boot工程整合Active MQ(Queue)的代码(此处代码省略),结果如下:
(1)发布者
(2)消费者

可以看到,虽然发布者显示发送了10条信息,但实际上监听器没有完全没有监听到消息队列中的信息发生改变,我们再打开Active MQ的后台界面。
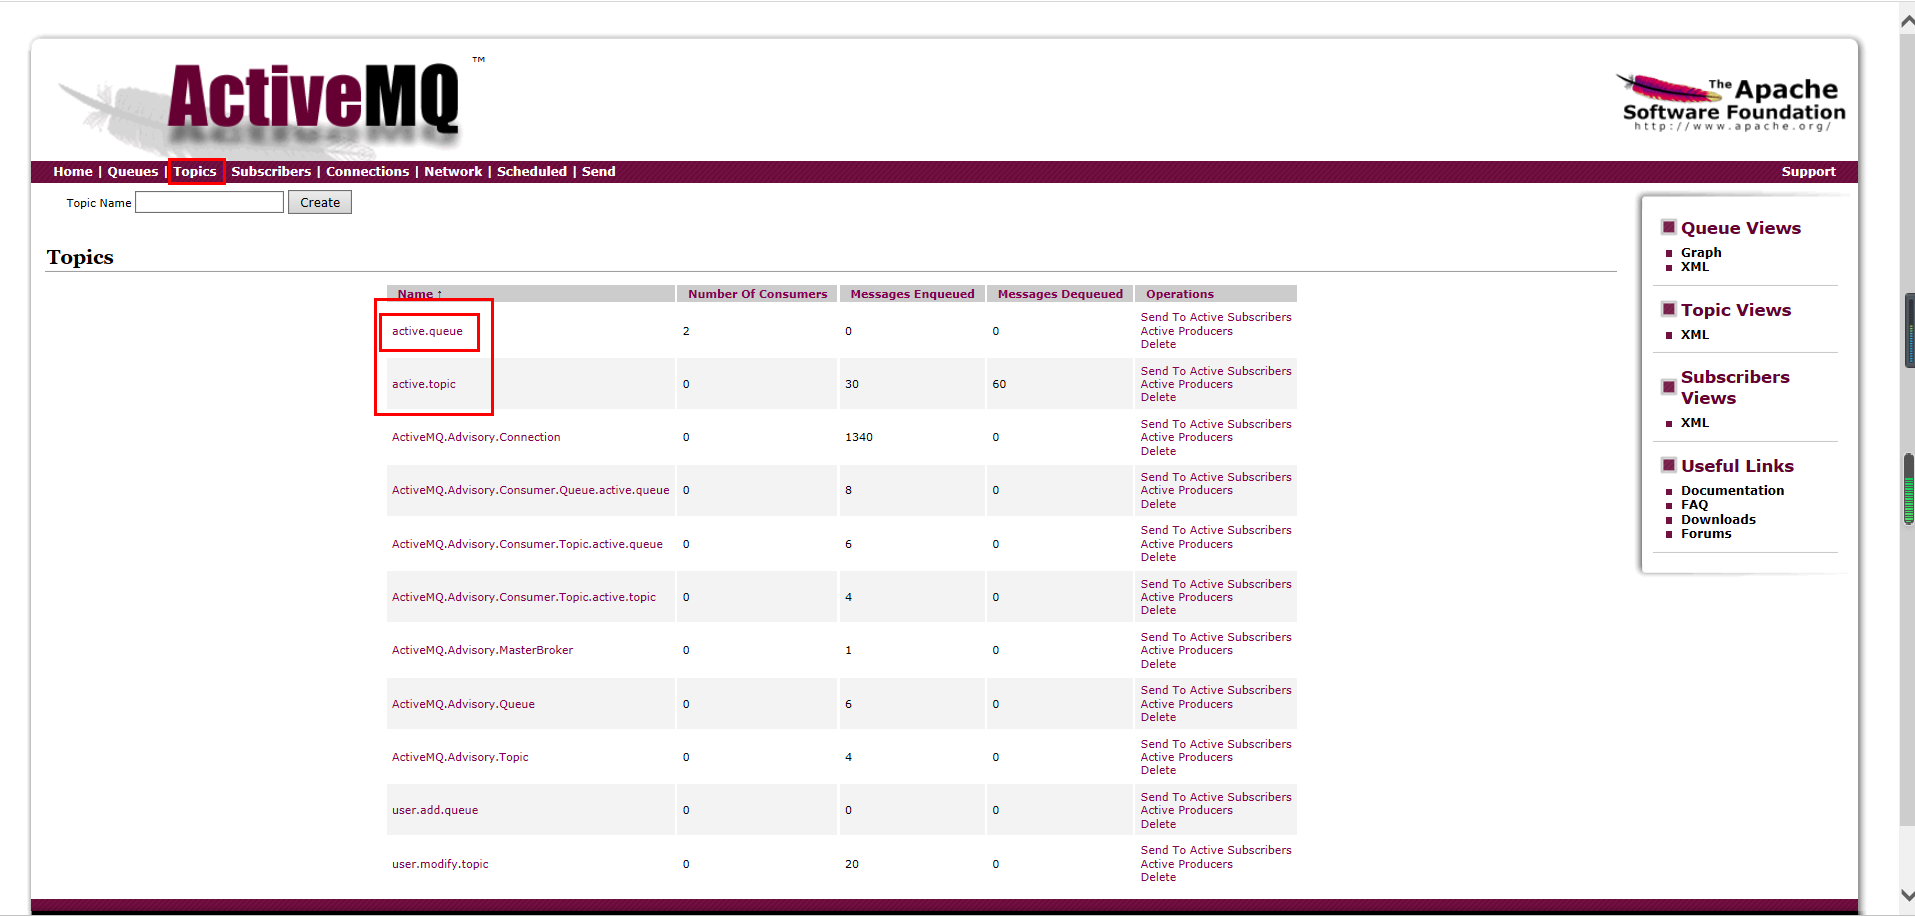
我们可以看到active.queue消息队列的类型无形中变为了Topic类型。
因此可以知道,一般情况下,在特定的模式下是无法发送非特定类型的消息的。
八 使用Active MQ传输对象
很遗憾,Active MQ是无法直接传输对象的,如果你很有冒险精神的尝试了(说的就是我),系统会回以你一个很不可爱的异常:

但是也不是毫无解决办法,我们可以先将对象转换成JSON字符串后发送,再在消费者端转换成对象的模式。
(1)依赖(pom.xml)
    <!--  阿里巴巴Json依赖  -->
    <dependency>
        <groupId>com.alibaba</groupId>
        <artifactId>fastjson</artifactId>
        <version>1.2.25</version>
    </dependency>
(2)发布者
    /**
     * 2:下发Topic消息
     *
     * @return
     */
    @PostMapping(value = "send/topic", produces = MediaType.APPLICATION_JSON_UTF8_VALUE)
    public void sendTopic() {
        // 设置发布/订阅模式队列名。
        String name = "active.topic";
        // 实例化发布/订阅模式队列实例。
        Topic topic = new ActiveMQTopic(name);
        // 循环发送消息。
        UserInformation userInformation;
        for (int i = 1; i <= 10; i++) {
            userInformation = new UserInformation();
            userInformation.setId(i);
            // 将对象转换成JSON字符串。
            jmsTemplate.convertAndSend(topic, JSONObject.toJSONString(userInformation));
        }
    }
(3)消费者
    /**
     * 1:处理
     *
     * @param message
     */
    @JmsListener(destination = "active.topic")
    public void handlerOne(String message) {
        UserInformation userInformation = JSONObject.parseObject(message, UserInformation.class);
        System.out.println("消费者1接收 " + userInformation);
    }

    /**
     * 2:处理
     *
     * @param message
     */
    @JmsListener(destination = "active.topic")
    public void handlerTwo(String message) {
        UserInformation userInformation = JSONObject.parseObject(message, UserInformation.class);
        System.out.println("消费者2接收 " + userInformation);
    }
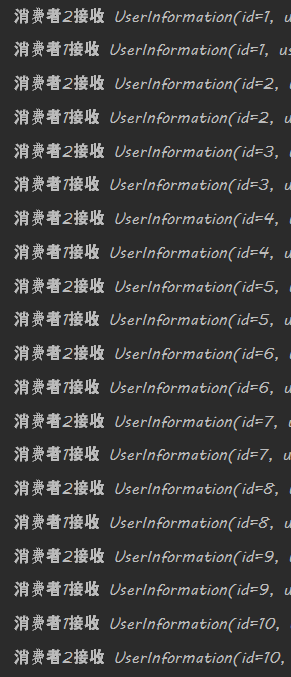
成功。
九 同时使用Queue和Topic
想在工程中同时使用Queue和Topic,关键是能为消费者自主配置不通模式的监听工厂,因此我们需要先分别为Queue和Topic实例化一个监听工厂。
(1)配置
package com.lsy.housewifery.tool.config.active;

import org.springframework.context.annotation.Bean;
import org.springframework.context.annotation.Configuration;
import org.springframework.jms.config.DefaultJmsListenerContainerFactory;
import org.springframework.jms.config.JmsListenerContainerFactory;

import javax.jms.ConnectionFactory;

/**
 * @author 白
 */
@Configuration
public class ActiveConfig {

    // 监听器工厂名
    public static final String QUEUE_LISTENER_FACTORY = "queueJmsListenerContainerFactory";
    public static final String TOPIC_LISTENER_FACTORY = "topicJmsListenerContainerFactory";

    /**
     * 配置Queue监听器工厂Bean
     *
     * @param connectionFactory 连接工厂对象
     * @return 监听器工厂对象
     */
    @Bean(name = QUEUE_LISTENER_FACTORY)
    public JmsListenerContainerFactory<?> queueJmsListenerContainerFactoryBean(ConnectionFactory connectionFactory) {
        DefaultJmsListenerContainerFactory defaultJmsListenerContainerFactory = new DefaultJmsListenerContainerFactory();
        defaultJmsListenerContainerFactory.setPubSubDomain(false);
        defaultJmsListenerContainerFactory.setConnectionFactory(connectionFactory);
        return defaultJmsListenerContainerFactory;
    }

    /**
     * 配置Topic监听器工厂Bean
     *
     * @param connectionFactory 连接工厂对象
     * @return 监听器工厂对象
     */
    @Bean(name = TOPIC_LISTENER_FACTORY)
    public JmsListenerContainerFactory<?> topicJmsListenerContainerFactoryBean(ConnectionFactory connectionFactory) {
        DefaultJmsListenerContainerFactory defaultJmsListenerContainerFactory = new DefaultJmsListenerContainerFactory();
        defaultJmsListenerContainerFactory.setPubSubDomain(true);
        defaultJmsListenerContainerFactory.setConnectionFactory(connectionFactory);
        return defaultJmsListenerContainerFactory;
    }

}
spring:
  activemq:
    // 注意,默认的端口号是61616。
    broker-url: tcp://127.0.0.1:61616
    user: admin
    password: admin
    pool:
      enabled: true
      max-connections: 10
  // 因为自主配置模式,因此jms配置可以删除。
  // jms:
    // 是否开启发布/订阅模式(false:Queue模式,true:Topic模式,默认false)。
    // pub-sub-domain: true
(2)Queue模式
    /**
     * 1:处理
     *
     * @param message
     */
    @JmsListener(destination = "active.queue", containerFactory = ActiveConfig.QUEUE_LISTENER_FACTORY)
    public void handlerOne(String message) {
        UserInformation userInformation = JSONObject.parseObject(message, UserInformation.class);
        System.out.println("消费者1接收 " + userInformation);
    }
(3)Topic模式
    /**
     * 2:处理
     *
     * @param message
     */
    @JmsListener(destination = "active.topic", containerFactory = ActiveConfig.TOPIC_LISTENER_FACTORY)
    public void handlerTwo(String message) {
        UserInformation userInformation = JSONObject.parseObject(message, UserInformation.class);
        System.out.println("消费者2接收 " + userInformation);
    }


 203
203


 被折叠的 条评论
为什么被折叠?
被折叠的 条评论
为什么被折叠?
 到【灌水乐园】发言


