


这里做一个demo供大家互相借鉴一下,步骤如下
1. 先创建springboot工程项目,本人使用的是IDEA,创建过程这里不做讲解,请自行完成。
2. 在pom.xml中导入freemarker。
    <dependency>
        <groupId>org.springframework.boot</groupId>
        <artifactId>spring-boot-starter-freemarker</artifactId>
    </dependency>
3. 在配置文件application.properties中加入关于freemarker的相关配置。
#freemarker 配置信息
spring.freemarker.cache=true
spring.freemarker.check-template-location=true
spring.freemarker.charset=UTF-8
spring.freemarker.content-type=text/html
#文件的后缀一定不要写成html否则找不到映射路径
spring.freemarker.suffix=.ftl
spring.freemarker.templateEncoding=UTF-8
#设定ftl文件路径
spring.freemarker.templateLoaderPath=classpath:/templates/
spring.freemarker.expose-spring-macro-helpers=false
#设定静态文件路径,js,css等
spring.resources.static-locations=classpath:/templates/,classpath:/static/
#更多的配置信息这里不做详解
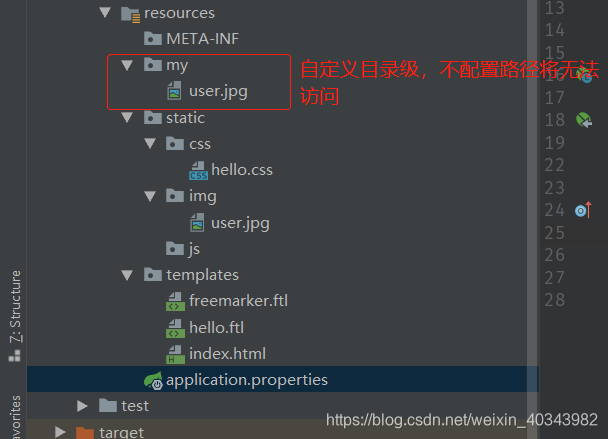
4. 相关静态资源的存放目录一般如下结构所示。
    -resources
		|
		| - META_INF
		|
		| - static
		|	|
		|	| - img
		|	|	|
		|	|	|-user.jpg
		|	|
		|	| - css
		|		|
		|		| - hello.css
		|
		| - templates
			|
			| - hello.ftl
			|
			| - freemarker.ftl
			|
			| - index.html
5.编写ftl文件和html文件。
		<!DOCTYPE html>
		<html xmlns="http://www.w3.org/1999/xhtml" xmlns:th="http://www.thymeleaf.org"
			  xmlns:sec="http://www.thymeleaf.org/thymeleaf-extras-springsecurity3">
		<head>
			<title>Hello World!</title>
		</head>
		<body>
		<center>
			<p>
				welcome ${name} to freemarker!
			</p>

			<p>性别:
				   <#if sex==0>
						  女
				   <#elseif sex==1>
						  男
				   <#else>
						  保密
				   </#if>
			</p>

			<h4>我的好友:</h4>
			   <#list friends as item>
					   姓名:${item.name} , 年龄${item.age}
				   <br>
			   </#list>
		</center>
		</body>
		</html>
		<!DOCTYPE html>
		<html xmlns="http://www.w3.org/1999/xhtml" xmlns:th="http://www.thymeleaf.org"
			  xmlns:sec="http://www.thymeleaf.org/thymeleaf-extras-springsecurity3">
		<head>
			<title>Hello World!</title>
			<link rel="stylesheet" href="/css/hello.css" type="text/css" />

		</head>
		<body>
		<center>
			<p>
				welcome ${name} to freemarker!
			</p>
			<img src='/img/user.jpg'>
			<p>性别:
				   <#if sex==0>
						  女
				   <#elseif sex==1>
						  男
				   <#else>
						  保密
				   </#if>
			</p>

			<p>朋友${friend2}</p>

		</center>
		</body>
		</html>
		<!DOCTYPE html>
		<html lang="en">
		<head>
			<meta charset="UTF-8">
			<title>htmlTest</title>
		</head>
		<body>
		<p>hello world!</p>
		<img src="/img/user.jpg">
		</body>
		</html>
6. 在做好以上步骤就基本做好了准备工作,下面编写controller类,测试静态资源的访问方式和效果。这里还测试了如何拿到传入controller的参数,当然ftl的配置信息里还可以配置将参数自动装入页面,这里也不做详解。
package com.example.springboot.controller;
	import org.springframework.stereotype.Controller;
	import org.springframework.web.bind.annotation.RequestMapping;
	import org.springframework.web.servlet.ModelAndView;

	import javax.servlet.http.HttpServletRequest;
	import java.util.ArrayList;
	import java.util.HashMap;
	import java.util.List;
	import java.util.Map;

	/**
	 * CREATED BY silence ON 2018/12/12
	 * freemarker测试demo
	 **/
	@Controller
	@RequestMapping("/plan")
	public class freemarkerController {

		@RequestMapping("/freemarker")
		public String freeMarker(Map<String, Object> map) {

			map.put("name", "赛伦斯");
			map.put("sex", 1);

			// 模拟数据
			List<Map<String, Object>> friends = new ArrayList<Map<String, Object>>();
			Map<String, Object> friend = new HashMap<String, Object>();
			friend.put("name", "xbq");
			friend.put("age", 22);
			friends.add(friend);
			friend = new HashMap<String, Object>();
			friend.put("name", "July");
			friend.put("age", 18);
			friends.add(friend);
			map.put("friends", friends);
			return "freemarker";
		}


		@RequestMapping("/todemo")
		public ModelAndView toDemo(ModelAndView mv, HttpServletRequest request, String friend) {
			String s = request.getParameter("friend");
			if (s!=null){
				/**
				 * 这里不清楚原因 freemarker无法通过@PathVariable和@RequestBody拿到请求参数
				 */
				mv.addObject("friend2",s);
				System.out.println("通过request拿到参数--->"+s);
				System.out.println("通过string拿到参数--->"+friend);
			}
			mv.addObject("name", "jack");
			mv.addObject("sex",0);
			mv.setViewName("hello");
			System.out.println("模板----->"+mv);
			return mv;
		}

		@RequestMapping("/i")
		public String i(){
			System.out.println("index");
			return "/index.html";
		}

	}
7.测试访问效果。以下路径均可访问到resources目录下的资源。注意这里我测试用的端口是8000。
http://localhost:8000/plan/i (index.html)
http://localhost:8000/index.html (index.html)
 http://localhost:8000/plan/todemo (hello.ftl)

http://localhost:8000/plan/freemarker (freemarker.ftl)

这里没有做拦截操作所以静态资源均可访问
例如 http://localhost:8000/img/user.jpg (user.jpg)

总结一下最后:
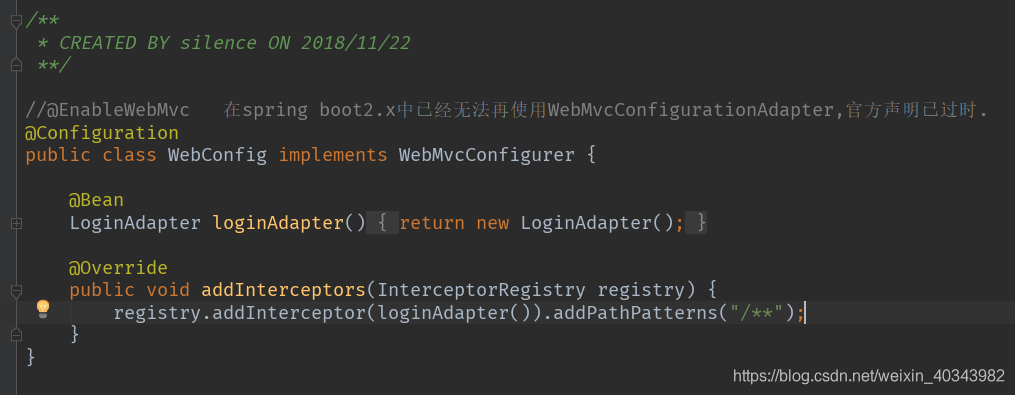
对于springboot来说项目中会应用到拦截器,这里注明一下,在spring boot2.x中已经无法再使用WebMvcConfigurationAdapter,官方声明已过时。对于有mvc注释的操作可以导致映射路径失效,例如@EnableWebMvc。
如果你想定义更多的静态资源路径可以通过配置文件中 spring.resources.static-locations=classpath:/templates/,classpath:/static/,…来指定。
资源访问的优先级顺序为 /META-INF/resources>resources>static>public 感兴趣可以尝试一下和自定义目录的优先级排序。


 885
885

 被折叠的 条评论
为什么被折叠?
被折叠的 条评论
为什么被折叠?
 到【灌水乐园】发言


