


前言
我们在开发中如何保证代码质量,我的回答是做充分的代码测试。Jacoco的出发点是为基于JVM运行的代码提供代码覆盖率统计,期望提供轻量级的、可伸缩的、文档较全的库文件来集成各类构建和开发工具。
ASM介绍
ASM 是一个通用的 Java 字节码操作和分析框架。 它可以用于修改现有类或直接以二进制形式动态生成类。 ASM 提供了一些常见的字节码转换和分析算法,可以从中构建自定义复杂转换和代码分析工具。 ASM 提供与其他 Java 字节码框架类似的功能,但专注于性能。 因为它的设计和实现尽可能小而且快,所以它非常适合在动态系统中使用(但当然也可以以静态方式使用,例如在编译器中)。
ASM增强流程
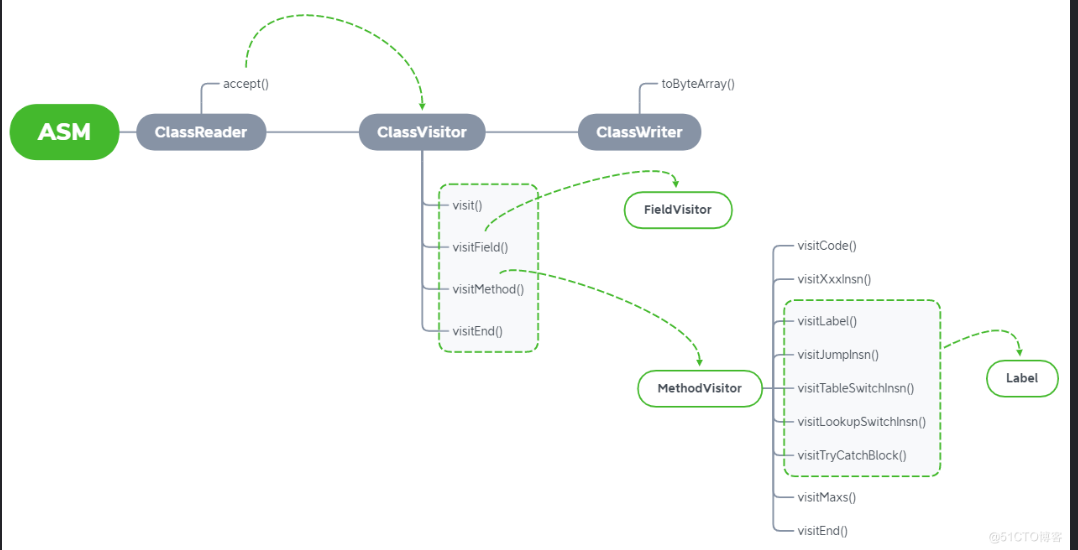
step1:需要创建一个 ClassReader 对象,将 .class 文件的内容读入到一个字节数组中
step2:需要事件过滤器 ClassVisitor。在调用 ClassVisitor 的某些方法时会产生一个新的 XXXVisitor 对象
step3:然后需要一个 ClassWriter 的对象将操作之后的字节码的字节数组回写
step4:当我们需要修改对应的内容时只要实现自己的 XXXVisitor 并返回就可以了
ASM Bytecode Outline 插件
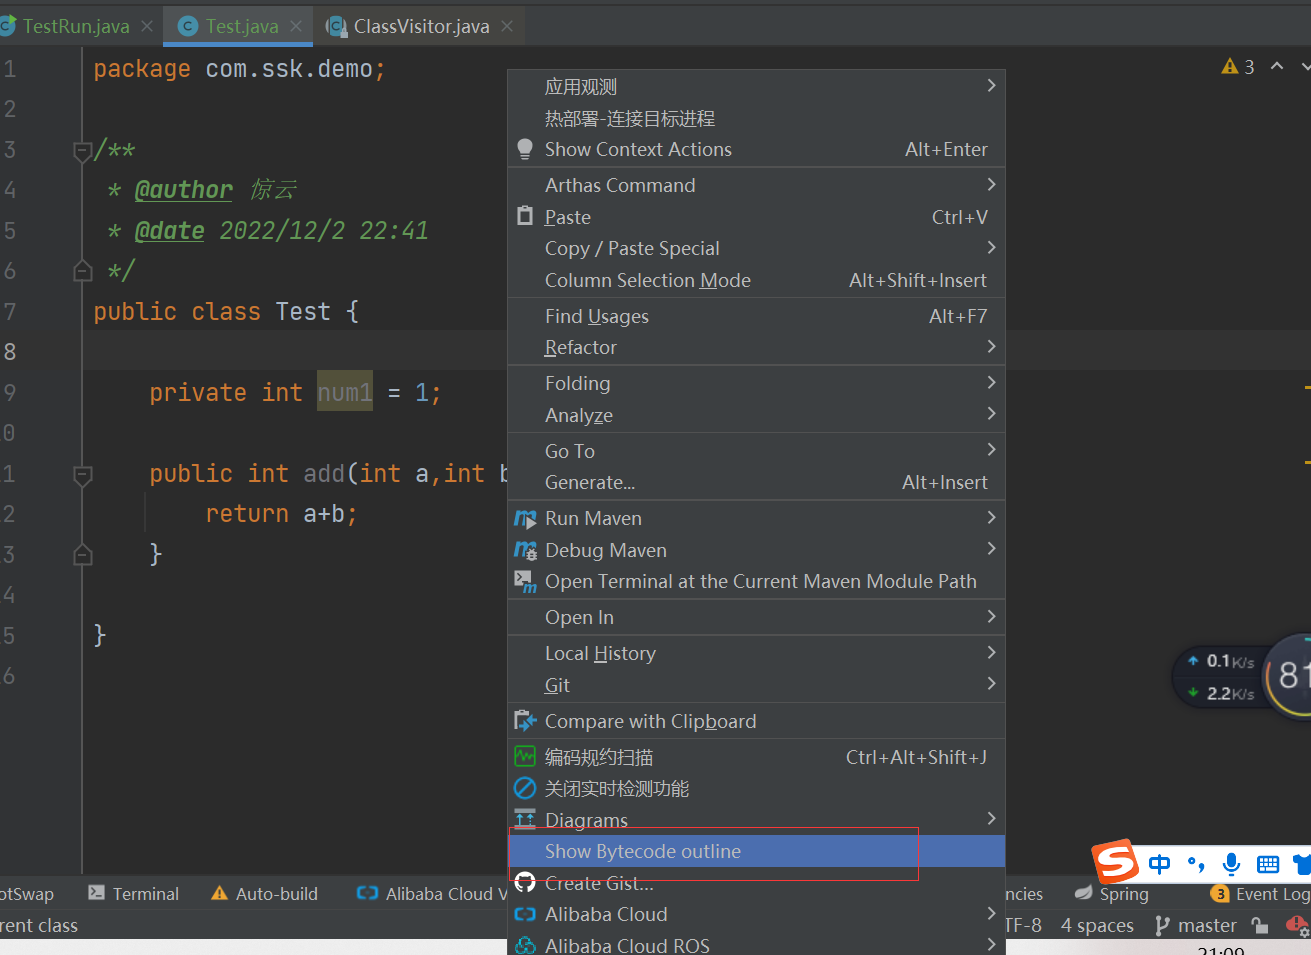
asm是一款偏底层的字节码增强工具,所以在使用的时候需要对字节码指令有一定的了解。我们可以借助asm bytecode outline插件可以帮我们将java文件编译成字节码文件和使用asm指令生成java代码(IDEA2022版本暂不支持)。
我们写一个简单的java实例:
public class Test {
    private int num1 = 1;
    public int add(int a,int b) {
        return a+b;
    }
}
使用asm bytecode outline插件翻译当前文件
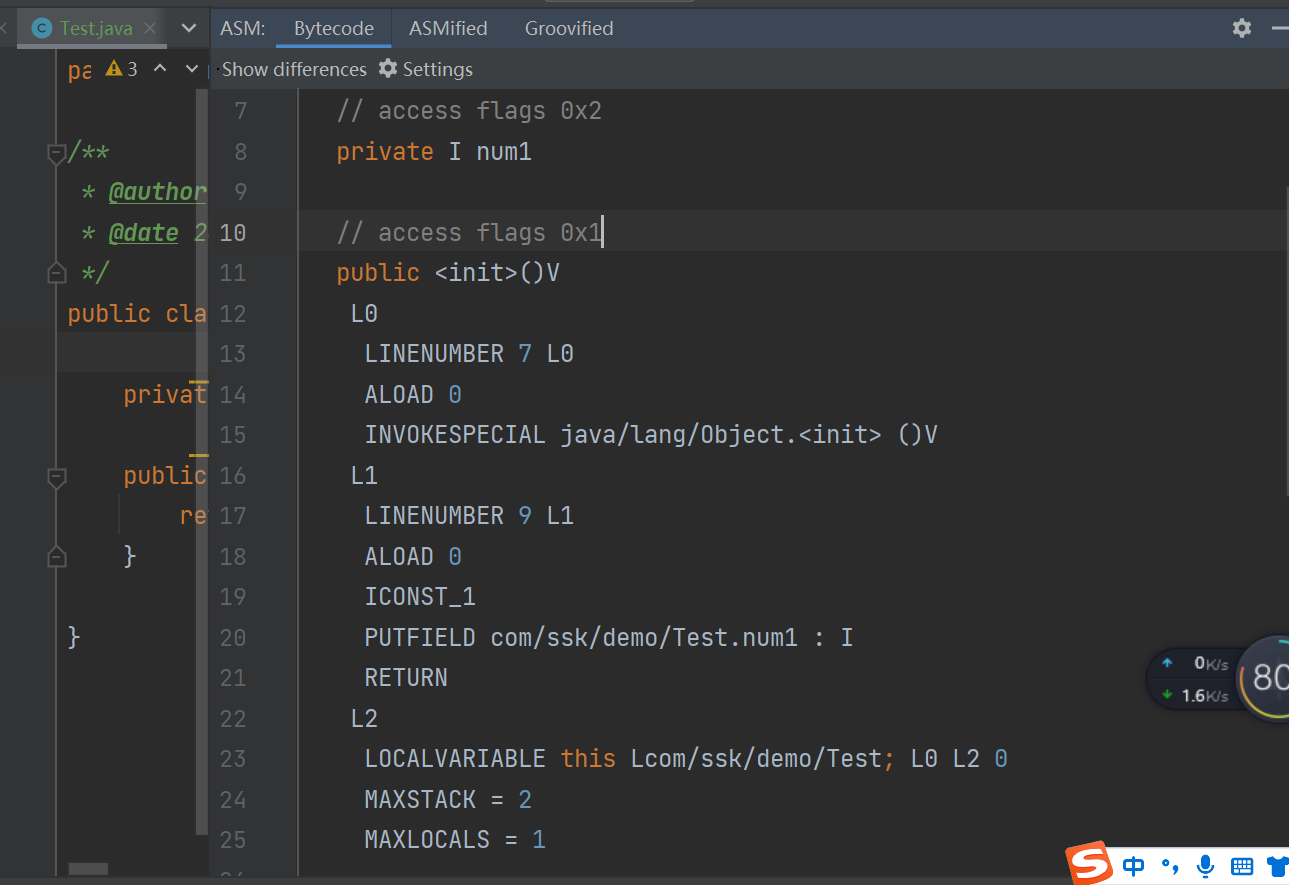
我们可以看到当前类对应的字节码文件:
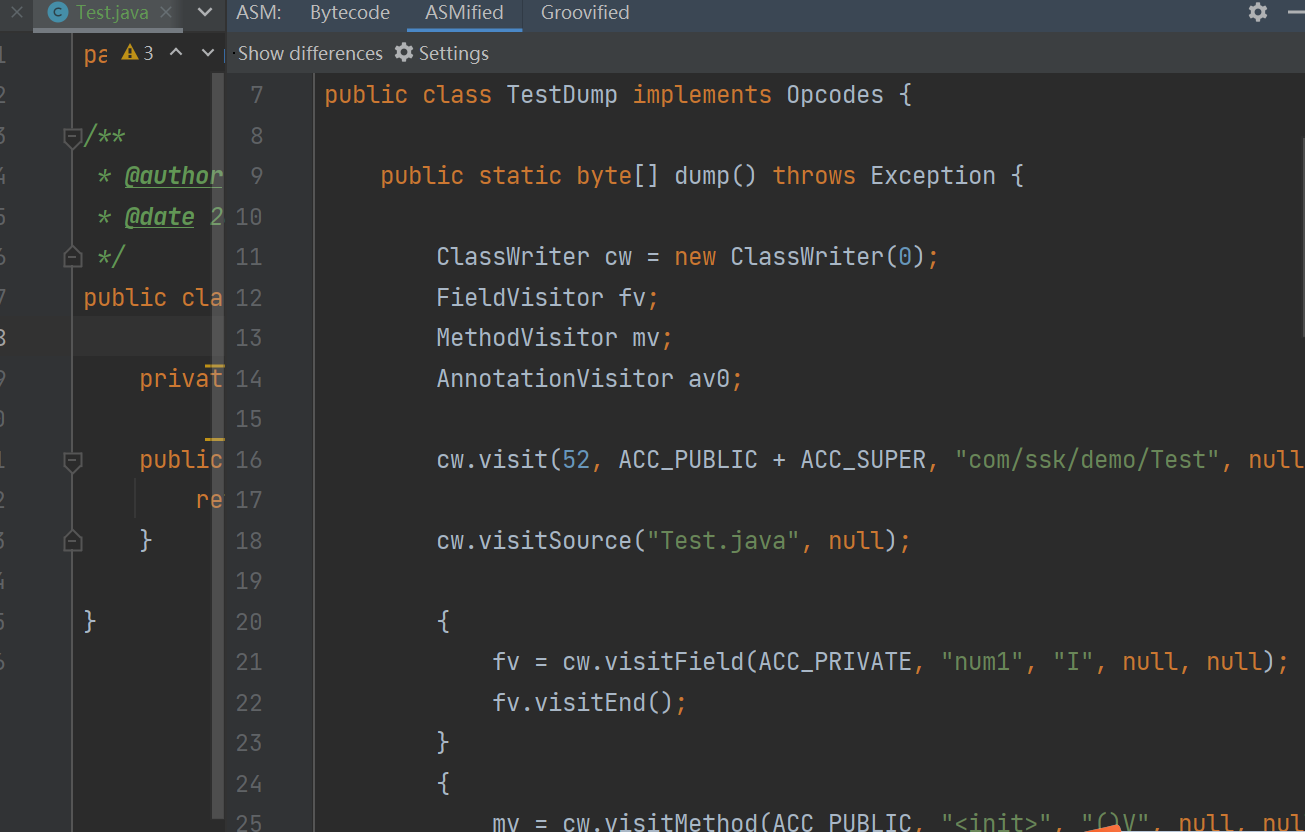
同时也可以看到如何使用ASM工具生成当前类文件,这样我们在用ASM动态生成或者修改类文件的时候就可以以此作为参考。
jacoco源码
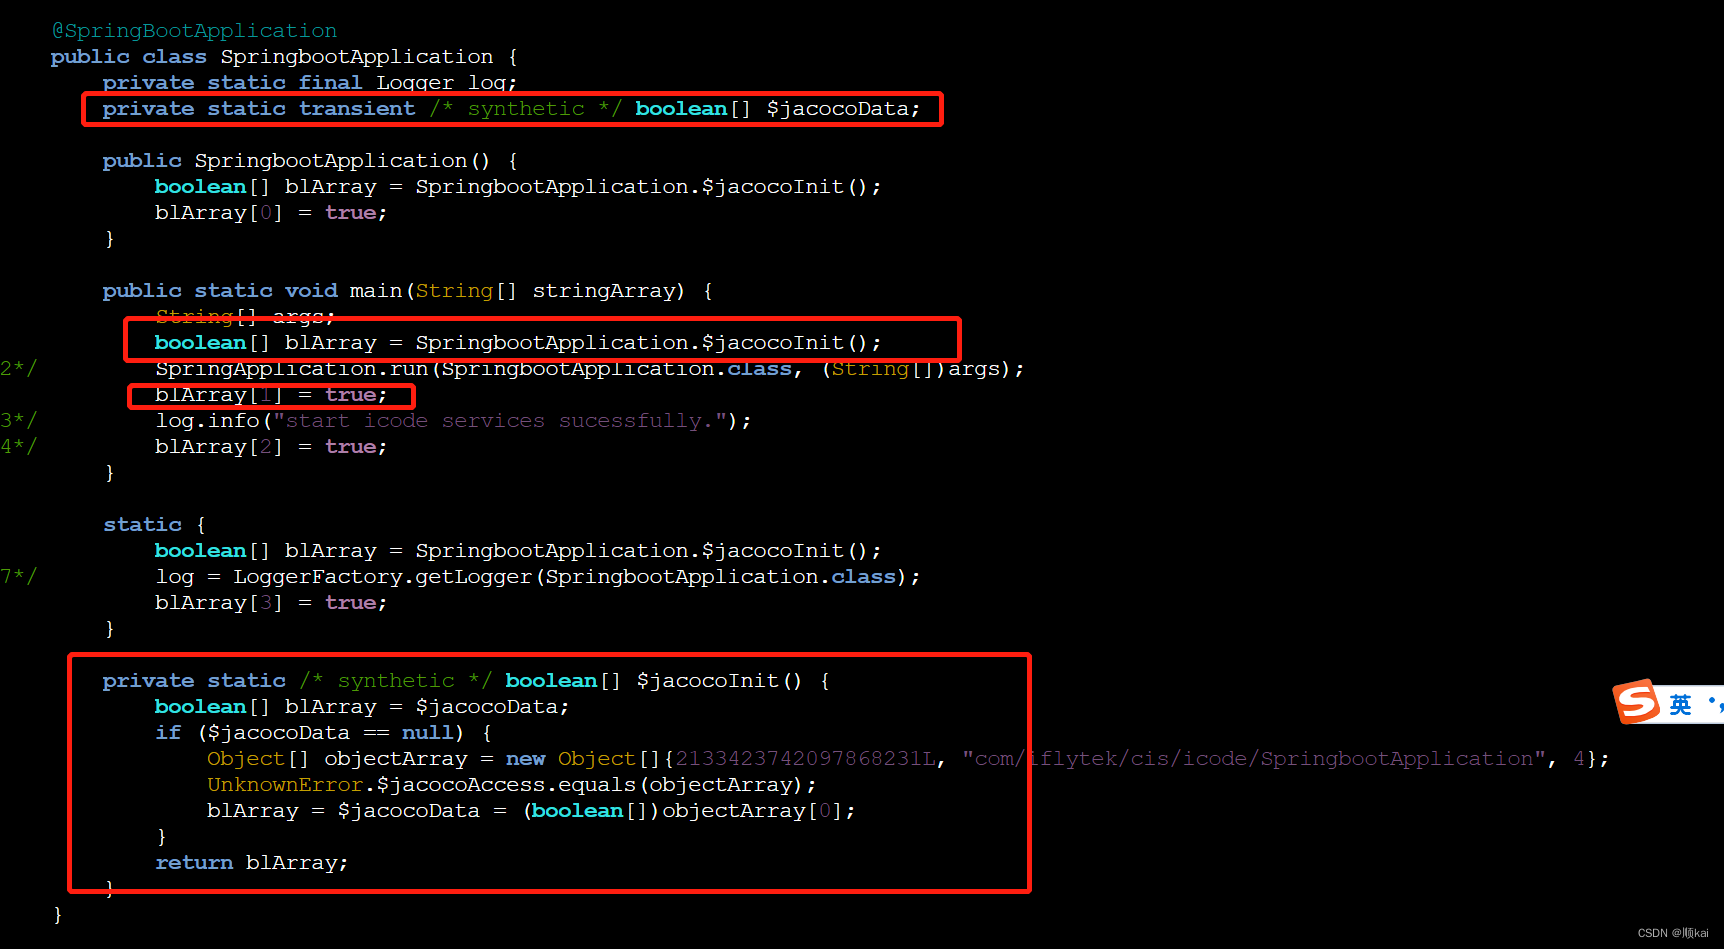
jacoco的运行原理也很简单,就是在我们的目标服务代码进行插装,记录代码的执行位置,这样我们能很清晰的看到代码的执行位置,也可以生成覆盖度报告。这样说你可能没有什么概览,我们使用反编译查看被插装的代码你就能大概知道jacoco究竟是如何进行覆盖度收集的了。
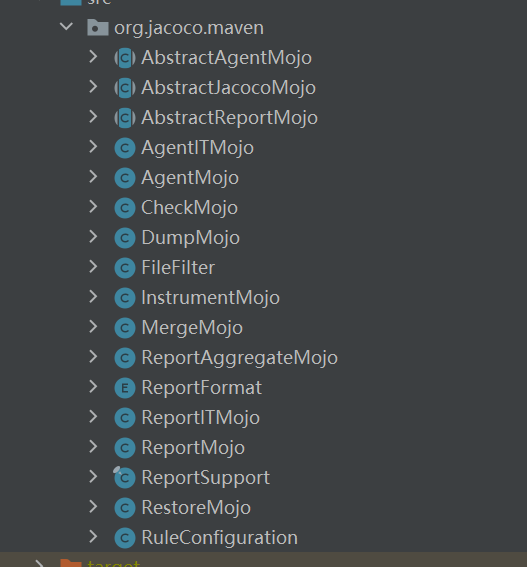
下载jacoco的源码一看,有这么多子moudle,一下子是不是有点懵,不知从何看起呢?其实jacoco实现覆盖度收集的方式有很多种:agent、ant、maven、cli等,再回过头来看代码结构是不是很清晰了很多。其中ant和agent是不会对打包好的jar或war代码产生影响,是在运行时去改变字节码,而maven是在编译的时候就去生成字节码,所以使用maven的方式不适合在生产上使用。

core模块
core作为jacoco的核心模块,完成代码插装、收集、合并等操作。
ExecutionDataStore执行数据集
ExecutionDataStore主要是存储对应的收集数据,由于存储在内存中,所以在停机之前如果不进行收集,则测试数据会被丢失。entries是一个Map,id是对应class的唯一标识,ExecutionData是对应类的覆盖数据。

ExecutionData数据结构如下:
public final class ExecutionData {

	private final long id;
	private final String name;
	private final boolean[] probes;

	public ExecutionData(final long id, final String name,
			final boolean[] probes) {
		this.id = id;
		this.name = name;
		this.probes = probes;
	}

	public void reset() {
		Arrays.fill(probes, false);
	}

	public boolean hasHits() {
		for (final boolean p : probes) {
			if (p) {
				return true;
			}
		}
		return false;
	}

	public void merge(final ExecutionData other, final boolean flag) {
		assertCompatibility(other.getId(), other.getName(),
				other.getProbes().length);
		final boolean[] otherData = other.getProbes();
		for (int i = 0; i < probes.length; i++) {
			if (otherData[i]) {
				probes[i] = flag;
			}
		}
	}

}
-
id:对应class唯一标识。
-
name:对应class的name。
-
probes:打桩数据,是一个boolean的数组,初始化时为全为false,如果有相应位置的代码被执行,则对应位置的数据变为true。
-
reset():清空测试覆盖数据。
-
hasHits():检查是否有任何探针被击中。
-
merge():将同一个类的两次收集数据合并,合并的逻辑就是如果有对应下标为true,则合并后的数据就为flag,flag可以为true也可以为false。
Instrumenter插装
Instrumenter是负责处理插装核心逻辑,它接受的是源class字节码数据,返回含插装数据的字节数组。
private byte[] instrument(final byte[] source) {
		final long classId = CRC64.classId(source);
		final ClassReader reader = InstrSupport.classReaderFor(source);
		final ClassWriter writer = new ClassWriter(reader, 0) {
			@Override
			protected String getCommonSuperClass(final String type1,
					final String type2) {
				throw new IllegalStateException();
			}
		};
		final IProbeArrayStrategy strategy = ProbeArrayStrategyFactory
				.createFor(classId, reader, accessorGenerator);
		final int version = InstrSupport.getMajorVersion(reader);
		final ClassVisitor visitor = new ClassProbesAdapter(
				new ClassInstrumenter(strategy, writer),
				InstrSupport.needsFrames(version));
		reader.accept(visitor, ClassReader.EXPAND_FRAMES);
		return writer.toByteArray();
	}
我们再回想一下前面使用反编译的类信息,多了哪些信息呢?分别是成员变量jacocoData, jacocoInit方法,以及方法中为jacocoData数组赋值,那我们就看下是在什么时机去完成上面三个操作的。
jacocoData数组赋值
org.jacoco.core.internal.instr.ProbeInserter#insertProbe这个方法就是给数组赋值的,并且值为true。java中方法被调用,对应一次入栈与出栈操作,那么对应的指令也需要进行入栈,所以通过相应位置加入额外的入栈指令,达到字节码增强的目的。
public void insertProbe(final int id) {
		mv.visitVarInsn(Opcodes.ALOAD, variable);
		// Stack[0]: [Z
		InstrSupport.push(mv, id);
		// Stack[1]: I
		// Stack[0]: [Z
		mv.visitInsn(Opcodes.ICONST_1);
		// Stack[2]: I
		// Stack[1]: I
		// Stack[0]: [Z
		mv.visitInsn(Opcodes.BASTORE);
	}
接下来我们看下insertProbe方法在哪些地方被调用:MethodInstrumenter。
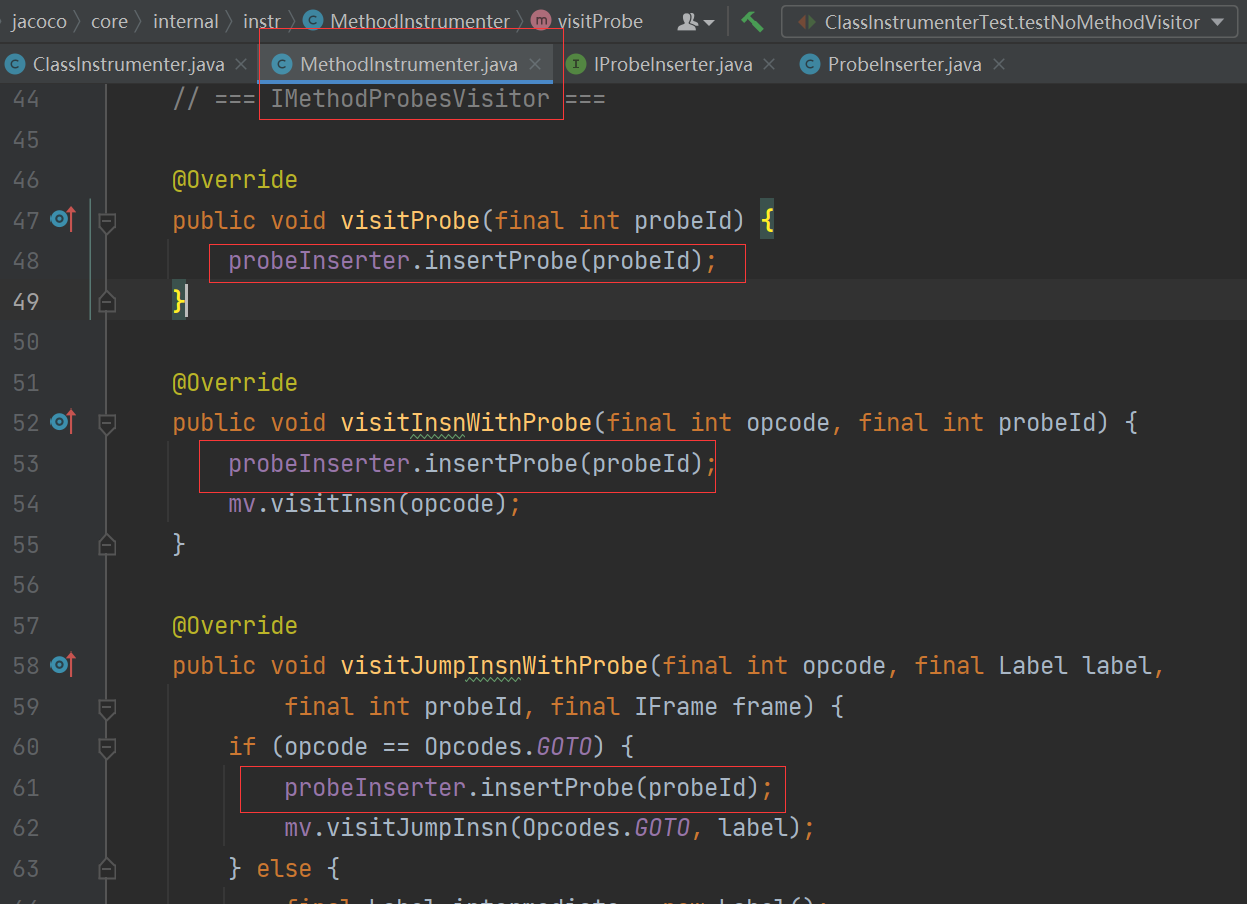
这里还需要提一下ASM 的Label,是实现条件语句跳转的。换句话说,我们需要知道在方法的哪些位置插装。
public void test(){
	// ①
	int a = 1;
	// ②
	int b = 2;
	// ③
	if(a > 2){
		// ④
	}else{
		// ⑤
	}
}
我们看下上面的代码,我们并不是需要在每一个位置都进行插装,比如在①插装②、③就没必须进行插装了,因为②、③是一定会执行到的;所以我们需要插装的位置就是①、④、⑤。
jacocoData和jacocoInit
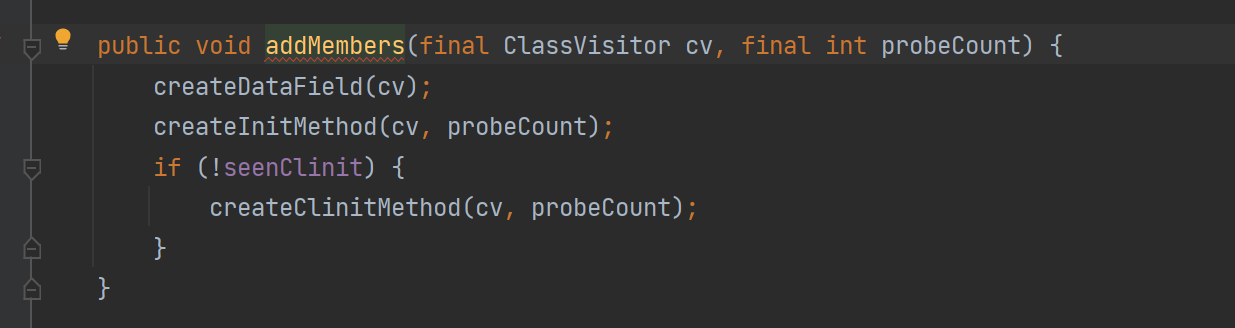
org.jacoco.core.internal.flow.ClassProbesAdapter#visitEnd,在类被加载完毕的时候执行visitEnd,最后调用org.jacoco.core.internal.instr.InterfaceFieldProbeArrayStrategy#addMembers,这里我们已经清楚jacocoData和jacocoInit的生成时机了,生成的逻辑也是使用ASM增强。
agent插装调度
agent的执行入口是premain方法,如何开发和调试agent这里就不多说了,可以自行百度。我们看看jacoco agent方式是如何进行插装的。
org.jacoco.agent.rt.internal.PreMain#premain
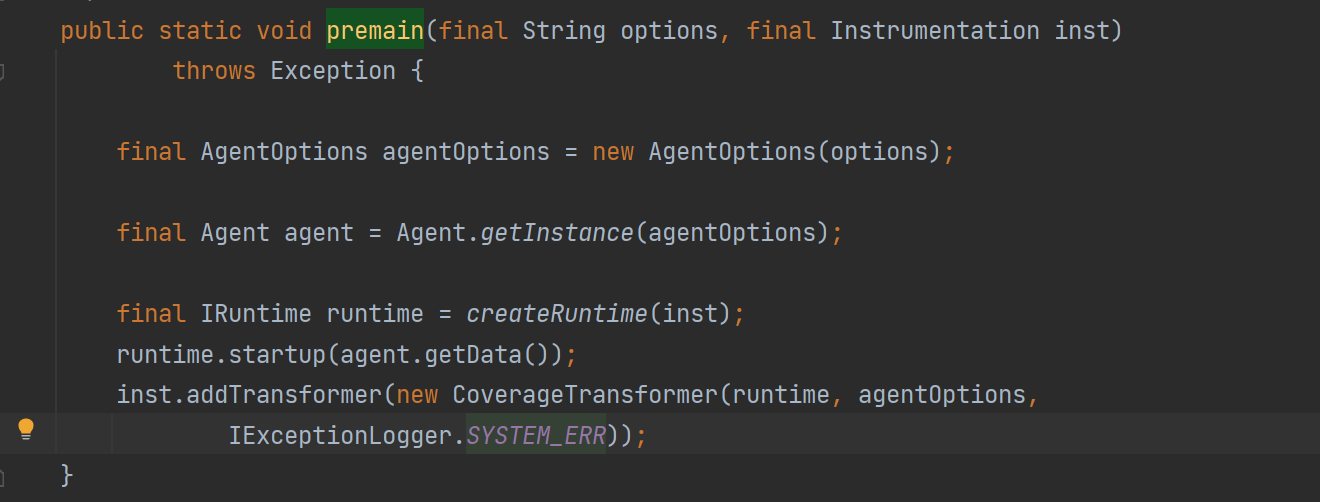
由此可以看出,jacoco是在org.jacoco.agent.rt.internal.CoverageTransformer中完成插装任务的。
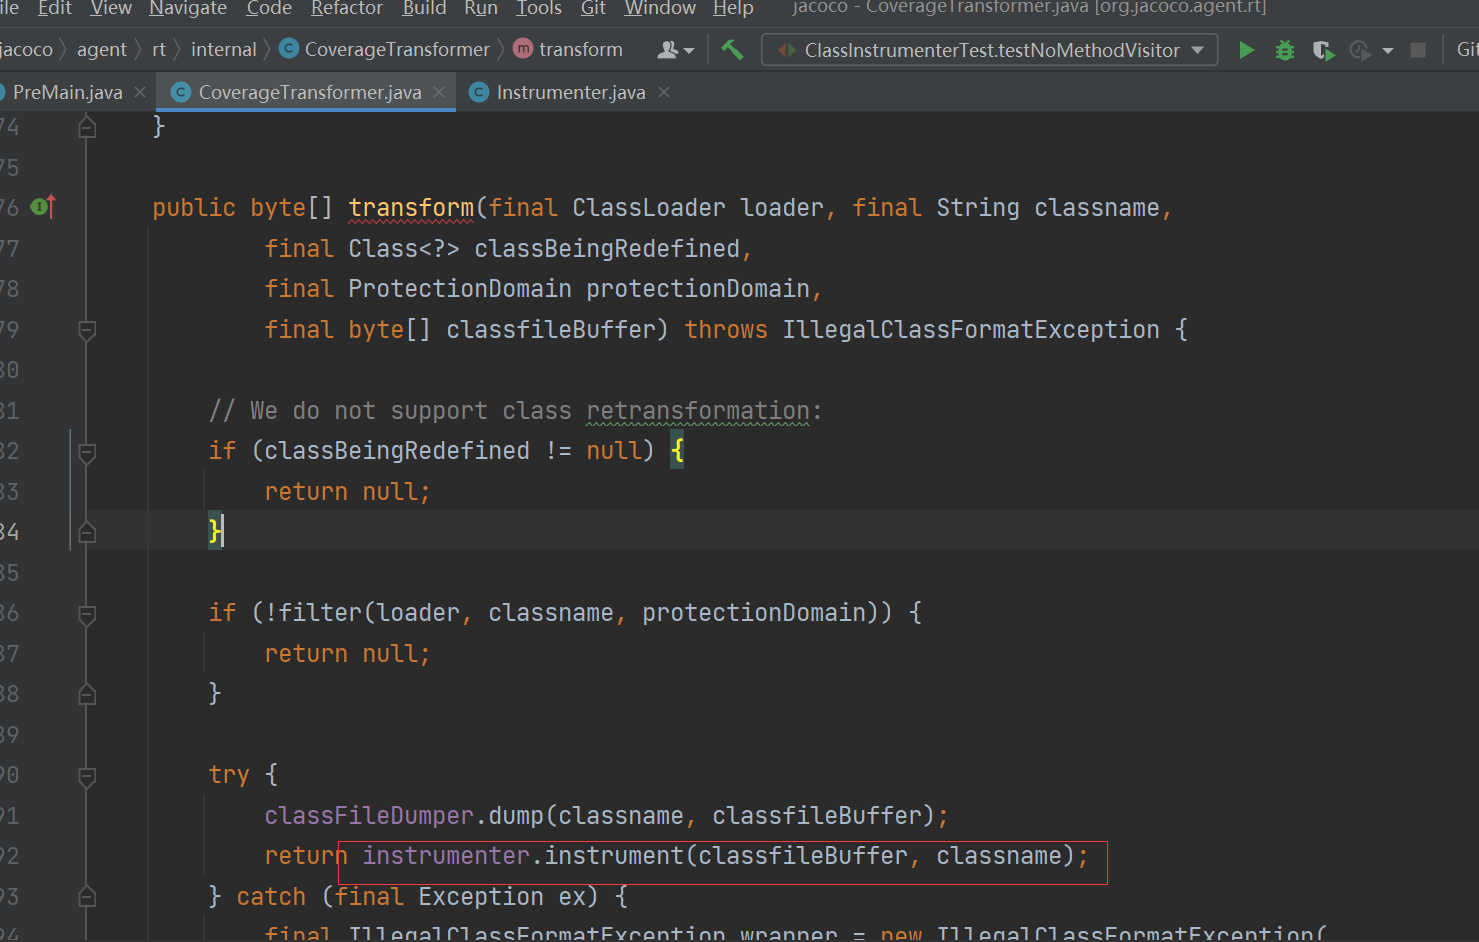
这里先调用了dump方法是为了将源字节码信息存储下来,方便后面清除插装数据;然后我们在transform方法中看到了调用Instrumenter,这里是不是又很熟悉了,开始调用core模块的插装接口。
maven插装调度
maven的插装入口是InstrumentMojo,这里需要有maven插件开发基础,不然的话可能不太理解运行原理。
@Mojo(name = "instrument", defaultPhase = LifecyclePhase.PROCESS_CLASSES, threadSafe = true)
public class InstrumentMojo extends AbstractJacocoMojo {

	@Parameter
	private List<String> includes;

	@Parameter
	private List<String> excludes;

	@Override
	public void executeMojo()
			throws MojoExecutionException, MojoFailureException {
		final File originalClassesDir = new File(
				getProject().getBuild().getDirectory(),
				"generated-classes/jacoco");
		originalClassesDir.mkdirs();
		final File classesDir = new File(
				getProject().getBuild().getOutputDirectory());
		if (!classesDir.exists()) {
			getLog().info(
					"Skipping JaCoCo execution due to missing classes directory:"
							+ classesDir);
			return;
		}
		final List<String> fileNames;
		try {
			fileNames = new FileFilter(includes, excludes)
					.getFileNames(classesDir);
		} catch (final IOException e1) {
			throw new MojoExecutionException(
					"Unable to get list of files to instrument.", e1);
		}

		final Instrumenter instrumenter = new Instrumenter(
				new OfflineInstrumentationAccessGenerator());
		for (final String fileName : fileNames) {
			if (fileName.endsWith(".class")) {
				final File source = new File(classesDir, fileName);
				final File backup = new File(originalClassesDir, fileName);
				InputStream input = null;
				OutputStream output = null;
				try {
					FileUtils.copyFile(source, backup);
					input = new FileInputStream(backup);
					output = new FileOutputStream(source);
					instrumenter.instrument(input, output, source.getPath());
				} catch (final IOException e2) {
					throw new MojoExecutionException(
							"Unable to instrument file.", e2);
				} finally {
					IOUtil.close(input);
					IOUtil.close(output);
				}
			}
		}
	}
}
从上面代码可以看到调用Instrumenter的地方,与探针插装不同的是maven方式拿到插装的字节数据是写入到文件中,其他也就是编译后的产物。
其他指令
除了插状之外,jacoco还提供了dump、merge、restore、report等指令,基于上面的基础,不难分析出它的工作原理。


 896
896

 被折叠的 条评论
为什么被折叠?
被折叠的 条评论
为什么被折叠?
 到【灌水乐园】发言


