


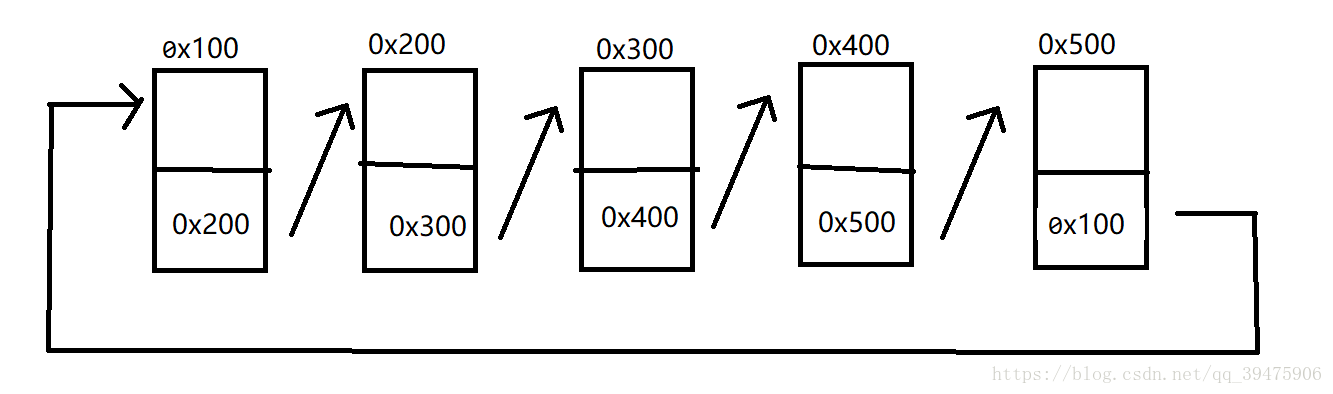
1.循环单链表
循环单链表的结构:
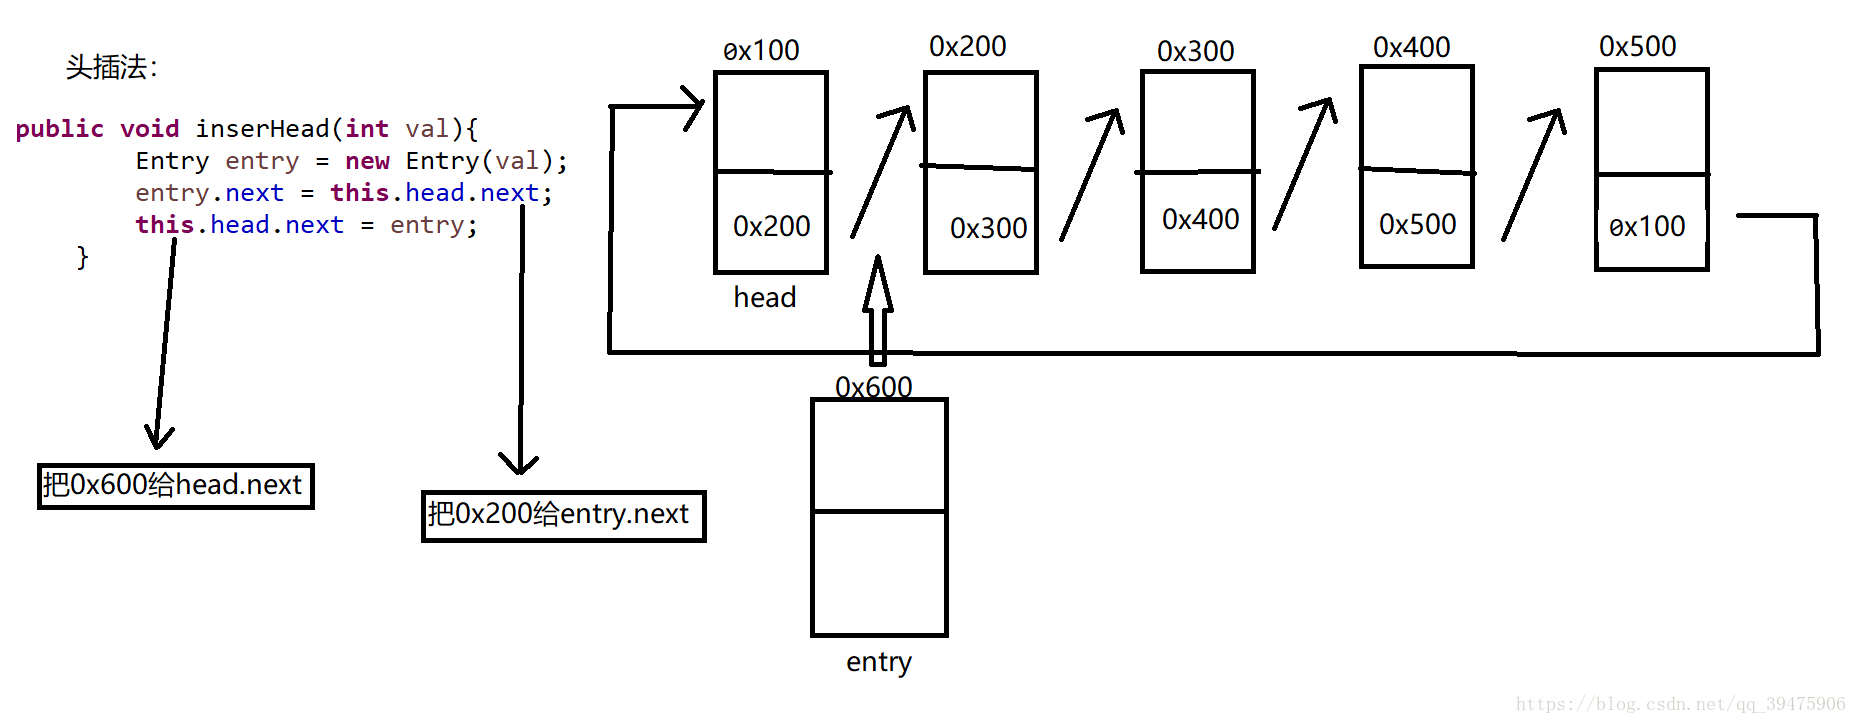
循环单链表的头插
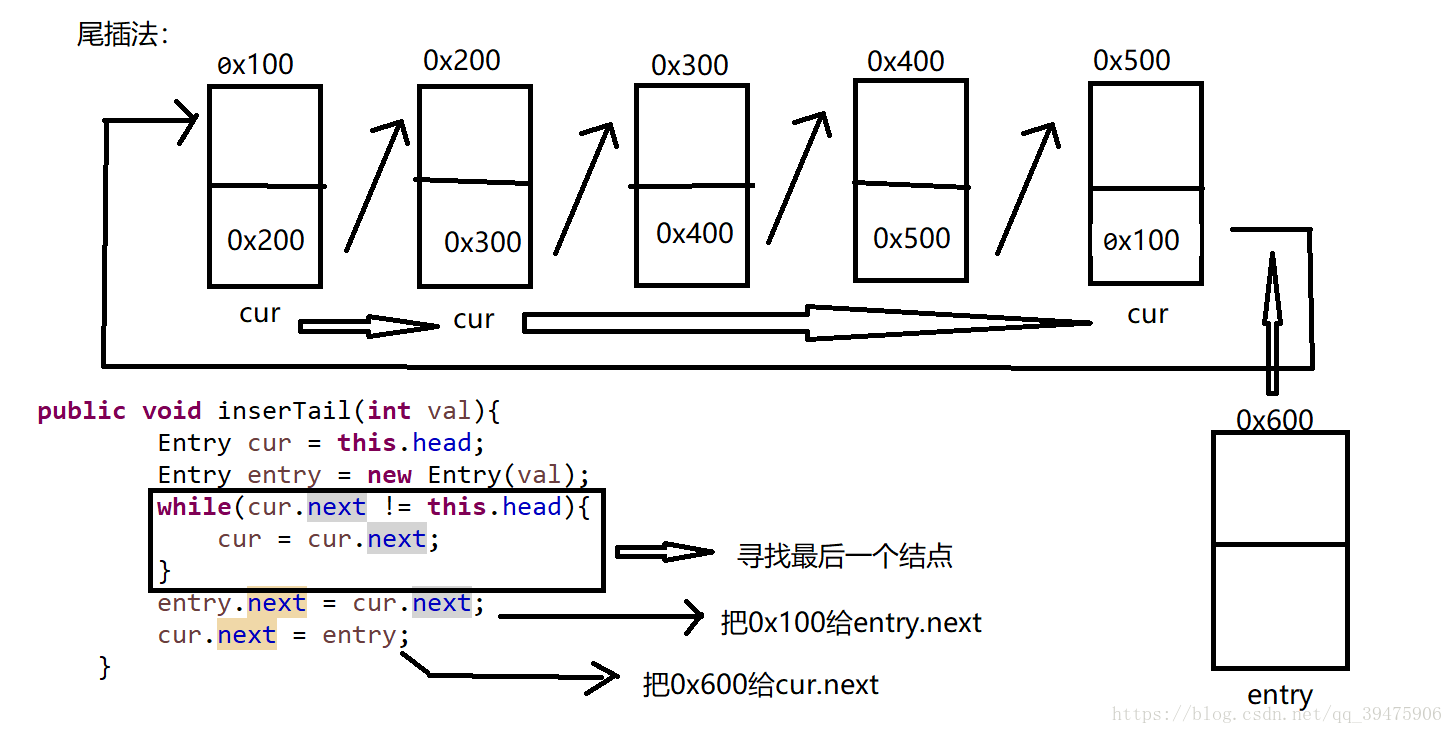
循环链表的尾插
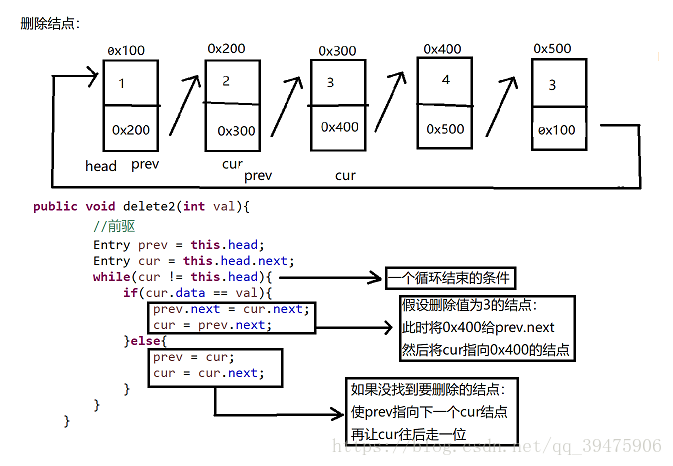
循环链表的删除
代码:
class TestClink{
class Entry{
int data;
Entry next;
//无参构造方法
public Entry(){
this.data = -1;
next = null;
}
//有参构造方法
public Entry(int data){
this.data = data;
this.next = this;
}
}
private Entry head = null;
//头结点的初始化
public TestClink(){
this.head = new Entry();
this.head.next = this.head;
}
/**
* 头插法
* @param val
*/
public void inserHead(int val){
Entry entry = new Entry(val);
entry.next = this.head.next;
this.head.next = entry;
}
/**
* 尾插法
* @param val
*/
public void inserTail(int val){
Entry cur = this.head;
Entry entry = new Entry(val);
while(cur.next != this.head){
cur = cur.next;
}
entry.next = cur.next;
cur.next = entry;
}
/**
* 删除一个val结点
*/
public void delete(int val){
//前驱
Entry prev = this.head;
Entry cur = this.head.next;
while(cur != this.head){
if(cur.data != val){
cur = cur.next;
prev = prev.next;
}else{
prev.next = cur.next;
return;
}
}
}
/**
* 删除循环单链表里所有的val结点
*/
public void delete2(int val){
//前驱
Entry prev = this.head;
Entry cur = this.head.next;
while(cur != this.head){
if(cur.data == val){
prev.next = cur.next;
//cur = cur.next;也是正确,前面更规范
cur = prev.next;
}else{
prev = cur;
cur = cur.next;
}
}
}
/**
* 求长度
* @return
*/
public int getLength(){
int length = 0;
Entry cur = this.head;
while(cur.next != this.head){
cur = cur.next;
length++;
}
return length;
}
/**
* 是否为空
*/
public boolean isEmpty(){
Entry cur = this.head;
if(cur.next != this.head){
return false;
}
return true;
}
/**
* 打印输出
*/
public void show(){
Entry cur = this.head.next;
while(cur != this.head){
System.out.print(cur.data+" ");
cur = cur.next;
}
System.out.println();
}
}
/**
*
* @author jhl
*
*/
public class TestDemo1 {
public static void main(String[] args) {
// TODO Auto-generated method stub
TestClink t1 = new TestClink();
int testClinkLength = 9;
for(int i = 0;i<testClinkLength;i++){
t1.inserHead(i);
//t1.inserTail(i);
}
t1.inserTail(5);
t1.inserTail(5);
t1.inserTail(5);
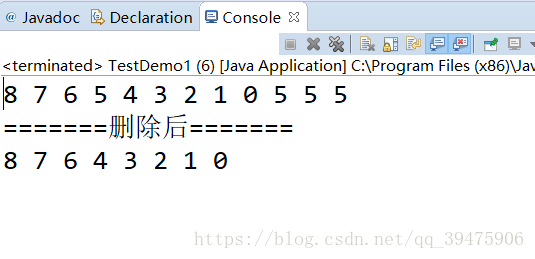
t1.show();
System.out.println("=======删除后=======");
t1.delete2(5);
t1.show();
}
}运行结果:
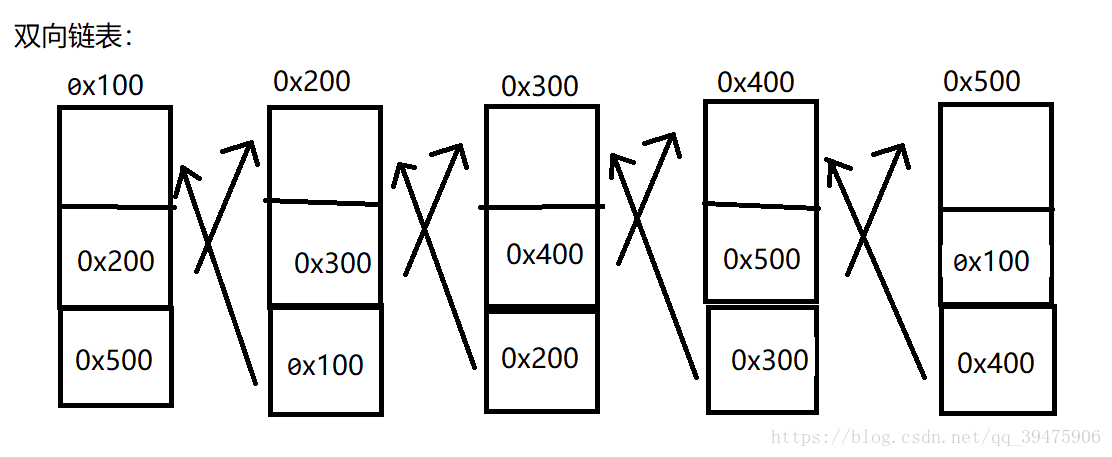
2.双向链表
双向链表的结构
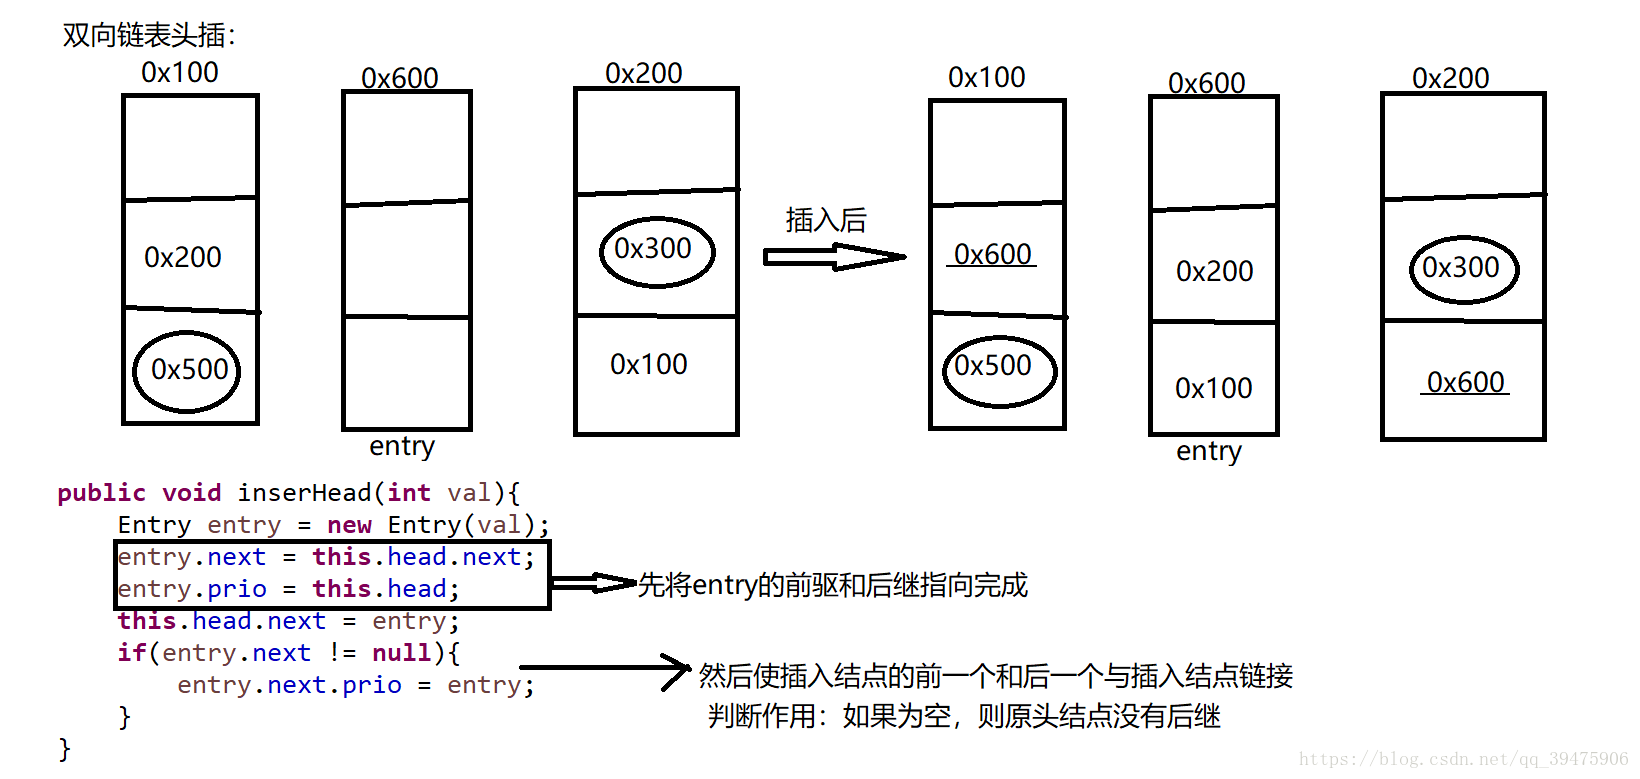
双向链表头插
双向链表尾插以及删除:和循环单链表的尾插以及删除原理相同,只是在插入及删除有4个数据的变化
代码:
class DoubleLink{
class Entry{
int data;
/**
* 后继
*/
Entry next;
/**
* 前驱
*/
Entry prio;
public Entry(){
this.data = -1;
this.next = null;
this.prio = null;
}
public Entry(int data){
this.data = data;
this.next = null;
this.prio = null;
}
}
private Entry head = null;
public DoubleLink(){
this.head = new Entry();
}
/**
* 头插法
*/
public void inserHead(int val){
Entry entry = new Entry(val);
entry.next = this.head.next;
entry.prio = this.head;
this.head.next = entry;
if(entry.next != null){
entry.next.prio = entry;
}
}
/**
* 尾插法
* @param val 数据
*/
public void inserTail(int val){
Entry cur = this.head;
Entry entry = new Entry(val);
while(cur.next != null){
cur = cur.next;
}
cur.next = entry;
entry.prio = cur;
}
/**
* 删除值为val的结点
*/
public void delete(int val){
Entry cur = this.head.next;
while(cur != null){
if(cur.data == val){
cur.prio.next = cur.next;
//删除最后一个结点的时候
if(cur.next != null){
cur.next.prio = cur.prio;
}
}
cur = cur.next;
}
}
/**
* 打印输出
*/
public void show(){
Entry cur = this.head.next;
while(cur != null){
System.out.print(cur.data + " ");
cur = cur.next;
}
System.out.println();
}
}
/**
*
* @author jhl
*
*/
public class TestDemo2 {
public static void main(String[] args) {
// TODO Auto-generated method stub
DoubleLink a1 = new DoubleLink();
a1.inserHead(10);
a1.inserHead(20);
a1.inserHead(50);
a1.inserHead(30);
a1.inserTail(50);
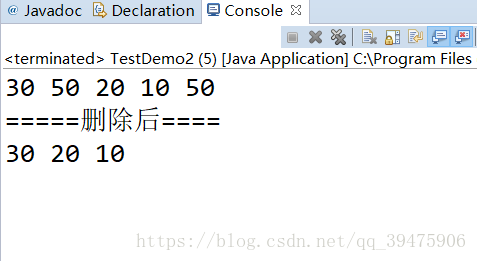
a1.show();
System.out.println("=====删除后====");
a1.delete(50);
a1.show();
}
}运行结果:
3.顺序栈
顺序栈结构

入栈
1.先判断栈是否已满
2.每入一个使top++
    public boolean push(int val){
        if(isFull()){
            return false;
        }
        this.elem[this.top++] = val;
        return true;
    }
出栈
1.先判断栈是否为空
2.每出一个使top–
public void pop(int val){
        if(isEmpty()){
            return;
        }
        --this.top;
    }
代码:
class Stack{
    int top;
    int[] elem;
    public Stack(){
        this(10);
    }
    public Stack(int size){
        this.elem = new int[size];
        this.top = 0;
    }
    /**
     * 栈是否已满
     */
    public boolean isFull(){
        if(this.top == this.elem.length){
            return true;
        }
        return false;
    }
    /**
     * 入栈
     */
    public boolean push(int val){
        if(isFull()){
            return false;
        }
        this.elem[top++] = val;
        //this.top()++;
        return true;
    }
    /**
     * 是否为空
     */
    public boolean isEmpty(){
        if(this.top == 0){
            return true;
        }
        return false;
        //return this.top = 0;直接代替
    }
    /**
     * 出栈
     */
    public int pop(){
        if(isEmpty()){
            return -1;
        }

        return elem[--this.top];
    }
    /**
     * 得到栈的元素
     */
    public int getTop(){
        if(isEmpty()){
            return -1;
        }
        //不能进行--top,会将top值减掉
        return this.elem[this.top-1];
    }
    /**
     * 打印栈内元素
     */
    public void show(){
        for(int i =0;i<this.top;i++){
            System.out.println(this.elem[i]+" ");
        }
        System.out.println();
    }
}
/**
 *
 * @author jhl
 *
 */
public class TestDemo3 {

    public static void main(String[] args) {
        // TODO Auto-generated method stub
        Stack s1 = new Stack();
        int length = 10;
        for(int i = 0;i<length;i++){
            s1.push(i);
        }
        s1.show();
    }
}
运行结果:


 839
839


 被折叠的 条评论
为什么被折叠?
被折叠的 条评论
为什么被折叠?
 到【灌水乐园】发言


