


简介
实现底部选项卡转换页面效果
环境
Android Studio:2020.3.1 这里注意:最新版的2021.1.1在布局编辑器对于material design的某些组件可以会造成无法显示的情况
Android Gradle Plugin Version:7.0.4
Gradle Version:7.0.2
实现步骤
1.设置底部选项卡
在res/menu目录下新建文件bottom_navigation_menu.xml (建议添加图标icon,title可以不写)
没有menu文件夹可以右键res新建Android Resource Directory,Resource type中选择menu,OK添加即可
<menu xmlns:android="http://schemas.android.com/apk/res/android">
    <item
        android:id="@+id/page_1"
        android:enabled="true"
        android:title="选项卡1"/>
    <item
        android:id="@+id/page_2"
        android:enabled="true"
        android:title="选项卡2" />
    <item
        android:id="@+id/page_3"
        android:enabled="true"
        android:title="选项卡3" />
</menu>
2.设置三个选项卡的布局以及类
- 新建布局:fragment_1.xml、fragment_2.xml、fragment_3.xml、
举例:(这里没有内容,只拿背景颜色做区分)
<?xml version="1.0" encoding="utf-8"?>
<androidx.constraintlayout.widget.ConstraintLayout
    xmlns:android="http://schemas.android.com/apk/res/android"
    android:layout_width="match_parent"
    android:layout_height="match_parent"
    android:background="#FF0000">
</androidx.constraintlayout.widget.ConstraintLayout>
- 新建类:fragment_1、fragment_2、fragment_3与布局对应
举例:
import android.os.Bundle;
import android.view.LayoutInflater;
import android.view.View;
import android.view.ViewGroup;
import androidx.fragment.app.Fragment;

public class Fragment_1 extends Fragment {

    @Override
    public View onCreateView(LayoutInflater inflater,
    				ViewGroup container, Bundle savedInstanceState) {
        View fragment_1= LayoutInflater.from(getActivity()).inflate(R.layout.fragment_1, container, false);

        //这里可以通过view.findViewById() 找到fragment_1中的按钮并进行添加Listener等操作
        return fragment_1;
    }
}
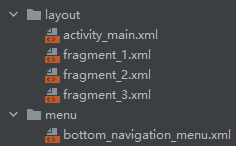
最终文件:

2.设置主界面布局(activity_main.xml)
核心内容为两个,一个存放3个单独页面的FrameLayout,一个下面显示选项卡的BottomNavigationView
<?xml version="1.0" encoding="utf-8"?>
<androidx.constraintlayout.widget.ConstraintLayout
	xmlns:android="http://schemas.android.com/apk/res/android"
    xmlns:app="http://schemas.android.com/apk/res-auto"
    xmlns:tools="http://schemas.android.com/tools"
    android:layout_width="match_parent"
    android:layout_height="match_parent">

    <FrameLayout
        android:id="@+id/Main_fragment"
        android:layout_width="match_parent"
        android:layout_height="match_parent"
        android:layout_marginBottom="60dp">

    </FrameLayout>

    <LinearLayout
        android:id="@+id/linearLayout3"
        android:layout_width="match_parent"
        android:layout_height="60dp"
        android:padding="0dp"
        app:layout_constraintBottom_toBottomOf="parent"
        app:layout_constraintEnd_toEndOf="parent"
        app:layout_constraintStart_toStartOf="parent">

        <com.google.android.material.bottomnavigation.BottomNavigationView
            android:id="@+id/bottom_navigation"
            android:layout_width="match_parent"
            android:layout_height="wrap_content"
            app:labelVisibilityMode="labeled"
            app:menu="@menu/bottom_navigation_menu" />
    </LinearLayout>

</androidx.constraintlayout.widget.ConstraintLayout>
3.设置主界面类(MainActivity.java)
- 声明变量
    private Fragment_1 f1;
    private Fragment_2 f2;
    private Fragment_3 f3;
    BottomNavigationView bottomNavigationView = null;
    FragmentTransaction transaction = getSupportFragmentManager().beginTransaction();//切换页面的核心
- 初始化变量(在onCreate中使用initFragment())
void initFragment() {
		//初始化3个页面
        f1 = new Fragment_1();
        f2 = new Fragment_2();
        f3 = new Fragment_3();
        transaction.add(R.id.Main_fragment, f1);
        transaction.add(R.id.Main_fragment, f2);
        transaction.add(R.id.Main_fragment, f3);
        hideAllFragment(transaction);//隐藏全部界面

        //默认显示第一个选项卡
        transaction.show(f1);
        transaction.commit();//show()后一定要commit()

        //布局中的底部bottom_navigation
        bottomNavigationView = findViewById(R.id.bottom_navigation);
        //设置底部三个选项卡按钮进行切换的事件
        bottomNavigationView.setOnNavigationItemSelectedListener(item -> {
            transaction = getSupportFragmentManager().beginTransaction();
            hideAllFragment(transaction);//先隐藏全部界面 再根据按钮显示
            switch (item.getItemId()) {
                case R.id.page_1:
                    transaction.show(f1);
                    transaction.commit();
                    return true;
                case R.id.page_2:
                    transaction.show(f2);
                    transaction.commit();
                    return true;
                case R.id.page_3:
                    transaction.show(f3);
                    transaction.commit();
                    return true;
            }
            return false;
        });
    }
- 隐藏全部选项卡的方法
void hideAllFragment(FragmentTransaction transaction) {
	if (f1 != null)
	    transaction.hide(f1);
	if (f2 != null)
	    transaction.hide(f2);
	if (f3 != null)
	    transaction.hide(f3);
}


 500
500


 被折叠的 条评论
为什么被折叠?
被折叠的 条评论
为什么被折叠?
 到【灌水乐园】发言


