创建时间 2022年8月29日
标签:Java、SpringBoot、RabbitMQ、队列
注释:新建SpringBoot项目实操RabbitMQ实现多种模式
来源:CSDN博主:小目标青年
文章目录
本文为实操性文章,更适合初学 RabbitMQ 的朋友一边操作一边阅读,在阅读之前,请保证你对SpringBoot有一定了解。
浪费别人的时间就是在谋财害命
本文涉及的所有代码均已上传至 Gitee 链接:https://gitee.com/Array_Xiang/spring-boot-rabbit-mq.git
SpringBoot 整合 RabbitMQ
1、交换机类型
相信看到这篇文章时,大部分人都对 RabbitMQ 有所了解,所以具体的 RabbitMQ 是干啥的,有啥用我就不做多赘述了,本文实操 SpringBootWeb 工程操作 RabbitMQ 实现,消息推送、消费,Direct、Topic、Fanout的使用
前期准备工作:IDEA、Jdk8、RabbitMQ

访问 localhost:15672 登录 guest 用户看到 RabbitMQ 后台管理页面
操作前先说明三种模型
1.1、直连交换机 Direct
直连形交换机,根据消息携带的路由键将消息投递到对应队列。大致流程就是一个队列绑定到一个直连交换机,同时赋上一个路由键 routingkey,消息进入rabbitmq后,根据路由键找到绑定的队列
1.2、扇形交换机 Fanout
这个交换机没有路由键概念,就算你绑定了路由键也是无视的,交换机在接收到消息后会转发到绑定的队列里
1.3、主题交换机 Topic
这个交换机跟直流交换机差不多,但是他的特点就是路由键和绑定建之间是有规则的
*(星号) 用来表示一个单词 (必须出现的)#(井号) 用来表示任意数量(零个或多个)单词
举个🌰
队里A 绑定
Hello*,队列B 绑定Hi#HelloX 会进入队列A。Hi 和 HiMoney 会进入队列B
主题交换机非常强大,这个队列无视路由消息的路由键,接收所有消息当 # 、* 都未绑定时,此时的主题交换机拥有了直连交换机的行为,即可实现扇形也可以实现直连
此外还有 Header 头交换机、Default 默认交换机、Dead Letter 死信交换机,这篇不做讲述
2、SpringBoot 编码
项目已上传至 Gitee 且持续更新,感谢关注
https://gitee.com/Array_Xiang/spring-boot-rabbit-mq.git
使用 IDE SpringInit 工具初始化项目
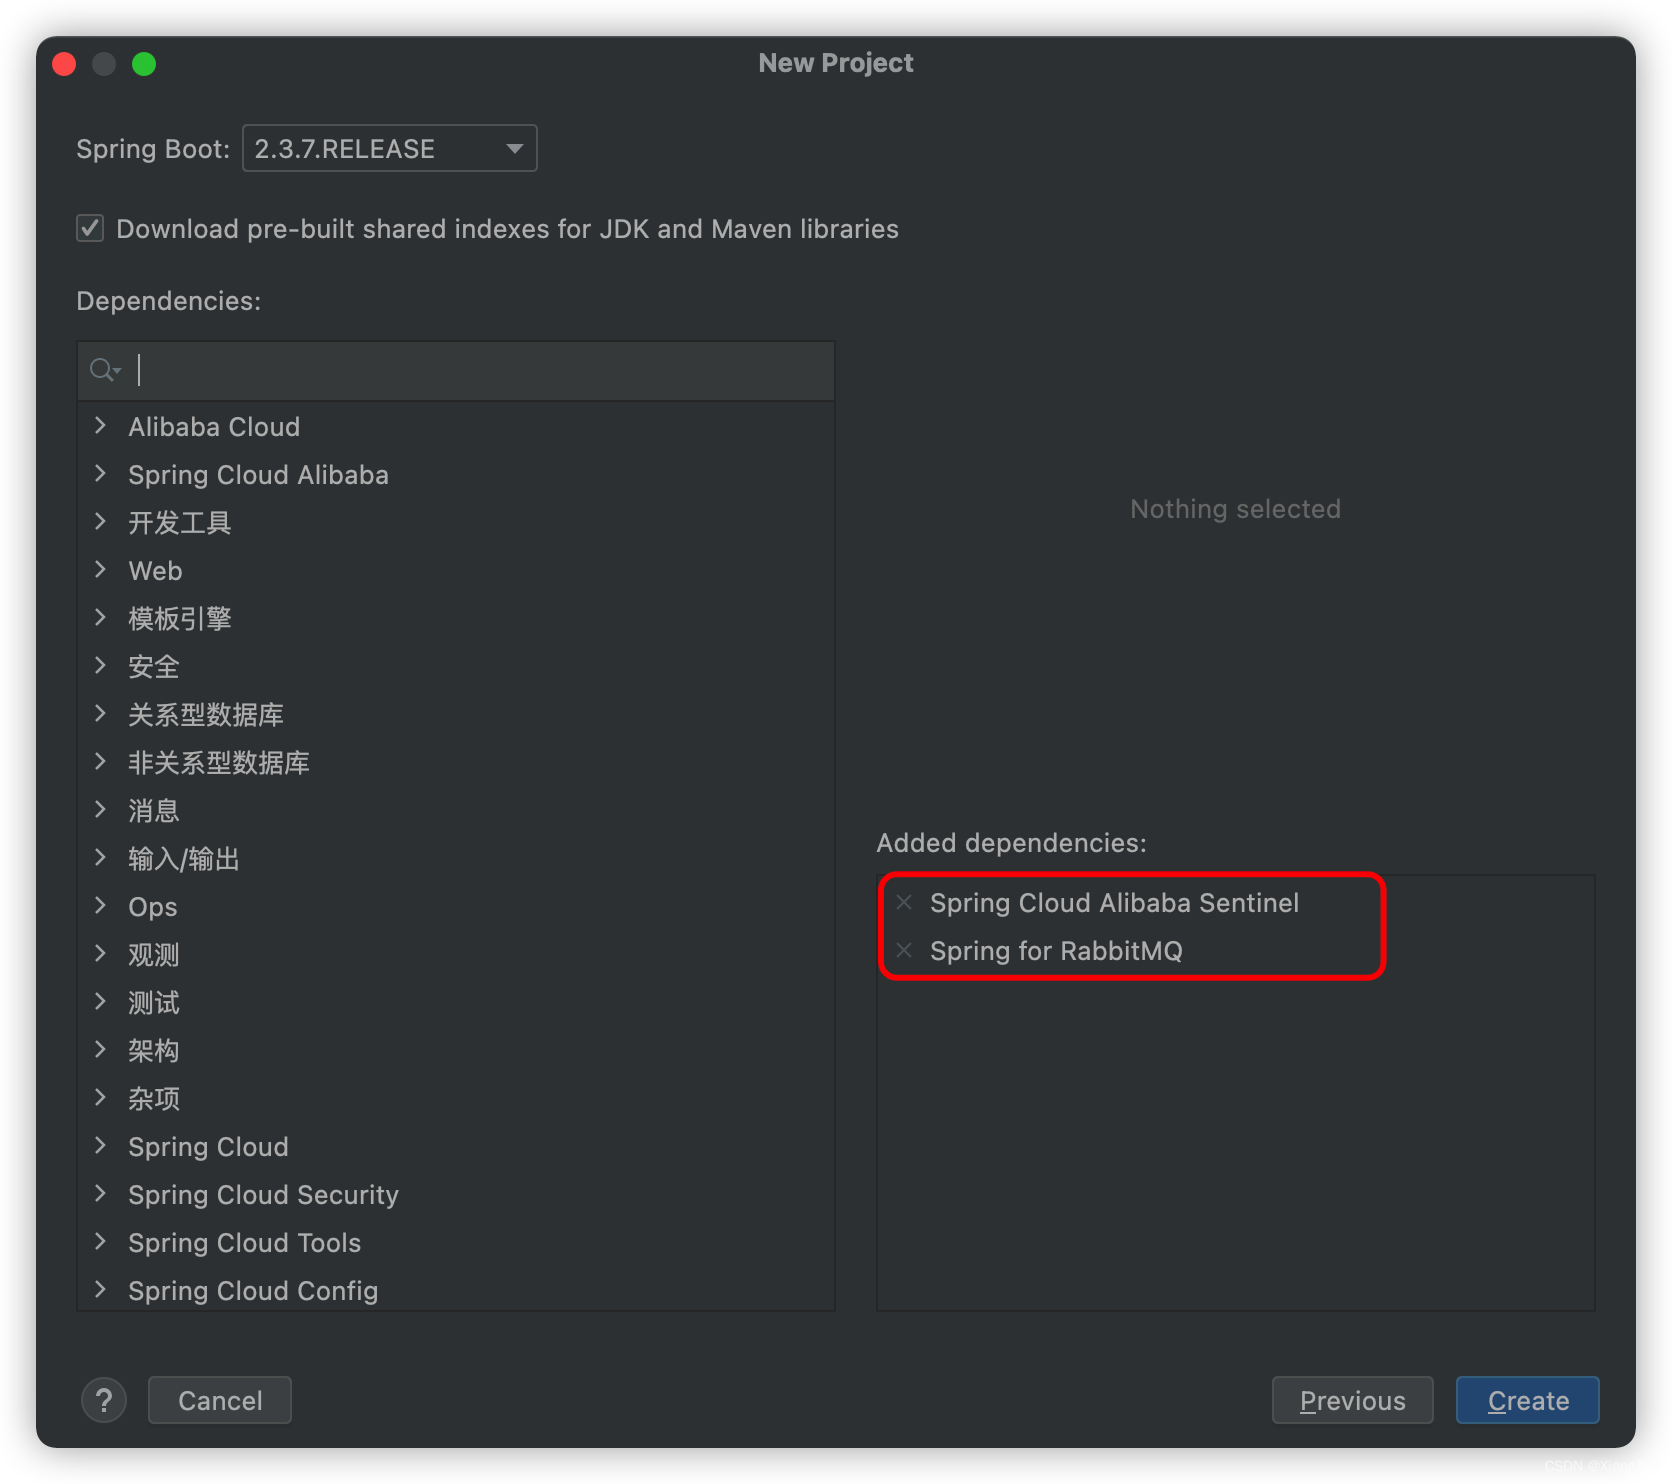
添加这两个就够了,或者也可以直接用依赖
        <!--rabbitmq-->
        <dependency>
            <groupId>org.springframework.boot</groupId>
            <artifactId>spring-boot-starter-amqp</artifactId>
        </dependency>
        <dependency>
            <groupId>org.springframework.boot</groupId>
            <artifactId>spring-boot-starter-web</artifactId>
        </dependency>
创建一个消费者和生产者,代码结构如下:rabbitmq-consumer 消费者,rabbitmq-provider 生产者
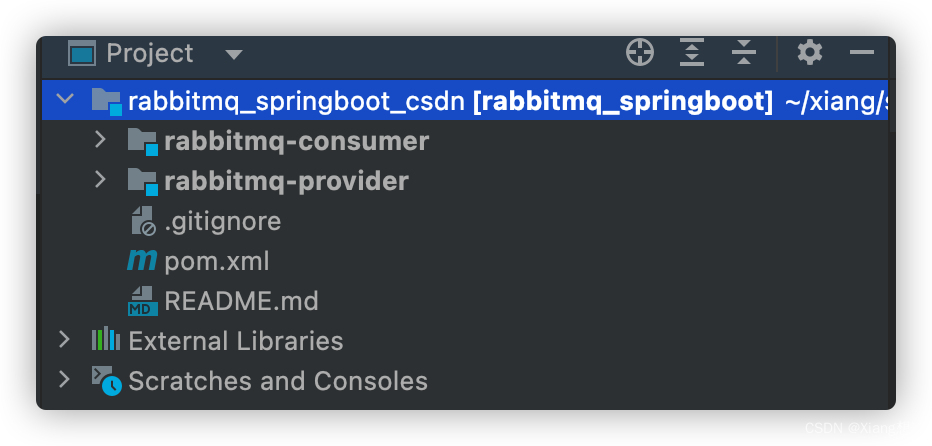
然后 application.yml 配置文件,注意生产者和消费者的端口区分
server:
  port: 8091
spring:
  application:
    name: rabbitmq_provider
  rabbitmq:
    host: 127.0.0.1
    port: 5672
    username: guest
    password: guest
    # 虚拟 Host,可以不设置,不设置默认使用/
    virtual-host: XiangHosts
新建虚拟 host:
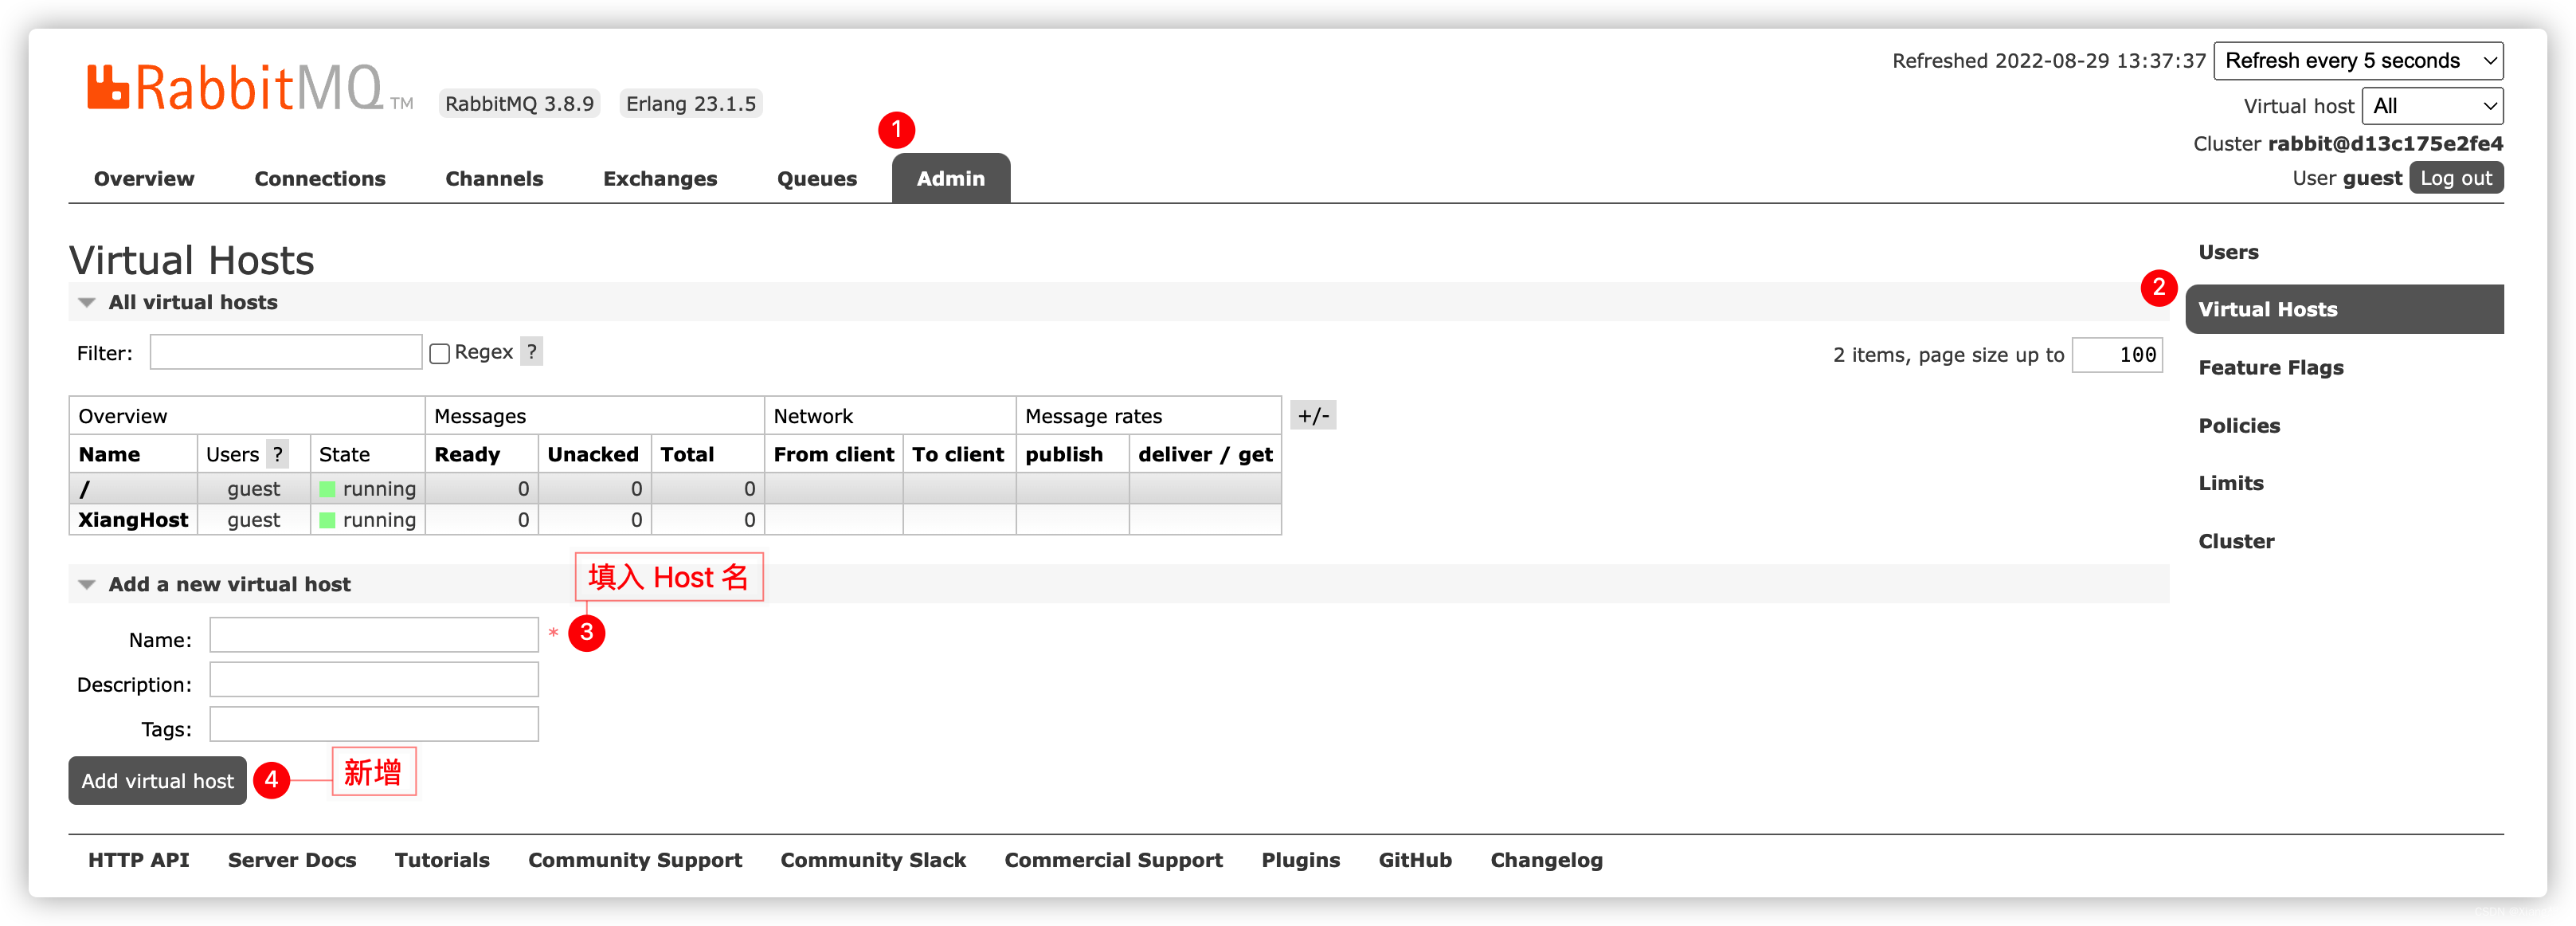
2.1、直连 direct
2.1.1、一对一
在provider生产者,中创建 DirectRabbitConfig进行配置,配置及说明在注释里头
package com.liuyuncen.config;

import org.springframework.amqp.core.Binding;
import org.springframework.amqp.core.BindingBuilder;
import org.springframework.amqp.core.DirectExchange;
import org.springframework.amqp.core.Queue;
import org.springframework.context.annotation.Bean;
import org.springframework.context.annotation.Configuration;


/**
 * @belongsProject: rabbitmq_springboot
 * @belongsPackage: com.liuyuncen.config
 * @author: Xiang想
 * @createTime: 2022-08-29  13:49
 * @description: TODO
 * @version: 1.0
 */
@Configuration
public class DirectRabbitConfig {

    /**
     *  Queue(String name, boolean durable, boolean exclusive, boolean autoDelete)
     *  durable:是否持久化,默认是false,持久化队列:会被存储在磁盘上,当消息代理重启时仍然存在,暂存队列:当前连接有效
     *  exclusive:默认也是false,只能被当前创建的连接使用,而且当连接关闭后队列即被删除。此参考优先级高于durable
     *  autoDelete:是否自动删除,当没有生产者或者消费者使用此队列,该队列会自动删除
     * @description:
     * @author: Xiang想
     * @date: 2022/8/29 1:52 PM
     * @param: []
     * @return: org.springframework.amqp.core.Queue
     **/
    @Bean
    public Queue TestDirectQueue(){
        // 队列名叫 DirectQueue
        return new Queue("DirectQueue",true);
    }

    @Bean
    DirectExchange TestDirectExchange(){
        // 交换机名叫 directExchange
        // 如果没有叫这个的交换机 rabbitmq 会自己创建
        return new DirectExchange("directExchange",true,false);
    }

    @Bean
    Binding bindingDirect(){
        // 绑定并且指定 路由键
        return BindingBuilder.bind(TestDirectQueue()).to(TestDirectExchange()).with("routingKey");
    }

}
简单的写一个接口,进行消息推送
package com.liuyuncen.controller;

import org.springframework.amqp.rabbit.core.RabbitTemplate;
import org.springframework.beans.factory.annotation.Autowired;
import org.springframework.web.bind.annotation.GetMapping;
import org.springframework.web.bind.annotation.RestController;

import java.time.LocalDateTime;
import java.time.format.DateTimeFormatter;
import java.util.HashMap;
import java.util.Map;
import java.util.UUID;

/**
 * @belongsProject: rabbitmq_springboot
 * @belongsPackage: com.liuyuncen.controller
 * @author: Xiang想
 * @createTime: 2022-08-29  13:55
 * @description: TODO
 * @version: 1.0
 */
@RestController
public class DirectController {
    @Autowired
    RabbitTemplate rabbitTemplate;

    @GetMapping("/sendDirectMessage")
    public String sendDirectMessage(){
        Map<String,Object> map = new HashMap<>();
        map.put("code",String.valueOf(UUID.randomUUID()));
        map.put("time", LocalDateTime.now().format(DateTimeFormatter.ofPattern("yyyy-MM-dd HH:mm:ss")));
        map.put("message","hi 我是 直连 Direct Exchange");
        rabbitTemplate.convertAndSend("directExchange","routingKey",map);
        return "ok";
    }
}
启动创建一个 http 请求
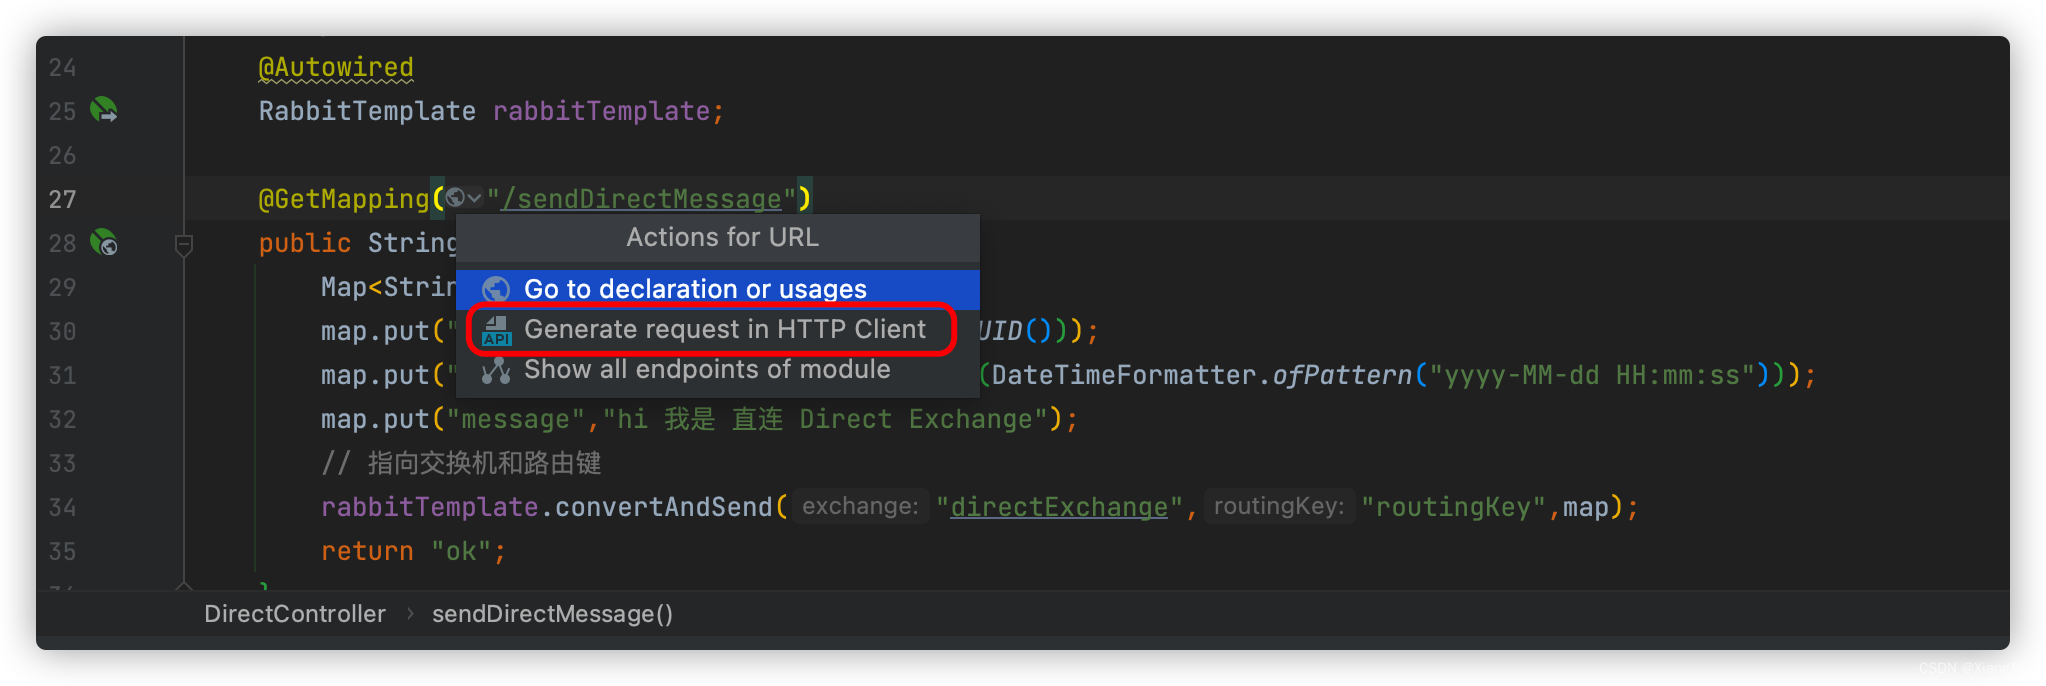
点击运行

结果返回成功

次数就有1条消息进入 rabbitmq中了
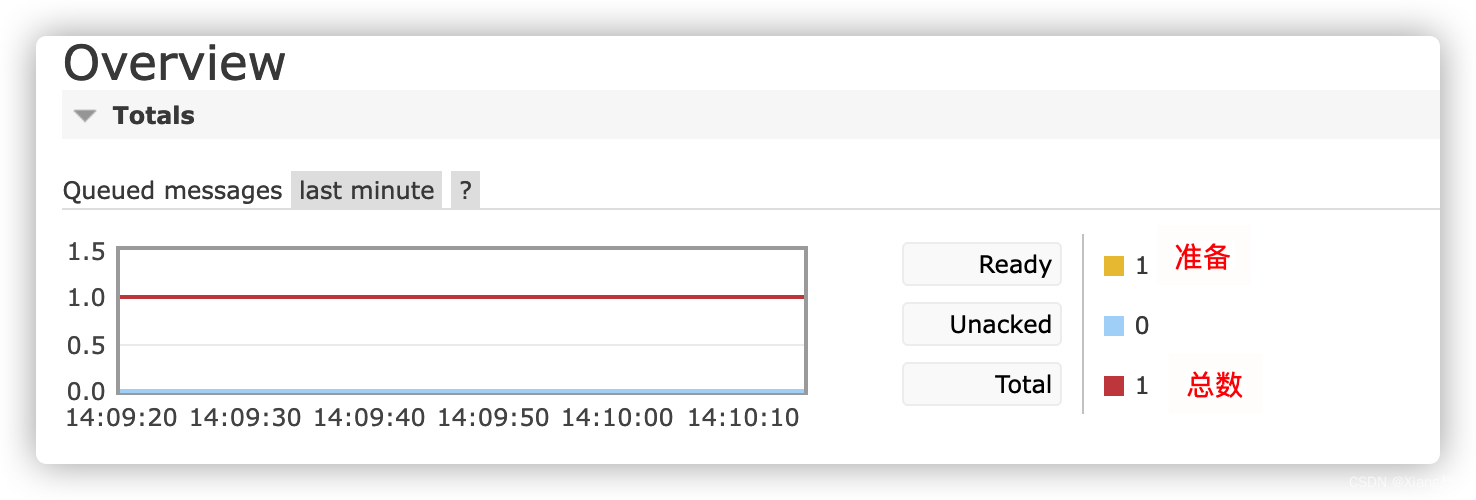
这个全英文的界面,说实话还是有点难度的,见到不认识的单词,多去查阅,不要懒!我们再去看一下交换机和队列

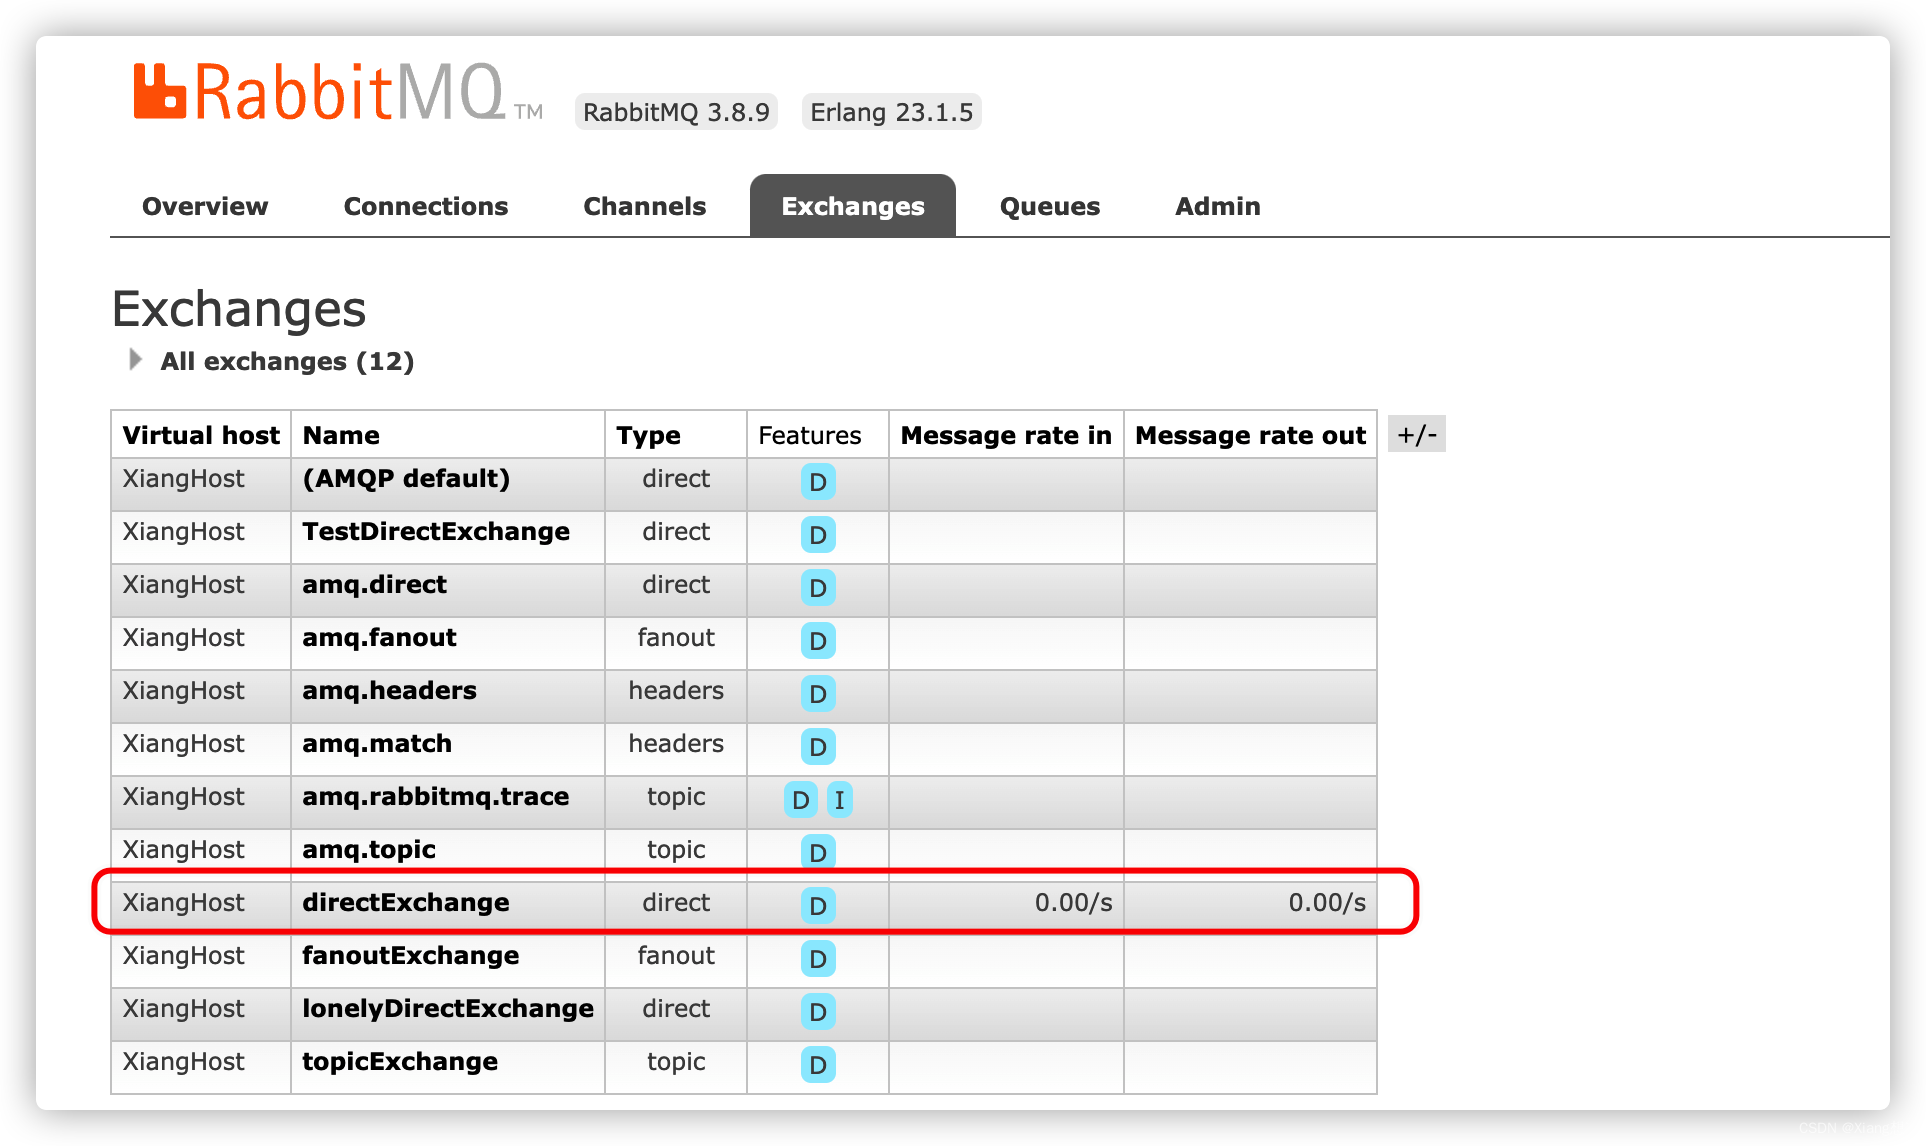
我们可以看到队列和交换机都在rabbitMQ中了。接下来写消费者 consumer
其实引用 pom 文件,添加一个 application.yml 的配置文件就可以了
server:
  port: 8092

spring:
  application:
    name: rabbitmq_consumer
  rabbitmq:
    host: 127.0.0.1
    port: 5672
    username: guest
    password: guest
    virtual-host: XiangHost
至于 DirectRabbitConfig.java 其实没必要创建,单纯的消费者监听就好了。配置上了,其实消费者也是生产者身份,也可以推送消息
创建 消费者监听类 DirectReceiver
package com.liuyuncen.receiver;

import org.springframework.amqp.rabbit.annotation.RabbitHandler;
import org.springframework.amqp.rabbit.annotation.RabbitListener;
import org.springframework.stereotype.Component;

import java.util.Map;

/**
 * @belongsProject: rabbitmq_springboot
 * @belongsPackage: com.liuyuncen.receiver
 * @author: Xiang想
 * @createTime: 2022-08-29  14:16
 * @description: TODO
 * @version: 1.0
 */
@Component
@RabbitListener(queues = "DirectQueue") // 监听队列名称
public class DirectReceiver {

    /**
     * @description:
     * @author: Xiang想
     * @date: 2022/8/29 2:17 PM
     * @param: [message] 如果推送是 Map 类型,同一个队列接收也一定要是 Map 类型
     * @return: void
     **/
    @RabbitHandler
    public void process(Map message){
        System.out.println("directReceiver 接收到了消息 :"+message.toString());
    }
}
启动消费者,我们就可以看到程序在运行成功后,立即把消息消费了下来

然后我们可以一直调用 生产者 provider 消息推送接口,可以看到

2.1.2、一对多
那么直连交换机既然是一对一,如果我们配置多个监听绑定同一个直连交互的同一个队列会怎样

可以看到实现了轮询方式消费,而不是重复消费
2.2、主题 Topic
生产者创建 TopicRabbitConfig,之前创建的 DirectRabbitConfig 不用删
package com.liuyuncen.config;

import org.springframework.amqp.core.Binding;
import org.springframework.amqp.core.BindingBuilder;
import org.springframework.amqp.core.Queue;
import org.springframework.amqp.core.TopicExchange;
import org.springframework.context.annotation.Bean;
import org.springframework.context.annotation.Configuration;

/**
 * @belongsProject: rabbitmq_springboot
 * @belongsPackage: com.liuyuncen.config
 * @author: Xiang想
 * @createTime: 2022-08-29  14:28
 * @description: TODO
 * @version: 1.0
 */
@Configuration
public class TopicRabbitConfig {
    // 绑定键
    public final static String TOPIC_A = "topic.A";
    public final static String TOPIC_B = "topic.B";

    @Bean
    public Queue aQueue(){
        return new Queue(TOPIC_A);
    }

    @Bean
    public Queue bQueue(){
        return new Queue(TOPIC_B);
    }

    @Bean
    TopicExchange topicExchange(){
        return new TopicExchange("topicExchange");
    }

    /**
     * @description: 只有消息携带的路由键为
     * @author: Xiang想
     * @date: 2022/8/29 2:33 PM
     * @param: []
     * @return: org.springframework.amqp.core.Binding
     **/
    @Bean
    Binding bindingTopicAExchangeMessage(){
        return BindingBuilder.bind(aQueue()).to(topicExchange()).with(TOPIC_A);
    }

    @Bean
    Binding bindingTopicBExchangeMessage(){
        return BindingBuilder.bind(bQueue()).to(topicExchange()).with("topic.#");
    }
}
然后添加2个接口,用于推送不同的主题交换机
package com.liuyuncen.controller;

import org.springframework.amqp.rabbit.core.RabbitTemplate;
import org.springframework.beans.factory.annotation.Autowired;
import org.springframework.web.bind.annotation.GetMapping;
import org.springframework.web.bind.annotation.RestController;

import java.time.LocalDateTime;
import java.time.format.DateTimeFormatter;
import java.util.HashMap;
import java.util.Map;
import java.util.UUID;

/**
 * @belongsProject: rabbitmq_springboot
 * @belongsPackage: com.liuyuncen.controller
 * @author: Xiang想
 * @createTime: 2022-08-29  14:31
 * @description: TODO
 * @version: 1.0
 */
@RestController
public class TopicController {
    @Autowired
    RabbitTemplate rabbitTemplate;

    @GetMapping("/sendTopicA")
    public String sendTopicA(){
        Map<String,Object> map = new HashMap<>();
        map.put("code",String.valueOf(UUID.randomUUID()));
        map.put("time", LocalDateTime.now().format(DateTimeFormatter.ofPattern("yyyy-MM-dd HH:mm:ss")));
        map.put("message","我是 topic A");
        // 指向交换机和路由键
        rabbitTemplate.convertAndSend("topicExchange","topic.A",map);
        return "ok";
    }

    @GetMapping("/sendTopicB")
    public String sendTopicB(){
        Map<String,Object> map = new HashMap<>();
        map.put("code",String.valueOf(UUID.randomUUID()));
        map.put("time", LocalDateTime.now().format(DateTimeFormatter.ofPattern("yyyy-MM-dd HH:mm:ss")));
        map.put("message","我是 topic B");
        // 指向交换机和路由键
        rabbitTemplate.convertAndSend("topicExchange","topic.B",map);
        return "ok";
    }
}
生产者这边已经创建完了,不急着启动,先把消费者 consumer上创建监听消息 topic.TopicA 和 topic.TopicB
package com.liuyuncen.receiver.topic;

import org.springframework.amqp.rabbit.annotation.RabbitHandler;
import org.springframework.amqp.rabbit.annotation.RabbitListener;
import org.springframework.stereotype.Component;

import java.util.Map;

/**
 * @belongsProject: rabbitmq_springboot
 * @belongsPackage: com.liuyuncen.receiver.topic
 * @author: Xiang想
 * @createTime: 2022-08-29  14:47
 * @description: TODO
 * @version: 1.0
 */
@Component
@RabbitListener(queues = "topic.A")
public class TopicA {

    @RabbitHandler
    public void process(Map message){
        System.out.println("Topic A 接收消息:"+message.toString());
    }
}
package com.liuyuncen.receiver.topic;

import org.springframework.amqp.rabbit.annotation.RabbitHandler;
import org.springframework.amqp.rabbit.annotation.RabbitListener;
import org.springframework.stereotype.Component;

import java.util.Map;

/**
 * @belongsProject: rabbitmq_springboot
 * @belongsPackage: com.liuyuncen.receiver.topic
 * @author: Xiang想
 * @createTime: 2022-08-29  14:47
 * @description: TODO
 * @version: 1.0
 */
@Component
@RabbitListener(queues = "topic.B")
public class TopicB {

    @RabbitHandler
    public void process(Map message){
        System.out.println("Topic B 接收消息:"+message.toString());
    }
}
消费者这里还需要创建 TopicRabbitConfig 吗?其实是不用的,道理之前说过了
我们启动消费者和生产者
调用 topic A

发现 topic A、topic B都接收到了消息,原因是 Topic B 绑定的路由键是 topic.#

接下来,我们调用 topic B

老铁,没毛病
2.3、扇型 Fanout
按部就班,创建 FanoutRabbiConfig
package com.liuyuncen.config;

import org.springframework.amqp.core.Binding;
import org.springframework.amqp.core.BindingBuilder;
import org.springframework.amqp.core.FanoutExchange;
import org.springframework.amqp.core.Queue;
import org.springframework.context.annotation.Bean;
import org.springframework.context.annotation.Configuration;

/**
 * @belongsProject: rabbitmq_springboot
 * @belongsPackage: com.liuyuncen.config
 * @author: Xiang想
 * @createTime: 2022-08-29  14:59
 * @description: TODO
 * @version: 1.0
 */
@Configuration
public class FanoutRabbitConfig {

    /**
     *  创建三个队列 :fanout.A   fanout.B  fanout.C
     *  将三个队列都绑定在交换机 fanoutExchange 上
     *  因为是扇型交换机, 路由键无需配置,配置也不起作用
     */

    @Bean
    public Queue queueA(){
        return new Queue("fanout.A");
    }

    @Bean
    public Queue queueB(){
        return new Queue("fanout.B");
    }

    @Bean
    public Queue queueC(){
        return new Queue("fanout.C");
    }

    @Bean
    FanoutExchange fanoutExchange(){
        return new FanoutExchange("fanoutExchange");
    }

    @Bean
    Binding bindingExchangeA(){
        return BindingBuilder.bind(queueA()).to(fanoutExchange());
    }

    @Bean
    Binding bindingExchangeB(){
        return BindingBuilder.bind(queueB()).to(fanoutExchange());
    }

    @Bean
    Binding bindingExchangeC(){
        return BindingBuilder.bind(queueC()).to(fanoutExchange());
    }
}
推送接口
package com.liuyuncen.controller;

import org.springframework.amqp.rabbit.core.RabbitTemplate;
import org.springframework.beans.factory.annotation.Autowired;
import org.springframework.web.bind.annotation.GetMapping;
import org.springframework.web.bind.annotation.RestController;

import java.time.LocalDateTime;
import java.time.format.DateTimeFormatter;
import java.util.HashMap;
import java.util.Map;
import java.util.UUID;

/**
 * @belongsProject: rabbitmq_springboot
 * @belongsPackage: com.liuyuncen.controller
 * @author: Xiang想
 * @createTime: 2022-08-29  15:07
 * @description: TODO
 * @version: 1.0
 */
@RestController
public class FanoutController {

    @Autowired
    RabbitTemplate rabbitTemplate;

    @GetMapping("/fanoutMessage")
    public String fanoutMessage(){
        Map<String,Object> map = new HashMap<>();
        map.put("code",String.valueOf(UUID.randomUUID()));
        map.put("time", LocalDateTime.now().format(DateTimeFormatter.ofPattern("yyyy-MM-dd HH:mm:ss")));
        map.put("message","我是 Fanout");
        // 扇形给了路由键也没用
        rabbitTemplate.convertAndSend("fanoutExchange",null,map);
        return "ok";
    }

}
consumer 消费者来个三个消费者 fanout.FanoutA、fanout.FanoutB、fanout.FanoutC
package com.liuyuncen.receiver.fanout;

import org.springframework.amqp.rabbit.annotation.RabbitHandler;
import org.springframework.amqp.rabbit.annotation.RabbitListener;
import org.springframework.stereotype.Component;

import java.util.Map;

/**
 * @belongsProject: rabbitmq_springboot
 * @belongsPackage: com.liuyuncen.receiver.fanout
 * @author: Xiang想
 * @createTime: 2022-08-29  15:11
 * @description: TODO
 * @version: 1.0
 */
@Component
@RabbitListener(queues = "fanout.A")
public class FanoutA {
    @RabbitHandler
    public void process(Map message){
        System.out.println("Fanout A 接收到消息 " + message.toString());
    }
}
我这里就写了一个,另外两个按部就班
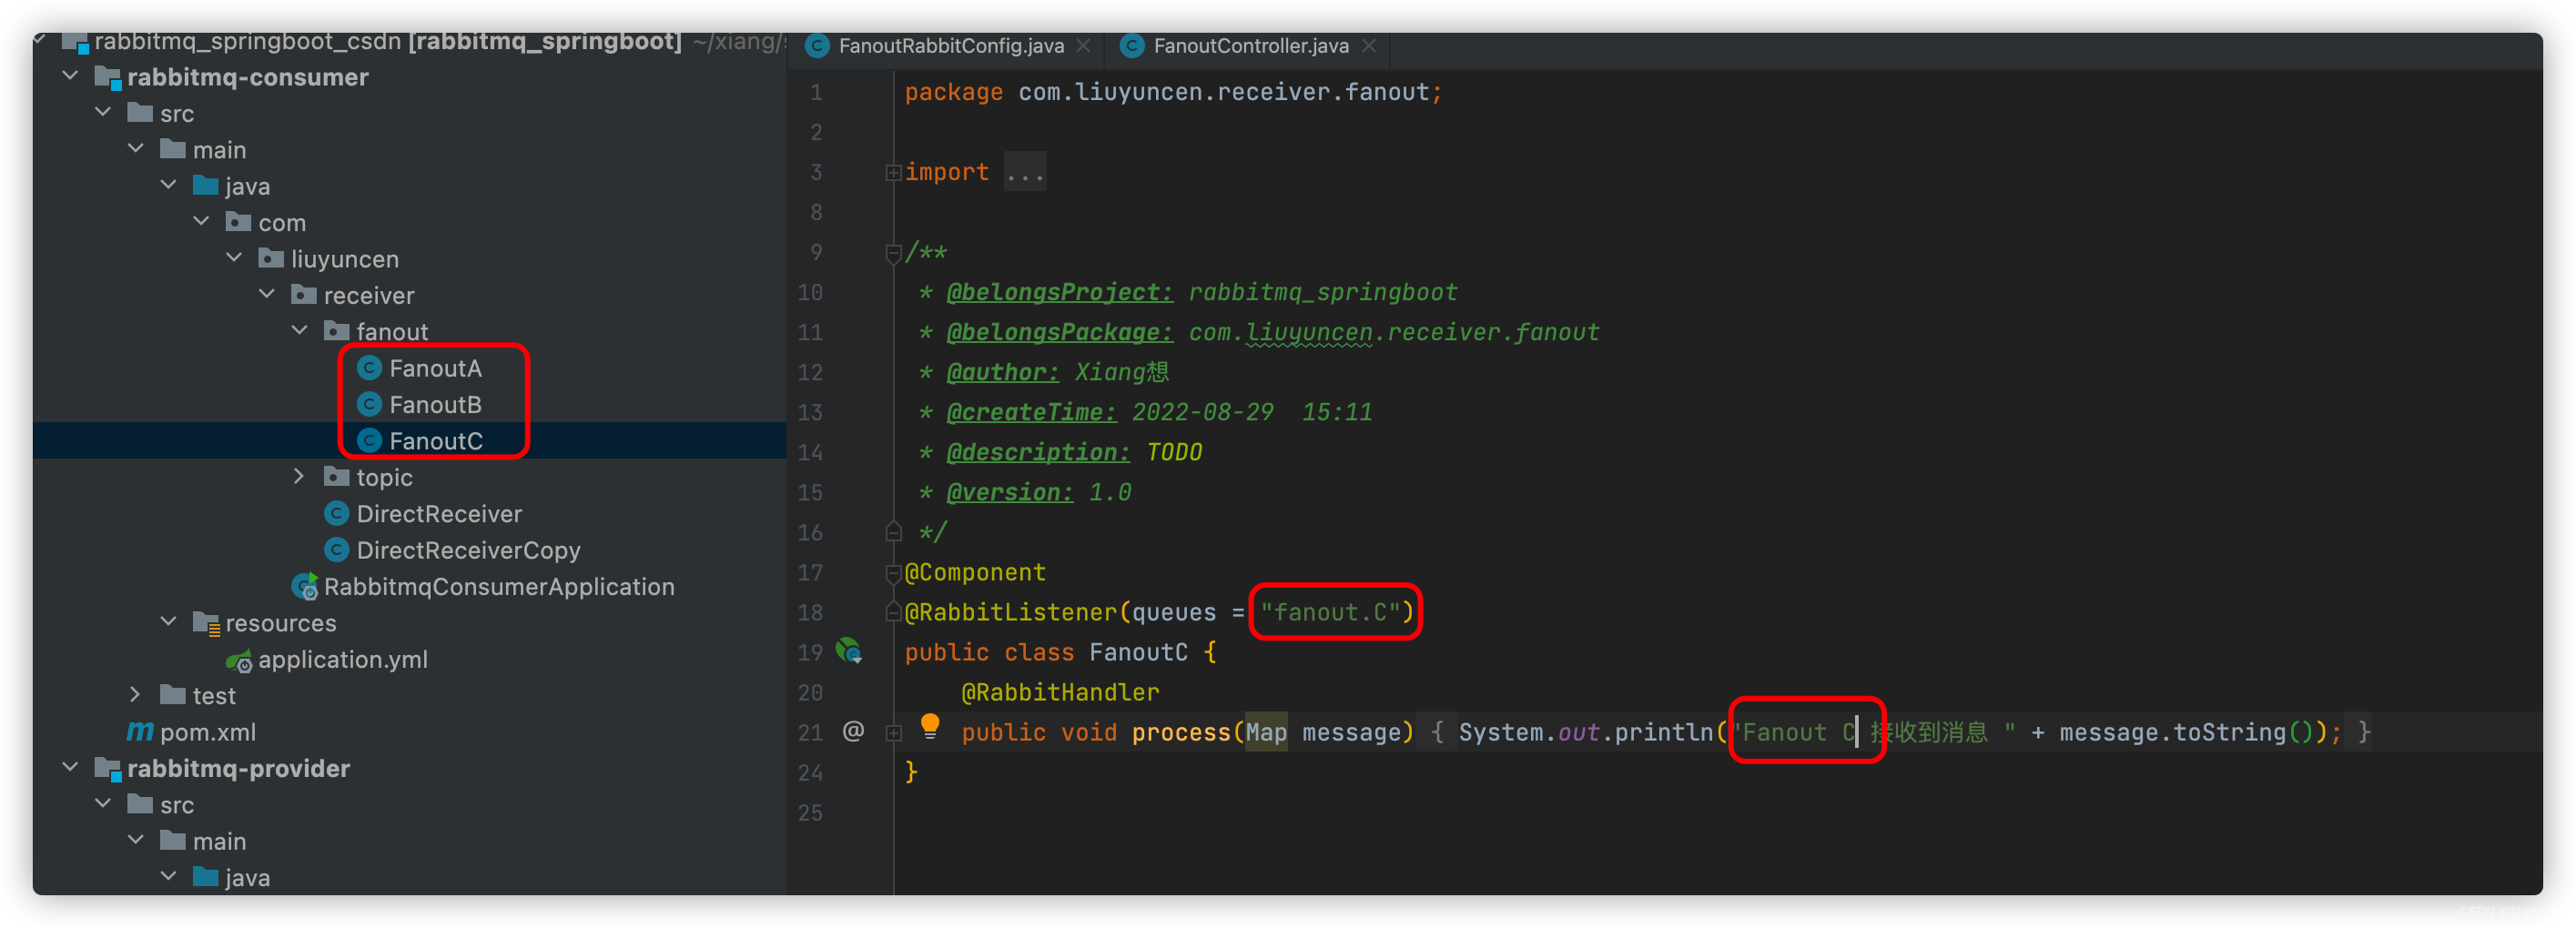
启动项目,调用 /fanoutMessage 接口

可以看到三个队列都绑定这个交换机,所以三个消息接收类都监听到了消息


 714
714


 被折叠的 条评论
为什么被折叠?


