abp 应用层异常处理(自动控制器中)

官网文档地址:https://docs.abp.io/zh-Hans/abp/latest/Exception-Handling

官网写的太过于啰嗦


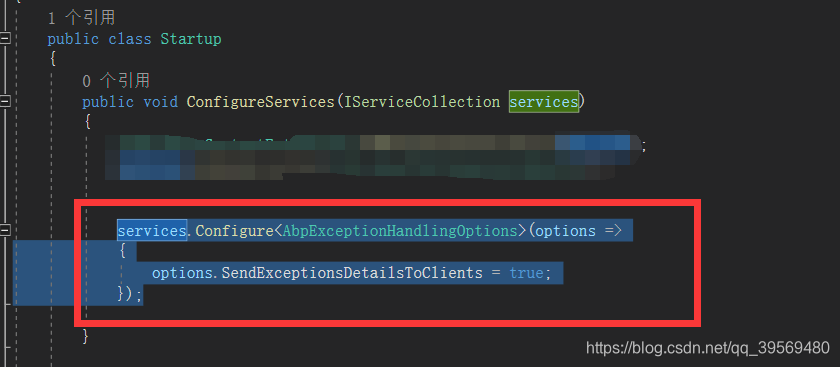
实际用的时候只需在host中的Startup文件中的ConfigureServices中添加以下代码

然后在代码中使用   BusinessException不适用 直接抛给前端,抛给前端不会把信息扔出    BusinessException适用于应用层

如果返回前端异常  使用    UserFriendlyException("错误内容");

throw new UserFriendlyException("异常信息"); 

结果

{
    "error": {
        "code": "",
        "message": "异常信息",
        "details": null,
        "data": {},
        "validationErrors": null
    }
}


throw new BusinessException(code: "", message: e.Message+"===="+e.InnerException, details: "");

结果

{
    "error": {
        "code": "",
        "message": "An internal error occurred during your request!",
        "details": null,
        "data": {},
        "validationErrors": null
    }
}


  • 0
    点赞
  • 0
    收藏
    觉得还不错? 一键收藏
  • 打赏
    打赏
  • 0
    评论
ABP 应用程序,您可以使用 Dapper 和 Entity Framework Core 两种 ORM 工具之一,或者甚至可以同时使用它们来访问数据库。以下是如何在 ABP 应用程序同时使用 Dapper 和 Entity Framework Core 的步骤: 1.添加 Dapper 和 Entity Framework Core 的依赖项 在您的 ABP 应用程序,您需要添加 Dapper 和 Entity Framework Core 的依赖项。您可以通过 NuGet 包管理器或手动编辑项目文件添加这些依赖项。添加 Dapper 和 Entity Framework Core 的依赖项后,您需要在 `Startup.cs` 文件配置它们。 2.配置 Dapper 和 Entity Framework Core 在 `Startup.cs` 文件,您需要配置 Dapper 和 Entity Framework Core。以下是一个示例: ```csharp public void ConfigureServices(IServiceCollection services) { // Add Dapper services.AddScoped<IDbConnection>(x => new SqlConnection(Configuration.GetConnectionString("Default"))); // Add Entity Framework Core services.AddAbpDbContext<MyProjectDbContext>(options => { options.AddDefaultRepositories(includeAllEntities: true); }); } ``` 在上面的代码,我们使用 `AddScoped` 方法将 `IDbConnection` 注册为一个服务,并指定使用 `SqlConnection` 类创建连接。然后,我们使用 `AddAbpDbContext` 方法将 `MyProjectDbContext` 注册为一个服务,并指定包含所有实体。 3.编写 Dapper 和 Entity Framework Core 的查询 在您的应用程序,您可以使用 Dapper 和 Entity Framework Core 的查询来访问数据库。以下是一个示例: ```csharp public class MyService : ITransientDependency { private readonly IDbConnection _connection; private readonly IRepository<MyEntity> _repository; public MyService(IDbConnection connection, IRepository<MyEntity> repository) { _connection = connection; _repository = repository; } public async Task<MyEntity> GetEntity(int id) { // Use Dapper var entity = await _connection.QueryFirstOrDefaultAsync<MyEntity>("SELECT * FROM MyEntities WHERE Id = @Id", new { Id = id }); // Use Entity Framework Core entity = await _repository.GetAsync(id); return entity; } } ``` 在上面的代码,我们注入 `IDbConnection` 和 `IRepository<MyEntity>`,并在 `GetEntity` 方法使用它们来执行 Dapper 和 Entity Framework Core 的查询。 需要注意的是,使用 Dapper 和 Entity Framework Core 的查询时,您需要务必遵循正确的事务处理和连接管理方式,以确保应用程序的数据完整性和性能。

“相关推荐”对你有帮助么?

  • 非常没帮助
  • 没帮助
  • 一般
  • 有帮助
  • 非常有帮助
提交
评论
添加红包

请填写红包祝福语或标题

红包个数最小为10个

红包金额最低5元

当前余额3.43前往充值 >
需支付:10.00
成就一亿技术人!
领取后你会自动成为博主和红包主的粉丝 规则
hope_wisdom
发出的红包

打赏作者

香煎三文鱼

你的鼓励将是我创作的最大动力!

¥1 ¥2 ¥4 ¥6 ¥10 ¥20
扫码支付:¥1
获取中
扫码支付

您的余额不足,请更换扫码支付或充值

打赏作者

实付
使用余额支付
点击重新获取
扫码支付
钱包余额 0

抵扣说明:

1.余额是钱包充值的虚拟货币,按照1:1的比例进行支付金额的抵扣。
2.余额无法直接购买下载,可以购买VIP、付费专栏及课程。

余额充值