@CrossOrigin注解
Spring 从4.2版本后开始支持 @CrossOrigin 注解实现跨域,这在一定程度上简化了我们实现跨域访问的开发成本,在需要跨域访问的方法或者类上加上这个注解便大功告成
session.setAttribute("username",username); 将后者的username内容放到前者username中并保存起来 方便与在其他的页面提取username的值
把username对象放到session里面,并用一个字符串"username"标识,session是jsp或servlet里的重要内容,利用session可以跟踪会话,比如你实现了一个页面跳转,从A页面调到了B页面,则在B页面对应的jsp或servlet内就可以通过request.getSession()得到session对象,然后用session.getAttibute("username")就可以获得你先前放在session里面的username对象
以前在做项目的时候不太了解model与entity的含义,在公司(卓~)项目中学习到了。model的字段>entity的字段,并且model的字段属性可以与entity不一致,model是用于前端页面数据展示的,而entity则是与数据库进行交互做存储用途。
举个例子:
比如在存储时间的类型时,数据库中存的是datetime类型,entity获取时的类型是Date()类型,date型的数据在前端展示的时候必须进行类型转换(转为String类型),在前端的进行类型转换则十分的麻烦,转换成功了代码也显得十分的臃肿,
所以将entity类型转换后,存储到对应的model中,在后台做类型转换,然后将model传到前端显示时,前端的就十分的干净。
同时也可以添加字段,作为数据中转。
template might not exist or might not be accessible by any of the configured Template Resolvers
报错,报错原因是缺少Template的pom依赖。
首先我理解的model.addAttribute的作用:向前台传送数据
1、此Demo只单纯的实现传值并跳转页面,在controller层的对应方法中,应用model.addAttribute形势如下:
springmvc的model.addAttribute用法
首先我理解的model.addAttribute的作用:向前台传送数据
1、此Demo只单纯的实现传值并跳转页面,在controller层的对应方法中,应用model.addAttribute形势如下:
 @RequestMapping("/toShowResume")
    public String toShowResume(String resume,Model model){
        System.err.println("进来去显示简历的后端了");
        System.err.println(resume);
        model.addAttribute("resume",resume);
        return "showResume";
    }
2、controller层控制跳转到showResume后,便可以直接通过el表达式 ${}获取到该值如下
<td>${resume}</td>本项目中的用法
在Controller层中 进行定义传输格式
if(u==null){
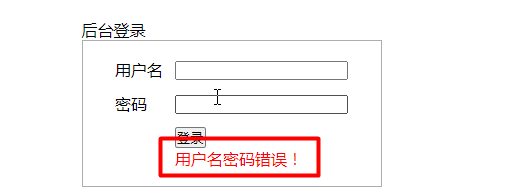
            model.addAttribute("err","用户名密码错误!");
            /*登录失败返回登录界面*/
            return "admin/login";
        }
后台进行获取
<td>
     <input type="submit" value="登录">
     <div th:text="${err}" style="color:red;"></div>
</td>
HTML标签语法
<iframe src="/admin/welcome" name="content"></iframe>
<iframe src="http://edu.jb51.net/"></iframe>
作用/admin/welcome 是Controller中的跳转链接,直接跳转到其他页面,之后将连接中的内容展示到这个页面中。
src="http://edu.jb51.net/"是直接将此链接网站进行展示到页面中,在本页面中展示其他页面的内容

2.HttpSession session, Model model 运用总结。
Model model 用法,在页面中用
model.addAttribute("err","用户名密码错误!");
进行返回值的定义,数据和属性值,在HTML代码正进行展示错误提示信息,当用户登录失败。
Controller中
//校验用户名和密码
        Users u = usersService.adminLogin(users);
        //登录账号和密码不正确
        if(u==null){
            model.addAttribute("err","用户名密码错误!");
            /*登录失败返回登录界面*/
            return "admin/login";
        }
HTML中
<tr>
     <td></td>
     <td>
          <input type="submit" value="登录">
          <div th:text="${err}" style="color:red;"></div>
     </td>
</tr>
当用户名和密码错误的时候

session.setAttribute("adminUser",u); 是将登录信息存储到浏览器中,并进行保存,前台可以进行获取
//将登陆的账号对象存入session
        session.setAttribute("adminUser",u);
        /*登陆成功进入后台主页面*/
        return "/admin/index";
将信息存储到session中。
前台进行获取相关数据。后端传入session对象后,前台可获取用户的用户名和密码进行展示。
依照此方法,可进行用户名密码,头像等各种用户信息进行展示。
<h3>
            欢迎
            <th:block th:text="${session.adminUser.userName}"></th:block>
            <th:block th:text="${session.adminUser.password}"></th:block>
            [<a href="/admin/logout">注销</a> ]
</h3>
<th:block th:text="${session.adminUser.userName}"></th:block>
前边为session对象获取对象中的数据,对象后面为数据库中对应字段名称。
直接渲染到页面上。
<ul>
        <li><a href="/admin/category/list" target="content">商品分类查询</a></li>
        <li><a href="/admin/category/add_show" target="content">商品分类添加</a></li>
        <li><a href="/admin/goods/list" target="content">商品信息查询</a></li>
        <li><a href="/admin/goods/add_show" target="content">商品信息添加</a></li>
</ul>
其中 target="content" 属性是将跳转的页面放在本页面中进行展示

重点知识总结---知识体系
如何将后台的数据熏染到前台进行展示。
实现对数据库内容的增删改查。
整体知识梳理。
首先建立springboot 最典型的三层架构。
创建HTML页面。对应后台数据。Controller页面,
@Controller
@RequestMapping("/admin/category")
public class AdminCategoryController {
    /*定义业务层对象*/
    @Autowired
    private ICategoryService categoryService;
    @RequestMapping("/list")
    public String list(Model model){
        List<Category> categoryList = categoryService.lsit();
        model.addAttribute("categoryList", categoryList);

        return "/admin/category_list";
    }
    @RequestMapping("/add_show")
    public String add_show(){
        return "/admin/category_add";
    }
}
List<Category> categoryList = categoryService.lsit();
遍历获取对象,得到数据中的数据。
Model model 对象
model.addAttribute("categoryList", categoryList);
将后端数据请求到前端,将数据封装在categoryList属性中,前台用此属性接口进行调用。
return "/admin/category_list";
之后跳转到对象页面。
<th:block th:each="c:${categoryList}">
       <tr>
       <td th:text="${c.categoryId}"></td>
       <td th:text="${c.categoryName}"></td>
       <th>
          <a th:href="@{/admin/category/update_show(categoryId=${c.categoryId})}">修改</a>
       </th>
       </tr>
</th:block>
<th:block th:each="c:${categoryList}">
将后台属性对象抽象出来。
<td th:text="${c.categoryId}"></td>
用抽象对象调用数据库中的字段。categoryId为数据库中的字段。在xml文件已经映射。
进行添加操作。
添加商品分类
创建三层架构,xml文件增加
创建三层架构,实体类,添加接口,服务层添加接口,实现添加接口,创建数据文件。
<mapper namespace="com.liuboss.boot.mapper.CategoryMapper">
    <select id="findAll" parameterType="com.liuboss.boot.entity.Category" resultType="com.liuboss.boot.entity.Category">
       select categoryId,categoryName
       from category
    </select>
    <!--添加商品分类|-->
    <insert id="doAll" parameterType="com.liuboss.boot.entity.Category">
        insert into category
        (categoryName)
        values
        (#{categoryName})
    </insert>

</mapper>
创建HTML页面。
<div class="frm">
    <div class="title">
        商品分类添加
    </div>
    <form action="/admin/category/add_submit" method="post">
        <table>
            <tr>
                <td>分类名称</td>
                <td>
                    <input type="text" name="categoryName" required="required">
                </td>
            </tr>
            <tr>
                <td></td>
                <td>
                    <input type="submit" value="添加">
                </td>
            </tr>
        </table>
    </form>
</div>
<input type="text" name="categoryName" required="required">
name="categoryName" 其中name中的字段必须和数据库中的字段对应上。前台添加的数据才能插入数据库。
Controller中添加的操作。
/*添加商品分类*/
    @RequestMapping("/add_submit")
    public String add_submit(Category category){
        categoryService.insert(category);
        return "redirect:/admin/category/list";
    }
关于服务端跳转和客户端跳转,怎么判断应该使用哪一种啊?
return “admin/listCategory”;
用的通过前端控制器的转发,服务器跳转,从查询页面跳转到编辑页面,请求域中的数据不丢失
return “redirect:/admin_category_list”;
用的重定向关键字,重新发起请求,客户端跳转
如果有数据要传递到下一个页面用服务端跳转,否则用客户端跳转。(一般来说增删改用重定向,查询用转发)
实现修改-更新操作。
实现修改操作最初需要实现查询,因为在新的页面进行修改,需要先实现查询,现将也看进行查询,查询之后将数据展示,之后进行修改更新操作。
首先实现查询操作。
实现三层架构,在接口中定义根据ID进行查询操作
/*根据编号进行查询数据*/
    Category find(Integer categoryId);
在Service层中定义根据ID进行查询的接口
/*按编号进行查询分类*/
    Category find(Integer categoryId);
实现接口
@Override
public Category find(Integer categoryId) {
    return categoryMapper.find(categoryId);
}
在Controller接口层中进行实现
/*根据商品编号进行查询*/
    @RequestMapping("/update_show")
    public String update_show(Integer categoryId,Model model){
        Category category = categoryService.find(categoryId);
        model.addAttribute("category",category);
        return "/admin/category_update";
    }
实现HTML页面
<body>
<div class="frm">
    <div class="title">
        商品分类修改
    </div>
    <form action="/admin/category/update_submit" method="post">
        <!--只修改ID-->
        <input type="hidden" name="categoryId" th:value="${category.categoryId}">
        <table>
            <tr>
                <td>分类名称</td>
                <td>
                    <input type="text"
                           name="categoryName"
                           th:value="${category.categoryName}"
                           required="required">
                </td>
            </tr>
            <tr>
                <td></td>
                <td>
                    <input type="submit" value="修改">
                </td>
            </tr>
        </table>
    </form>
</div>
</body>
xml文件中实现根据ID进行查询
<select id="find" parameterType="com.liuboss.boot.entity.Category" resultType="com.liuboss.boot.entity.Category">
       select categoryId,categoryName
       from category
       where  categoryId = #{categoryId}
    </select>
实现商品分类修改
/*修改商品分类*/
    int doUpdate(Category category);
/*修改商品分类*/
int update(Category category);实现接口中的方法
<update id="doUpdate" parameterType="com.liuboss.boot.entity.Category">
        update category
        set categoryName = #{categoryName}
        where categoryId = #{categoryId}
    </update>
/*根据商品编号进行添加数据*/
@RequestMapping("/update_submit")
public String update_submit(Category category){
categoryService.update(category);
return "redirect:/admin/category/list";
}<body>
<table class="table_list">
<tr class="title">
<th>分类编号</th>
<th>分类名称</th>
<th>操作</th>
</tr>
<th:block th:each="c:${categoryList}">
<tr>
<td th:text="${c.categoryId}"></td>
<td th:text="${c.categoryName}"></td>
<th>
<a th:href="@{/admin/category/update_show(categoryId=${c.categoryId})}">修改</a>
</th>
</tr>
</th:block>
<tr>
<td colspan="3">
<a href="/admin/category/add_show">添加分类</a>
</td>
</tr>
</table>
</body>


 916
916


 被折叠的 条评论
为什么被折叠?


