


Spring Boot中引入静态配置文件
1.Spring Boot 默认加载/src/main/resources(classpath跟目录)或/src/main/resources/config或file:/或file:config/中的配置文件application.properties/application.yml
后两种情况代表去文件系统加载(可以理解为磁盘)
获取配置文件中的属性
方法一:
public static void main( String[] args )
    {
		ConfigurableApplicationContext context=  SpringApplication.run(App.class, args);
        //context.getBean(Runnable.class).run();
        System.out.print(context.getEnvironment().getProperty("local.ip"));
        context.close();
    }
方法二:
import org.springframework.beans.factory.annotation.Autowired;
import org.springframework.core.env.Environment;
import org.springframework.stereotype.Component;

@Component
public class UserConfig {

	@Autowired
	private Environment env;
	public void show()
	{

		System.out.println("local.ip:"+env.getProperty("local.ip"));

	}

}
方法三:
//注意:在使用此注解时配置文件中必须要有配置项,配置项的值可以为空,如果没哟配置项可以使用@Value("${local.port:9090}")此形式设置默认值
@Value("${local.port}")//此注解可以自动将字符串转换成整数
private String localport;
2.如果配置文件的名字不是默认值,那么可以用过以下方式加载配置文件
方法一:在启动参数中设置
Run --> Run Configrations–>Arguments
//配置文件在classpath路径下
--spring.config.name=app.properties
//app.properties为配置文件的名字
//如果配置文件在classpath下的其他文件夹(假设文件夹的名字为conf)下,则通过以下方式进行配置
--spring.config.location=classpath:conf/app.properties
//在启动参数中可以设置多个配置文件(假设其中一个配置文件不在classpath目录下(假设在E:/tomcat目录下,配置文件的名称为tomcat.properties)),多个配置文件间用逗号隔开
--spring.config.location=classpath:conf/app.properties,file:E:/tomcat/tomcat.properties
方法二:使用@PropertySource(“classpath:jdbc.properties”)注解的方式(此注解也可用在其它类上(只要保证配置文件可以加载到Spring容器中即可),在当前类上仍然可以获取配置文件的值),另外此注解是可以重复使用的,具体见代码。
详解
import org.springframework.beans.factory.annotation.Value;
import org.springframework.context.annotation.PropertySource;
import org.springframework.stereotype.Component;

@Component
@PropertySource("classpath:jdbc.properties")
@PropertySource("file:/e:/tmp/jdbc.properties")
public class jdbcConfig {
    @Value("${url}")
	private String url;
	public void show()
	{
		System.out.println(url);

	}
}
可以使用此注解将两种情况合并@PropertySources()
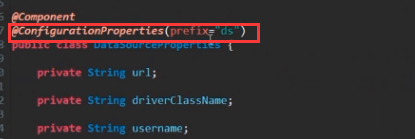
方法三:使用@ConfigurationProperties注解,此注解需要为注入的属性设置get()/set()方法。
此注解默认加载classpath下的application.properties文件,利用如下方法改变所要加载的文件路径
@ConfigurationProperties(prefix="",location="")//如果没有前缀可以将prefix属性去掉
可以利用此注解注入集合和数组
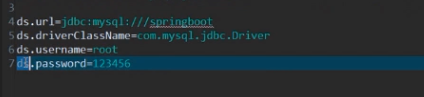
配置文件内容:
ds.hosts[0]=192.168.1.100
ds.hosts[1]=192.168.1.101
ds.hosts[2]=192.168.1.102
注入集合的代码:
import org.springframework.boot.context.properties.ConfigurationProperties;
import org.springframework.stereotype.Component;

@Component
@ConfigurationProperties(prefix="ds")
public class TomcatProperties {
private List hosts=new ArrayList<>();

public List getHosts() {
	return hosts;
}

public void setHosts(List hosts) {
	this.hosts = hosts;
}

@Override
public String toString() {
	return "TomcatProperties [hosts=" + hosts + "]";
}
}
Spring Boot中引入动态配置文件
利用动态方法引入配置文件不需要再手动注入配置文件的属性,可以将多个配置文件的中心化,各个应用在启动时可以直接读取配置项,而不需要在每个应用中分别放置配置文件。
步骤一:实现相应接口org.springframework.boot.env.EnvironmentPostProcessor
package com.edu1.spring.springboot;

import java.io.FileInputStream;
import java.io.FileNotFoundException;
import java.io.IOException;
import java.io.InputStream;
import java.util.Properties;

import org.springframework.boot.SpringApplication;
import org.springframework.core.env.ConfigurableEnvironment;
import org.springframework.core.env.PropertiesPropertySource;
import org.springframework.stereotype.Component;

@Component
public class myEnvironmentPostProcessor implements org.springframework.boot.env.EnvironmentPostProcessor {

	@Override
	public void postProcessEnvironment(ConfigurableEnvironment environment, SpringApplication application) {
	//D:/tmp/springboot.properties为配置文件的位置
	try(InputStream input=new FileInputStream("D:/tmp/springboot.properties")){
		Properties source=new Properties();
		source.load(input);
		PropertiesPropertySource  propertySource=new PropertiesPropertySource("my", source);
	    environment.getPropertySources().addLast(propertySource);

	} catch (IOException e) {
		// TODO Auto-generated catch block
		e.printStackTrace();
	}
  }
}
步骤二:将实现类注入到classpath下的META-INF/spring.factories文件中
key为接口的全路径 value为实现类的全路径
org.springframework.boot.env.EnvironmentPostProcessor=com.edu1.spring.springboot.myEnvironmentPostProcessor
步骤三:获取配置项
@SpringBootApplication
public class App
{
	public static void main( String[] args )
    {
		ConfigurableApplicationContext context=  SpringApplication.run(App.class, args);
        //获取配置项,配置文件的内容为:springboot.name=mySpringboot
		System.out.print(context.getEnvironment().getProperty("springboot.name"));
        context.close();
    }
}


 被折叠的 条评论
为什么被折叠?
被折叠的 条评论
为什么被折叠?
 到【灌水乐园】发言


