


在设计流程的下一步是 创建 DFT 规范。
使用 create_dft_specification 命令可以根据之前在 “指定和验证 DFT 要求” 步骤中定义的 DFT 需求,创建一个默认的 DFT 规范。你可以使用 report_config_data 命令来报告这个默认的 DFT 规范。有多种方法可用于编辑或配置 DFT 规范,以满足你的特定需求。
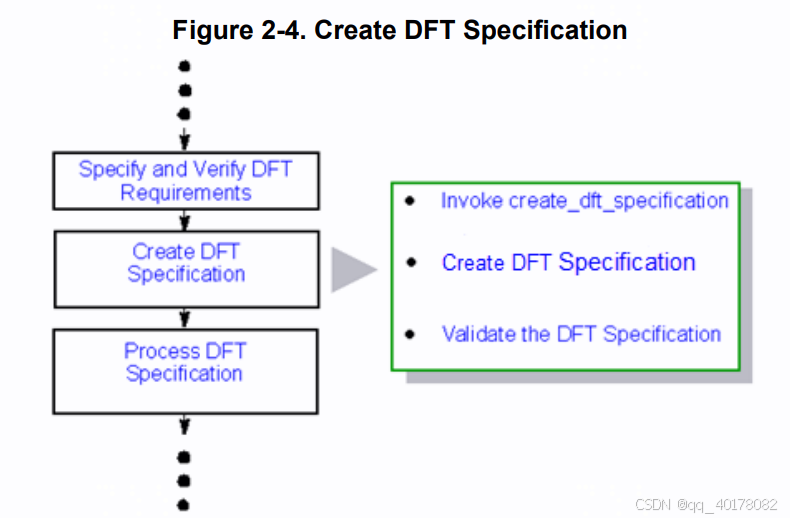
Invoke create_dft_specification
DFT 规范 是通过 create_dft_specification 命令自动创建的。这个 DFT specification会存储在内存中。
要打印内存中的 DFT specification,可以使用 report_config_data 命令。DFT sepcification 使用 IJTAG 网络基础设施,因为这是唯一支持增量插入步骤的方法。IJTAG 网络完全符合 1149.1 IEEE 标准。有关 Tessent IJTAG 流程的更多信息,请参考 Tessent IJTAG 用户手册。
如果要在设计中已有的 TAP 中插入边界扫描,必须为该 TAP 提供一个 ICL 文件。如果 TAP 的 ICL 文件中包含 ScanInterface host_bscan,工具会自动使用该 TAP 连接到 boundary scan。
你也可以通过 create_dft_specification -existing_host_bscan_scan_in 命令指定要连接的 host_bscan。如果 TAP 的模块描述存在于某个位置,工具会自动读取该 TAP 的 ICL 文件。你也可以使用 read_icl 命令手动读取已有 TAP 的 ICL 文件。(读取已有的Tap)
有关在边界扫描中使用已有 TAP 的要求,请参考 Tessent Shell 参考手册 中的 “Requirements on a TAP to be usable for BoundaryScan” 部分。
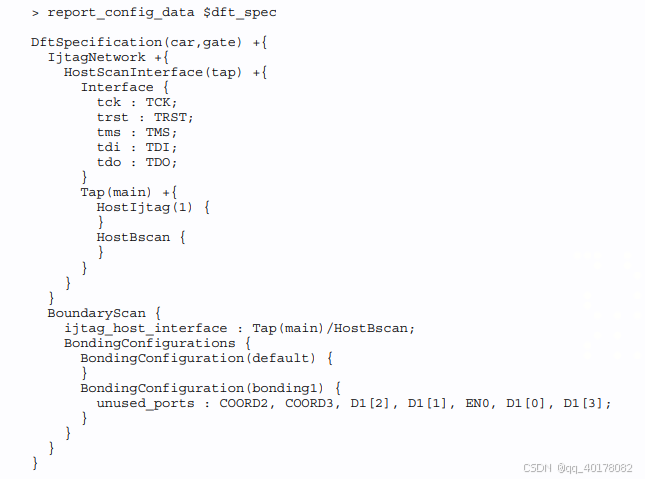
示例 1 以下示例展示了如何使用 create_dft_specification 生成 DFT 规范,并将其存储在变量 dft_spec 中,以便使用该变量报告 DFT 规范:
set dft_spec [create_dft_specification]
report_config_data $dft_spec
示例 2 以下示例展示了在存在多个 TAP 时,如何连接到已有的 TAP。这仅在已有 TAP 控制器的 ICL 文件中包含 ScanInterface host_bscan 时有效。如果设计中只有一个 TAP 控制器,工具会自动使用该控制器,无需指定 host_bscan。
create_dft_specification -existing_host_bscan_scan_in \
My_TAP_INST/fromBscan
report_config_data 在此示例中,My_TAP_INST 是设计中已有 TAP 的实例名称,fromBscan 是已有 TAP 上需要连接边界扫描链的输入端口。
Configure the DFT Specification
有两种方法可以根据你的需求配置默认的 DFT 规范:
-
使用 Tessent Visualizer 中的 Config Data Browser,
-
Modifying the specification in memory。
如果你希望使用默认配置,则无需编辑 DFT specification。配置 DFT 规范的一种方法是使用 Tessent Visualizer 中的 Config Data Browser。通过此工具进行的编辑会更新内存中的 DFT specifaication。
前提条件
-
你已经按照 “Create DFT Specification”(第 36 页)中的描述创建了 DFT 规范。
Procedure
操作步骤
-
使用
display_specification命令打开 Config Data Browser。
Config Data Browser 会显示基于 “指定和验证 DFT 要求”(第 32 页)中定义的 DFT 需求的 DFT 规范。 -
在 Configuration Tree 窗格中,导航到树结构以展开
BondingConfigurations包装器。 -
右键单击
BondingConfigurations包装器,然后选择 Add wrapper as a child(添加子包装器)。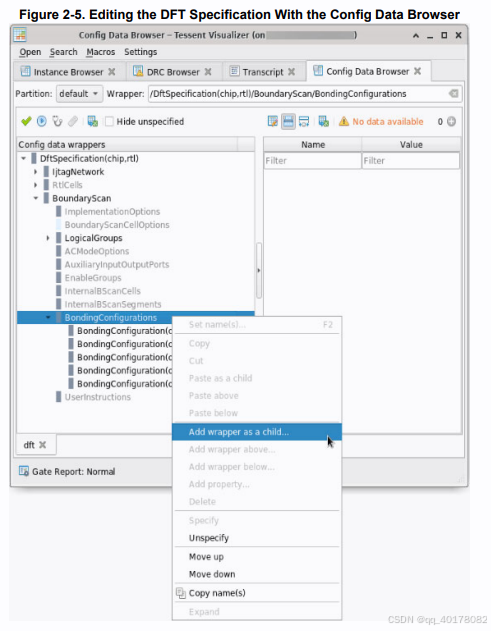
-
在弹出的对话框中,输入新
BondingConfiguration包装器的名称,然后单击 Apply(应用)。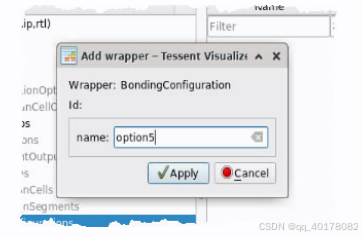
-
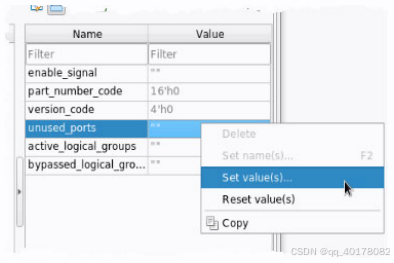
单击一个
BondingConfiguration包装器以显示 Configuration Options 窗格。 -
通过右键单击 unused ports 字段并手动输入端口名称,使用 Set value(s) 选项添加要排除的端口。
-
单击 Apply 以更新 Config Data Browser 和内存中的 DFT 规范。
-
重复这些步骤以添加其他修改。
结果
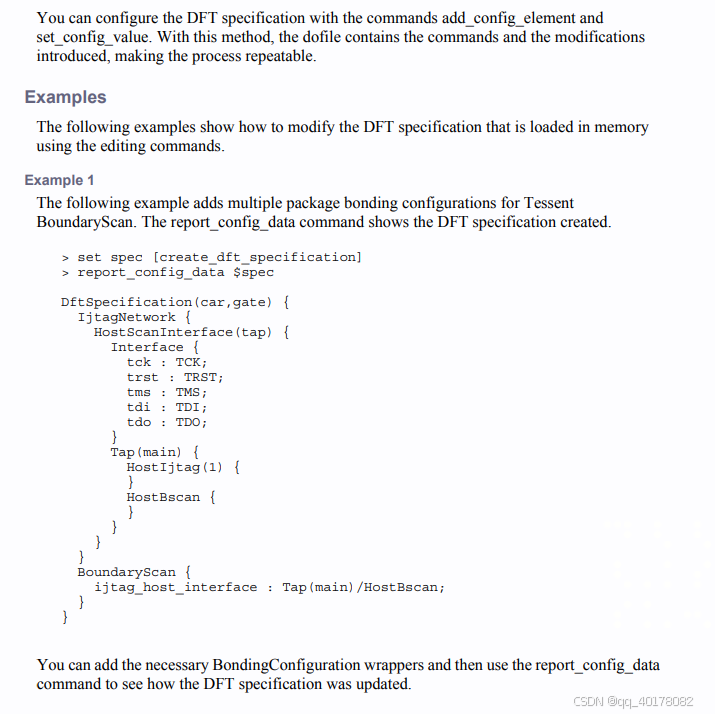
此方法演示了如何使用 Config Data Browser 编辑 DFT 规范,通过添加由两个 BondingConfiguration 包装器定义的多个封装绑定配置。
要查看最终的配置结果,可以使用 report_config_data 命令。
示例
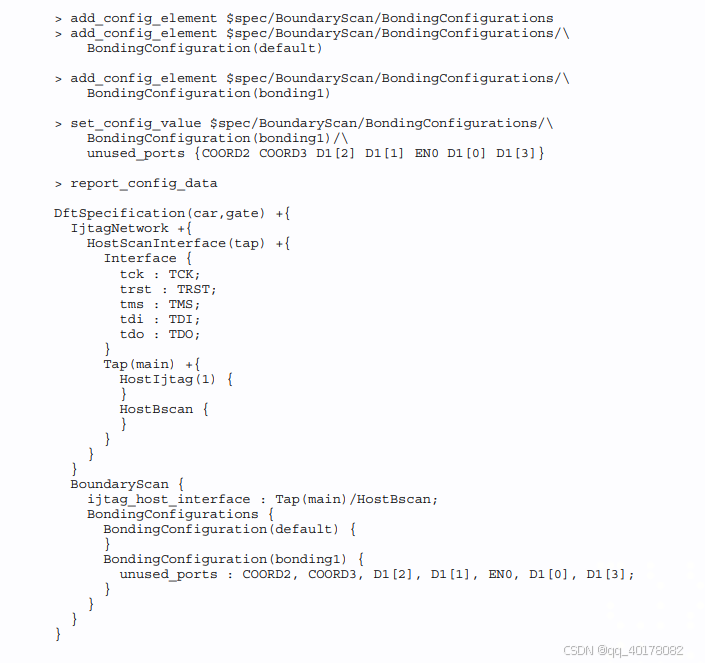
使用 read_config_data 命令,你可以将手动在 Config Data Browser 中进行的编辑有效地“剪切并粘贴”到 dofile 中,如下例所示。这样,在后续运行时,配置编辑已经存在于 dofile 中,从而使该过程可通过脚本重复执行。
read_config_data -in $dft_spec/BoundaryScan -from_string {
    BondingConfigurations +{
        BondingConfiguration(default) {
        }
        BondingConfiguration(bonding1) {
            unused_ports : COORD2, COORD3, D1[2], D1[1], EN0, D1[0], D1[3];
        }
     }
}
Configure the DFT Specification in Memory

Validate the DFT Specification
In this optional step, you can validate the edits you made to the DFT specification to make sure no errors exist before you proceed to the next step.
Example The following example validates your DFT specification.
process_dft_specification -validate_only


 1879
1879

 被折叠的 条评论
为什么被折叠?
被折叠的 条评论
为什么被折叠?
 到【灌水乐园】发言


