


Spring Boot Actuator&Admin
指标监控简介
干嘛的:
主要运用在微服务架构,所以我建议你先学微服务,否则可能get不到它的用处,只有大型的分布式系统才会用到指标监控… Why:?
对于一个大型的几十个、几百个微服务构成的微服务架构系统,在线上时通常会遇到下面一些问题,比如:
- 如何知道哪些服务除了问题,如何快速定位? (健康状况)
- 如何统一监控各个微服务的性能指标(内存、jvm、并发数、线程池、Http 请求统计)
- 如何统一管理各个微服务的日志?(切换线上日志等级,快速搜索日志…)
- 如何优雅管理服务下线(正在运行的线程不发生中断)
So: 在这种大型分布式应用的环境下,我们如何能够快速发现问题、快速解决问题, 必须要有监控平台、(链路追踪、日志)
SpringBoot Actuator
SpringBoot自带监控功能Actuator,可以帮助实现对程序内部运行情况监控,比如监控状况、Bean加载情况、环境变量、日志信息、线程信息等
依赖
        <dependency>
            <groupId>org.springframework.boot</groupId>
            <artifactId>spring-boot-starter-actuator</artifactId>
        </dependency>
Actuator Endpoint端点
官方文档:https://docs.spring.io/spring-boot/docs/2.4.10/reference/html/production-ready-features.html#production-ready-endpoints
总之使用了actuator之后我们就可以通过http或者 JMX方式 获取应用的一些指标信息
[外链图片转存失败,源站可能有防盗链机制,建议将图片保存下来直接上传(img-A4nMBV2l-1670331038967)(C:\Users\jeol\AppData\Roaming\Typora\typora-user-images\image-20221118190037432.png)]
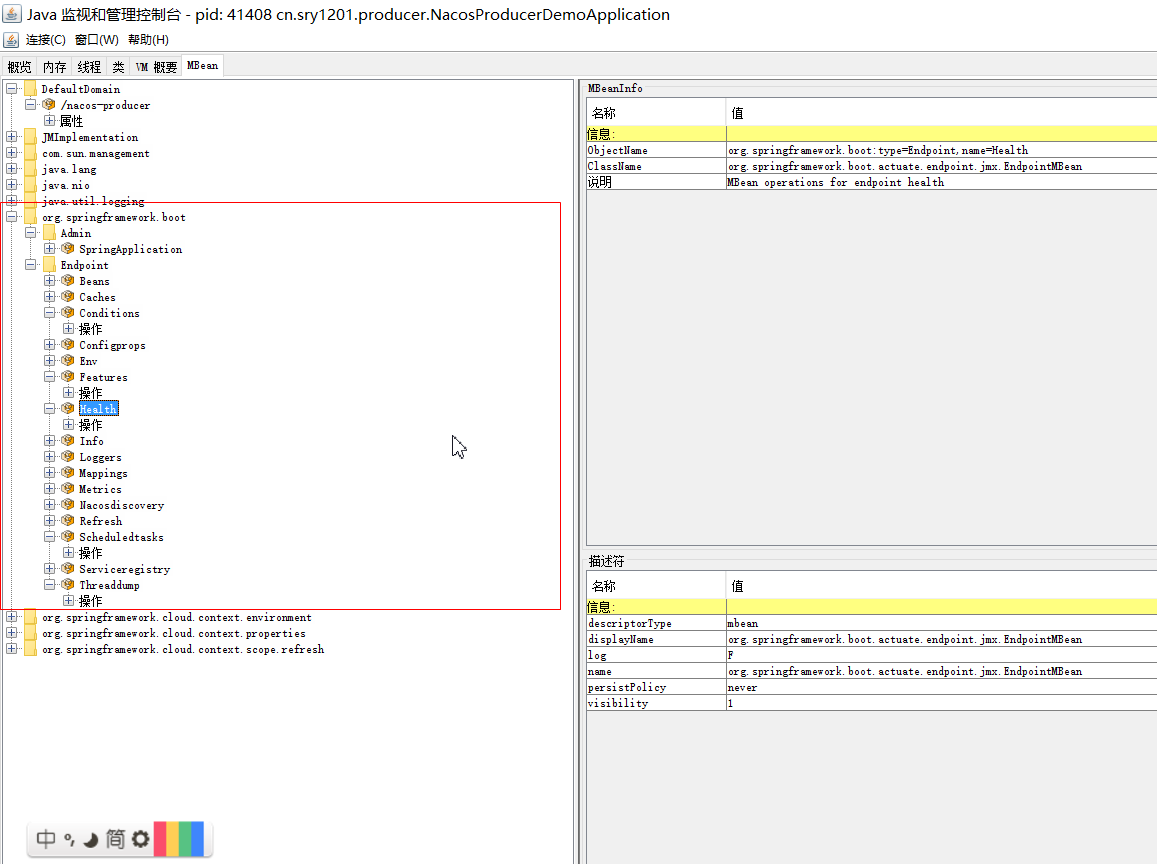
JMX方式查看EndPoint
这里是使用jconsole命令来查看这些信息
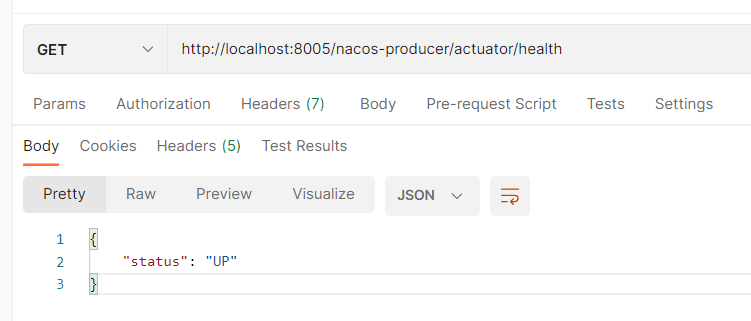
http获取EndPoint信息
http部分端点信息是被限制访问的,springboot中添加如下配置开启权限
management:
  endpoints:
    web:
      exposure:
        include: '*'
然后通过请求项目根路径 + /actuator + /EndPoint名称
当然你也可以直接调用项目根路径 + /actuator 获取所有可以调用的endpoint的uri
shutdown:优雅关闭
优雅的关闭应用
配置
# 对应枚举类org.springframework.boot.web.server.Shutdown 优雅关闭和立即关闭两个枚举值
server:
  shutdown: graceful

management:
  endpoints:
    web:
      exposure:
        include: '*'
  endpoint:
    shutdown:
      enabled: true # 设置shutdown断点开启关闭,默认是关闭的
然后post访问 http://localhost:8005/nacos-producer/actuator/shutdown
修改默认的访问路径
# 设置actuator的base-path
management.endpoints.web.base-path= /system
修改后
请求项目根路径 +/system + /EndPoint名称
单独控制某个断点启用
# 是否启用端点默认配置
management.endpoints.enabled-by-default=false
# 启用info端点
management.endpoint.info.enabled=true
security 保护endpoint
就是设置一个角色 ,需要权限才能访问
@Bean
public SecurityFilterChain securityFilterChain(HttpSecurity http) throws Exception {
    http.requestMatcher(EndpointRequest.toAnyEndpoint()).authorizeRequests((requests) ->
        requests.anyRequest().hasRole("ENDPOINT_ADMIN"));
    http.httpBasic();
    return http.build();
}
其他配置
比如jmx不再允许访问所有endpoint,比如排除特定的endpoint不公开等等,请查看官网
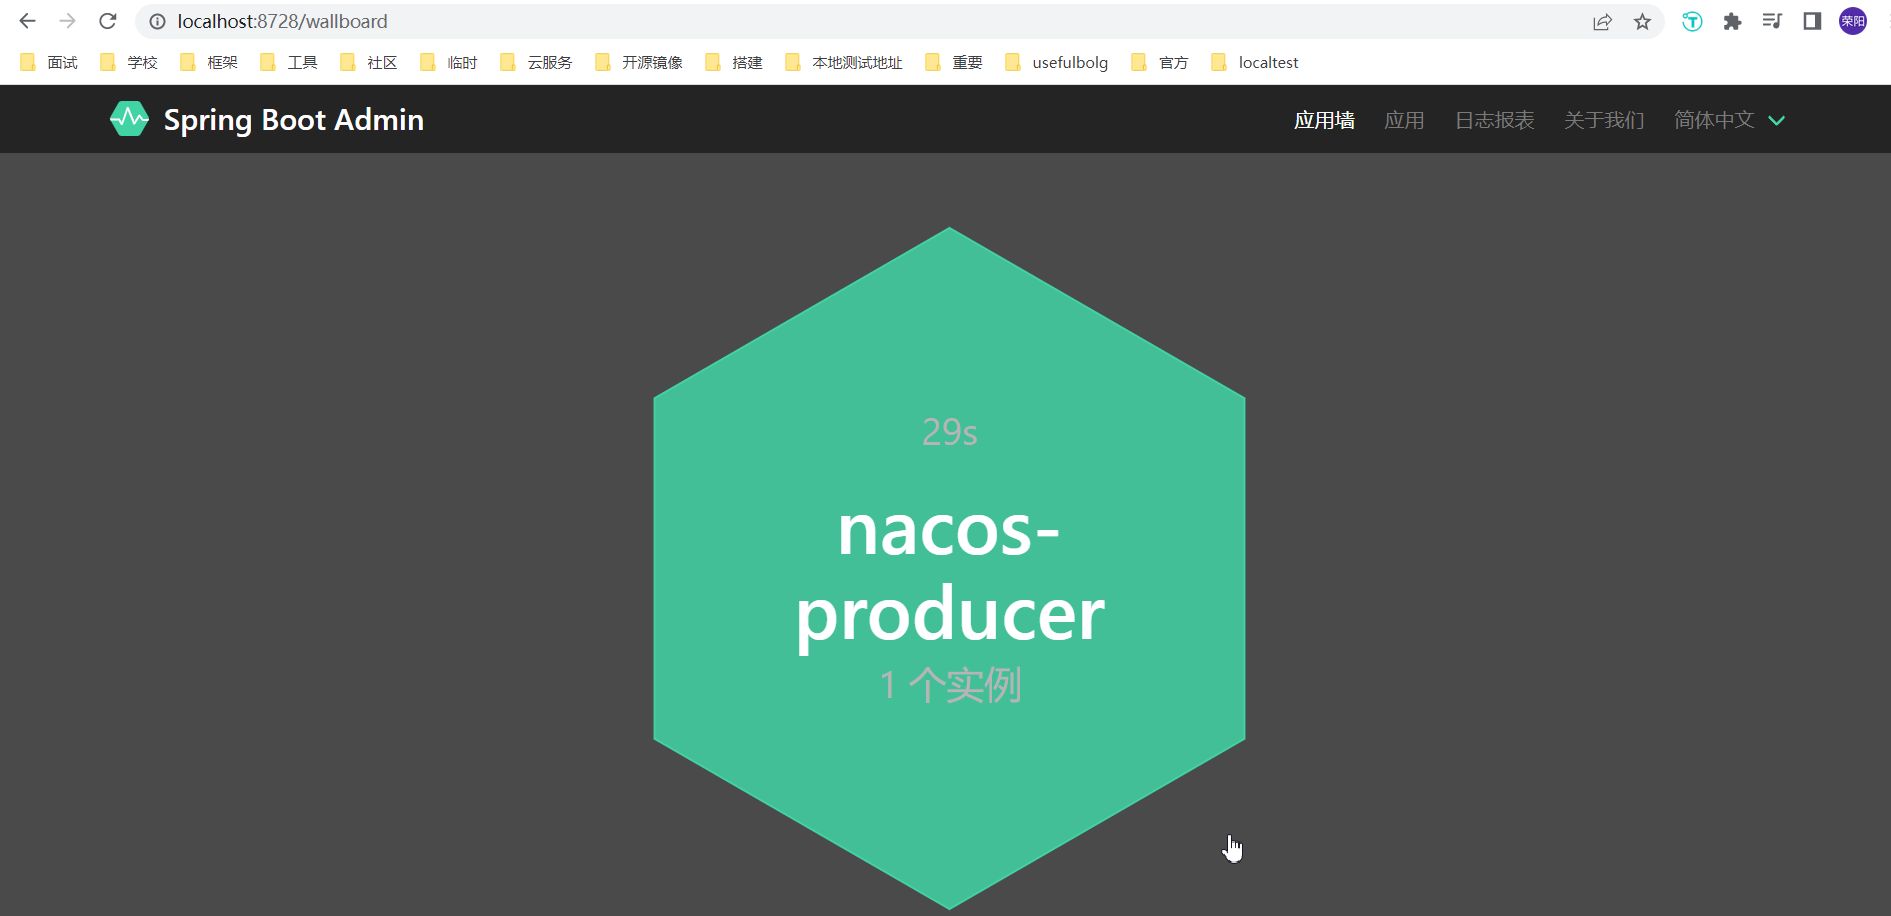
Spring Boot Admin
可视化监控平台, 是一个基于 Spring Boot Actuator 端点之上的 Vue.js 应用程序。
官方文档:https://github.com/codecentric/spring-boot-admin
快速搭建
服务端
依赖
        <dependency>
            <groupId>org.springframework.boot</groupId>
            <artifactId>spring-boot-starter-web</artifactId>
        </dependency>

        <dependency>
            <groupId>de.codecentric</groupId>
            <artifactId>spring-boot-admin-starter-server</artifactId>
            <version>2.6.9</version>
        </dependency>
代码
启动类添加@EnableAdminServer
@SpringBootApplication
@Slf4j
@EnableAdminServer
public class BootAdminApplication {

    public static void main(String[] args) {

        SpringApplication.run(BootAdminApplication.class, args);
        log.info("{} startup success", "BootAdminApplication");
    }
}
客户端
依赖
        <!--spring-boot-admin 客户端依赖-->
        <dependency>
            <groupId>de.codecentric</groupId>
            <artifactId>spring-boot-admin-starter-client</artifactId>
            <version>2.6.9</version>
        </dependency>
配置
spring.boot:
    admin:
      client:
        url: http://localhost:8728

management:
  endpoints:
    web:
      exposure:
        include: '*'
#      base-path: /system # 设置actuator的base-path
    enabled-by-default: true  # 是否启用端点
  endpoint:
    shutdown:
      enabled: true # 设置shutdown断点开启关闭,默认是关闭的
    health:
      show-details: always # 就会显示健康状态的详细指标
默认使用应用名称注册,可以选择使用ip注册
spring:
 boot:
    admin:
      client:
        url: http://localhost:8080
        instance:
          prefer-ip: true # 使用ip注册进来
  application:
    name: boot-05-web-admin # 客户端名称
成功测试
admin服务端安全防护
默认是不需要密码就可以访问的,这里使用springSecrity 来支持基础的用户名密码登录
官方文档:https://codecentric.github.io/spring-boot-admin/2.6.6/#_securing_spring_boot_admin_server
        <!--安全问题-->
        <dependency>
            <groupId>org.springframework.boot</groupId>
            <artifactId>spring-boot-starter-security</artifactId>
        </dependency>
@Configuration(proxyBeanMethods = false)
public class SecuritySecureConfig extends WebSecurityConfigurerAdapter {

  private final AdminServerProperties adminServer;

  private final SecurityProperties security;

  public SecuritySecureConfig(AdminServerProperties adminServer, SecurityProperties security) {
    this.adminServer = adminServer;
    this.security = security;
  }

  @Override
  protected void configure(HttpSecurity http) throws Exception {
    SavedRequestAwareAuthenticationSuccessHandler successHandler = new SavedRequestAwareAuthenticationSuccessHandler();
    successHandler.setTargetUrlParameter("redirectTo");
    successHandler.setDefaultTargetUrl(this.adminServer.path("/"));

    http.authorizeRequests(
        (authorizeRequests) -> authorizeRequests.antMatchers(this.adminServer.path("/assets/**")).permitAll()
            .antMatchers(this.adminServer.path("/actuator/info")).permitAll()
            .antMatchers(this.adminServer.path("/actuator/health")).permitAll()
            .antMatchers(this.adminServer.path("/login")).permitAll().anyRequest().authenticated()
    ).formLogin(
        (formLogin) -> formLogin.loginPage(this.adminServer.path("/login")).successHandler(successHandler).and()
    ).logout((logout) -> logout.logoutUrl(this.adminServer.path("/logout"))).httpBasic(Customizer.withDefaults())
        .csrf((csrf) -> csrf.csrfTokenRepository(CookieCsrfTokenRepository.withHttpOnlyFalse())
            .ignoringRequestMatchers(
                new AntPathRequestMatcher(this.adminServer.path("/instances"),
                    HttpMethod.POST.toString()),
                new AntPathRequestMatcher(this.adminServer.path("/instances/*"),
                    HttpMethod.DELETE.toString()),
                new AntPathRequestMatcher(this.adminServer.path("/actuator/**"))
            ))
        .rememberMe((rememberMe) -> rememberMe.key(UUID.randomUUID().toString()).tokenValiditySeconds(1209600));
  }

  // Required to provide UserDetailsService for "remember functionality"
  @Override
  protected void configure(AuthenticationManagerBuilder auth) throws Exception {
    auth.inMemoryAuthentication().withUser(security.getUser().getName())
        .password("{noop}" + security.getUser().getPassword()).roles("USER");
  }

}
- 授予对所有静态资产和登录页面的公共访问权。
- 所有其他请求都必须经过身份验证。
- 配置登录和注销。
- 启用HTTP基本支持。这是Spring Boot Admin Client注册所需的。
- 使用Cookie启用CSRF保护
- 为Spring Boot Admin Client用于(取消)注册的端点禁用CSRF保护。
- 禁用致动器端点的CSRF保护。
spring.security:
    user:
      name: sry
      password: 123456
通过注册中心集成客户端
如果你有成百上千个微服务, 这样配置未免太麻烦。如果您已经为您的应用程序使用了 Spring Cloud (Alibaba-nacos) Discovery,那么您就不需要 SBA 客户端。只需在 Spring Boot Admin Server 中添加一个 DiscoveryClient,剩下的工作由我们的 AutoConfiguration 完成。
下面的步骤使用 Nacos,但是也支持其他 SpringDiscovery实现。
服务端添加依赖
        <!--nacos-服务注册发现-->
        <dependency>
            <groupId>com.alibaba.cloud</groupId>
            <artifactId>spring-cloud-starter-alibaba-nacos-discovery</artifactId>
        </dependency>
服务端添加配置
spring:
  cloud:
    nacos:
      # 需要注意的是客户客户端会在此端口+1000的基础上获取通信端口,具体参考nacos安装中的几个端口
      server-addr: 61.171.5.6:30848
      discovery:
        username: nacos
        password: nacos
        # group: nacos-producer1  # 默认使用DEFAULT_GROUP作为分组名称
        #service: nacos-producer1 # 默认使用spring.application.name作为服务名称
#        namespace: public #指定命名空间 ,

# 也会将SBA服务配置为客户端, 所以也可以配置自己的endpoint规则(可选)
management:
  endpoints:
    web:
      exposure:
        include: '*'
  endpoint:
    health:
      show-details: always # 就会显示健康状态的详细指标
客户端
客户端就不需要spring-boot-admin-starter-client依赖了,也不需要指定服务端地址,只需要开启endpoint的访问配置即可
如果服务端不是通过注册中心进行获取客户端 ,需要单独为客户端配置,因为不配置客户端无法向服务端注册应用( 没有配置不会报错,只是在监控台看不到应用,也就是没有注册进去)
spring.boot.admin.client:
   username: sry
   password: 123456
问题
应用下线后
Did not observe any item or terminal signal within 10000ms in
常用配置
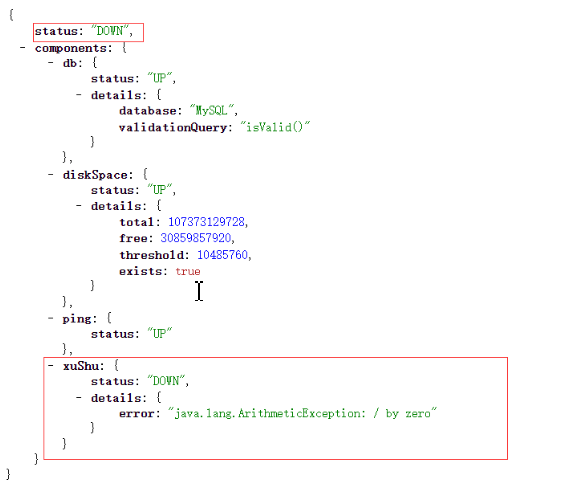
Health:监控状况
- 一个组件指标状态为Down则总状态信息Down,很多组件中都定制了Health子节点指标: 比如jdbc、redis、等等
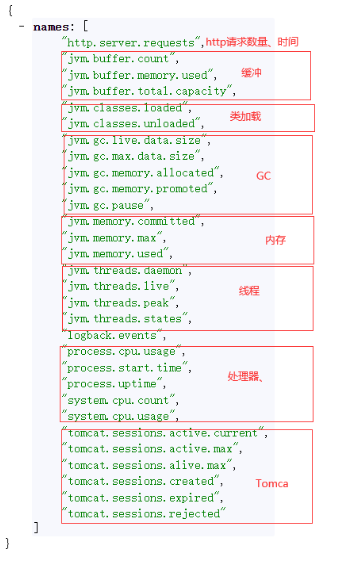
Metrics:运行时指标
缺省情况下的指标信息:
-
如需查看某一指标可以在URL后面加上对应的指标名称
-
- 如要查看http.server.requests指标:则访问actuator/metrics/http.server.requests
-
还可以传入tag过滤具体数据:/metrics/http.server.requests?tag=method:GET
-
- 所有tag都可以作为参数(大小写敏感)
Logfile:远程日志跟踪
必须按如下配置设置日志添加到文件中,一旦设置会出现一个 /actuator/logfile 端点
logging:
  file:
    name: D:/logs/xushu.log
如果使用的是配置文件,这个就不行了
treaddump && heapdump
使用jvisualvm进行分析线程信息和堆信息
邮件通知
如果服务下线,会进行邮件通知
在spring boot amdin 服务端修改
仅做记录
       <!--邮件通知-->
       <dependency>
           <groupId>org.springframework.boot</groupId>
           <artifactId>spring-boot-starter-mail</artifactId>
       </dependency>
spring:
  mail:
    # 发件人使用的qq邮箱服务
    host: smtp.qq.com
    username: tulingxushu@foxmail.com
    # 授权码,不是密码,在qq邮箱设置-账号里面有生成授权码
    password: bktymeooyuapggbe
  boot:
    admin:
      notify:
        mail:
          # 收件人,多个中间用,分隔
          to: tulingxushu@foxmail.com
          # 发件人
          from: tulingxushu@foxmail.com
还需要开启邮箱的smtp服务
定制endpoint
…


 823
823


 被折叠的 条评论
为什么被折叠?
被折叠的 条评论
为什么被折叠?
 到【灌水乐园】发言


